Just a second! 🫷 If you are here, it means that you are a software developer.
So, you know that storage, networking, and domain management have a cost .
If you want to support this blog, please ensure that you have disabled the adblocker for this site. I configured Google AdSense to show as few ADS as possible – I don’t want to bother you with lots of ads, but I still need to add some to pay for the resources for my site.
Thank you for your understanding. – Davide
It may happen, even just for testing some functionalities, that you want to change the Culture of the thread your application is running on.
The current Culture is defined in this global property: Thread.CurrentThread.CurrentCulture. How can we temporarily change it?
An idea is to create a class that implements the IDisposable interface to create a section, delimited by a using block, with the new Culture:
In the constructor, we store the current Culture in a private field. Then, when we call the Dispose method (which is implicitly called when closing the using block), we use that value to restore the original Culture.
How to use it
How can we try it? An example is by checking the currency symbol.
Thread.CurrentThread.CurrentCulture = new CultureInfo("ja-jp");
Console.WriteLine(Thread.CurrentThread.CurrentCulture.NumberFormat.CurrencySymbol); //¥using (new TemporaryThreadCulture(new CultureInfo("it-it")))
{
Console.WriteLine(Thread.CurrentThread.CurrentCulture.NumberFormat.CurrencySymbol);//€}
Console.WriteLine(Thread.CurrentThread.CurrentCulture.NumberFormat.CurrencySymbol); //¥
We start by setting the Culture of the current thread to Japanese so that the Currency symbol is ¥. Then, we temporarily move to the Italian culture, and we print the Euro symbol. Finally, when we move outside the using block, we get back to ¥.
Here’s a test that demonstrates the usage:
[Fact]void TestChangeOfCurrency()
{
using (new TemporaryThreadCulture(new CultureInfo("it-it")))
{
var euro = CultureInfo.CurrentCulture.NumberFormat.CurrencySymbol;
Assert.Equal(euro, "€");
using (new TemporaryThreadCulture(new CultureInfo("en-us")))
{
var dollar = CultureInfo.CurrentCulture.NumberFormat.CurrencySymbol;
Assert.NotEqual(euro, dollar);
}
Assert.Equal(euro, "€");
}
}
Using a class that implements IDisposable is a good way to create a temporary environment with different characteristics than the main environment.
I use this approach a lot when I want to experiment with different cultures to understand how the code behaves when I’m not using English (or, more generically, Western) culture.
Do you have any other approaches for reaching the same goal? If so, feel free to share them in the comments section!
We all need to parse strings as integers. Most of the time, we use int.TryParse(string, out int). But there’s a more advanced overload that we can use for complex parsing.
Table of Contents
Just a second! 🫷 If you are here, it means that you are a software developer.
So, you know that storage, networking, and domain management have a cost .
If you want to support this blog, please ensure that you have disabled the adblocker for this site. I configured Google AdSense to show as few ADS as possible – I don’t want to bother you with lots of ads, but I still need to add some to pay for the resources for my site.
Thank you for your understanding. – Davide
You have probably used the int.TryParse method with this signature:
That C# method accepts a string, s, which, if it can be parsed, will be converted to an int value and whose integer value will be stored in the result parameter; at the same time, the method returns true to notify that the parsing was successful.
As an example, this snippet:
if (int.TryParse("100", outint result))
{
Console.WriteLine(result + 2); // correctly parsed as an integer}
else{
Console.WriteLine("Failed");
}
prints 102.
Does it work? Yes. Is this the best we can do? No!
How to parse complex strings with int.TryParse
What if you wanted to parse 100€? There is a less-known overload that does the job:
NumberStyles.AllowThousands | NumberStyles.AllowCurrencySymbol does the trick.
Conclusion
We all use the simple int.TryParse method, but when parsing the input string requires more complex calculations, we can rely on those overloads. Of course, if it’s still not enough, you should create your custom parsers (or, as a simpler approach, you can use regular expressions).
Are there any methods that have overloads that nobody uses? Share them in the comments!
Just a second! 🫷 If you are here, it means that you are a software developer.
So, you know that storage, networking, and domain management have a cost .
If you want to support this blog, please ensure that you have disabled the adblocker for this site. I configured Google AdSense to show as few ADS as possible – I don’t want to bother you with lots of ads, but I still need to add some to pay for the resources for my site.
Thank you for your understanding. – Davide
Many developers say that
All comments are bad! 💢
False! Most of the comments are bad!
For example, look at this method, and look at the comments:
/// <summary> Checks if the password is valid </summary>/// <param name="password">The password to be validated</param>/// <returns>True if the password is valid, false otherwise</returns>publicbool IsPasswordValid(string password)
{
Regex regex = new Regex(@"[a-z]{2,7}[1-9]{3,4}");
var hasMatch = regex.IsMatch(password);
return hasMatch;
}
Here the comments are pointless – they just tell the same things you can infer by looking at the method signature: this method checks if the input string is a valid password.
So, yes, those kinds of comments are totally meaningless, and they should be avoided.
But still, there are cases when writing comments is pretty helpful.
publicbool IsPasswordValid(string password)
{
// 2 to 7 lowercase chars followed by 3 or 4 numbers// Valid: kejix173// aoe193// Invalid: a92881 Regex regex = new Regex(@"[a-z]{2,7}[1-9]{3,4}");
return regex.IsMatch(password);
}
Here the purpose of the comment is not to explain what the method does (it’s already pretty explicit), but it explains with examples the Regular Expression used to validate the password. Another way to explain it is by adding tests that validate some input strings. In this way, you make sure that the documentation (aka the tests) is always aligned with the production code.
By the way, for more complex calculations, adding comments explaining WHY (and not HOW or WHAT) a piece of code does is a good way to help developers understand the code.
Another reason to add comments is to explain why a specific piece of code exists: examples are legal regulations, related work items, or references to where you’ve found that particular solution.
Conclusion
Always pay attention when writing comments: yes, they often just clutter the code. But they can really add value to the code, in some cases.
To read more about good and bad comments, here’s a well-detailed article you might like:
With Entity Framework you can perform operations on relational databases without writing a single line of SQL. We will use EF to integrate PostgreSQL in our application
Table of Contents
Just a second! 🫷 If you are here, it means that you are a software developer.
So, you know that storage, networking, and domain management have a cost .
If you want to support this blog, please ensure that you have disabled the adblocker for this site. I configured Google AdSense to show as few ADS as possible – I don’t want to bother you with lots of ads, but I still need to add some to pay for the resources for my site.
Thank you for your understanding. – Davide
When working with relational databases, you often come across two tasks: writing SQL queries and mapping the results to some DTO objects.
.NET developers are lucky to have an incredibly powerful tool that can speed up their development: Entity Framework. Entity Framework (in short: EF) is an ORM built with in mind simplicity and readability.
In this article, we will perform CRUD operations with Entity Framework Core on a database table stored on PostgreSQL.
Introduction EF Core
With Entity Framework you don’t have to write SQL queries in plain text: you write C# code that gets automatically translated into SQL commands. Then the result is automatically mapped to your C# classes.
Entity Framework supports tons of database engines, such as SQL Server, MySQL, Azure CosmosDB, Oracle, and, of course, PostgreSQL.
There are a lot of things you should know about EF if you’re new to it. In this case, the best resource is its official documentation.
But the only way to learn it is by getting your hands dirty. Let’s go!
How to set up EF Core
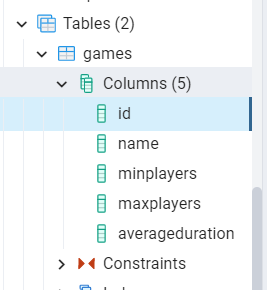
For this article, we will reuse the same .NET Core repository and the same database table we used when we performed CRUD operations with Dapper (a lightweight OR-M) and with NpgSql, which is the library that performs bare-metal operations.
The first thing to do is, as usual, install the related NuGet package. Here we will need Npgsql.EntityFrameworkCore.PostgreSQL. Since I’ve used .NET 5, I have downloaded version 5.0.10.
Then, we need to define and configure the DB Context.
Define and configure DbContext
The idea behind Entity Framework is to create DB Context objects that map database tables to C# data sets. DB Contexts are the entry point to the tables, and the EF way to work with databases.
So, the first thing to do is to define a class that inherits from DbContext:
publicclassBoardGamesContext : DbContext
{
}
Within this class we define one or more DbSets, that represent the collections of data rows on their related DB table:
public DbSet<BoardGame> Games { get; set; }
Then we can configure this specific DbContext by overriding the OnConfiguring method and specifying some options; for example, you can specify the connection string:
Now that we have the BoardGamesContext ready we have to add its reference in the Startup class.
In the ConfigureServices method, add the following instruction:
services.AddDbContext<BoardGamesContext>();
With this instruction, you make the BoardGamesContext context available across the whole application.
You can further configure that context using an additional parameter of type Action<DbContextOptionsBuilder>. In this example, you can skip it, since we’ve already configured the BoardGamesContext using the OnConfiguring method. They are equivalent.
As we know, EF allows you to map DB rows to C# objects. So, we have to create a class and configure it in a way that allows EF Core to perform the mapping.
Now that the setup is complete, we can perform our CRUD operations. Entity Framework simplifies a lot the way to perform such types of operations, so we can move fast in this part.
There are two main points to remember:
to access the context we have to create a new instance of BoardGamesContext, which should be placed into a using block.
When performing operations that change the status of the DB (insert/update/delete rows), you have to explicitly call SaveChanges or SaveChangesAsync to apply those changes. This is useful when performing batch operations on one or more tables (for example, inserting an order in the Order table and updating the user address in the Users table).
Create
To add a new BoardGame, we have to initialize the BoardGamesContext context and add a new game to the Games DbSet.
publicasync Task Add(BoardGame game)
{
using (var db = new BoardGamesContext())
{
await db.Games.AddAsync(game);
await db.SaveChangesAsync();
}
}
Read
If you need a specific entity by its id you can use Find and FindAsync.
publicasync Task<BoardGame> Get(int id)
{
using (var db = new BoardGamesContext())
{
returnawait db.Games.FindAsync(id);
}
}
Or, if you need all the items, you can retrieve them by using ToListAsync
publicasync Task<IEnumerable<BoardGame>> GetAll()
{
using (var db = new BoardGamesContext())
{
returnawait db.Games.ToListAsync();
}
}
Update
Updating an item is incredibly straightforward: you have to call the Update method, and then save your changes with SaveChangesAsync.
publicasync Task Update(int id, BoardGame game)
{
using (var db = new BoardGamesContext())
{
db.Games.Update(game);
await db.SaveChangesAsync();
}
}
For some reason, EF does not provide an asynchronous way to update and remove items. I suppose that it’s done to prevent or mitigate race conditions.
Delete
Finally, to delete an item you have to call the Remove method and pass to it the game to be removed. Of course, you can retrieve that game using FindAsync.
publicasync Task Delete(int id)
{
using (var db = new BoardGamesContext())
{
var game = await db.Games.FindAsync(id);
if (game == null)
return;
db.Games.Remove(game);
await db.SaveChangesAsync();
}
}
Further readings
Entity Framework is impressive, and you can integrate it with tons of database vendors. In the link below you can find the full list. But pay attention that not all the libraries are implemented by the EF team, some are third-party libraries (like the one we used for Postgres):
This article concludes the series that explores 3 ways to perform CRUD operations on a Postgres database with C#.
In the first article, we’ve seen how to perform bare-metal queries using NpgSql. In the second article, we’ve used Dapper, which helps mapping queries results to C# DTOs. Finally, we’ve used Entity Framework to avoid writing SQL queries and have everything in place.
Which one is your favorite way to query relational databases?
It would be great if we could break the debugging flow if a condition is (not) met. Can we? Of course!
Table of Contents
Just a second! 🫷 If you are here, it means that you are a software developer.
So, you know that storage, networking, and domain management have a cost .
If you want to support this blog, please ensure that you have disabled the adblocker for this site. I configured Google AdSense to show as few ADS as possible – I don’t want to bother you with lots of ads, but I still need to add some to pay for the resources for my site.
Thank you for your understanding. – Davide
Sometimes, while debugging, you want to check if the state of your code is still valid, or, at least, it corresponds to some expectations.
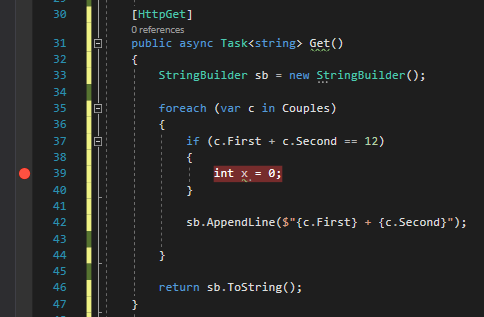
A simple approach to this problem is to add an if statement with the condition you need to check and place a dummy instruction just to be marked with a breakpoint.
[HttpGet]publicasync Task<string> Get()
{
StringBuilder sb = new StringBuilder();
foreach (var c in Couples)
{
if(c.First + c.Second == 12)
{
int x = 0;
// just to put here the debugger// or place a Console.WriteLine,// which in most of the cases// is not available }
sb.AppendLine($"{c.First} + {c.Second}");
}
return sb.ToString();
}
Which is fine, but it clutters your code.
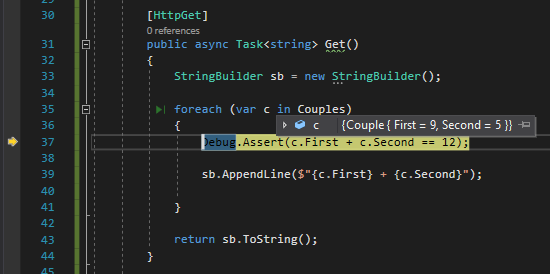
Instead of placing breakpoints all over your code to manually check the application state (or use conditional breakpoints), you can create assertions that break your code only if launched in Debug mode.
[HttpGet]publicasync Task<string> Get()
{
StringBuilder sb = new StringBuilder();
foreach (var c in Couples)
{
Debug.Assert(c.First + c.Second == 12);
sb.AppendLine($"{c.First} + {c.Second}");
}
return sb.ToString();
}
⚠ Note: Debug, not Debugger!
With Debug.Assert can define a custom condition to be evaluated. If the check fails, the debugger automatically stops there to allow you to check the locals.
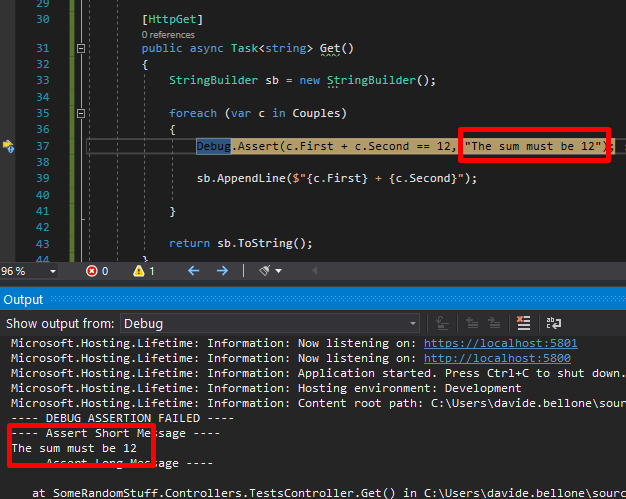
You can also add a message that can help you understand why the check fails:
foreach (var c in Couples)
{
    Debug.Assert(c.First + c.Second == 12, "The sum must be 12");

    sb.AppendLine($"{c.First} + {c.Second}");
}
To see the error message, you have to navigate to Debug > Windows > Output
where you can see the message you’ve defined before.
Note: the messages are sent to the System.Diagnostics.Trace.Listeners collection. If you have another listener, you can use it to intercept those messages.
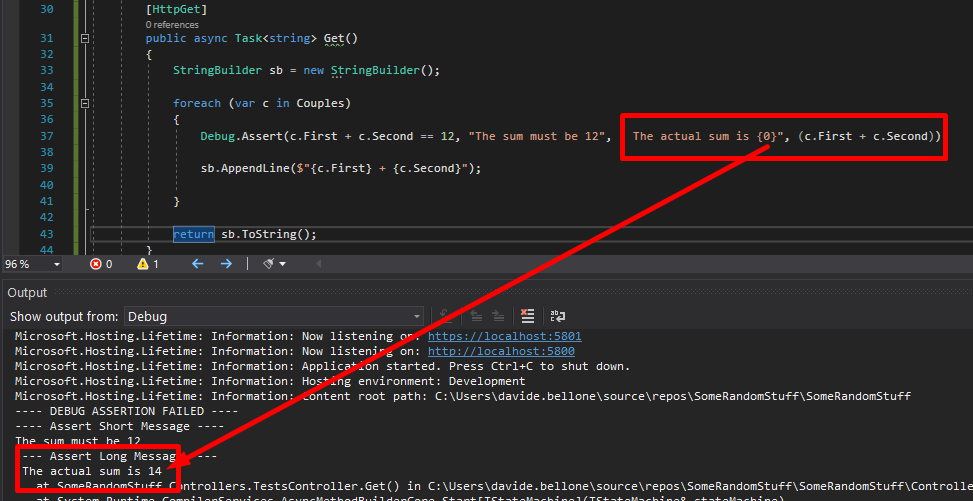
Then you can add more details to that message, and you can also more info to the detailed message by adding additional parameters to it as if you were using String.Format.
foreach (var c in Couples)
{
    Debug.Assert(c.First + c.Second == 12, "The sum must be 12", " The actual sum is {0}", (c.First + c.Second));

    sb.AppendLine($"{c.First} + {c.Second}");
}
Again, run the application and have a look at the Output folder:
Debug.Assert works only in DEBUG mode – or, at least, when the DEBUG variable is defined. Otherwise, all those checks will simply get removed from the build result, so they will not impact your application when running in RELEASE mode.
Just a second! 🫷 If you are here, it means that you are a software developer.
So, you know that storage, networking, and domain management have a cost .
If you want to support this blog, please ensure that you have disabled the adblocker for this site. I configured Google AdSense to show as few ADS as possible – I don’t want to bother you with lots of ads, but I still need to add some to pay for the resources for my site.
Thank you for your understanding. – Davide
Actually, this article is not about a tip to write cleaner code, but it is an article that aims at pointing out a code smell.
Of course, once you find this code smell in your code, you can act in order to eliminate it, and, as a consequence, you will end up with cleaner code.
The code smell is easy to identify: open your classes and have a look at the imports list (in C#, the using on top of the file).
A real example of too many imports
Here’s a real-life example (I censored the names, of course):
using MyCompany.CMS.Data;
using MyCompany.CMS.Modules;
using MyCompany.CMS.Rendering;
using MyCompany.Witch.Distribution;
using MyCompany.Witch.Distribution.Elements;
using MyCompany.Witch.Distribution.Entities;
using Microsoft.Extensions.Logging;
using Newtonsoft.Json;
using Newtonsoft.Json.Serialization;
using MyProject.Controllers.VideoPlayer.v1.DataSource;
using MyProject.Controllers.VideoPlayer.v1.Vod;
using MyProject.Core;
using MyProject.Helpers.Common;
using MyProject.Helpers.DataExplorer;
using MyProject.Helpers.Entities;
using MyProject.Helpers.Extensions;
using MyProject.Helpers.Metadata;
using MyProject.Helpers.Roofline;
using MyProject.ModelsEntities;
using MyProject.Models.ViewEntities.Tags;
using MyProject.Modules.EditorialDetail.Core;
using MyProject.Modules.VideoPlayer.Models;
using System;
using System.Collections.Generic;
using System.ComponentModel;
using System.Linq;

namespace MyProject.Modules.Video
Sounds familiar?
If we exclude the imports necessary to use some C# functionalities
using System;
using System.Collections.Generic;
using System.ComponentModel;
using System.Linq;
We have lots of dependencies on external modules.
This means that if something changes in one of the classes that are part of those namespaces, we may end up with code that is difficult to update.
Also, guess what comes with all those imports? Constructor with too many parameters (and, in fact, in this class, I have 11 dependencies injected in the constructor) and code that is too long and difficult to understand (and, in fact, this class has 500+ lines).
A solution? Refactor your project in order to minimize scattering those dependencies.
Wrapping up
Having all those imports (in C# we use the keyword using) is a good indicator that your code does too many things. You should focus on minimizing those imports without cheating (like using global imports).
After 100 articles, I’ve found some neat ways to automate my blogging workflow. I will share my experience and the tools I use from the very beginning to the very end.
Table of Contents
Just a second! 🫷 If you are here, it means that you are a software developer.
So, you know that storage, networking, and domain management have a cost .
If you want to support this blog, please ensure that you have disabled the adblocker for this site. I configured Google AdSense to show as few ADS as possible – I don’t want to bother you with lots of ads, but I still need to add some to pay for the resources for my site.
Thank you for your understanding. – Davide
This is my 100th article 🥳 To celebrate it, I want to share with you the full process I use for writing and publishing articles.
In this article I will share all the automation and tools I use for writing, starting from the moment an idea for an article pops up in my mind to what happens weeks after an article has been published.
I hope to give you some ideas to speed up your publishing process. Of course, I’m open to suggestions to improve my own flow: perhaps (well, certainly), you use better tools and processes, so feel free to share them.
Introducing my blog architecture
To better understand what’s going on, I need a very brief overview of the architecture of my blog.
It is written in Gatsby, a framework based on ReactJS that, in short, allows you to transform Markdown files into blog posts (it does many other things, but they are not important for the purpose of this article).
So, all my blog is stored in a private GitHub repository. Every time I push some changes on the master branch, a new deployment is triggered, and I can see my changes in a bunch of minutes on my blog.
As I said, I use Gatsby. But the key point here is that my blog is stored in a GitHub repo: this means that everything you’ll read here is valid for any Headless CMS based on Git, such as Gatsby, Hugo, NextJS, and Jekyll.
Now that you know some general aspects, it’s time to deep dive into my writing process.
Before writing: organizing ideas with GitHub
My central source, as you might have already understood, is GitHub.
There, I write all my notes and keep track of the status of my articles.
Everything is quite well organized, and with the support of some automation, I can speed up my publishing process.
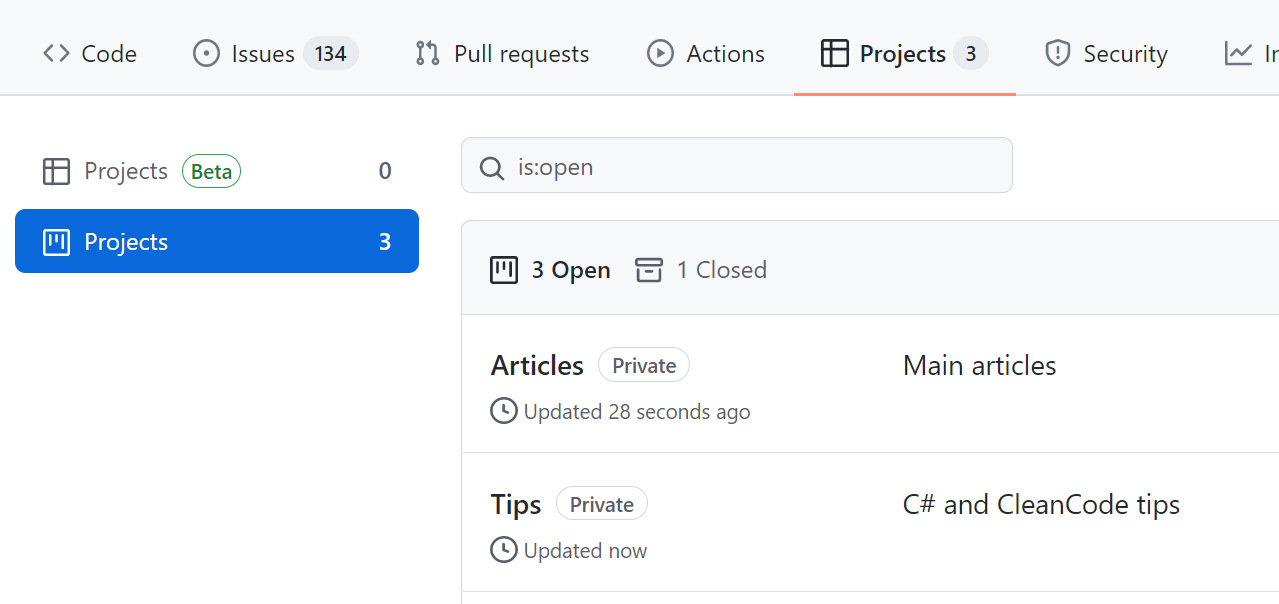
Github Projects to track the status of the articles
GitHub Projects are the parts of GitHub that allow you to organize GitHub Issues to track their status.
I’ve created 2 GitHub Projects: one for the main articles (like this one), and one for my C# and Clean Code Tips.
In this way, I can use different columns and have more flexibility when handling the status of the tasks.
GitHub issues templates
As I said, to write my notes I use GitHub issues.
When I add a new Issue, the first thing is to define which type of article I want to write. And, since sometimes many weeks or months pass between when I came up with the idea for an article and when I start writing it, I need to organize my ideas in a structured way.
To do that, I use GitHub templates. When I create a new Issue, I choose which kind of article I’m going to write.
Based on the layout, I can add different info. For instance, when I want to write a new “main” article, I see this form
which is prepopulated with some fields:
Title: with a placeholder ([Article] )
Content: with some sections (the titles, translated from Italian, mean Topics, Links, General notes)
Labels: I automatically assign the Article label to the issue (you’ll see later why I do that)
How can you create GitHub issue templates? All you need is a Markdown file under the .github/ISSUE_TEMPLATE folder with content similar to this one.
---
name: New article
about: New blog article
title: "[Article] - "
labels: Article
assignees: bellons91
---

## Argomenti

## Link

## Appunti vari
And you’re good to go!
GitHub action to assign issues to a project
Now I have GitHub Projects and different GitHub Issues Templates. How can I join the different parts? Well, with GitHub Actions!
With GitHub Actions, you can automate almost everything that happens in GitHub (and outside) using YAML files.
So, here’s mine:
For better readability, you can find the Gist here.
This action looks for opened and labeled issues and pull requests, and based on the value of the label it assigns the element to the correct project.
In this way, after I choose a template, filled the fields, and added additional labels (like C#, Docker, and so on), I can see my newly created issue directly in the Articles board. Neat 😎
Writing
Now it’s the time of writing!
As I said, I’m using Gatsby, so all my articles are stored in a GitHub repository and written in Markdown.
For every article I write, I use a separate git branch: in this way, I’m free to update the content already online (in case of a typo) without publishing my drafts.
But, of course, I automated it! 😎
Powershell script to scaffold a new article
Every article lives in its /content/posts/{year}/{folder-name}/article.md file. And they all have a cover image in a file named cover.png.
Also, every MD file begins with a Frontmatter section, like this:
---
title: "How I automated my publishing flow with Gatsby, GitHub, PowerShell and Azure"
path: "/blog/automate-articles-creations-github-powershell-azure"
tags: ["MainArticle"]
featuredImage: "./cover.png"
excerpt: "a description for 072-how-i-create-articles"
created: 4219-11-20
updated: 4219-11-20
---
But, you know, I was tired of creating everything from scratch. So I wrote a Powershell Script to do everything for me.
where article-creator.ps1 is the name of the file that contains the script.
Now I can simply run npm run create-article to have a new empty article in a new branch, already updated with everything published in the Master branch.
Markdown preview on VS Code
I use Visual Studio Code to write my articles: I like it because it’s quite fast and with lots of functionalities to write in Markdown (you can pick your favorites in the Extensions store).
One of my favorites is the Preview on Side. To see the result of your MarkDown on a side panel, press CTRL+SHIFT+P and select Open Preview to the Side.
Here’s what I can see right now while I’m writing:
Grammar check with Grammarly
Then, it’s time for a check on the Grammar. I use Grammarly, which helps me fix lots of errors (well, in the last time, only a few: it means I’ve improved a lot! 😎).
I copy the Markdown in their online editor, fix the issues, and copy it back into my repo.
Fun fact: the online editor recognizes that you’re using Markdown and automatically checks only the actual text, ignoring all the symbols you use in Markdown (like brackets).
Unprofessional, but fun, cover images
One of the tasks I like the most is creating my cover images.
I don’t use stock images, I prefer using less professional but more original cover images.
Creating and scheduling PR on GitHub with Templates and Actions
Now that my article is complete, I can set it as ready for being scheduled.
To do that, I open a Pull Request to the Master Branch, and, again, add some kind of automation!
I have created a PR template in an MD file, which I use to create a draft of the PR content.
In this way, I can define which task (so, which article) is related to this PR, using the “Closes” formula (“Closes #111174” means that I’m closing the Issue with ID 111174).
Also, I can define when this PR will be merged on Master, using the /schedule tag.
It works because I have integrated into my workflow a GitHub Action, merge-schedule, that reads the date from that field to understand when the PR must be merged.
So, every Tuesday at 8 AM, this action runs to check if there are any PRs that can be merged. If so, the PR will be merged into master, and the CI/CD pipeline builds the site and publishes the new content.
As usual, you can find the code of this action here
After the PR is merged, I also receive an email that notifies me of the action.
After publishing
Once a new article is online, I like to give it some visibility.
To do that, I heavily rely on Azure Logic Apps.
Azure Logic App for sharing on Twitter
My blog exposes an RSS feed. And, obviously, when a new article is created, a new item appears in the feed.
I use it to trigger an Azure Logic App to publish a message on Twitter:
The Logic App reads the newly published feed item and uses its metadata to create a message that will be shared on Twitter.
If you prefer, you can use a custom Azure Function! The choice is yours!
Cross-post reminder with Azure Logic Apps
Similarly, I use an Azure Logic App to send to myself an email to remind me to cross-post my articles to other platforms.
I’ve added a delay so that my content lives longer, and I can repost it even after weeks or months.
Unluckily, when I cross-post my articles I have to do it manually, This is quite a time-consuming especially when there are lots of images: in my MD files I use relative paths, so when porting my content to different platforms I have to find the absolute URL for my images.
And, my friends, this is everything that happens in the background of my blog!
What I’m still missing
I’ve added a lot of effort to my blog, and I’m incredibly proud of it!
But still, there are a few things I’d like to improve.
SEO Tools/analysis
I’ve never considered SEO. Or, better, Keywords.
I write for the sake of writing, and because I love it. And I don’t like to stuff my content with keywords just to rank better on search engines.
I take care of everything like alt texts, well-structured sections, and everything else. But I’m not able to follow the “rules” to find the best keywords.
Maybe I should use some SEO tools to find the best keywords for me. But I don’t want to bend to that way of creating content.
Also, I should spend more time thinking of the correct title and section titles.
Any idea?
Easy upgrade of Gatsby/Migrate to other headless CMSs
Lastly, I’d like to find another theme or platform and leave the one I’m currently using.
Not because I don’t like it. But because many dependencies are outdated, and the theme I’m using hasn’t been updated since 2019.
Wrapping up
That’s it: in this article, I’ve explained everything that I do when writing a blog post.
Feel free to take inspiration from my automation to improve your own workflow, and contact me if you have some nice improvements or ideas: I’m all ears!
Just a second! 🫷 If you are here, it means that you are a software developer.
So, you know that storage, networking, and domain management have a cost .
If you want to support this blog, please ensure that you have disabled the adblocker for this site. I configured Google AdSense to show as few ADS as possible – I don’t want to bother you with lots of ads, but I still need to add some to pay for the resources for my site.
Thank you for your understanding. – Davide
In C#, ExpandoObjects are dynamically-populated objects without a predefined shape.
dynamic myObj = new ExpandoObject();
myObj.Name ="Davide";
myObj.Age = 30;
Name and Age are not part of the definition of ExpandoObject: they are two fields I added without declaring their type.
This is a dynamic object, so I can add new fields as I want. Say that I need to add my City: I can simply use
without creating any field on the ExpandoObject class.
Now: how can I retrieve all the values? Probably the best way is by converting the ExpandoObject into a Dictionary.
Create a new Dictionary
Using an IDictionary makes it easy to access the keys of the object.
If you have an ExpandoObject that will not change, you can use it to create a new IDictionary:
Notice that we use the ExpandoObject to create a newIDictionary. This means that after the Dictionary creation if we add a new field to the ExpandoObject, that new field will not be present in the Dictionary.
Cast to IDictionary
If you want to use an IDictionary to get the ExpandoObject keys, and you need to stay in sync with the ExpandoObject status, you just have to cast that object to an IDictionary
In unit tests, sometimes you need to perform deep checks on the object passed to the mocked service. We will learn 3 ways to do that with Moq and C#
Table of Contents
Just a second! 🫷 If you are here, it means that you are a software developer.
So, you know that storage, networking, and domain management have a cost .
If you want to support this blog, please ensure that you have disabled the adblocker for this site. I configured Google AdSense to show as few ADS as possible – I don’t want to bother you with lots of ads, but I still need to add some to pay for the resources for my site.
Thank you for your understanding. – Davide
When writing unit tests, you can use Mocks to simulate the usage of class dependencies.
Even though some developers are harshly against the usage of mocks, they can be useful, especially when the mocked operation does not return any value, but still, you want to check that you’ve called a specific method with the correct values.
In this article, we will learn 3 ways to check the values passed to the mocks when using Moq in our C# Unit Tests.
To better explain those 3 ways, I created this method:
publicvoid UpdateUser(User user, Preference preference)
{
var userDto = new UserDto
{
Id = user.id,
UserName = user.username,
LikesBeer = preference.likesBeer,
LikesCoke = preference.likesCoke,
LikesPizza = preference.likesPizza,
};
_userRepository.Update(userDto);
}
UpdateUser simply accepts two objects, user and preference, combines them into a single UserDto object, and then calls the Update method of _userRepository, which is an interface injected in the class constructor.
As you can see, we are not interested in the return value from _userRepository.Update. Rather, we are interested in checking that we are calling it with the right values.
We can do it in 3 ways.
Verify each property with It.Is
The simplest, most common way is by using It.Is<T> within the Verify method.
This approach works well when you have to perform checks on only a few fields. But the more fields you add, the longer and messier that code becomes.
Also, a problem with this approach is that if it fails, it becomes hard to understand which is the cause of the failure, because there is no indication of the specific field that did not match the expectations.
Here’s an example of an error message:
Expected invocation on the mock at least once, but was never performed: _ => _.Update(It.Is<UserDto>(u => (((u.Id == 1 && u.UserName == "Davidde") && u.LikesPizza == True) && u.LikesBeer == True) && u.LikesCoke == False))

Performed invocations:

Mock<IUserRepository:1> (_):
    IUserRepository.Update(UserDto { UserName = Davide, Id = 1, LikesPizza = True, LikesCoke = False, LikesBeer = True })
Can you spot the error? And what if you were checking 15 fields instead of 5?
Verify with external function
Another approach is by externalizing the function.
[Test]publicvoid WithExternalFunction()
{
//Arrangevar user = new User(1, "Davide");
var preferences = new Preference(true, true, false);
UserDto expected = new UserDto
{
Id = 1,
UserName = "Davide",
LikesBeer = true,
LikesCoke = false,
LikesPizza = true,
};
//Act userUpdater.UpdateUser(user, preferences);
//Assert userRepo.Verify(_ => _.Update(It.Is<UserDto>(u => AreEqual(u, expected))));
}
privatebool AreEqual(UserDto u, UserDto expected)
{
Assert.AreEqual(expected.UserName, u.UserName);
Assert.AreEqual(expected.Id, u.Id);
Assert.AreEqual(expected.LikesBeer, u.LikesBeer);
Assert.AreEqual(expected.LikesCoke, u.LikesCoke);
Assert.AreEqual(expected.LikesPizza, u.LikesPizza);
returntrue;
}
Here, we are passing an external function to the It.Is<T> method.
This approach allows us to define more explicit and comprehensive checks.
The good parts of it are that you will gain more control over the assertions, and you will also have better error messages in case a test fails:
Expected string length 6 but was 7. Strings differ at index 5.
Expected: "Davide"
But was:  "Davidde"
The bad part is that you will stuff your test class with lots of different methods, and the class can easily become hard to maintain. Unluckily, we cannot use local functions.
On the other hand, having external functions allows us to combine them when we need to do some tests that can be reused across test cases.
Intercepting the function parameters with Callback
Lastly, we can use a hidden gem of Moq: Callbacks.
With Callbacks, you can store in a local variable the reference to the item that was called by the method.
[Test]publicvoid CompareWithCallback()
{
// Arrangevar user = new User(1, "Davide");
var preferences = new Preference(true, true, false);
UserDto actual = null;
userRepo.Setup(_ => _.Update(It.IsAny<UserDto>()))
.Callback(new InvocationAction(i => actual = (UserDto)i.Arguments[0]));
UserDto expected = new UserDto
{
Id = 1,
UserName = "Davide",
LikesBeer = true,
LikesCoke = false,
LikesPizza = true,
};
//Act userUpdater.UpdateUser(user, preferences);
//Assert Assert.IsTrue(AreEqual(expected, actual));
}
In this way, you can use it locally and run assertions directly to that object without relying on the Verify method.
Or, if you use records, you can use the auto-equality checks to simplify the Verify method as I did in the previous example.
Wrapping up
In this article, we’ve explored 3 ways to perform checks on the objects passed to dependencies mocked with Moq.
Each way has its pros and cons, and it’s up to you to choose the approach that fits you the best.
I personally prefer the second and third approaches, as they allow me to perform better checks on the passed values.
Just a second! 🫷 If you are here, it means that you are a software developer.
So, you know that storage, networking, and domain management have a cost .
If you want to support this blog, please ensure that you have disabled the adblocker for this site. I configured Google AdSense to show as few ADS as possible – I don’t want to bother you with lots of ads, but I still need to add some to pay for the resources for my site.
Thank you for your understanding. – Davide
You surely take care of your code to make it easy to read and understand, right? RIGHT??
Well done! 👏
But most of the developers tend to write good production code (the one actually executed by your system), but very poor test code.
Production code is meant to be run, while tests are also meant to document your code; therefore there must not be doubts about the meaning and the reason behind a test.
This also means that all the names must be explicit enough to help readers understand how and why a test should pass.
This is a valid C# test:
[Test]publicvoid TestHtmlParser()
{
HtmlDocument doc = new HtmlDocument();
doc.LoadHtml("<p>Hello</p>");
var node = doc.DocumentNode.ChildNodes[0];
var parser = new HtmlParser();
Assert.AreEqual("Hello", parser.ParseContent(node));
}
What is the meaning of this test? We should be able to understand it just by reading the method name.
Also, notice that here we are creating the HtmlNode object; imagine if this node creation is present in every test method: you will see the same lines of code over and over again.
you can understand its meaning by reading the test name
the code is concise, and some creation parts are refactored out
we’ve well separated the 3 parts of the tests: Arrange, Act, Assert (we’ve already talked about it here)
Wrapping up
Tests are still part of your project, even though they are not used directly by your customers.
Never skip tests, and never write them in a rush. After all, when you encounter a bug, the first thing you should do is write a test to reproduce the bug, and then validate the fix using that same test.