In the ever-evolving cybersecurity landscape, attackers constantly seek new ways to bypass traditional defences. One of the latest and most insidious methods involves using Scalable Vector Graphics (SVG)—a file format typically associated with clean, scalable images for websites and applications. But beneath their seemingly harmless appearance, SVGs can harbour threatening scripts capable of executing sophisticated phishing attacks.
This blog explores how SVGs are weaponized, why they often evade detection, and what organizations can do to protect themselves.
SVGs: More Than Just Images
SVG files differ fundamentally from standard image formats like JPEG or PNG. Instead of storing pixel data, SVGs use XML-based code to define vector paths, shapes, and text. This makes them ideal for responsive design, as they scale without losing quality. However, this same structure allows SVGs to contain embedded JavaScript, which can execute when the file is opened in a browser—something that happens by default on many Windows systems.
Delivery
Email Attachments: Sent via spear-phishing emails with convincing subject lines and sender impersonation.
Cloud Storage Links: Shared through Dropbox, Google Drive, OneDrive, etc., often bypassing email filters.
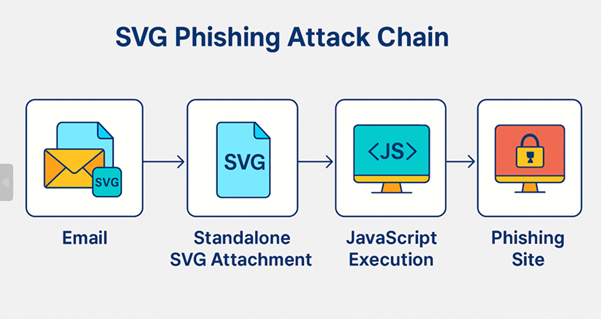
Fig:1 Attack chain of SVG campaign
The image illustrates the SVG phishing attack chain in four distinct stages: it begins with an email containing a seemingly harmless SVG attachment, which, when opened, triggers JavaScript execution in the browser, ultimately redirecting the user to a phishing site designed to steal credentials.
How the attack works:
When a target receives an SVG attachment and opens an email, the file typically launches in their default web browser—unless they have a specific application set to handle SVG files—allowing any embedded scripts to execute immediately.
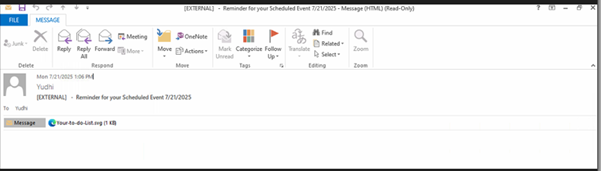
Fig2: Phishing Email of SVG campaign
Attackers commonly send phishing emails with deceptive subject lines like “Reminder for your Scheduled Event 7212025.msg” or “Meeting-Reminder-7152025.msg”, paired with innocuous-looking attachments named “Upcoming Meeting.svg” or “Your-to-do-List.svg” to avoid raising suspicion. Once opened, the embedded JavaScript within the SVG file silently redirects the victim to a phishing site that closely mimics trusted services like Microsoft 365 or Google Workspace. As shown in fig.
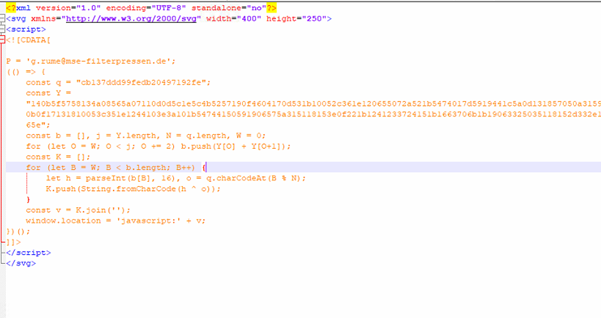
Fig3: Malicious SVG code.
In the analyzed SVG sample, the attacker embeds a <script> tag within the SVG, using a CDATA section to hide malicious logic. The code includes a long hex-encoded string (Y) and a short XOR key (q), which decodes into a JavaScript payload when processed. This decoded payload is then executed using window.location = ‘javascript:’ + v;, effectively redirecting the victim to a phishing site upon opening the file. An unused email address variable (g.rume@mse-filterpressen.de) is likely a decoy or part of targeted delivery.
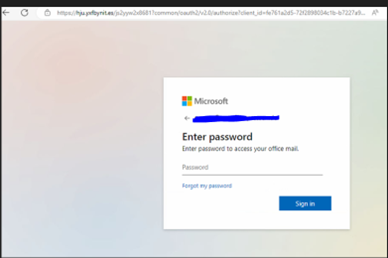
Upon decryption, we found the c2c phishing link as
hxxps://hju[.]yxfbynit[.]es/koRfAEHVFeQZ!bM9
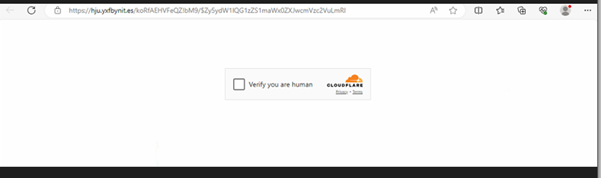
Fig4: Cloudflare CAPTCHA gate
The link directs to a phishing site protected by a Cloudflare CAPTCHA gate. After you check the box to verify, you’re human then you’re redirected to a malicious page controlled by the attackers.
Fig5: Office 365 login form
This page embeds a genuine-looking Office 365 login form, allowing the phishing group to capture and validate your email and password credentials simultaneously.
Conclusion: Staying Ahead of SVG-Based Threats
As attackers continue to innovate, organizations must recognize the hidden risks in seemingly benign file formats like SVG. Security teams should:
Implement deep content inspection for SVG files.
Disable automatic browser rendering of SVGs from untrusted sources.
Educate employees about the risks of opening unfamiliar attachments.
Monitor for unusual redirects and script activity in email and web traffic.
SVGs may be powerful tools for developers, but in the wrong hands, they can become potent weapons for cybercriminals. Awareness and proactive defense are key to staying ahead of this emerging threat.
“Move fast and break things” has graduated from a startup mantra to an industry-wide gospel. We’re told to ship now and ask questions later, to launch minimum viable products and iterate indefinitely. But in the race to be first, we risk forgetting what it means to be good. What if the relentless pursuit of ‘now’ comes with higher reputational consequences than we realise?
I have worked for a lot of other businesses before. Contract, Industry, Agency, you name it… over the last 17 years I’ve seen the decisions that get made, many of them mistakes, from junior level through to senior leadership. Often I would find myself wondering, ‘is this how it has to be?’.
Businesses I worked for would cut corners everywhere, and I don’t mean slightly under-deliver to preserve margin, I mean a perpetual ethos of poor performance was not just accepted, but cultivated through indifference and a lack of accountability.
Motivated by this behaviour, I wanted to start something with integrity, something a bit more human, something where value is determined by quality-delivered, not just cash-extracted.
Although I am introverted by nature, and generally more interested in craft than networking – I’ve been fortunate enough to build partnerships with some of the largest companies and brands in the world.
The projects we work on are usually for brands with a substantial audience, which require a holistic approach to design and development. We are particularly proud of our work in the entertainment sector, which we recently decided was a logical niche for us.
Our Ethos
Our guiding philosophy is simple:
Designed with purpose, built to perform.
In the entertainment space, a digital touchpoint is more than just a website or an app, it’s a gateway to an experience. It has to handle crushing traffic spikes for ticket or merchandise drops, convey the energy of an event (usually using highly visual, large content formats like video/audio), be just as performant on mobile as it is on desktop, and function flawlessly under pressure.
In this context, creativity without a clear purpose is just noise. A beautiful design that collapses under load isn’t just a failure; it’s a broken promise to thousands of fans. This is why we are laser-focused on creativity and performance being complimentary forces, rather than adversaries.
To design with purpose is to understand that every choice must be anchored in strategy. It means we don’t just ask “what does it look like?” but “what is it for?”. A critical part of our ethos involves avoiding common industry pitfalls.
I don’t know how loud this needs to be for people to hear me, but you should never build platform first.
If you’re advising clients that they need a WordPress website because that’s the only tool you know, you’re doing something wrong. The same is true of any solution that you deliver.
There is a right way and 17 wrong ways to do everything.
This is why we build for performance by treating speed, stability, and scalability as core features, not afterthoughts. It’s about architecting systems that are as resilient as they are beautiful. Working with the correct tech stack on every project is important. The user experience is only as good as the infrastructure that supports it.
That said, experiential design is an incredibly important craft, and at the front edge of this are libraries like GSAP, Lenis, and of course WebGL/Three.js. Over the last few years, we’ve been increasing the amount of these features across our work, thankfully to much delight.
liquidGL
Recently we launched a library you might like to try called liquidGL, an attempt to bring Apple’s new Liquid Glass aesthetic to the web. It’s a lot trickier in the browser, and there are still some things to work out in BETA, but it’s available now on GitHub and of course, it’s open source.
particlesGL
In addition to liquidGL, we recently launched particlesGL, a library for creating truly unique particle effects in the browser, complete with 6 core demos and support for all media formats including 3D models, video, audio, images and text. Available on GitHub and free for personal use.
glitchGL
Following on from particlesGL is glitchGL, a library for creating pixelation, CRT and glitch effects in the browser. With more than 30 custom properties and a configurable global interaction system, which can be applied to multiple elements. Also available on GitHub and free for personal use.
We post mainly on LinkedIn, so if you’re interested in libraries like these, give us a follow so you don’t miss new releases and updates.
The result is a suite of market-specific solutions that consistently deliver: web, game development, mobile app, and e-commerce; all made possible because we know the culture and the owners, not just the brief. This is why I would encourage other creatives to niche down into an industry they understand, and to see their clients as partners rather than targets – you might think this cynicism is rare but I can assure you it is not.
Quality relationships take time, but they’re the foundation of quality work.
OFFLIMITS
Sometimes the best choices you make on a project are the ones that no one sees.
For OFFLIMITS Festival, the UAE’s first open format music festival featuring Ed Sheeran, Kaiser Chiefs, OneRepublic, and more, one of the most critical aspects was the ability to serve large content formats performantly, at scale.
Whilst Webflow was the right platform for the core requirements, we decided to forgo several of Webflow’s own features, including their forms setup and asset handling. We opted to use Cloudflare R2 to serve videos and audio, giving us granular control over caching policies and delivery. One of many hidden changes which were invisible to users, but critical to performance. Taking time for proper decisions, even boring ones, is what separates experiences that deliver from those that merely look nice.
PRIMAL™
PRIMAL™ started as a sample pack library focused on raw high quality sounds. When they wanted to expand into audio plugins, we spent eighteen months developing custom audio plugins and architecting a comprehensive ecosystem from scratch, because comprehensive solutions create lasting value.
The result is something we’re particularly proud of, with automatic account creation, login, subscription creation, and license generation happening from a single click. This may sound simple on the surface, but it required months of careful planning and development across JUCE/C++, Stripe, Clerk, React, Cloudflare, and Mailchimp.
More information on this repositioning will be available late 2025.
The Integrated Pipeline
Our philosophy of Quality Over Speed only works if your team is structured to support it. Common approaches separate concerns like design and development. In large teams this is seen as somewhat essential, a project moves along a conveyor belt, handed off from one silo to the next.
Having a holistic approach allows you to create deeply connected digital ecosystems.
When the same team that designs the brand identity also builds the mobile app and architects the backend, you get a level of coherence that simply isn’t possible otherwise. This leads to better outcomes: lower operational costs for our clients, less patchwork for us, higher conversion rates, and a superior customer experience that feels seamless and intentional.
Final Thoughts
Choosing craft over haste is not an indulgence, it’s a strategic decision we make every day.
It’s not that we are perfect, we’re not. It’s that we’d rather aim for perfection and miss, than fail to even try and settle for ‘good enough’. In a digital landscape saturated with forgettable experiences, perfectionism is what cuts through the noise.
It’s what turns a user into a fan and a brand into a legacy.
Our work has been fortunate enough to win awards, but the real validation comes from seeing our clients thrive on the back of the extra care and attention to detail that goes into a Quality Over Speed mindset. By building platforms that are purposeful, performant, and deeply integrated, we deliver lasting value.
The goal isn’t just to launch something, it’s to launch something right.
In today’s hyper-connected world, cyberattacks are no longer just a technical issue, they are a serious business risk. From ransomware shutting down operations to data breaches costing millions, the threat landscape is constantly evolving. According to IBM’s 2024 Cost of a Data Breach Report, the global average cost of a data breach has reached 4.45 million dollars, marking a 15 percent increase over the past three years. As a result, more organizations are turning to EDR cybersecurity solutions.
EDR offers real-time monitoring, threat detection, and rapid incident response to protect endpoints like desktops, and laptops from malicious activity. These capabilities are critical for minimizing the impact of attacks and maintaining operational resilience. Below are the top benefits of implementing EDR cybersecurity in your organization.
Top EDR Cybersecurity Benefits
1. Improved Visibility and Threat Awareness
In a modern enterprise, visibility across all endpoints is crucial. EDR offers a comprehensive lens into every device, user activity, and system process within your network.
Continuous Endpoint Monitoring
EDR agents installed on endpoints continuously collect data related to file access, process execution, login attempts, and more. This enables 24/7 monitoring of activity across desktops, and mobile devices regardless of location.
Behavioral Analytics
EDR solutions use machine learning to understand normal behavior across systems and users. When anomalies occur—like unusual login patterns or unexpected file transfers—they are flagged for investigation.
2. Faster Threat Response and Containment
In cybersecurity, response speed is critical. Delayed action can lead to data loss, system compromise, and reputational damage.
Real-Time Containment
EDR solutions enable security teams to isolate infected endpoints instantly, preventing malware from spreading laterally through the network. Even if the endpoint is rebooted or disconnected, containment policies remain active.
Automated Response Workflows
EDR systems support predefined rules for automatic responses such as:
Killing malicious processes
Quarantining suspicious files
Blocking communication with known malicious IPs
Disconnecting compromised endpoints from the network
Protection for Offline Devices
Remote endpoints or those operating without an internet connection remain protected. Security policies continue to function, ensuring consistent enforcement even in disconnected environments.
According to IDC’s 2024 report on endpoint security, companies with automated EDR solutions reduced their average incident containment time by 60 percent.
3. Regulatory Compliance and Reporting
Compliance is no longer optional—especially for organizations in healthcare, finance, government, and other regulated sectors. EDR tools help meet these requirements.
Support for Compliance Standards
EDR solutions help organizations meet GDPR, HIPAA, PCI-DSS, and the Indian DPDP Act by:
Enforcing data encryption
Applying strict access controls
Maintaining audit logs of all system and user activities
Enabling rapid response and documentation of security incidents
Simplified Audit Readiness
Automated report generation and log retention ensure that organizations can quickly present compliance evidence during audits.
Proactive Compliance Monitoring
EDR platforms identify areas of non-compliance and provide recommendations to fix them before regulatory issues arise.
HIPAA, for instance, requires logs to be retained for at least six years. EDR solutions ensure this requirement is met with minimal manual intervention.
4. Cost Efficiency and Operational Gains
Strong cybersecurity is not just about prevention it is also about operational and financial efficiency. EDR helps reduce the total cost of ownership of security infrastructure.
Lower Incident Management Costs
According to Deloitte India’s Cybersecurity Report 2024, companies using EDR reported an average financial loss of 42 million rupees per attack. In contrast, companies without EDR reported average losses of 253 million rupees.
Reduced Business Disruption
EDR solutions enable security teams to isolate only affected endpoints rather than taking entire systems offline. This minimizes downtime and maintains business continuity.
More Efficient Security Teams
Security analysts often spend hours manually investigating each alert. EDR platforms automate much of this work by providing instant analysis, root cause identification, and guided response steps. This frees up time for more strategic tasks like threat hunting and policy improvement.
The Ponemon Institute’s 2024 report notes that organizations using EDR reduced average investigation time per incident by 30 percent.
5. Protection Against Advanced and Evolving Threats
Cyberthreats are evolving rapidly, and many now bypass traditional defenses. EDR solutions are built to detect and respond to these sophisticated attacks.
Detection of Unknown Threats
Unlike traditional antivirus software, EDR uses heuristic and behavioral analysis to identify zero-day attacks and malware that do not yet have known signatures.
Defense Against Advanced Persistent Threats (APTs)
EDR systems correlate seemingly minor events such as login anomalies, privilege escalations, and file modifications—into a single threat narrative that identifies stealthy attacks.
Integration with Threat Intelligence
EDR platforms often incorporate global and local threat feeds, helping organizations respond to emerging threats faster and more effectively.
Verizon’s 2024 Data Breach Investigations Report found that 70 percent of successful breaches involved endpoints, highlighting the need for more advanced protection mechanisms like EDR.
Why Choose Seqrite EDR
Seqrite EDR cybersecurity is designed to meet the needs of today’s complex and fast-paced enterprise environments. It provides centralized control, powerful analytics, and advanced response automation all in a user-friendly package.
Unified dashboard for complete endpoint visibility
Seamless integration with existing IT infrastructure
Resilient protection for remote and offline devices
Scalability for growing enterprise needs
Seqrite EDR is especially well-suited for industries such as finance, healthcare, manufacturing, and government, where both threat risk and compliance pressure are high.
Conclusion
EDR cybersecurity solutions have become a strategic necessity for organizations of all sizes. They offer comprehensive protection by detecting, analyzing, and responding to threats across all endpoints in real time. More importantly, they help reduce incident costs, improve compliance, and empower security teams with automation and insight.
Seqrite Endpoint Detection and Response provides a powerful, cost-effective way to future-proof your organization’s cybersecurity. By adopting Seqrite EDR, you can strengthen your cyber defenses, reduce operational risk, and ensure compliance with evolving regulations.
To learn more, visit www.seqrite.com and explore how Seqrite EDR can support your business in the age of intelligent cyber threats.
Integration Tests are incredibly useful: a few Integration Tests are often more useful than lots of Unit Tests. Let’s learn some advanced capabilities of WebApplicationFactory.
Table of Contents
Just a second! 🫷 If you are here, it means that you are a software developer.
So, you know that storage, networking, and domain management have a cost .
If you want to support this blog, please ensure that you have disabled the adblocker for this site. I configured Google AdSense to show as few ADS as possible – I don’t want to bother you with lots of ads, but I still need to add some to pay for the resources for my site.
Thank you for your understanding. – Davide
In a previous article, we learned a quick way to create Integration Tests for ASP.NET API by using WebApplicationFactory. That was a nice introductory article. But now we will delve into more complex topics and examples.
In my opinion, a few Integration Tests and just the necessary number of Unit tests are better than hundreds of Unit Tests and no Integration Tests at all. In general, the Testing Diamond should be preferred over the Testing Pyramid (well, in most cases).
In this article, we are going to create advanced Integration Tests by defining custom application settings, customizing dependencies to be used only during tests, defining custom logging, and performing complex operations in our tests.
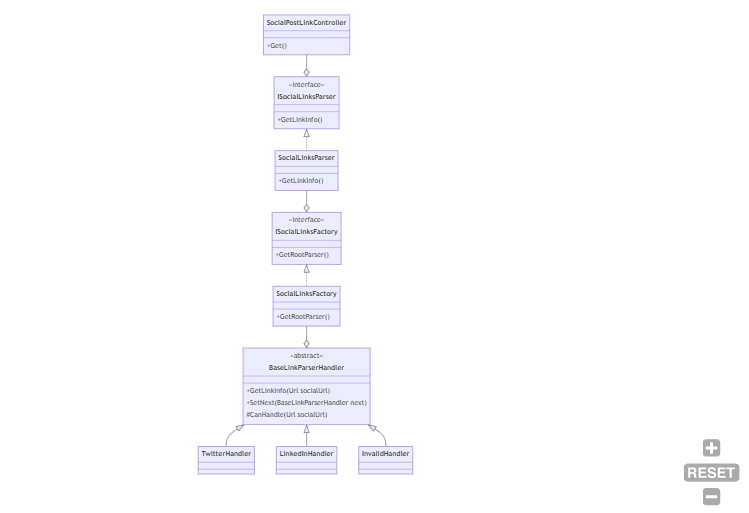
For the sake of this article, I created a sample API application that exposes one single endpoint whose purpose is to retrieve some info about the URL passed in the query string. For example,
GET /SocialPostLink?uri=https%3A%2F%2Ftwitter.com%2FBelloneDavide%2Fstatus%2F1682305491785973760
For completeness, instanceName is a value coming from the appsettings.json file, while info is an object that holds some info about the social post URL passed as input.
Internally, the code is using the Chain of Responsibility pattern: there is a handler that “knows” if it can handle a specific URL; if so, it just elaborates the input; otherwise, it calls the next handler.
There is also a Factory that builds the chain, and finally, a Service that instantiates the Factory and then resolves the dependencies.
As you can see, this solution can become complex. We could run lots of Unit Tests to validate that the Chain of Responsibility works as expected. We can even write a Unit Tests suite for the Factory.
But, at the end of the day, we don’t really care about the internal structure of the project: as long as it works as expected, we could even use a huge switch block (clearly, with all the consequences of this choice). So, let’s write some Integration Tests.
How to create a custom WebApplicationFactory in .NET
When creating Integration Tests for .NET APIs you have to instantiate a new instance of WebApplicationFactory, a class coming from the Microsoft.AspNetCore.Mvc.Testing NuGet Package.
Since we are going to define it once and reuse it across all the tests, let’s create a new class that extends WebApplicationFactory, and add some custom behavior to it.
Let’s focus on the Program class: as you can see, the WebApplicationFactory class requires an entry point. Generally speaking, it’s the Program class of our application.
If you hover on WebApplicationFactory<Program> and hit CTRL+. on Visual Studio, the autocomplete proposes two alternatives: one is the Program class defined in your APIs, while the other one is the Program class defined in Microsoft.VisualStudio.TestPlatform.TestHost. Choose the one for your API application! The WebApplicationFactory class will then instantiate your API following the instructions defined in your Program class, thus resolving all the dependencies and configurations as if you were running your application locally.
What to do if you don’t have the Program class? If you use top-level statements, you don’t have the Program class, because it’s “implicit”. So you cannot reference the whole class. Unless… You have to create a new partial class named Program, and leave it empty: this way, you have a class name that can be used to reference the API definition:
publicpartialclassProgram { }
Here you can override some definitions of the WebHost to be created by calling ConfigureWebHost:
How to use WebApplicationFactory in your NUnit tests
It’s time to start working on some real Integration Tests!
As we said before, we have only one HTTP endpoint, defined like this:
privatereadonly ISocialLinkParser _parser;
privatereadonly ILogger<SocialPostLinkController> _logger;
privatereadonly IConfiguration _config;
public SocialPostLinkController(ISocialLinkParser parser, ILogger<SocialPostLinkController> logger, IConfiguration config)
{
_parser = parser;
_logger = logger;
_config = config;
}
[HttpGet]public IActionResult Get([FromQuery] string uri)
{
_logger.LogInformation("Received uri {Uri}", uri);
if (Uri.TryCreate(uri, new UriCreationOptions { }, out Uri _uri))
{
var linkInfo = _parser.GetLinkInfo(_uri);
_logger.LogInformation("Uri {Uri} is of type {Type}", uri, linkInfo.SocialNetworkName);
var instance = new Instance
{
InstanceName = _config.GetValue<string>("InstanceName"),
Info = linkInfo
};
return Ok(instance);
}
else {
_logger.LogWarning("Uri {Uri} is not a valid Uri", uri);
return BadRequest();
}
}
We have 2 flows to validate:
If the input URI is valid, the HTTP Status code should be 200;
If the input URI is invalid, the HTTP Status code should be 400;
We could simply write Unit Tests for this purpose, but let me write Integration Tests instead.
First of all, we have to create a test class and create a new instance of IntegrationTestWebApplicationFactory. Then, we will create a new HttpClient every time a test is run that will automatically include all the services and configurations defined in the API application.
As you can see, the test class implements IDisposable so that we can call Dispose() on the IntegrationTestWebApplicationFactory instance.
From now on, we can use the _client instance to work with the in-memory instance of the API.
One of the best parts of it is that, since it’s an in-memory instance, we can even debug our API application. When you create a test and put a breakpoint in the production code, you can hit it and see the actual values as if you were running the application in a browser.
Now that we have the instance of HttpClient, we can create two tests to ensure that the two cases we defined before are valid. If the input string is a valid URI, return 200:
[Test]publicasync Task Should_ReturnHttp200_When_UrlIsValid()
{
string inputUrl = "https://twitter.com/BelloneDavide/status/1682305491785973760";
var result = await _client.GetAsync($"SocialPostLink?uri={inputUrl}");
Assert.That(result.StatusCode, Is.EqualTo(HttpStatusCode.OK));
}
Otherwise, return Bad Request:
[Test]publicasync Task Should_ReturnBadRequest_When_UrlIsNotValid()
{
string inputUrl = "invalid-url";
var result = await _client.GetAsync($"/SocialPostLink?uri={inputUrl}");
Assert.That(result.StatusCode, Is.EqualTo(HttpStatusCode.BadRequest));
}
How to create test-specific configurations using InMemoryCollection
WebApplicationFactory is highly configurable thanks to the ConfigureWebHost method. For instance, you can customize the settings injected into your services.
Usually, you want to rely on the exact same configurations defined in your appsettings.json file to ensure that the system behaves correctly with the “real” configurations.
For example, I defined the key “InstanceName” in the appsettings.json file whose value is “Real”, and whose value is used to create the returned Instance object. We can validate that that value is being read from that source as validated thanks to this test:
[Test]publicasync Task Should_ReadInstanceNameFromSettings()
{
string inputUrl = "https://twitter.com/BelloneDavide/status/1682305491785973760";
var result = await _client.GetFromJsonAsync<Instance>($"/SocialPostLink?uri={inputUrl}");
Assert.That(result.InstanceName, Is.EqualTo("Real"));
}
But some other times you might want to override a specific configuration key.
The ConfigureAppConfiguration method allows you to customize how you manage Configurations by adding or removing sources.
If you want to add some configurations specific to the WebApplicationFactory, you can use AddInMemoryCollection, a method that allows you to add configurations in a key-value format:
protectedoverridevoid ConfigureWebHost(IWebHostBuilder builder)
{
builder.ConfigureAppConfiguration((host, configurationBuilder) =>
{
configurationBuilder.AddInMemoryCollection(
new List<KeyValuePair<string, string?>>
{
new KeyValuePair<string, string?>("InstanceName", "FromTests")
});
});
}
Even if you had the InstanceName configured in your appsettings.json file, the value is now overridden and set to FromTests.
You can validate this change by simply replacing the expected value in the previous test:
[Test]publicasync Task Should_ReadInstanceNameFromSettings()
{
string inputUrl = "https://twitter.com/BelloneDavide/status/1682305491785973760";
var result = await _client.GetFromJsonAsync<Instance>($"/SocialPostLink?uri={inputUrl}");
Assert.That(result.InstanceName, Is.EqualTo("FromTests"));
}
If you also want to discard all the other existing configuration sources, you can call configurationBuilder.Sources.Clear() before AddInMemoryCollection and remove all the other existing configurations.
How to set up custom dependencies for your tests
Maybe you don’t want to resolve all the existing dependencies, but just a subset of them. For example, you might not want to call external APIs with a limited number of free API calls to avoid paying for the test-related calls. You can then rely on Stub classes that simulate the dependency by giving you full control of the behavior.
We want to replace an existing class with a Stub one: we are going to create a stub class that will be used instead of SocialLinkParser:
publicclassStubSocialLinkParser : ISocialLinkParser
{
public LinkInfo GetLinkInfo(Uri postUri) => new LinkInfo
{
SocialNetworkName = "test from stub",
Id = "test id",
SourceUrl = postUri,
Username = "test username" };
}
We can then customize Dependency Injection to use StubSocialLinkParser in place of SocialLinkParser by specifying the dependency within the ConfigureTestServices method:
Finally, we can create a method to validate this change:
[Test]publicasync Task Should_UseStubName()
{
string inputUrl = "https://twitter.com/BelloneDavide/status/1682305491785973760";
var result = await _client.GetFromJsonAsync<Instance>($"/SocialPostLink?uri={inputUrl}");
Assert.That(result.Info.SocialNetworkName, Is.EqualTo("test from stub"));
}
How to create Integration Tests on specific resolved dependencies
Now we are going to test that the SocialLinkParser does its job, regardless of the internal implementation. Right now we have used the Chain of Responsibility pattern, and we rely on the ISocialLinksFactory interface to create the correct sequence of handlers. But we don’t know in the future how we will define the code: maybe we will replace it all with a huge if-else sequence – the most important part is that the code works, regardless of the internal implementation.
We can proceed in two ways: writing tests on the interface or writing tests on the concrete class.
For the sake of this article, we are going to run tests on the SocialLinkParser class. Not the interface, but the concrete class. The first step is to add the class to the DI engine in the Program class:
builder.Services.AddScoped<SocialLinkParser>();
Now we can create a test to validate that it is working:
[Test]publicasync Task Should_ResolveDependency()
{
using (var _scope = _factory.Services.CreateScope())
{
var service = _scope.ServiceProvider.GetRequiredService<SocialLinkParser>();
Assert.That(service, Is.Not.Null);
Assert.That(service, Is.AssignableTo<SocialLinkParser>());
}
}
As you can see, we are creating an IServiceScope by calling _factory.Services.CreateScope(). Since we have to discard this scope after the test run, we have to place it within a using block. Then, we can create a new instance of SocialLinkParser by calling _scope.ServiceProvider.GetRequiredService<SocialLinkParser>() and create all the tests we want on the concrete implementation of the class.
The benefit of this approach is that you have all the internal dependencies already resolved, without relying on mocks. You can then ensure that everything, from that point on, works as you expect.
Here I created the scope within a using block. There is another approach that I prefer: create the scope instance in the SetUp method, and call Dispose() on it the the TearDown phase:
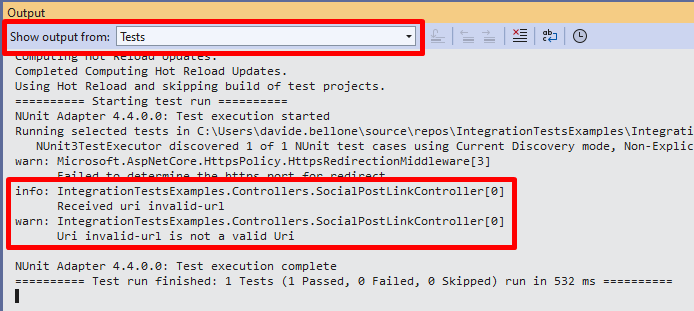
Sometimes you just want to see the logs generated by your application to help you debug an issue (yes, you can simply debug the application!). But, unless properly configured, the application logs will not be available to you.
But you can add logs to the console easily by customizing the adding the Console sink in your ConfigureTestServices method:
Now you will be able to see all the logs you generated in the Output panel of Visual Studio by selecting the Tests source:
Beware that you are still reading the configurations for logging from the appsettings file! If you have specified in your project to log directly to a sink (such as DataDog or SEQ), your tests will send those logs to the specified sinks. Therefore, you should get rid of all the other logging sources by calling ClearProviders():
As I often say, a few Integration Tests are often more useful than a ton of Unit Tests. Focusing on Integration Tests instead that on Unit Tests has the benefit of ensuring that the system behaves correctly regardless of the internal implementation.
In this article, I used the Chain of Responsibility pattern, so Unit Tests would be tightly coupled to the Handlers. If we decided to move to another pattern, we would have to delete all the existing tests and rewrite everything from scratch.
Therefore, in my opinion, the Testing Diamond is often more efficient than the Testing Pyramid, as I explained here:
Feature Flags are a technique that allows you to control the visibility and functionality of features in your software without changing the code. They enable you to experiment with new features, perform gradual rollouts, and revert changes quickly if needed.
Table of Contents
Just a second! 🫷 If you are here, it means that you are a software developer.
So, you know that storage, networking, and domain management have a cost .
If you want to support this blog, please ensure that you have disabled the adblocker for this site. I configured Google AdSense to show as few ADS as possible – I don’t want to bother you with lots of ads, but I still need to add some to pay for the resources for my site.
Thank you for your understanding. – Davide
To turn functionalities on or off on an application, you can use simple if(condition) statements. That would work, of course. But it would not be flexible, and you’ll have to scatter those checks all around the application.
There is another way, though: Feature Flags. Feature Flags allow you to effortlessly enable and disable functionalities, such as Middlewares, HTML components, and API controllers. Using ASP.NET Core, you have Feature Flags almost ready to be used: it’s just a matter of installing one NuGet package and using the correct syntax.
In this article, we are going to create and consume Feature Flags in an ASP.NET Core application. We will start from the very basics and then see how to use complex, built-in filters. We will consume Feature Flags in a generic C# code, and then we will see how to include them in a Razor application and in ASP.NET Core APIs.
How to add the Feature Flags functionality on ASP.NET Core applications
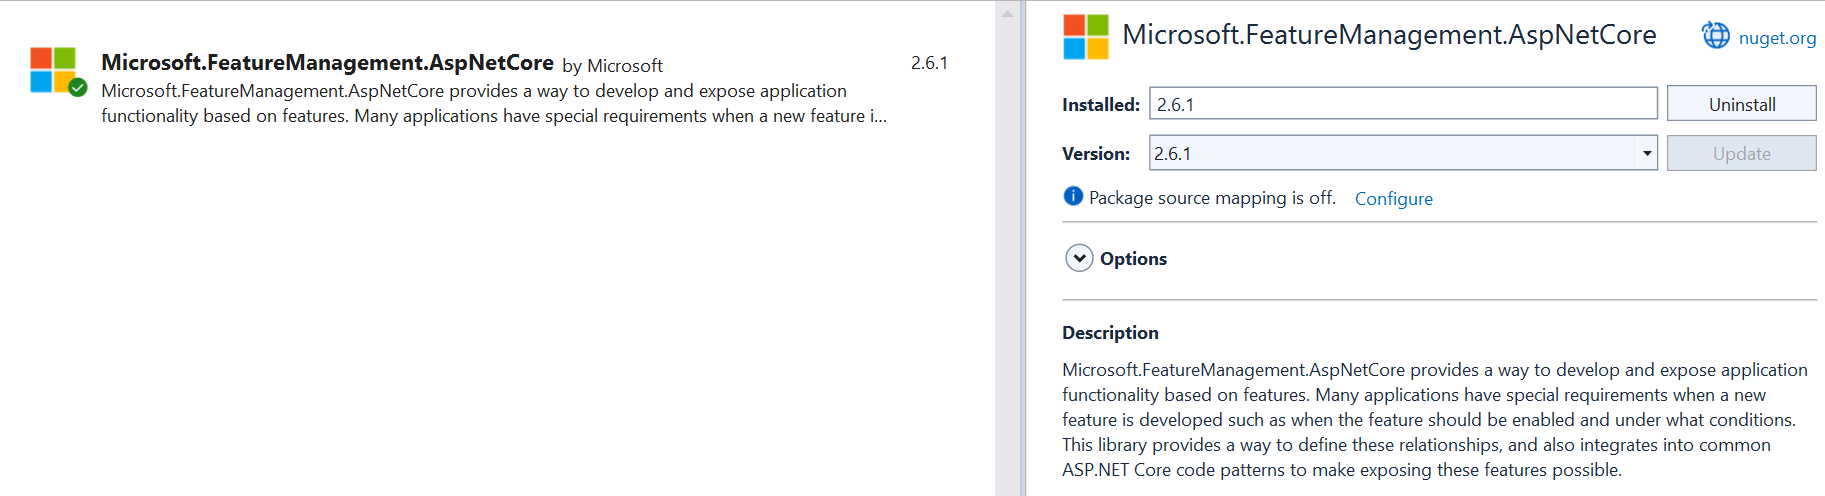
The very first step to do is to install the Microsoft.FeatureManagement.AspNetCore NuGet package:
This package contains everything you need to integrate Feature Flags in an ASP.NET application, from reading configurations from the appsettings.json file to the utility methods we will see later in this article.
Now that we have the package installed, we can integrate it into our application. The first step is to call AddFeatureManagement on the IServiceCollection object available in the Main method:
var builder = WebApplication.CreateBuilder(args);

builder.Services.AddFeatureManagement();
By default, this method looks for Feature Flags in a configuration section named FeatureManagement.
If you want to use another name, you can specify it by accessing the Configuration object. For example, if your section name is MyWonderfulFlags, you must use this line instead of the previous one:
But, for now, let’s stick with the default section name: FeatureManagement.
Define Feature Flag values in the appsettings file
As we saw, we have to create a section named FeatureManagement in the appsettings file. This section will contain a collection of keys, each representing a Feature Flag and an associated value.
For now, let’s say that the value is a simple boolean (we will see an advanced case later!).
The simplest way to use Feature Flags is by accessing the value directly in the C# code.
By calling AddFeatureManagement, we have also injected the IFeatureManager interface, which comes in handy to check whether a flag is enabled.
You can then inject it in a class constructor and reference it:
privatereadonly IFeatureManager _featureManager;
public MyClass(IFeatureManager featureManager)
{
_featureManager = featureManager;
}
publicasync Task DoSomething()
{
bool privacyEnabled = await _featureManager.IsEnabledAsync("PrivacyPage");
if(privacyEnabled)
{
// do something specific }
}
This is the simplest way. Looks like it’s nothing more than a simple if statement. Is it?
Applying a Feature Flag to a Controller or a Razor Model using the FeatureGate attribute
When rolling out new versions of your application, you might want to enable or disable an API Controller or a whole Razor Page, depending on the value of a Feature Flag.
There is a simple way to achieve this result: using the FeatureGate attribute.
Suppose you want to hide the “Privacy” Razor page depending on its related flag, PrivacyPage. You then have to apply the FeatureGate attribute to the whole Model class (in our case, PrivacyModel), specifying that the flag to watch out for is PrivacyPage:
Depending on the value of the flag, we will have two results:
if the flag is enabled, we will see the whole page normally;
if the flag is disabled, we will receive a 404 – Not Found response.
Let’s have a look at the attribute definition:
//
// Summary:// An attribute that can be placed on MVC controllers, controller actions, or Razor// pages to require all or any of a set of features to be enabled.[AttributeUsage(AttributeTargets.Class | AttributeTargets.Method, AllowMultiple = true)]publicclassFeatureGateAttribute : ActionFilterAttribute, IAsyncPageFilter, IFilterMetadata
As you can see, you can apply the attribute to any class or method that is related to API controllers or Razor pages. This allows you to support several scenarios:
add a flag on a whole API Controller by applying the attribute to the related class;
add a flag on a specific Controller Action, allowing you, for example, to expose the GET Action but apply the attribute to the POST Action.
add a flag to a whole Razor Model, hiding or showing the related page depending on the flag value.
You can apply the attribute to a custom class or method unrelated to the MVC pipeline, but it will be ineffective.
the Hello method will be called as usual. The same happens for the OnGet method: yes, it represents the way to access the Razor Page, but you cannot hide it; the only way is to apply the flag to the whole Model.
You can use multiple Feature Flags on the same FeatureGate attribute. If you need to hide or show a component based on various Feature Flags, you can simply add the required keys in the attribute parameters list:
Now, the GET endpoint will be available only if both PrivacyPage and Footer are enabled.
Finally, you can define that the component is available if at least one of the flags is enabled by setting the requirementType parameter to RequirementType.Any:
The Microsoft.FeatureManagement.AspNetCore NuGet package brings a lot of functionalities. Once installed, you can use Feature Flags in your Razor pages.
To use such functionalities, though, you have to add the related tag helper: open the _ViewImports.cshtml file and add the following line:
Say you want to show an HTML tag when the Header flag is on. You can use the feature tag this way:
<featurename="Header"><p>The header flag is on.</p></feature>
You can also show some content when the flag is off, by setting the negate attribute to true. This comes in handy when you want to display alternative content when the flag is off:
<featurename="ShowPicture"><imgsrc="image.png"/></feature><featurename="ShowPicture"negate="true"><p>There should have been an image, here!</p></feature>
Clearly, if ShowPicture is on, it shows the image; otherwise, it displays a text message.
Similar to the FeatureGate attribute, you can apply multiple flags and choose whether all of them or at least one must be on to show the content by setting the requirement attribute to Any (remember: the default value is All):
<featurename="Header, Footer"requirement="All"><p>Both header and footer are enabled.</p></feature><featurename="Header, Footer"requirement="Any"><p>Either header or footer is enabled.</p></feature>
Conditional Feature Filters: a way to activate flags based on specific advanced conditions
Sometimes, you want to activate features using complex conditions. For example:
activate a feature only for a percentage of requests;
activate a feature only during a specific timespan;
Let’s see how to use the percentage filter.
The first step is to add the related Feature Filter to the FeatureManagement functionality. In our case, we will add the Microsoft.FeatureManagement.FeatureFilters.PercentageFilter.
Now we just have to define the related flag in the appsettings file. We cannot use anymore a boolean value, but we need a complex object. Let’s configure the ShowPicture flag to use the Percentage filter.
every object within the array is made of two fields: Name, which must match the filter name, and Parameters, which is a generic object whose value depends on the type of filter.
In this example, we have set "Value": 60. This means that the flag will be active in around 60% of calls. In the remaining 40%, the flag will be off.
Now, I encourage you to toy with this filter:
Apply it to a section or a page.
Run the application.
Refresh the page several times without restarting the application.
You’ll see the component appear and disappear.
Further readings
We learned about setting “simple” configurations in an ASP.NET Core application in a previous article. You should read it to have a better understanding of how we can define configurations.
Here, we focused on the Feature Flags. As we saw, most functionalities come out of the box with ASP.NET Core.
In particular, we learned how to use the <feature> tag on a Razor page. You can read more on the official documentation (even though we already covered almost everything!):
In this article, we learned how to use Feature Flags in an ASP.NET application on Razor pages and API Controllers.
Feature Flags can be tremendously useful when activating or deactivating a feature in some specific cases. For example, you can roll out a functionality in production by activating the related flag. Suppose you find an error in that functionality. In that case, you just have to turn off the flag and investigate locally the cause of the issue.
I hope you enjoyed this article! Let’s keep in touch on Twitter or LinkedIn! 🤜🤛
Just a second! 🫷 If you are here, it means that you are a software developer.
So, you know that storage, networking, and domain management have a cost .
If you want to support this blog, please ensure that you have disabled the adblocker for this site. I configured Google AdSense to show as few ADS as possible – I don’t want to bother you with lots of ads, but I still need to add some to pay for the resources for my site.
Thank you for your understanding. – Davide
Model validation is fundamental to any project: it brings security and robustness acting as a first shield against an invalid state.
You should then add Unit Tests focused on model validation. In fact, when defining the input model, you should always consider both the valid and, even more, the invalid models, making sure that all the invalid models are rejected.
BDD is a good approach for this scenario, and you can use TDD to implement it gradually.
Okay, but how can you validate that the models and model attributes you defined are correct?
Have we defined our model correctly? Are we covering all the edge cases? A well-written Unit Test suite is our best friend here!
We have two choices: we can write Integration Tests to send requests to our system, which is running an in-memory server, and check the response we receive. Or we can use the internal Validator class, the one used by ASP.NET to validate input models, to create slim and fast Unit Tests. Let’s use the second approach.
Here’s a utility method we can use in our tests:
publicstatic IList<ValidationResult> ValidateModel(object model)
{
var results = new List<ValidationResult>();
var validationContext = new ValidationContext(model, null, null);
Validator.TryValidateObject(model, validationContext, results, true);
if (model is IValidatableObject validatableModel)
results.AddRange(validatableModel.Validate(validationContext));
return results;
}
In short, we create a validation context without any external dependency, focused only on the input model: new ValidationContext(model, null, null).
Next, we validate each field by calling TryValidateObject and store the validation results in a list, result.
Finally, if the Model implements the IValidatableObject interface, which exposes the Validate method, we call that Validate() method and store the returned validation errors in the final result list created before.
As you can see, we can handle both validation coming from attributes on the fields, such as [Required], and custom validation defined in the model class’s Validate() method.
Now, we can use this method to verify whether the validation passes and, in case it fails, which errors are returned:
[Test]publicvoid User_ShouldPassValidation_WhenModelIsValid()
{
var model = new User { FirstName = "Davide", LastName = "Bellone", Age = 32 };
var validationResult = ModelValidationHelper.ValidateModel(mode);
Assert.That(validationResult, Is.Empty);
}
[Test]publicvoid User_ShouldNotPassValidation_WhenLastNameIsEmpty()
{
var model = new User { FirstName = "Davide", LastName = null, Age = 32 };
var validationResult = ModelValidationHelper.ValidateModel(mode);
Assert.That(validationResult, Is.Not.Empty);
}
[Test]publicvoid User_ShouldNotPassValidation_WhenAgeIsLessThan18()
{
var model = new User { FirstName = "Davide", LastName = "Bellone", Age = 10 };
var validationResult = ModelValidationHelper.ValidateModel(mode);
Assert.That(validationResult, Is.Not.Empty);
}
Further readings
Model Validation allows you to create more robust APIs. To improve robustness, you can follow Postel’s law:
Model validation, in my opinion, is one of the cases where Unit Tests are way better than Integration Tests. This is a perfect example of Testing Diamond, the best (in most cases) way to structure a test suite:
If you still prefer writing Integration Tests for this kind of operation, you can rely on the WebApplicationFactory class and use it in your NUnit tests:
TLDR: You can browse the Internet safely and anonymously using a virtual browser at browserling.com/browse. It runs in your browser, so there’s nothing to download or install.
What Is a Virtual Browser?
It’s a real browser running on a remote machine that you control through your browser. Everything you do happens on a secure server, so your device never touches the website directly.
Is It Safe to Visit Weird Websites With It?
Yes, because the risky stuff stays on the remote machine, not your own. Malware, pop-ups, viruses, and trackers never get near your real computer.
Can I Test Suspicious Links With It?
Yes, it’s made for testing suspicious URLs without risking your system. Just paste the link into the virtual browser and see what it does.
Can I Open Dangerous Email Attachments?
Yes, you can upload attachments to the virtual browser and open them there. This helps protect your actual files and avoids infecting your computer with malware hidden in shady attachments.
Is It Good for Cybersecurity Testing?
Totally. Virtual browsers are often used in security testing, link analysis, sandboxing, and checking how websites behave under different conditions without exposing a real system.
How Is This Different From Incognito Mode?
Incognito just hides your history. It doesn’t protect you from viruses or sketchy websites. A virtual browser, on the other hand, acts like a shield, running everything remotely and keeping your device safe.
Do I Need to Install Anything?
Nope, it works straight from your browser. Just open a virtual browser in your browser and start browsing!
Can It Help With Online Privacy?
Absolutely. Since all browsing happens on a remote server, your IP address, cookies, and local data are never exposed to the sites you visit.
Can I Use It to Test Different Browsers?
Yeah, you can pick Chrome, Firefox, Edge, Safari, and others. It’s super helpful for developers, QA testers, or curious users who want to see how sites look in different browsers.
Is It Free?
There’s a free version with limited time, and paid plans for more features. If you just need quick tests or occasional safe browsing, the free plan is usually enough.
Is It On GitHub?
Absolutely. You can contribute to virtual browser repository on GitHub.
What Is Browserling?
Browserling is a virtual browser service that lets you use real web browsers on other computers, right from your own browser. It’s great for testing websites or visiting stuff safely without messing up your device.
Who Uses Browserling?
Browserling is a popular virtual browser tool used by people in tech, like cybersecurity pros, IT teams, and even researchers who check out the dark web. It’s trusted by millions of users every month, including big names like banks, governments, schools, news sites, and huge companies around the world.
TLDR: You can get instant access to an online browser at browserling.com/browse. It runs entirely in your own browser. No downloads, no installs.
What’s An Online Browser?
It’s a browser hosted elsewhere, streamed to you in real time. You use it like any regular browser, but it runs safely outside your device on a remote server.
Is It Safe For Sketchy Sites?
Absolutely. Any harmful scripts or shady behavior stay isolated on the remote machine. Your computer stays untouched and safe from viruses, malware, and phishing traps.
Can I Test Suspicious Links?
Yes, you can open any link inside an online browser without risking your own device. Using an online browser is one of the safest ways to check unknown URLs, especially if you’re worried about phishing or malware.
What About Email Attachments?
You can use an online browser to open files or attachments from emails without downloading them locally. This is a smart trick for checking PDFs or Office files that might contain malicious scripts.
Is It Good For Cybersecurity?
Absolutely. Online browsers are a big help for threat hunters and analysts. They let you investigate risky sites, test exploits, and open shady content without ever touching your network.
Do I Need To Install Anything?
No installation needed. It works instantly in your browser. Just click and go. No plugins, no setup, nothing to configure.
Can I Test Different Browsers?
Yes! You can choose from Chrome, Firefox, Edge, Safari, and more to test how sites look and behave across platforms. This is super useful for developers checking cross-browser compatibility, or QA testers fixing layout bugs.
Is It Free?
There’s a free version with time limits, and paid plans that unlock full access and extra features. The free plan is good for quick tasks, and the premium plans are built for teams, security testing, and daily use.
Is It On GitHub?
Yes. You can contribute to online browser repository on GitHub.
What Is Browserling?
Browserling is an online browser service that gives you instant access to real browsers running on remote systems. It’s made for testing, development, and secure browsing.
Who Uses Browserling?
Tech professionals around the world rely on Browserling. From cybersecurity experts and IT teams to cybersecurity experts exploring high-risk parts of the web. It’s trusted by millions each month, including major banks, universities, media outlets, government agencies, and Fortune 100 companies.
TLDR: Want to browse the web safely without messing up your computer? Try a browser sandbox at browserling.com/browse. It runs straight in your browser. No installs, no downloads.
What’s a Browser Sandbox?
A browser sandbox is like a “browser inside a browser”. It runs on another computer in the cloud, and you control it from your own screen. You get to surf the web, but the websites never touch your actual device.
Is It Safe to Use?
Yep! You can click on sketchy links or check out weird websites without any risk. All the dangerous stuff stays far away – on the remote computer, not yours. Even if a site tries to install a virus or download something, it won’t reach your actual system.
Can I Open Suspicious Emails Safely?
Yes, with a browser sandbox you can open sketchy emails or attachments without danger. If the attachment contains malware, it gets trapped inside the sandbox and can’t harm your real device.
What About Testing Suspicious URLs?
Absolutely. A browser sandbox is the safest way to test unknown URLs. It keeps malicious scripts, drive-by downloads, and tracking attempts locked away from your real system.
Can I Use It for Digital Forensics?
Yes, browser sandboxes are super useful for digital forensics work. Investigators can safely open phishing emails, suspicious websites, or malware links without risking their machines or leaking any data.
Do I Need to Download Anything?
Nope. Just open the sandbox, pick a browser, and start browsing. It’s that easy. Everything runs in your web browser via HTML5, JavaScript, and WebSockets, so there’s no software setup or weird permissions needed.
Can I Try Different Browsers?
Totally. You can switch between Chrome, Firefox, Edge, Safari, and even older versions if you’re testing an exploit that detonates in a particular browser version. This makes it useful for developers, bug bounty hunters, and cybersecurity researchers.
Is It Free?
There’s a free version with limited time. If you need more time or features, then there are paid plans too. The paid plans offer longer sessions, more browsers, and even persistent browser sessions.
What Is Browserling?
Browserling is an online tool that gives you access to real sandboxed browsers running on remote machines. Its use cases include safe browsing, testing websites in different browsers, and opening suspicious files and PDFs.
Who Uses Browserling?
Millions of people! Tech experts, digital forensics teams, IT departments, schools, and even government workers use Browserling. Big companies and researchers trust it too. Especially when checking out risky sites or testing code in different browsers.