Just a second! 🫷 If you are here, it means that you are a software developer.
So, you know that storage, networking, and domain management have a cost .
If you want to support this blog, please ensure that you have disabled the adblocker for this site. I configured Google AdSense to show as few ADS as possible – I don’t want to bother you with lots of ads, but I still need to add some to pay for the resources for my site.
Thank you for your understanding. – Davide
It may happen, even just for testing some functionalities, that you want to change the Culture of the thread your application is running on.
The current Culture is defined in this global property: Thread.CurrentThread.CurrentCulture. How can we temporarily change it?
An idea is to create a class that implements the IDisposable interface to create a section, delimited by a using block, with the new Culture:
In the constructor, we store the current Culture in a private field. Then, when we call the Dispose method (which is implicitly called when closing the using block), we use that value to restore the original Culture.
How to use it
How can we try it? An example is by checking the currency symbol.
Thread.CurrentThread.CurrentCulture = new CultureInfo("ja-jp");
Console.WriteLine(Thread.CurrentThread.CurrentCulture.NumberFormat.CurrencySymbol); //¥using (new TemporaryThreadCulture(new CultureInfo("it-it")))
{
Console.WriteLine(Thread.CurrentThread.CurrentCulture.NumberFormat.CurrencySymbol);//€}
Console.WriteLine(Thread.CurrentThread.CurrentCulture.NumberFormat.CurrencySymbol); //¥
We start by setting the Culture of the current thread to Japanese so that the Currency symbol is ¥. Then, we temporarily move to the Italian culture, and we print the Euro symbol. Finally, when we move outside the using block, we get back to ¥.
Here’s a test that demonstrates the usage:
[Fact]void TestChangeOfCurrency()
{
using (new TemporaryThreadCulture(new CultureInfo("it-it")))
{
var euro = CultureInfo.CurrentCulture.NumberFormat.CurrencySymbol;
Assert.Equal(euro, "€");
using (new TemporaryThreadCulture(new CultureInfo("en-us")))
{
var dollar = CultureInfo.CurrentCulture.NumberFormat.CurrencySymbol;
Assert.NotEqual(euro, dollar);
}
Assert.Equal(euro, "€");
}
}
Using a class that implements IDisposable is a good way to create a temporary environment with different characteristics than the main environment.
I use this approach a lot when I want to experiment with different cultures to understand how the code behaves when I’m not using English (or, more generically, Western) culture.
Do you have any other approaches for reaching the same goal? If so, feel free to share them in the comments section!
With Entity Framework you can perform operations on relational databases without writing a single line of SQL. We will use EF to integrate PostgreSQL in our application
Table of Contents
Just a second! 🫷 If you are here, it means that you are a software developer.
So, you know that storage, networking, and domain management have a cost .
If you want to support this blog, please ensure that you have disabled the adblocker for this site. I configured Google AdSense to show as few ADS as possible – I don’t want to bother you with lots of ads, but I still need to add some to pay for the resources for my site.
Thank you for your understanding. – Davide
When working with relational databases, you often come across two tasks: writing SQL queries and mapping the results to some DTO objects.
.NET developers are lucky to have an incredibly powerful tool that can speed up their development: Entity Framework. Entity Framework (in short: EF) is an ORM built with in mind simplicity and readability.
In this article, we will perform CRUD operations with Entity Framework Core on a database table stored on PostgreSQL.
Introduction EF Core
With Entity Framework you don’t have to write SQL queries in plain text: you write C# code that gets automatically translated into SQL commands. Then the result is automatically mapped to your C# classes.
Entity Framework supports tons of database engines, such as SQL Server, MySQL, Azure CosmosDB, Oracle, and, of course, PostgreSQL.
There are a lot of things you should know about EF if you’re new to it. In this case, the best resource is its official documentation.
But the only way to learn it is by getting your hands dirty. Let’s go!
How to set up EF Core
For this article, we will reuse the same .NET Core repository and the same database table we used when we performed CRUD operations with Dapper (a lightweight OR-M) and with NpgSql, which is the library that performs bare-metal operations.
The first thing to do is, as usual, install the related NuGet package. Here we will need Npgsql.EntityFrameworkCore.PostgreSQL. Since I’ve used .NET 5, I have downloaded version 5.0.10.
Then, we need to define and configure the DB Context.
Define and configure DbContext
The idea behind Entity Framework is to create DB Context objects that map database tables to C# data sets. DB Contexts are the entry point to the tables, and the EF way to work with databases.
So, the first thing to do is to define a class that inherits from DbContext:
publicclassBoardGamesContext : DbContext
{
}
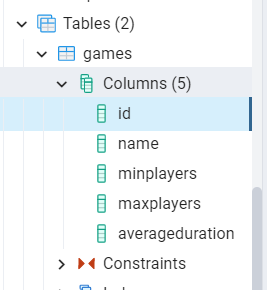
Within this class we define one or more DbSets, that represent the collections of data rows on their related DB table:
public DbSet<BoardGame> Games { get; set; }
Then we can configure this specific DbContext by overriding the OnConfiguring method and specifying some options; for example, you can specify the connection string:
Now that we have the BoardGamesContext ready we have to add its reference in the Startup class.
In the ConfigureServices method, add the following instruction:
services.AddDbContext<BoardGamesContext>();
With this instruction, you make the BoardGamesContext context available across the whole application.
You can further configure that context using an additional parameter of type Action<DbContextOptionsBuilder>. In this example, you can skip it, since we’ve already configured the BoardGamesContext using the OnConfiguring method. They are equivalent.
As we know, EF allows you to map DB rows to C# objects. So, we have to create a class and configure it in a way that allows EF Core to perform the mapping.
Now that the setup is complete, we can perform our CRUD operations. Entity Framework simplifies a lot the way to perform such types of operations, so we can move fast in this part.
There are two main points to remember:
to access the context we have to create a new instance of BoardGamesContext, which should be placed into a using block.
When performing operations that change the status of the DB (insert/update/delete rows), you have to explicitly call SaveChanges or SaveChangesAsync to apply those changes. This is useful when performing batch operations on one or more tables (for example, inserting an order in the Order table and updating the user address in the Users table).
Create
To add a new BoardGame, we have to initialize the BoardGamesContext context and add a new game to the Games DbSet.
publicasync Task Add(BoardGame game)
{
using (var db = new BoardGamesContext())
{
await db.Games.AddAsync(game);
await db.SaveChangesAsync();
}
}
Read
If you need a specific entity by its id you can use Find and FindAsync.
publicasync Task<BoardGame> Get(int id)
{
using (var db = new BoardGamesContext())
{
returnawait db.Games.FindAsync(id);
}
}
Or, if you need all the items, you can retrieve them by using ToListAsync
publicasync Task<IEnumerable<BoardGame>> GetAll()
{
using (var db = new BoardGamesContext())
{
returnawait db.Games.ToListAsync();
}
}
Update
Updating an item is incredibly straightforward: you have to call the Update method, and then save your changes with SaveChangesAsync.
publicasync Task Update(int id, BoardGame game)
{
using (var db = new BoardGamesContext())
{
db.Games.Update(game);
await db.SaveChangesAsync();
}
}
For some reason, EF does not provide an asynchronous way to update and remove items. I suppose that it’s done to prevent or mitigate race conditions.
Delete
Finally, to delete an item you have to call the Remove method and pass to it the game to be removed. Of course, you can retrieve that game using FindAsync.
publicasync Task Delete(int id)
{
using (var db = new BoardGamesContext())
{
var game = await db.Games.FindAsync(id);
if (game == null)
return;
db.Games.Remove(game);
await db.SaveChangesAsync();
}
}
Further readings
Entity Framework is impressive, and you can integrate it with tons of database vendors. In the link below you can find the full list. But pay attention that not all the libraries are implemented by the EF team, some are third-party libraries (like the one we used for Postgres):
This article concludes the series that explores 3 ways to perform CRUD operations on a Postgres database with C#.
In the first article, we’ve seen how to perform bare-metal queries using NpgSql. In the second article, we’ve used Dapper, which helps mapping queries results to C# DTOs. Finally, we’ve used Entity Framework to avoid writing SQL queries and have everything in place.
Which one is your favorite way to query relational databases?
If your application is exposed on the Web, I guess that you get some values from the HTTP Requests, don’t you?
Table of Contents
Just a second! 🫷 If you are here, it means that you are a software developer.
So, you know that storage, networking, and domain management have a cost .
If you want to support this blog, please ensure that you have disabled the adblocker for this site. I configured Google AdSense to show as few ADS as possible – I don’t want to bother you with lots of ads, but I still need to add some to pay for the resources for my site.
Thank you for your understanding. – Davide
If you are building an application that is exposed on the Web, you will probably need to read some data from the current HTTP Request or set some values on the HTTP Response.
In a .NET API, all the info related to both HTTP Request and HTTP Response is stored in a global object called HttpContext. How can you access it?
In this article, we will learn how to get rid of the old HttpContext.Current and what we can do to write more testable code.
Why not HttpContext directly
Years ago, we used to access the HttpContext directly in our code.
For example, if we had to access the Cookies collection, we used to do
var cookies = HttpContext.Current.Request.Cookies;
It worked, right. But this approach has a big problem: it makes our tests hard to set up.
In fact, we were using a static instance that added a direct dependency between the client class and the HttpContext.
That’s why the .NET team has decided to abstract the retrieval of that class: we now need to use IHttpContextAccessor.
Add IHttpContextAccessor
Now, I have this .NET project that exposes an endpoint, /WeatherForecast, that returns the current weather for a particular city, whose name is stored in the HTTP Header “data-location”.
The real calculation (well, real… everything’s fake, here 😅) is done by the WeatherService. In particular, by the GetCurrentWeather method.
public WeatherForecast GetCurrentWeather()
{
string currentLocation = GetLocationFromContext();
var rng = new Random();
returnnew WeatherForecast
{
TemperatureC = rng.Next(-20, 55),
Summary = Summaries[rng.Next(Summaries.Length)],
Location = currentLocation
};
}
We have to retrieve the current location.
As we said, we cannot anymore rely on the old HttpContext.Current.Request.
Instead, we need to inject IHttpContextAccessor in the constructor, and use it to access the Request object:
public WeatherService(IHttpContextAccessor httpContextAccessor)
{
    _httpContextAccessor = httpContextAccessor;
}
Once we have the instance of IHttpContextAccessor, we can use it to retrieve the info from the current HttpContext headers:
string currentLocation = "";

if (_httpContextAccessor.HttpContext.Request.Headers.TryGetValue("data-location", out StringValues locationHeaders) && locationHeaders.Any())
{
    currentLocation = locationHeaders.First();
}

return currentLocation;
Easy, right? We’re almost done.
Configure Startup class
If you run the application in this way, you will not be able to access the current HTTP request.
That’s because we haven’t specified that we want to add IHttpContextAccessor as a service in our application.
To do that, we have to update the ConfigureServices class by adding this instruction:
services.AddHttpContextAccessor();
Which comes from the Microsoft.Extensions.DependencyInjection namespace.
Now we can run the project!
If we call the endpoint specifying a City in the data-location header, we will see its value in the returned WeatherForecast object, in the Location field:
Further improvements
Is it enough?
If we use it this way, every class that needs to access the HTTP Context will have tests quite difficult to set up, because you will need to mock several objects.
In fact, for mocking HttpContext.Request.Headers, we need to create mocks for HttpContext, for Request, and for Headers.
This makes our tests harder to write and understand.
So, my suggestion is to wrap the HttpContext access in a separate class and expose only the methods you actually need.
For instance, you could wrap the access to HTTP Request Headers in the GetValueFromRequestHeader of an IHttpContextWrapper service:
In this way, you will be able to write better tests both for the HttpContextWrapper class, by focusing on the building of the HttpRequest, and for the WeatherService class, so that you can write tests without worrying about setting up complex structures just for retrieving a value.
But pay attention to the dependency lifescope! HTTP Requests info live within – guess what? – their HTTP Request. So, when defining the dependencies in the Startup class, remember to inject the IHttpContextWrapper as Transient or, even better, as Scoped. If you don’t remember the difference, I got you covered here!
Wrapping up
In this article, we’ve learned that you can access the current HTTP request by using IHttpContextAccessor. Of course, you can use it to update the Response too, for instance by adding an HTTP Header.
After 100 articles, I’ve found some neat ways to automate my blogging workflow. I will share my experience and the tools I use from the very beginning to the very end.
Table of Contents
Just a second! 🫷 If you are here, it means that you are a software developer.
So, you know that storage, networking, and domain management have a cost .
If you want to support this blog, please ensure that you have disabled the adblocker for this site. I configured Google AdSense to show as few ADS as possible – I don’t want to bother you with lots of ads, but I still need to add some to pay for the resources for my site.
Thank you for your understanding. – Davide
This is my 100th article 🥳 To celebrate it, I want to share with you the full process I use for writing and publishing articles.
In this article I will share all the automation and tools I use for writing, starting from the moment an idea for an article pops up in my mind to what happens weeks after an article has been published.
I hope to give you some ideas to speed up your publishing process. Of course, I’m open to suggestions to improve my own flow: perhaps (well, certainly), you use better tools and processes, so feel free to share them.
Introducing my blog architecture
To better understand what’s going on, I need a very brief overview of the architecture of my blog.
It is written in Gatsby, a framework based on ReactJS that, in short, allows you to transform Markdown files into blog posts (it does many other things, but they are not important for the purpose of this article).
So, all my blog is stored in a private GitHub repository. Every time I push some changes on the master branch, a new deployment is triggered, and I can see my changes in a bunch of minutes on my blog.
As I said, I use Gatsby. But the key point here is that my blog is stored in a GitHub repo: this means that everything you’ll read here is valid for any Headless CMS based on Git, such as Gatsby, Hugo, NextJS, and Jekyll.
Now that you know some general aspects, it’s time to deep dive into my writing process.
Before writing: organizing ideas with GitHub
My central source, as you might have already understood, is GitHub.
There, I write all my notes and keep track of the status of my articles.
Everything is quite well organized, and with the support of some automation, I can speed up my publishing process.
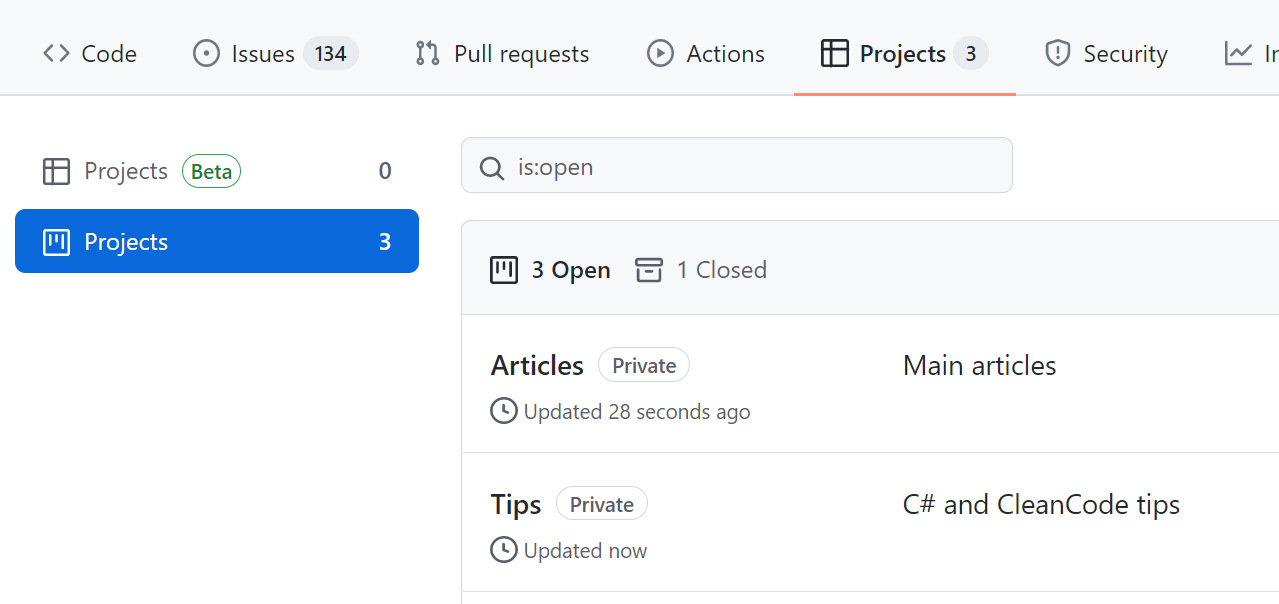
Github Projects to track the status of the articles
GitHub Projects are the parts of GitHub that allow you to organize GitHub Issues to track their status.
I’ve created 2 GitHub Projects: one for the main articles (like this one), and one for my C# and Clean Code Tips.
In this way, I can use different columns and have more flexibility when handling the status of the tasks.
GitHub issues templates
As I said, to write my notes I use GitHub issues.
When I add a new Issue, the first thing is to define which type of article I want to write. And, since sometimes many weeks or months pass between when I came up with the idea for an article and when I start writing it, I need to organize my ideas in a structured way.
To do that, I use GitHub templates. When I create a new Issue, I choose which kind of article I’m going to write.
Based on the layout, I can add different info. For instance, when I want to write a new “main” article, I see this form
which is prepopulated with some fields:
Title: with a placeholder ([Article] )
Content: with some sections (the titles, translated from Italian, mean Topics, Links, General notes)
Labels: I automatically assign the Article label to the issue (you’ll see later why I do that)
How can you create GitHub issue templates? All you need is a Markdown file under the .github/ISSUE_TEMPLATE folder with content similar to this one.
---
name: New article
about: New blog article
title: "[Article] - "
labels: Article
assignees: bellons91
---

## Argomenti

## Link

## Appunti vari
And you’re good to go!
GitHub action to assign issues to a project
Now I have GitHub Projects and different GitHub Issues Templates. How can I join the different parts? Well, with GitHub Actions!
With GitHub Actions, you can automate almost everything that happens in GitHub (and outside) using YAML files.
So, here’s mine:
For better readability, you can find the Gist here.
This action looks for opened and labeled issues and pull requests, and based on the value of the label it assigns the element to the correct project.
In this way, after I choose a template, filled the fields, and added additional labels (like C#, Docker, and so on), I can see my newly created issue directly in the Articles board. Neat 😎
Writing
Now it’s the time of writing!
As I said, I’m using Gatsby, so all my articles are stored in a GitHub repository and written in Markdown.
For every article I write, I use a separate git branch: in this way, I’m free to update the content already online (in case of a typo) without publishing my drafts.
But, of course, I automated it! 😎
Powershell script to scaffold a new article
Every article lives in its /content/posts/{year}/{folder-name}/article.md file. And they all have a cover image in a file named cover.png.
Also, every MD file begins with a Frontmatter section, like this:
---
title: "How I automated my publishing flow with Gatsby, GitHub, PowerShell and Azure"
path: "/blog/automate-articles-creations-github-powershell-azure"
tags: ["MainArticle"]
featuredImage: "./cover.png"
excerpt: "a description for 072-how-i-create-articles"
created: 4219-11-20
updated: 4219-11-20
---
But, you know, I was tired of creating everything from scratch. So I wrote a Powershell Script to do everything for me.
where article-creator.ps1 is the name of the file that contains the script.
Now I can simply run npm run create-article to have a new empty article in a new branch, already updated with everything published in the Master branch.
Markdown preview on VS Code
I use Visual Studio Code to write my articles: I like it because it’s quite fast and with lots of functionalities to write in Markdown (you can pick your favorites in the Extensions store).
One of my favorites is the Preview on Side. To see the result of your MarkDown on a side panel, press CTRL+SHIFT+P and select Open Preview to the Side.
Here’s what I can see right now while I’m writing:
Grammar check with Grammarly
Then, it’s time for a check on the Grammar. I use Grammarly, which helps me fix lots of errors (well, in the last time, only a few: it means I’ve improved a lot! 😎).
I copy the Markdown in their online editor, fix the issues, and copy it back into my repo.
Fun fact: the online editor recognizes that you’re using Markdown and automatically checks only the actual text, ignoring all the symbols you use in Markdown (like brackets).
Unprofessional, but fun, cover images
One of the tasks I like the most is creating my cover images.
I don’t use stock images, I prefer using less professional but more original cover images.
Creating and scheduling PR on GitHub with Templates and Actions
Now that my article is complete, I can set it as ready for being scheduled.
To do that, I open a Pull Request to the Master Branch, and, again, add some kind of automation!
I have created a PR template in an MD file, which I use to create a draft of the PR content.
In this way, I can define which task (so, which article) is related to this PR, using the “Closes” formula (“Closes #111174” means that I’m closing the Issue with ID 111174).
Also, I can define when this PR will be merged on Master, using the /schedule tag.
It works because I have integrated into my workflow a GitHub Action, merge-schedule, that reads the date from that field to understand when the PR must be merged.
So, every Tuesday at 8 AM, this action runs to check if there are any PRs that can be merged. If so, the PR will be merged into master, and the CI/CD pipeline builds the site and publishes the new content.
As usual, you can find the code of this action here
After the PR is merged, I also receive an email that notifies me of the action.
After publishing
Once a new article is online, I like to give it some visibility.
To do that, I heavily rely on Azure Logic Apps.
Azure Logic App for sharing on Twitter
My blog exposes an RSS feed. And, obviously, when a new article is created, a new item appears in the feed.
I use it to trigger an Azure Logic App to publish a message on Twitter:
The Logic App reads the newly published feed item and uses its metadata to create a message that will be shared on Twitter.
If you prefer, you can use a custom Azure Function! The choice is yours!
Cross-post reminder with Azure Logic Apps
Similarly, I use an Azure Logic App to send to myself an email to remind me to cross-post my articles to other platforms.
I’ve added a delay so that my content lives longer, and I can repost it even after weeks or months.
Unluckily, when I cross-post my articles I have to do it manually, This is quite a time-consuming especially when there are lots of images: in my MD files I use relative paths, so when porting my content to different platforms I have to find the absolute URL for my images.
And, my friends, this is everything that happens in the background of my blog!
What I’m still missing
I’ve added a lot of effort to my blog, and I’m incredibly proud of it!
But still, there are a few things I’d like to improve.
SEO Tools/analysis
I’ve never considered SEO. Or, better, Keywords.
I write for the sake of writing, and because I love it. And I don’t like to stuff my content with keywords just to rank better on search engines.
I take care of everything like alt texts, well-structured sections, and everything else. But I’m not able to follow the “rules” to find the best keywords.
Maybe I should use some SEO tools to find the best keywords for me. But I don’t want to bend to that way of creating content.
Also, I should spend more time thinking of the correct title and section titles.
Any idea?
Easy upgrade of Gatsby/Migrate to other headless CMSs
Lastly, I’d like to find another theme or platform and leave the one I’m currently using.
Not because I don’t like it. But because many dependencies are outdated, and the theme I’m using hasn’t been updated since 2019.
Wrapping up
That’s it: in this article, I’ve explained everything that I do when writing a blog post.
Feel free to take inspiration from my automation to improve your own workflow, and contact me if you have some nice improvements or ideas: I’m all ears!
Logs are important. Properly structured logs can be the key to resolving some critical issues. With Serilog’s Scopes, you can enrich your logs with info about the context where they happened.
Table of Contents
Just a second! 🫷 If you are here, it means that you are a software developer.
So, you know that storage, networking, and domain management have a cost .
If you want to support this blog, please ensure that you have disabled the adblocker for this site. I configured Google AdSense to show as few ADS as possible – I don’t want to bother you with lots of ads, but I still need to add some to pay for the resources for my site.
Thank you for your understanding. – Davide
Even though it’s not one of the first things we usually set up when creating a new application, logging is a real game-changer in the long run.
When an error occurred, if we have proper logging we can get more info about the context where it happened so that we can easily identify the root cause.
In this article, we will use Scopes, one of the functionalities of Serilog, to create better logs for our .NET 6 application. In particular, we’re going to create a .NET 6 API application in the form of Minimal APIs.
We will also use Seq, just to show you the final result.
To summarize, Serilog is an open source .NET library for logging. One of the best features of Serilog is that messages are in the form of a template (called Structured Logs), and you can enrich the logs with some value automatically calculated, such as the method name or exception details.
To add Serilog to your application, you simply have to run dotnet add package Serilog.AspNetCore.
Since we’re using Minimal APIs, we don’t have the StartUp file anymore; instead, we will need to add it to the Program.cs file:
As you can see, we’re injecting an ILogger<ItemsRepository>: specifying the related class automatically adds some more context to the logs that we will generate.
Installing Seq and adding it as a Sink
Seq is a logging platform that is a perfect fit for Serilog logs. If you don’t have it already installed, head to their download page and install it locally (you can even install it as a Docker container 🤩).
In the installation wizard, you can select the HTTP port that will expose its UI. Once everything is in place, you can open that page on your localhost and see a page like this:
On this page, we will see all the logs we write.
But wait! ⚠ We still have to add Seq as a sink for Serilog.
A sink is nothing but a destination for the logs. When using .NET APIs we can define our sinks both on the appsettings.json file and on the Program.cs file. We will use the second approach.
First of all, you will need to install a NuGet package to add Seq as a sink: dotnet add package Serilog.Sinks.Seq.
Then, you have to update the Serilog definition we’ve seen before by adding a .WriteTo.Seq instruction:
Notice that we’ve specified also the port that exposes our Seq instance.
Now, every time we log something, we will see our logs both on the Console and on Seq.
How to add scopes
The time has come: we can finally learn how to add Scopes using Serilog!
Setting up the example
For this example, I’ve created a simple controller, ItemsController, which exposes two endpoints: Get and Add. With these two endpoints, we are able to add and retrieve items stored in an in-memory collection.
This class has 2 main dependencies: IItemsRepository and IUsersItemsRepository. Each of these interfaces has its own concrete class, each with a private logger injected in the constructor:
public ItemsRepository(ILogger<ItemsRepository> logger)
{
    _logger = logger;
}
and, similarly
public UsersItemRepository(ILogger<UsersItemRepository> logger)
{
    _logger = logger;
}
How do those classes use their own _logger instances?
For example, the UsersItemRepository class exposes an AddItem method that adds a specific item to the list of items already possessed by a specific user.
publicvoid AddItem(string username, Item item)
{
if (!_usersItems.ContainsKey(username))
{
_usersItems.Add(username, new List<Item>());
_logger.LogInformation("User was missing from the list. Just added");
}
_usersItems[username].Add(item);
_logger.LogInformation("Added item for to the user's catalogue");
}
We are logging some messages, such as “User was missing from the list. Just added”.
Something similar happens in the ItemsRepository class, where we have a GetItem method that returns the required item if it exists, and null otherwise.
[HttpPost(Name = "AddItems")]public IActionResult Add(string userName, int itemId)
{
var item = _itemsRepository.GetItem(itemId);
if (item == null)
{
_logger.LogWarning("Item does not exist");
return NotFound();
}
_usersItemsRepository.AddItem(userName, item);
return Ok(item);
}
Ok then, we’re ready to run the application and see the result.
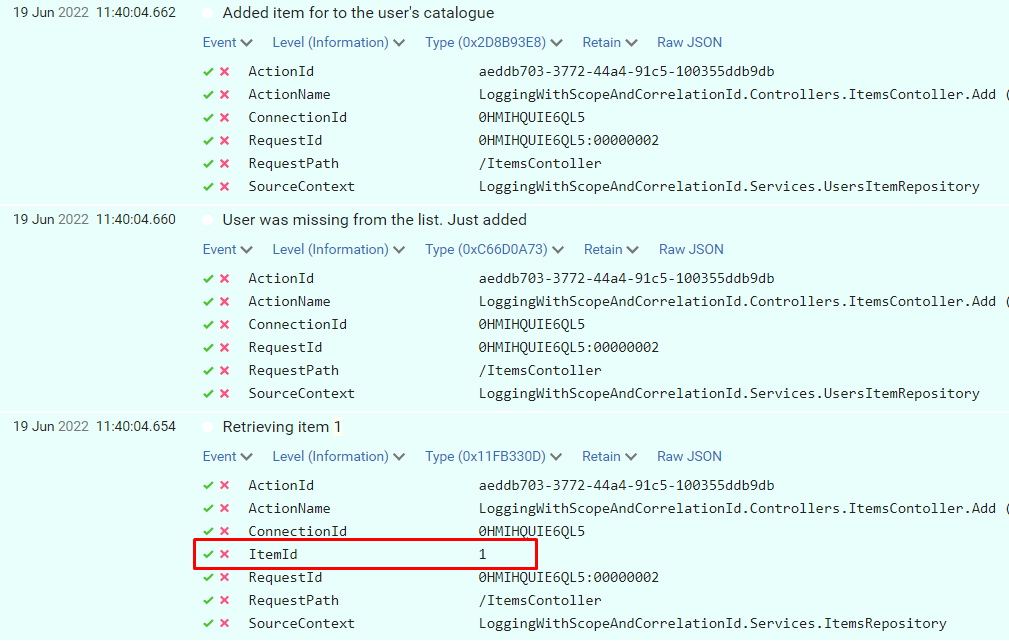
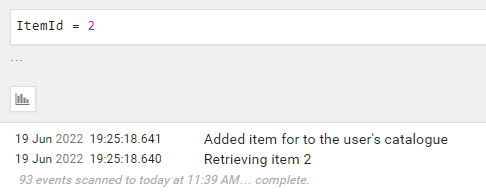
When I call that endpoint by passing “davide” as userName and “1” as itemId, we can see these logs:
We can see the 3 log messages but they are unrelated one each other. In fact, if we expand the logs to see the actual values we’ve logged, we can see that only the “Retrieving item 1” log has some information about the item ID we want to associate with the user.
Using BeginScope with Serilog
Finally, it’s time to define the Scope.
It’s as easy as adding a simple using statement; see how I added the scope to the Add method in the Controller:
[HttpPost(Name = "AddItems")]public IActionResult Add(string userName, int itemId)
{
using (_logger.BeginScope("Adding item {ItemId} for user {UserName}", itemId, userName))
{
var item = _itemsRepository.GetItem(itemId);
if (item == null)
{
_logger.LogWarning("Item does not exist");
return NotFound();
}
_usersItemsRepository.AddItem(userName, item);
return Ok(item);
}
}
Here’s the key!
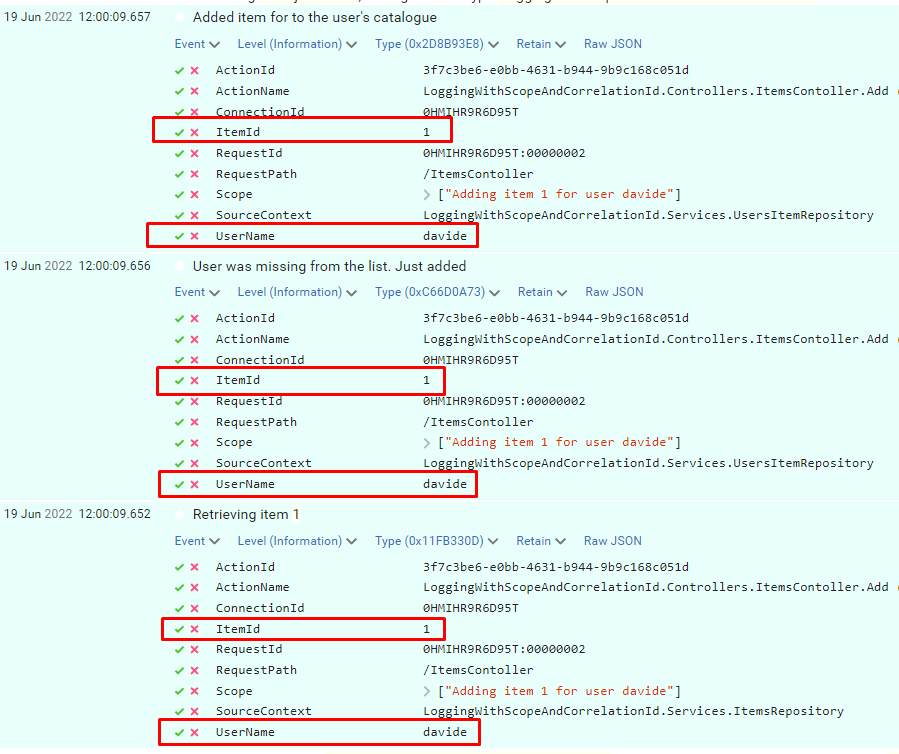
using (_logger.BeginScope("Adding item {ItemId} for user {UserName}", itemId, userName))
With this single instruction, we are actually performing 2 operations:
we are adding a Scope to each message – “Adding item 1 for user davide”
we are adding ItemId and UserName to each log entry that falls in this block, in every method in the method chain.
Let’s run the application again, and we will see this result:
So, now you can use these new properties to get some info about the context of when this log happened, and you can use the ItemId and UserName fields to search for other related logs.
You can also nest scopes, of course.
Why scopes instead of Correlation ID?
You might be thinking
Why can’t I just use correlation IDs?
Well, the answer is pretty simple: correlation IDs are meant to correlate different logs in a specific request, and, often, across services. You generally use Correlation IDs that represent a specific call to your API and act as a Request ID.
For sure, that can be useful. But, sometimes, not enough.
Using scopes you can also “correlate” distinct HTTP requests that have something in common.
If I call 2 times the AddItem endpoint, I can filter both for UserName and for ItemId and see all the related logs across distinct HTTP calls.
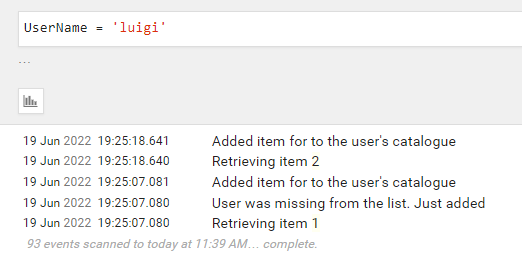
Let’s see a real example: I have called the endpoint with different values
id=1, username=“davide”
id=1, username=“luigi”
id=2, username=“luigi”
Since the scope reference both properties, we can filter for UserName and discover that Luigi has added both Item1 and Item 2.
At the same time, we can filter by ItemId and discover that the item with id = 2 has been added only once.
Ok, then, in the end, Scopes or Correlation IDs? The answer is simple:
Then, you might want to deep dive into Serilog’s BeginScope. Here’s a neat article by Nicholas Blumhardt. Also, have a look at the comments, you’ll find interesting points to consider
A suitable constructor for type ‘X’ could not be located. What a strange error message! Luckily it’s easy to solve.
Table of Contents
Just a second! 🫷 If you are here, it means that you are a software developer.
So, you know that storage, networking, and domain management have a cost .
If you want to support this blog, please ensure that you have disabled the adblocker for this site. I configured Google AdSense to show as few ADS as possible – I don’t want to bother you with lots of ads, but I still need to add some to pay for the resources for my site.
Thank you for your understanding. – Davide
A few days ago I was preparing the demo for a new article. The demo included a class with an IHttpClientFactory service injected into the constructor. Nothing more.
Then, running the application (well, actually, executing the code), this error popped out:
System.InvalidOperationException: A suitable constructor for type ‘X’ could not be located. Ensure the type is concrete and all parameters of a public constructor are either registered as services or passed as arguments. Also ensure no extraneous arguments are provided.
How to solve it? It’s easy. But first, let me show you what I did in the wrong version.
Setting up the wrong example
For this example, I created an elementary project.
It’s a .NET 7 API project, with only one controller, GenderController, which calls another service defined in the IGenderizeService interface.
IGenderizeService is implemented by a class, GenderizeService, which is the one that fails to load and, therefore, causes the exception to be thrown. The class calls an external endpoint, parses the result, and then returns it to the caller:
publicclassGenderizeService : IGenderizeService
{
privatereadonly IHttpClientFactory _httpClientFactory;
public GenderizeService(IHttpClientFactory httpClientFactory)
{
_httpClientFactory = httpClientFactory;
}
publicasync Task<GenderProbability> GetGenderProbabiliy(string name)
{
var httpClient = _httpClientFactory.CreateClient();
var response = await httpClient.GetAsync($"?name={name}");
var result = await response.Content.ReadFromJsonAsync<GenderProbability>();
return result;
}
}
Finally, I’ve defined the services in the Program class, and then I’ve specified which is the base URL for the HttpClient instance generated in the GenderizeService class:
// some codebuilder.Services.AddScoped<IGenderizeService, GenderizeService>();
builder.Services.AddHttpClient<IGenderizeService, GenderizeService>(
            client => client.BaseAddress = new Uri("https://api.genderize.io/")
        );
var app = builder.Build();
// some more code
That’s it! Can you spot the error?
2 ways to solve the error
The error was quite simple, but it took me a while to spot:
In the constructor I was injecting an IHttpClientFactory:
public GenderizeService(IHttpClientFactory httpClientFactory)
while in the host definition I was declaring an HttpClient for a specific class:
We no longer need to call _httpClientFactory.CreateClient because the injected instance of HttpClient is already customized with the settings we’ve defined at Startup.
Further readings
I’ve briefly talked about HttpClientFactory in one article of my C# tips series:
Cyberattacks aren’t slowing down—they’re getting bolder and smarter. From phishing scams to ransomware outbreaks, the number of incidents has doubled or even tripled year over year. In today’s hybrid, multi-vendor IT landscape, protecting your organization’s digital assets requires choosing the top XDR vendor that can see and stop threats across every possible entry point.
Over the last five years, XDR (Extended Detection and Response) has emerged as one of the most promising cybersecurity innovations. Leading IT analysts agree: XDR solutions will play a central role in the future of cyber defense. But not all XDR platforms are created equal. Success depends on how well an XDR vendor integrates Endpoint Protection Platforms (EPP) and Endpoint Detection and Response (EDR) to detect, analyze, and neutralize threats in real time.
This guide will explain what makes a great XDR vendor and how Seqrite XDR compares to industry benchmarks. It also includes a practical checklist for confidently evaluating your next security investment.
Why Choosing the Right XDR Vendor Matters
Your XDR platform isn’t just another security tool; it’s the nerve center of your threat detection and response strategy. The best solutions act as a central brain, collecting security telemetry from:
Endpoints
Networks
Firewalls
Email
Identity systems
DNS
They don’t just collect this data, they correlate it intelligently, filter out the noise, and give your security team actionable insights to respond faster.
According to industry reports, over 80% of IT and cybersecurity professionals are increasing budgets for threat detection and response. If you choose the wrong vendor, you risk fragmented visibility, alert fatigue, and missed attacks.
Key Capabilities Every Top XDR Vendor Should Offer
When shortlisting top XDR vendors, here’s what to look for:
Advanced Threat Detection – Identify sophisticated, multi-layer attack patterns that bypass traditional tools.
Risk-Based Prioritization – Assign scores (1–1000) so you know which threats truly matter.
Unified Visibility – A centralized console to eliminate security silos.
Integration Flexibility – Native and third-party integrations to protect existing investments.
Automation & Orchestration – Automate repetitive workflows to respond in seconds, not hours.
MITRE ATT&CK Mapping – Know exactly which attacker tactics and techniques you can detect.
Remember, it’s the integration of EPP and EDR that makes or breaks an XDR solution’s effectiveness.
Your Unified Detection & Response Checklist
Use this checklist to compare vendors on a like-for-like basis:
Full telemetry coverage: Endpoints, networks, firewalls, email, identity, and DNS.
Native integration strength: Smooth backend-to-frontend integration for consistent coverage.
Real-time threat correlation: Remove false positives, detect real attacks faster.
Proactive security posture: Shift from reactive to predictive threat hunting.
MITRE ATT&CK alignment: Validate protection capabilities against industry-recognized standards.
Why Automation Is the Game-Changer
The top XDR vendors go beyond detection, they optimize your entire security operation. Automated playbooks can instantly execute containment actions when a threat is detected. Intelligent alert grouping cuts down on noise, preventing analyst burnout.
Automation isn’t just about speed; it’s about cost savings. A report by IBM Security shows that organizations with full automation save over ₹31 crore annually and detect/respond to breaches much faster than those relying on manual processes.
The Seqrite XDR Advantage
Seqrite XDR combines advanced detection, rich telemetry, and AI-driven automation into a single, unified platform. It offers:
Seamless integration with Seqrite Endpoint Protection (EPP) and Seqrite Endpoint Detection & Response (EDR) and third party telemetry sources.
MITRE ATT&CK-aligned visibility to stay ahead of attackers.
Automated playbooks to slash response times and reduce manual workload.
Unified console for complete visibility across your IT ecosystem.
GenAI-powered SIA (Seqrite Intelligent Assistant) – Your AI-Powered Virtual Security Analyst. SIA offers predefined prompts and conversational access to incident and alert data, streamlining investigations and making it faster for analysts to understand, prioritize, and respond to threats.
In a market crowded with XDR solutions, Seqrite delivers a future-ready, AI-augmented platform designed for today’s threats and tomorrow’s unknowns.
If you’re evaluating your next security investment, start with a vendor who understands the evolving threat landscape and backs it up with a platform built for speed, intelligence, and resilience.
Propagating HTTP Headers can be useful, especially when dealing with Correlation IDs. It’s time to customize our HttpClients!
Table of Contents
Just a second! 🫷 If you are here, it means that you are a software developer.
So, you know that storage, networking, and domain management have a cost .
If you want to support this blog, please ensure that you have disabled the adblocker for this site. I configured Google AdSense to show as few ADS as possible – I don’t want to bother you with lots of ads, but I still need to add some to pay for the resources for my site.
Thank you for your understanding. – Davide
Imagine this: you have a system made up of different applications that communicate via HTTP. There’s some sort of entry point, exposed to the clients, that orchestrates the calls to the other applications. How do you correlate those requests?
A good idea is to use a Correlation ID: one common approach for HTTP-based systems is passing a value to the “public” endpoint using HTTP headers; that value will be passed to all the other systems involved in that operation to say that “hey, these incoming requests in the internal systems happened because of THAT SPECIFIC request in the public endpoint”. Of course, it’s more complex than this, but you got the idea.
Now. How can we propagate an HTTP Header in .NET? I found this solution on GitHub, provided by no less than David Fowler. In this article, I’m gonna dissect his code to see how he built this solution.
Important update: there’s a NuGet package that implements these functionalities: Microsoft.AspNetCore.HeaderPropagation. Consider this article as an excuse to understand what happens behind the scenes of an HTTP call, and use it to learn how to customize and extend those functionalities. Here’s how to integrate that package.
Just interested in the C# methods?
As I said, I’m not reinventing anything new: the source code I’m using for this article is available on GitHub (see link above), but still, I’ll paste the code here, for simplicity.
First of all, we have two extension methods that add some custom functionalities to the IServiceCollection.
It’s quite easy: if you want to propagate the my-correlation-id header for all the HttpClients created in your application, you just have to add this line to your Startup method.
This class lies in the middle of the HTTP Request pipeline. It can extend the functionalities of HTTP Clients because it inherits from System.Net.Http.DelegatingHandler.
If you recall from a previous article, the SendAsync method is the real core of any HTTP call performed using .NET’s HttpClients, and here we’re enriching that method by propagating some HTTP headers.
protectedoverride Task<HttpResponseMessage> SendAsync(HttpRequestMessage request, System.Threading.CancellationToken cancellationToken)
{
if (_contextAccessor.HttpContext != null)
{
foreach (var headerName in _options.HeaderNames)
{
// Get the incoming header valuevar headerValue = _contextAccessor.HttpContext.Request.Headers[headerName];
if (StringValues.IsNullOrEmpty(headerValue))
{
continue;
}
request.Headers.TryAddWithoutValidation(headerName, (string[])headerValue);
}
}
returnbase.SendAsync(request, cancellationToken);
}
By using _contextAccessor we can access the current HTTP Context. From there, we retrieve the current HTTP headers, check if one of them must be propagated (by looking up _options.HeaderNames), and finally, we add the header to the outgoing HTTP call by using TryAddWithoutValidation.
Notice that we’ve used `TryAddWithoutValidation` instead of `Add`: in this way, we can use whichever HTTP header key we want without worrying about invalid names (such as the ones with a new line in it). Invalid header names will simply be ignored, as opposed to the Add method that will throw an exception.
Finally, we continue with the HTTP call by executing `base.SendAsync`, passing the `HttpRequestMessage` object now enriched with additional headers.
Using HttpMessageHandlerBuilder to configure how HttpClients must be built
The Microsoft.Extensions.Http.IHttpMessageHandlerBuilderFilter interface allows you to apply some custom configurations to the HttpMessageHandlerBuilder right before the HttpMessageHandler object is built.
The Configure method allows you to customize how the HttpMessageHandler will be built: we are adding a new instance of the HeaderPropagationMessageHandler class we’ve seen before to the current HttpMessageHandlerBuilder’s AdditionalHandlers collection. All the handlers registered in the list will then be used to build the HttpMessageHandler object we’ll use to send and receive requests.
Here, we’re gonna extend the IServiceCollection with those functionalities. At first, we’re adding AddHttpContextAccessor, which allows us to access the current HTTP Context (the one we’ve used in the HeaderPropagationMessageHandler class).
Then, services.ConfigureAll(configure) registers an HeaderPropagationOptions that will be used by HeaderPropagationMessageHandlerBuilderFilter. Without that line, we won’t be able to specify the names of the headers to be propagated.
Honestly, I haven’t understood it thoroughly: I thought that it allows us to use more than one class implementing IHttpMessageHandlerBuilderFilter, but apparently if we create a sibling class and add them both using Add, everything works the same. If you know what this line means, drop a comment below! 👇
Wherever you access the ServiceCollection object (may it be in the Startup or in the Program class), you can propagate HTTP headers for every HttpClient by using
Yes, AddHeaderPropagation is the method we’ve seen in the previous paragraph!
Seeing it in action
Now we have all the pieces in place.
It’s time to run it 😎
To fully understand it, I strongly suggest forking this repository I’ve created and running it locally, placing some breakpoints here and there.
As a recap: in the Program class, I’ve added these lines to create a named HttpClient specifying its BaseAddress property. Then I’ve added the HeaderPropagation as we’ve seen before.
There’s also a simple Controller that acts as an entry point and that, using an HttpClient, sends data to another endpoint (the one defined in the previous snippet).
[HttpPost]publicasync Task<IActionResult> PostAsync([FromQuery] stringvalue)
{
var item = new Item(value);
var httpClient = _httpClientFactory.CreateClient("items");
await httpClient.PostAsJsonAsync("/", item);
return NoContent();
}
What happens at start-up time
When a .NET application starts up, the Main method in the Program class acts as an entry point and registers all the dependencies and configurations required.
We will then call builder.Services.AddHeaderPropagation, which is the method present in the HeaderPropagationExtensions class.
All the configurations are then set, but no actual operations are being executed.
The application then starts normally, waiting for incoming requests.
What happens at runtime
Now, when we call the PostAsync method by passing an HTTP header such as my-correlation-id:123, things get interesting.
The first operation is
var httpClient = _httpClientFactory.CreateClient("items");
While creating the HttpClient, the engine is calling all the registered IHttpMessageHandlerBuilderFilter and calling their Configure method. So, you’ll see the execution moving to HeaderPropagationMessageHandlerBuilderFilter’s Configure.
Of course, you’re also executing the HeaderPropagationMessageHandler constructor.
The HttpClient is now ready: when we call httpClient.PostAsJsonAsync("/", item) we’re also executing all the registered DelegatingHandler instances, such as our HeaderPropagationMessageHandler. In particular, we’re executing the SendAsync method and adding the required HTTP Headers to the outgoing HTTP calls.
We will then see the same HTTP Header on the destination endpoint.
If you’re not sure about what are extension methods (and you cannot respond to this question: How does inheritance work with extension methods?), then you can have a look at this article:
APIs often call other APIs to perform operations. If an error occurs in one of them, how can you understand the context that caused that error? You can use Correlation IDs in your logs!
Table of Contents
Just a second! 🫷 If you are here, it means that you are a software developer.
So, you know that storage, networking, and domain management have a cost .
If you want to support this blog, please ensure that you have disabled the adblocker for this site. I configured Google AdSense to show as few ADS as possible – I don’t want to bother you with lots of ads, but I still need to add some to pay for the resources for my site.
Thank you for your understanding. – Davide
Correlation IDs are values that are passed across different systems to correlate the operations performed during a “macro” operation.
Most of the time they are passed as HTTP Headers – of course in systems that communicate via HTTP.
In this article, we will learn how to log those Correlation IDs using Serilog, a popular library that helps handle logs in .NET applications.
Setting up the demo dotNET project
This article is heavily code-oriented. So, let me first describe the demo project.
Overview of the project
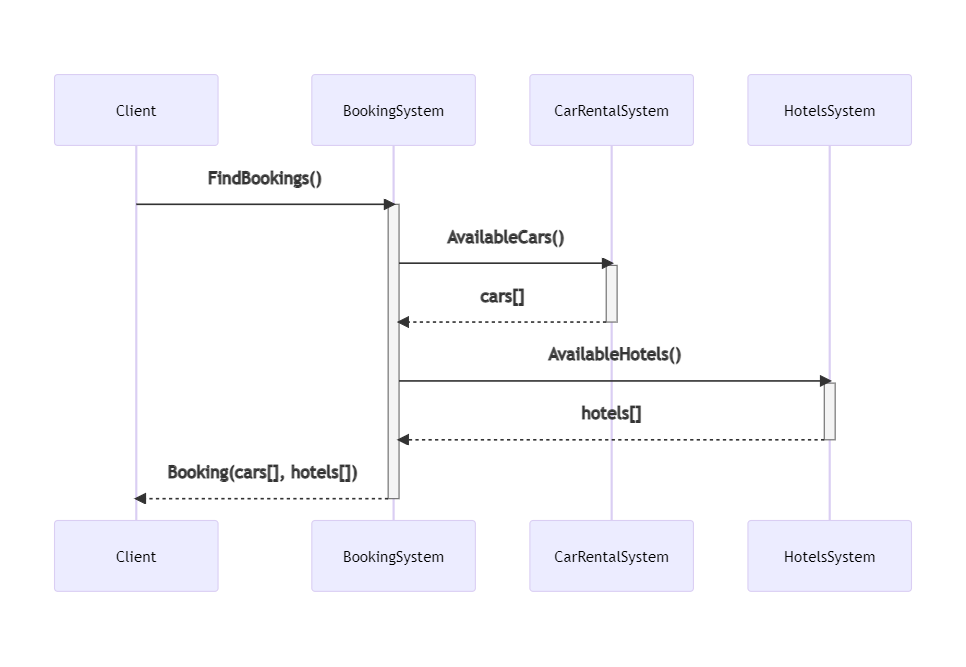
To demonstrate how to log Correlation IDs and how to correlate logs generated by different systems, I’ve created a simple solution that handles bookings for a trip.
The “main” project, BookingSystem, fetches data from external systems by calling some HTTP endpoints; it then manipulates the data and returns an aggregate object to the caller.
BookingSystem depends on two projects, placed within the same solution: CarRentalSystem, which returns data about the available cars in a specified date range, and HotelsSystem, which does the same for hotels.
So, this is the data flow:
If an error occurs in any of those systems, can we understand the full story of the failed request? No. Unless we use Correlation IDs!
Let’s see how to add them and how to log them.
We need to propagate HTTP Headers. You could implement it from scratch, as we’ve seen in a previous article. Or we could use a native library that does it all for us.
Of course, let’s go with the second approach.
For every project that will propagate HTTP headers, we have to follow these steps.
First, we need to install Microsoft.AspNetCore.HeaderPropagation: this NuGet package allows us to add the .NET classes needed to propagate HTTP headers.
Next, we have to update the part of the project that we use to configure our application. For .NET projects with Minimal APIs, it’s the Program class.
Here we need to add the capability to read the HTTP Context, by using
builder.Services.AddHttpContextAccessor();
As you can imagine, this is needed because, to propagate HTTP Headers, we need to know which are the incoming HTTP Headers. And they can be read from the HttpContext object.
Next, we need to specify, as a generic behavior, which headers must be propagated. For instance, to propagate the “my-custom-correlation-id” header, you must add
Since you probably know what’s going on, let me go straight to the point.
Install Serilog Enricher for Correlation IDs
We’re gonna use a specific library to log HTTP Headers treating them as Correlation IDs. To use it, you have to install the Serilog.Enrichers.CorrelationId package available on NuGet.
Therefore, you can simply run
dotnet add Serilog.Enrichers.CorrelationId
to every .NET project that will use this functionality.
Once we have that NuGet package ready, we can add its functionality to our logger by adding this line:
This simple line tells dotnet that, when we see an HTTP Header named “my-custom-correlation-id”, we should log it as a Correlation ID.
Run it all together
Now we have everything in place – it’s time to run it!
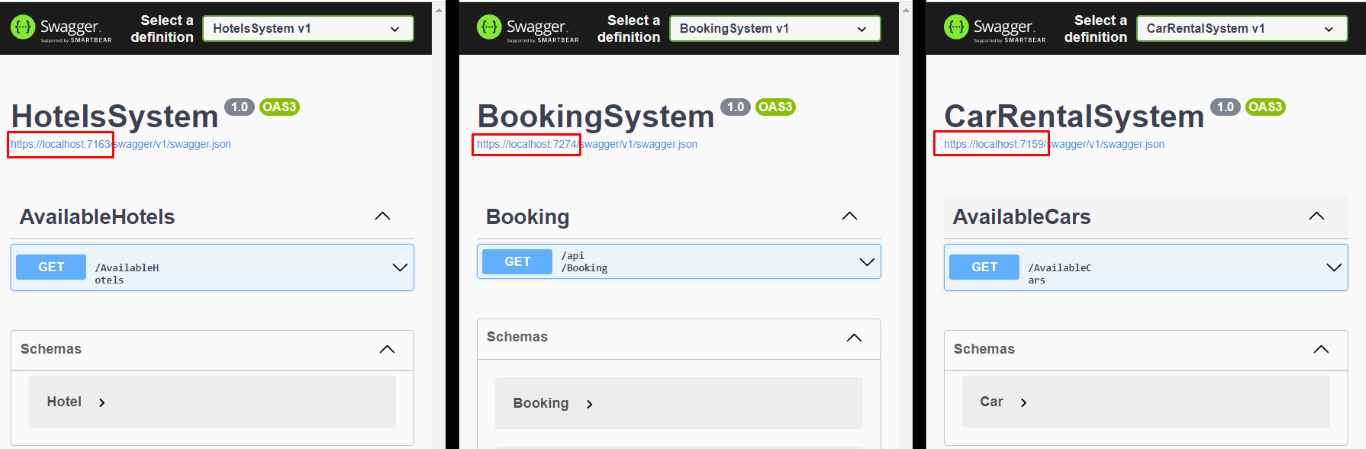
We have to run all the 3 services at the same time (you can do it with VisualStudio or you can run them separately using a CMD), and we need to have Seq installed on our local machine.
You will see 3 instances of Swagger, and each instance is running under a different port.
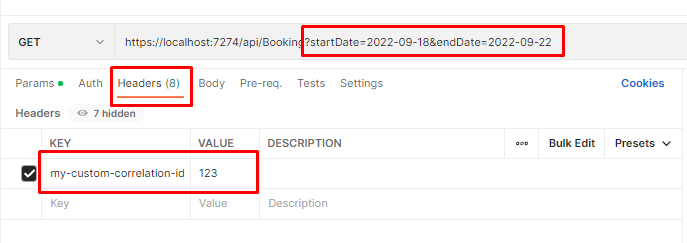
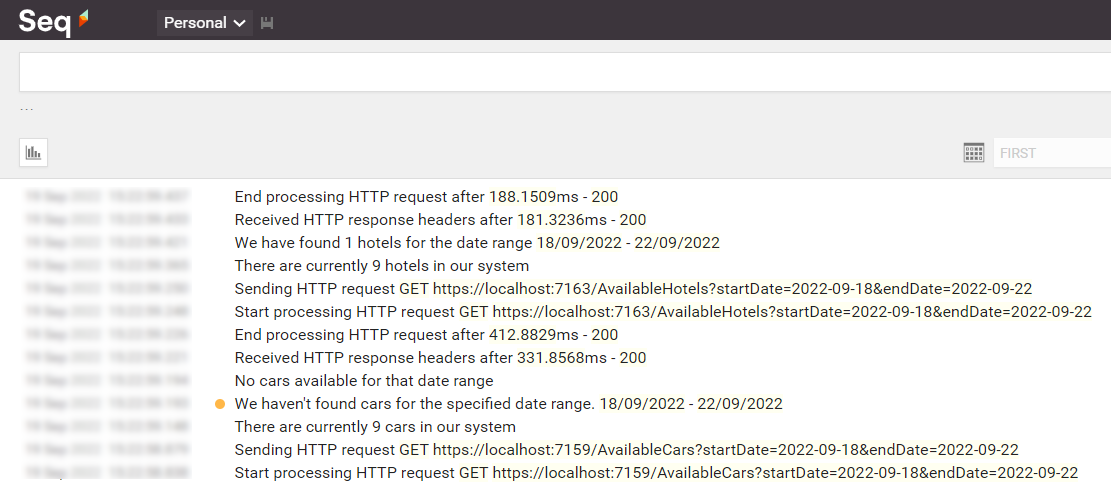
Once we have all the 3 applications up and running, we can call the /Bookings endpoint passing it a date range and an HTTP Header with key “my-custom-correlation-id” and value = “123” (or whatever we want).
If everything worked as expected, we can open Seq and see all the logs we’ve written in our applications:
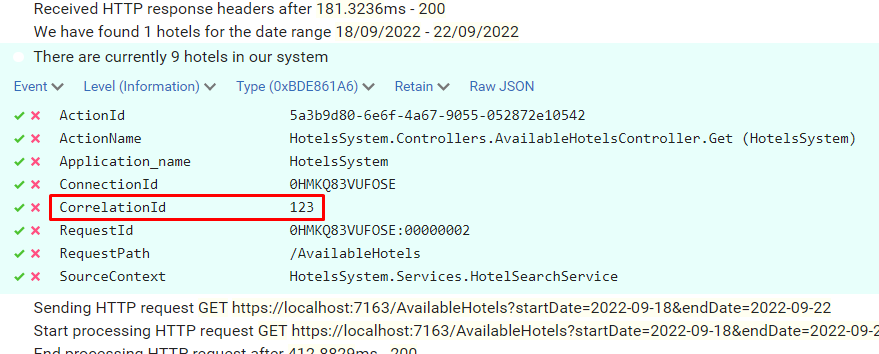
Open one of them and have a look at the attributes of the logs: you will see a CorrelationId field with the value set to “123”.
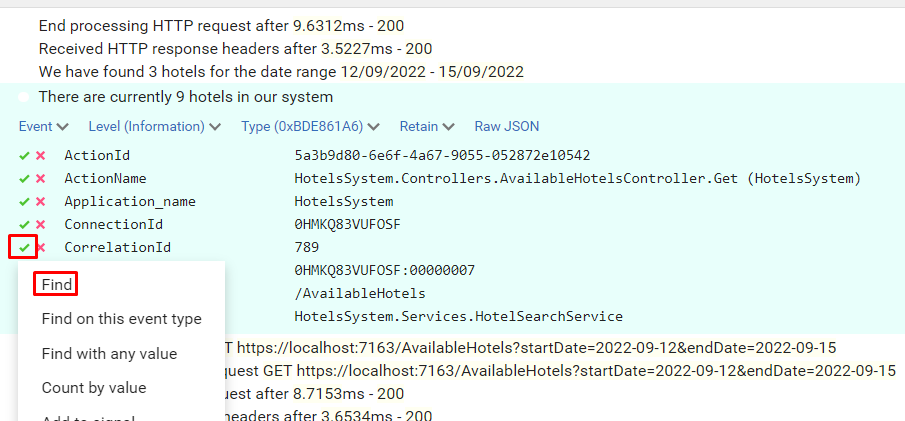
Now, to better demonstrate how it works, call the endpoint again, but this time set “789” as my-custom-correlation-id, and specify a different date range. You should be able to see another set of logs generated by this second call.
You can now apply filters to see which logs are related to a specific Correlation ID: open one log, click on the tick button and select “Find”.
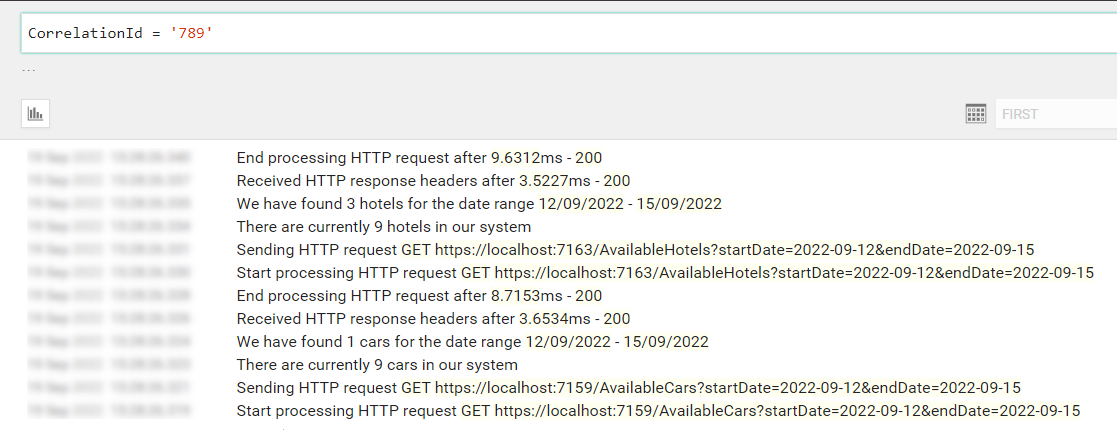
You will then see all and only logs that were generated during the call with header my-custom-correlation-id set to “789”.
Further readings
That’s it. With just a few lines of code, you can dramatically improve your logging strategy.
For this article, we’ve used the Microsoft.AspNetCore.HeaderPropagation package, which is ready to use. Are you interested in building your own solution – or, at least, learning how you can do that?
This article concludes a sort of imaginary path that taught us how to use Serilog, how to correlate different logs within the same application using Scopes, and how to correlate logs from different services using Correlation IDs.
Using these capabilities, you will be able to write logs that can help you understand the context in which a specific log occurred, thus helping you fix errors more efficiently.
In the ever-evolving cybersecurity landscape, attackers constantly seek new ways to bypass traditional defences. One of the latest and most insidious methods involves using Scalable Vector Graphics (SVG)—a file format typically associated with clean, scalable images for websites and applications. But beneath their seemingly harmless appearance, SVGs can harbour threatening scripts capable of executing sophisticated phishing attacks.
This blog explores how SVGs are weaponized, why they often evade detection, and what organizations can do to protect themselves.
SVGs: More Than Just Images
SVG files differ fundamentally from standard image formats like JPEG or PNG. Instead of storing pixel data, SVGs use XML-based code to define vector paths, shapes, and text. This makes them ideal for responsive design, as they scale without losing quality. However, this same structure allows SVGs to contain embedded JavaScript, which can execute when the file is opened in a browser—something that happens by default on many Windows systems.
Delivery
Email Attachments: Sent via spear-phishing emails with convincing subject lines and sender impersonation.
Cloud Storage Links: Shared through Dropbox, Google Drive, OneDrive, etc., often bypassing email filters.
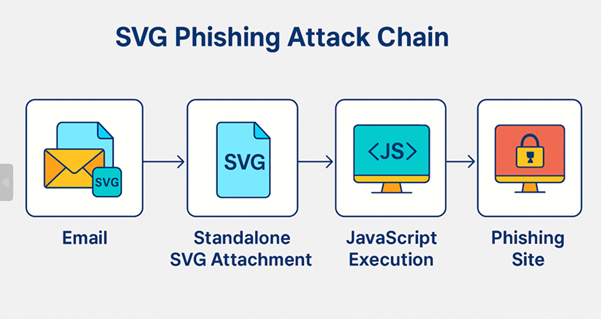
Fig:1 Attack chain of SVG campaign
The image illustrates the SVG phishing attack chain in four distinct stages: it begins with an email containing a seemingly harmless SVG attachment, which, when opened, triggers JavaScript execution in the browser, ultimately redirecting the user to a phishing site designed to steal credentials.
How the attack works:
When a target receives an SVG attachment and opens an email, the file typically launches in their default web browser—unless they have a specific application set to handle SVG files—allowing any embedded scripts to execute immediately.
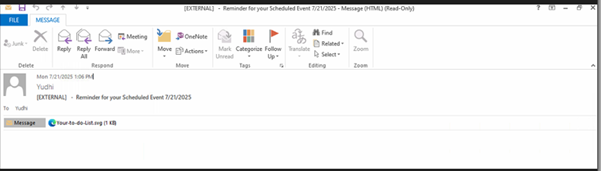
Fig2: Phishing Email of SVG campaign
Attackers commonly send phishing emails with deceptive subject lines like “Reminder for your Scheduled Event 7212025.msg” or “Meeting-Reminder-7152025.msg”, paired with innocuous-looking attachments named “Upcoming Meeting.svg” or “Your-to-do-List.svg” to avoid raising suspicion. Once opened, the embedded JavaScript within the SVG file silently redirects the victim to a phishing site that closely mimics trusted services like Microsoft 365 or Google Workspace. As shown in fig.
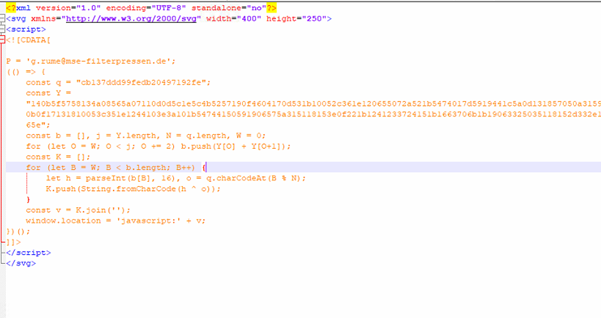
Fig3: Malicious SVG code.
In the analyzed SVG sample, the attacker embeds a <script> tag within the SVG, using a CDATA section to hide malicious logic. The code includes a long hex-encoded string (Y) and a short XOR key (q), which decodes into a JavaScript payload when processed. This decoded payload is then executed using window.location = ‘javascript:’ + v;, effectively redirecting the victim to a phishing site upon opening the file. An unused email address variable (g.rume@mse-filterpressen.de) is likely a decoy or part of targeted delivery.
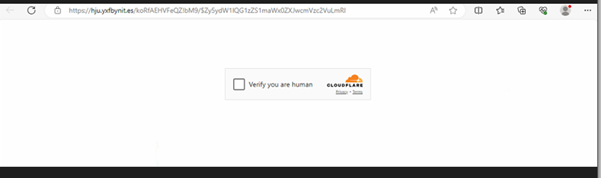
Upon decryption, we found the c2c phishing link as
hxxps://hju[.]yxfbynit[.]es/koRfAEHVFeQZ!bM9
Fig4: Cloudflare CAPTCHA gate
The link directs to a phishing site protected by a Cloudflare CAPTCHA gate. After you check the box to verify, you’re human then you’re redirected to a malicious page controlled by the attackers.
Fig5: Office 365 login form
This page embeds a genuine-looking Office 365 login form, allowing the phishing group to capture and validate your email and password credentials simultaneously.
Conclusion: Staying Ahead of SVG-Based Threats
As attackers continue to innovate, organizations must recognize the hidden risks in seemingly benign file formats like SVG. Security teams should:
Implement deep content inspection for SVG files.
Disable automatic browser rendering of SVGs from untrusted sources.
Educate employees about the risks of opening unfamiliar attachments.
Monitor for unusual redirects and script activity in email and web traffic.
SVGs may be powerful tools for developers, but in the wrong hands, they can become potent weapons for cybercriminals. Awareness and proactive defense are key to staying ahead of this emerging threat.