برچسب: .NET

  • How to add Dependency Injection, Configurations, and Logging in a .NET 7 Console Application | Code4IT

    How to add Dependency Injection, Configurations, and Logging in a .NET 7 Console Application | Code4IT


    By default, you cannot use Dependency Injection, custom logging, and configurations from settings in a Console Application. Unless you create a custom Host!

    Table of Contents

    Just a second! 🫷
    If you are here, it means that you are a software developer.
    So, you know that storage, networking, and domain management have a cost .

    If you want to support this blog, please ensure that you have disabled the adblocker for this site.
    I configured Google AdSense to show as few ADS as possible – I don’t want to bother you with lots of ads, but I still need to add some to pay for the resources for my site.

    Thank you for your understanding.
    Davide

    Sometimes, you just want to create a console application to run a complex script. Just because it is a “simple” console application, it doesn’t mean that you should not use best practices, such as using Dependency Injection.

    Also, you might want to test the code: Dependency Injection allows you to test the behavior of a class without having a strict dependency on the referenced concrete classes: you can use stubs and mocks, instead.

    In this article, we’re going to learn how to add Dependency Injection in a .NET 7 console application. The same approach can be used for other versions of .NET. We will also add logging, using Serilog, and configurations coming from an appsettings.json file.

    We’re going to start small, with the basic parts, and gradually move on to more complex scenarios. We’re gonna create a simple, silly console application: we will inject a bunch of services, and print a message on the console.

    We have a root class:

    public class NumberWorker
    {
        private readonly INumberService _service;
    
        public NumberWorker(INumberService service) => _service = service;
    
        public void PrintNumber()
        {
            var number = _service.GetPositiveNumber();
            Console.WriteLine($"My wonderful number is {number}");
        }
    }
    

    that injects an INumberService, implemented by NumberService:

    public interface INumberService
    {
        int GetPositiveNumber();
    }
    
    public class NumberService : INumberService
    {
        private readonly INumberRepository _repo;
    
        public NumberService(INumberRepository repo) => _repo = repo;
    
        public int GetPositiveNumber()
        {
            int number = _repo.GetNumber();
            return Math.Abs(number);
        }
    }
    

    which, in turn, uses an INumberRepository implemented by NumberRepository:

    public interface INumberRepository
    {
        int GetNumber();
    }
    
    public class NumberRepository : INumberRepository
    {
        public int GetNumber()
        {
            return -42;
        }
    }
    

    The console application will create a new instance of NumberWorker and call the PrintNumber method.

    Now, we have to build the dependency tree and inject such services.

    How to create an IHost to use a host for a Console Application

    The first step to take is to install some NuGet packages that will allow us to add a custom IHost container so that we can add Dependency Injection and all the customization we usually add in projects that have a StartUp (or a Program) class, such as .NET APIs.

    We need to install 2 NuGet packages: Microsoft.Extensions.Hosting.Abstractions and Microsoft.Extensions.Hosting will be used to create a new IHost that will be used to build the dependencies tree.

    By navigating your csproj file, you should be able to see something like this:

    <ItemGroup>
        <PackageReference Include="Microsoft.Extensions.Hosting" Version="7.0.1" />
        <PackageReference Include="Microsoft.Extensions.Hosting.Abstractions" Version="7.0.0" />
    </ItemGroup>
    

    Now we are ready to go! First, add the following using statements:

    using Microsoft.Extensions.DependencyInjection;
    using Microsoft.Extensions.Hosting;
    

    and then, within the Program class, add this method:

    private static IHost CreateHost() =>
      Host.CreateDefaultBuilder()
          .ConfigureServices((context, services) =>
          {
              services.AddSingleton<INumberRepository, NumberRepository>();
              services.AddSingleton<INumberService, NumberService>();
          })
          .Build();
    }
    

    Host.CreateDefaultBuilder() creates the default IHostBuilder – similar to the IWebHostBuilder, but without any reference to web components.

    Then we add all the dependencies, using services.AddSingleton<T, K>. Notice that it’s not necessary to add services.AddSingleton<NumberWorker>: when we will use the concrete instance, the dependency tree will be resolved, without the need of having an indication of the root itself.

    Finally, once we have everything in place, we call Build() to create a new instance of IHost.

    Now, we just have to run it!

    In the Main method, create the IHost instance by calling CreateHost(). Then, by using the ActivatorUtilities class (coming from the Microsoft.Externsions.DependencyInjection namespace), create a new instance of NumberWorker, so that you can call PrintNumber();

    private static void Main(string[] args)
    {
      IHost host = CreateHost();
      NumberWorker worker = ActivatorUtilities.CreateInstance<NumberWorker>(host.Services);
      worker.PrintNumber();
    }
    

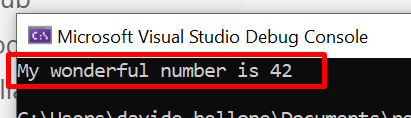
    Now you are ready to run the application, and see the message on the console:

    Basic result on Console

    Read configurations from appsettings.json for a Console Library

    We want to make our system configurable and place our configurations in an appsettings.json file.

    As we saw in a recent article 🔗, we can use IOptions<T> to inject configurations in the constructor. For the sake of this article, I’m gonna use a POCO class, NumberConfig, that is mapped to a configuration section and injected into the classes.

    public class NumberConfig
    {
        public int DefaultNumber { get; set; }
    }
    

    Now we need to manually create an appsettings.json file within the project folder, and add a new section that will hold the values of the configuration:

    {
      "Number": {
        "DefaultNumber": -899
      }
    }
    

    and now we can add the configuration binding in our CreateHost() method, within the ConfigureServices section:

    services.Configure<NumberConfig>(context.Configuration.GetSection("Number"));
    

    Finally, we can update the NumberRepository to accept the configurations in input and use them to return the value:

    public class NumberRepository : INumberRepository
    {
        private readonly NumberConfig _config;
    
        public NumberRepository(IOptions<NumberConfig> options) => _config = options.Value;
    
        public int GetNumber() => _config.DefaultNumber;
    }
    

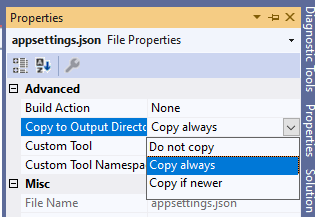
    Run the project to admire the result, and… BOOM! It will not work! You should see the message “My wonderful number is 0”, even though the number we set on the config file is -899.

    This happens because we must include the appsettings.json file in the result of the compilation. Right-click on that file, select the Properties menu, and set the “Copy to Output Directory” to “Copy always”:

    Copy always the appsettings file to the Output Directory

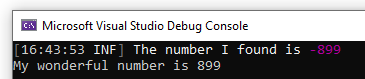
    Now, build and run the project, and you’ll see the correct message: “My wonderful number is 899”.

    Clearly, the same values can be accessed via IConfigurations.

    Add Serilog logging to log on Console and File

    Finally, we can add Serilog logs to our console applications – as well as define Sinks.

    To add Serilog, you first have to install these NuGet packages:

    • Serilog.Extensions.Hosting and Serilog.Formatting.Compact to add the basics of Serilog;
    • Serilog.Settings.Configuration to read logging configurations from settings (if needed);
    • Serilog.Sinks.Console and Serilog.Sinks.File to add the Console and the File System as Sinks.

    Let’s get back to the CreateHost() method, and add a new section right after ConfigureServices:

    .UseSerilog((context, services, configuration) => configuration
        .ReadFrom.Configuration(context.Configuration)
        .ReadFrom.Services(services)
        .Enrich.FromLogContext()
        .WriteTo.Console()
        .WriteTo.File($"report-{DateTimeOffset.UtcNow.ToString("yyyy-MM-dd-HH-mm-ss")}.txt", restrictedToMinimumLevel: LogEventLevel.Warning)
        )
    

    Here we’re telling that we need to read the config from Settings, add logging context, and write both on Console and on File (only if the log message level is greater or equal than Warning).

    Then, add an ILogger here and there, and admire the final result:

    Serilog Logging is visible on the Console

    Final result

    To wrap up, here’s the final implementation of the Program class and the
    CreateHost method:

    private static void Main(string[] args)
    {
        IHost host = CreateHost();
        NumberWorker worker = ActivatorUtilities.CreateInstance<NumberWorker>(host.Services);
        worker.PrintNumber();
    }
    
    private static IHost CreateHost() =>
      Host
      .CreateDefaultBuilder()
      .ConfigureServices((context, services) =>
      {
          services.Configure<NumberConfig>(context.Configuration.GetSection("Number"));
    
          services.AddSingleton<INumberRepository, NumberRepository>();
          services.AddSingleton<INumberService, NumberService>();
      })
      .UseSerilog((context, services, configuration) => configuration
          .ReadFrom.Configuration(context.Configuration)
          .ReadFrom.Services(services)
          .Enrich.FromLogContext()
          .WriteTo.Console()
          .WriteTo.File($"report-{DateTimeOffset.UtcNow.ToString("yyyy-MM-dd-HH-mm-ss")}.txt", restrictedToMinimumLevel: LogEventLevel.Warning)
          )
      .Build();
    

    Further readings

    As always, a few resources to learn more about the topics discussed in this article.

    First and foremost, have a look at this article with a full explanation of Generic Hosts in a .NET Core application:

    🔗 .NET Generic Host in ASP.NET Core | Microsoft docs

    Then, if you recall, we’ve already learned how to print Serilog logs to the Console:

    🔗 How to log to Console with .NET Core and Serilog | Code4IT

    This article first appeared on Code4IT 🐧

    Lastly, we accessed configurations using IOptions<NumberConfig>. Did you know that there are other ways to access config?

    🔗 Understanding IOptions, IOptionsMonitor, and IOptionsSnapshot in .NET 7 | Code4IT

    as well as defining configurations for your project?

    🔗 3 (and more) ways to set configuration values in .NET | Code4IT

    Wrapping up

    In this article, we’ve learned how we can customize a .NET Console application to use dependency injection, external configurations, and Serilog logging.

    I hope you enjoyed this article! Let’s keep in touch on Twitter or LinkedIn! 🤜🤛

    Happy coding!

    🐧


    Source link

  • [ENG] .NET 5, 6, and 7 for busy developers | Dotnet Sheff


    [ENG] .NET 5, 6, and 7 for busy developers | Dotnet Sheff


    Source link

  • Advanced Integration Tests for .NET 7 API with WebApplicationFactory and NUnit &vert; Code4IT

    Advanced Integration Tests for .NET 7 API with WebApplicationFactory and NUnit | Code4IT


    Integration Tests are incredibly useful: a few Integration Tests are often more useful than lots of Unit Tests. Let’s learn some advanced capabilities of WebApplicationFactory.

    Table of Contents

    Just a second! 🫷
    If you are here, it means that you are a software developer.
    So, you know that storage, networking, and domain management have a cost .

    If you want to support this blog, please ensure that you have disabled the adblocker for this site.
    I configured Google AdSense to show as few ADS as possible – I don’t want to bother you with lots of ads, but I still need to add some to pay for the resources for my site.

    Thank you for your understanding.
    Davide

    In a previous article, we learned a quick way to create Integration Tests for ASP.NET API by using WebApplicationFactory. That was a nice introductory article. But now we will delve into more complex topics and examples.

    In my opinion, a few Integration Tests and just the necessary number of Unit tests are better than hundreds of Unit Tests and no Integration Tests at all. In general, the Testing Diamond should be preferred over the Testing Pyramid (well, in most cases).

    In this article, we are going to create advanced Integration Tests by defining custom application settings, customizing dependencies to be used only during tests, defining custom logging, and performing complex operations in our tests.

    For the sake of this article, I created a sample API application that exposes one single endpoint whose purpose is to retrieve some info about the URL passed in the query string. For example,

    GET /SocialPostLink?uri=https%3A%2F%2Ftwitter.com%2FBelloneDavide%2Fstatus%2F1682305491785973760
    

    will return

    {
      "instanceName": "Real",
      "info": {
        "socialNetworkName": "Twitter",
        "sourceUrl": "https://twitter.com/BelloneDavide/status/1682305491785973760",
        "username": "BelloneDavide",
        "id": "1682305491785973760"
      }
    }
    

    For completeness, instanceName is a value coming from the appsettings.json file, while info is an object that holds some info about the social post URL passed as input.

    Internally, the code is using the Chain of Responsibility pattern: there is a handler that “knows” if it can handle a specific URL; if so, it just elaborates the input; otherwise, it calls the next handler.

    There is also a Factory that builds the chain, and finally, a Service that instantiates the Factory and then resolves the dependencies.

    As you can see, this solution can become complex. We could run lots of Unit Tests to validate that the Chain of Responsibility works as expected. We can even write a Unit Tests suite for the Factory.

    Class Diagram

    But, at the end of the day, we don’t really care about the internal structure of the project: as long as it works as expected, we could even use a huge switch block (clearly, with all the consequences of this choice). So, let’s write some Integration Tests.

    How to create a custom WebApplicationFactory in .NET

    When creating Integration Tests for .NET APIs you have to instantiate a new instance of WebApplicationFactory, a class coming from the Microsoft.AspNetCore.Mvc.Testing NuGet Package.

    Since we are going to define it once and reuse it across all the tests, let’s create a new class that extends WebApplicationFactory, and add some custom behavior to it.

    public class IntegrationTestWebApplicationFactory : WebApplicationFactory<Program>
    {
    
    }
    

    Let’s focus on the Program class: as you can see, the WebApplicationFactory class requires an entry point. Generally speaking, it’s the Program class of our application.

    If you hover on WebApplicationFactory<Program> and hit CTRL+. on Visual Studio, the autocomplete proposes two alternatives: one is the Program class defined in your APIs, while the other one is the Program class defined in Microsoft.VisualStudio.TestPlatform.TestHost. Choose the one for your API application! The WebApplicationFactory class will then instantiate your API following the instructions defined in your Program class, thus resolving all the dependencies and configurations as if you were running your application locally.

    What to do if you don’t have the Program class? If you use top-level statements, you don’t have the Program class, because it’s “implicit”. So you cannot reference the whole class. Unless… You have to create a new partial class named Program, and leave it empty: this way, you have a class name that can be used to reference the API definition:

    public partial class Program { }
    

    Here you can override some definitions of the WebHost to be created by calling ConfigureWebHost:

    public class IntegrationTestWebApplicationFactory : WebApplicationFactory<Program>
    {
        protected override void ConfigureWebHost(IWebHostBuilder builder)
        {
              builder.ConfigureAppConfiguration((host, configurationBuilder) => { });
        }
    }
    

    How to use WebApplicationFactory in your NUnit tests

    It’s time to start working on some real Integration Tests!

    As we said before, we have only one HTTP endpoint, defined like this:

    
    private readonly ISocialLinkParser _parser;
    private readonly ILogger<SocialPostLinkController> _logger;
    private readonly IConfiguration _config;
    
    public SocialPostLinkController(ISocialLinkParser parser, ILogger<SocialPostLinkController> logger, IConfiguration config)
    {
        _parser = parser;
        _logger = logger;
        _config = config;
    }
    
    [HttpGet]
    public IActionResult Get([FromQuery] string uri)
    {
        _logger.LogInformation("Received uri {Uri}", uri);
        if (Uri.TryCreate(uri, new UriCreationOptions {  }, out Uri _uri))
        {
            var linkInfo = _parser.GetLinkInfo(_uri);
            _logger.LogInformation("Uri {Uri} is of type {Type}", uri, linkInfo.SocialNetworkName);
    
            var instance = new Instance
            {
                InstanceName = _config.GetValue<string>("InstanceName"),
                Info = linkInfo
            };
            return Ok(instance);
        }
        else
        {
            _logger.LogWarning("Uri {Uri} is not a valid Uri", uri);
            return BadRequest();
        }
    }
    

    We have 2 flows to validate:

    • If the input URI is valid, the HTTP Status code should be 200;
    • If the input URI is invalid, the HTTP Status code should be 400;

    We could simply write Unit Tests for this purpose, but let me write Integration Tests instead.

    First of all, we have to create a test class and create a new instance of IntegrationTestWebApplicationFactory. Then, we will create a new HttpClient every time a test is run that will automatically include all the services and configurations defined in the API application.

    public class ApiIntegrationTests : IDisposable
    {
        private IntegrationTestWebApplicationFactory _factory;
        private HttpClient _client;
    
        [OneTimeSetUp]
        public void OneTimeSetup() => _factory = new IntegrationTestWebApplicationFactory();
    
        [SetUp]
        public void Setup() => _client = _factory.CreateClient();
    
        public void Dispose() => _factory?.Dispose();
    }
    

    As you can see, the test class implements IDisposable so that we can call Dispose() on the IntegrationTestWebApplicationFactory instance.

    From now on, we can use the _client instance to work with the in-memory instance of the API.

    One of the best parts of it is that, since it’s an in-memory instance, we can even debug our API application. When you create a test and put a breakpoint in the production code, you can hit it and see the actual values as if you were running the application in a browser.

    Now that we have the instance of HttpClient, we can create two tests to ensure that the two cases we defined before are valid. If the input string is a valid URI, return 200:

    [Test]
    public async Task Should_ReturnHttp200_When_UrlIsValid()
    {
        string inputUrl = "https://twitter.com/BelloneDavide/status/1682305491785973760";
    
        var result = await _client.GetAsync($"SocialPostLink?uri={inputUrl}");
    
        Assert.That(result.StatusCode, Is.EqualTo(HttpStatusCode.OK));
    }
    

    Otherwise, return Bad Request:

    [Test]
    public async Task Should_ReturnBadRequest_When_UrlIsNotValid()
    {
        string inputUrl = "invalid-url";
    
        var result = await _client.GetAsync($"/SocialPostLink?uri={inputUrl}");
    
        Assert.That(result.StatusCode, Is.EqualTo(HttpStatusCode.BadRequest));
    }
    

    How to create test-specific configurations using InMemoryCollection

    WebApplicationFactory is highly configurable thanks to the ConfigureWebHost method. For instance, you can customize the settings injected into your services.

    Usually, you want to rely on the exact same configurations defined in your appsettings.json file to ensure that the system behaves correctly with the “real” configurations.

    For example, I defined the key “InstanceName” in the appsettings.json file whose value is “Real”, and whose value is used to create the returned Instance object. We can validate that that value is being read from that source as validated thanks to this test:

    [Test]
    public async Task Should_ReadInstanceNameFromSettings()
    {
        string inputUrl = "https://twitter.com/BelloneDavide/status/1682305491785973760";
    
        var result = await _client.GetFromJsonAsync<Instance>($"/SocialPostLink?uri={inputUrl}");
    
        Assert.That(result.InstanceName, Is.EqualTo("Real"));
    }
    

    But some other times you might want to override a specific configuration key.

    The ConfigureAppConfiguration method allows you to customize how you manage Configurations by adding or removing sources.

    If you want to add some configurations specific to the WebApplicationFactory, you can use AddInMemoryCollection, a method that allows you to add configurations in a key-value format:

    protected override void ConfigureWebHost(IWebHostBuilder builder)
    {
        builder.ConfigureAppConfiguration((host, configurationBuilder) =>
        {
            configurationBuilder.AddInMemoryCollection(
                new List<KeyValuePair<string, string?>>
                {
                    new KeyValuePair<string, string?>("InstanceName", "FromTests")
                });
        });
    }
    

    Even if you had the InstanceName configured in your appsettings.json file, the value is now overridden and set to FromTests.

    You can validate this change by simply replacing the expected value in the previous test:

    [Test]
    public async Task Should_ReadInstanceNameFromSettings()
    {
        string inputUrl = "https://twitter.com/BelloneDavide/status/1682305491785973760";
    
        var result = await _client.GetFromJsonAsync<Instance>($"/SocialPostLink?uri={inputUrl}");
    
        Assert.That(result.InstanceName, Is.EqualTo("FromTests"));
    }
    

    If you also want to discard all the other existing configuration sources, you can call configurationBuilder.Sources.Clear() before AddInMemoryCollection and remove all the other existing configurations.

    How to set up custom dependencies for your tests

    Maybe you don’t want to resolve all the existing dependencies, but just a subset of them. For example, you might not want to call external APIs with a limited number of free API calls to avoid paying for the test-related calls. You can then rely on Stub classes that simulate the dependency by giving you full control of the behavior.

    We want to replace an existing class with a Stub one: we are going to create a stub class that will be used instead of SocialLinkParser:

    public class StubSocialLinkParser : ISocialLinkParser
    {
        public LinkInfo GetLinkInfo(Uri postUri) => new LinkInfo
        {
            SocialNetworkName = "test from stub",
            Id = "test id",
            SourceUrl = postUri,
            Username = "test username"
        };
    }
    

    We can then customize Dependency Injection to use StubSocialLinkParser in place of SocialLinkParser by specifying the dependency within the ConfigureTestServices method:

    builder.ConfigureTestServices(services =>
    {
        services.AddScoped<ISocialLinkParser, StubSocialLinkParser>();
    });
    

    Finally, we can create a method to validate this change:

    [Test]
    public async Task Should_UseStubName()
    {
        string inputUrl = "https://twitter.com/BelloneDavide/status/1682305491785973760";
    
        var result = await _client.GetFromJsonAsync<Instance>($"/SocialPostLink?uri={inputUrl}");
    
        Assert.That(result.Info.SocialNetworkName, Is.EqualTo("test from stub"));
    }
    

    How to create Integration Tests on specific resolved dependencies

    Now we are going to test that the SocialLinkParser does its job, regardless of the internal implementation. Right now we have used the Chain of Responsibility pattern, and we rely on the ISocialLinksFactory interface to create the correct sequence of handlers. But we don’t know in the future how we will define the code: maybe we will replace it all with a huge if-else sequence – the most important part is that the code works, regardless of the internal implementation.

    We can proceed in two ways: writing tests on the interface or writing tests on the concrete class.

    For the sake of this article, we are going to run tests on the SocialLinkParser class. Not the interface, but the concrete class. The first step is to add the class to the DI engine in the Program class:

    builder.Services.AddScoped<SocialLinkParser>();
    

    Now we can create a test to validate that it is working:

    [Test]
    public async Task Should_ResolveDependency()
    {
        using (var _scope = _factory.Services.CreateScope())
        {
            var service = _scope.ServiceProvider.GetRequiredService<SocialLinkParser>();
            Assert.That(service, Is.Not.Null);
            Assert.That(service, Is.AssignableTo<SocialLinkParser>());
        }
    }
    

    As you can see, we are creating an IServiceScope by calling _factory.Services.CreateScope(). Since we have to discard this scope after the test run, we have to place it within a using block. Then, we can create a new instance of SocialLinkParser by calling _scope.ServiceProvider.GetRequiredService<SocialLinkParser>() and create all the tests we want on the concrete implementation of the class.

    The benefit of this approach is that you have all the internal dependencies already resolved, without relying on mocks. You can then ensure that everything, from that point on, works as you expect.

    Here I created the scope within a using block. There is another approach that I prefer: create the scope instance in the SetUp method, and call Dispose() on it the the TearDown phase:

    protected IServiceScope _scope;
    protected SocialLinkParser _sut;
    private IntegrationTestWebApplicationFactory _factory;
    
    [OneTimeSetUp]
    public void OneTimeSetup() => _factory = new IntegrationTestWebApplicationFactory();
    
    [SetUp]
    public void Setup()
    {
        _scope = _factory.Services.CreateScope();
        _sut = _scope.ServiceProvider.GetRequiredService<SocialLinkParser>();
    }
    
    [TearDown]
    public void TearDown()
    {
        _sut = null;
        _scope.Dispose();
    }
    
    public void Dispose() => _factory?.Dispose();
    

    You can see an example of the implementation here in the SocialLinkParserTests class.

    Where are my logs?

    Sometimes you just want to see the logs generated by your application to help you debug an issue (yes, you can simply debug the application!). But, unless properly configured, the application logs will not be available to you.

    But you can add logs to the console easily by customizing the adding the Console sink in your ConfigureTestServices method:

    builder.ConfigureTestServices(services =>
    {
        services.AddLogging(builder => builder.AddConsole().AddDebug());
    });
    

    Now you will be able to see all the logs you generated in the Output panel of Visual Studio by selecting the Tests source:

    Logs appear in the Output panel of VisualStudio

    Beware that you are still reading the configurations for logging from the appsettings file! If you have specified in your project to log directly to a sink (such as DataDog or SEQ), your tests will send those logs to the specified sinks. Therefore, you should get rid of all the other logging sources by calling ClearProviders():

    services.AddLogging(builder => builder.ClearProviders() .AddConsole().AddDebug());
    

    Full example

    In this article, we’ve configured many parts of our WebApplicationFactory. Here’s the final result:

    public class IntegrationTestWebApplicationFactory : WebApplicationFactory<Program>
    {
        protected override void ConfigureWebHost(IWebHostBuilder builder)
        {
            builder.ConfigureAppConfiguration((host, configurationBuilder) =>
            {
                // Remove other settings sources, if necessary
                configurationBuilder.Sources.Clear();
    
                //Create custom key-value pairs to be used as settings
                configurationBuilder.AddInMemoryCollection(
                    new List<KeyValuePair<string, string?>>
                    {
                        new KeyValuePair<string, string?>("InstanceName", "FromTests")
                    });
            });
    
            builder.ConfigureTestServices(services =>
            {
                //Add stub classes
                services.AddScoped<ISocialLinkParser, StubSocialLinkParser>();
    
                //Configure logging
                services.AddLogging(builder => builder.ClearProviders().AddConsole().AddDebug());
            });
        }
    }
    

    You can find the source code used for this article on my GitHub; feel free to download it and toy with it!

    Further readings

    This is an in-depth article about Integration Tests in .NET. I already wrote an article about it with a simpler approach that you might enjoy:

    🔗 How to run Integration Tests for .NET API | Code4IT

    This article first appeared on Code4IT 🐧

    As I often say, a few Integration Tests are often more useful than a ton of Unit Tests. Focusing on Integration Tests instead that on Unit Tests has the benefit of ensuring that the system behaves correctly regardless of the internal implementation.

    In this article, I used the Chain of Responsibility pattern, so Unit Tests would be tightly coupled to the Handlers. If we decided to move to another pattern, we would have to delete all the existing tests and rewrite everything from scratch.

    Therefore, in my opinion, the Testing Diamond is often more efficient than the Testing Pyramid, as I explained here:

    🔗 Testing Pyramid vs Testing Diamond (and how they affect Code Coverage) | Code4IT

    Wrapping up

    This was a huge article, I know.

    Again, feel free to download and run the example code I shared on my GitHub.

    I hope you enjoyed this article! Let’s keep in touch on Twitter or LinkedIn! 🤜🤛

    Happy coding!

    🐧


    Source link

  • Pre-commit hooks with Husky.NET – build, format, and test your .NET application before a Git commit &vert; Code4IT

    Pre-commit hooks with Husky.NET – build, format, and test your .NET application before a Git commit | Code4IT


    A Git commit represents the status of a system. Learn how to validate that your code builds, is well-formatted, and all the tests pass by adding a Git hook!

    Table of Contents

    Just a second! 🫷
    If you are here, it means that you are a software developer.
    So, you know that storage, networking, and domain management have a cost .

    If you want to support this blog, please ensure that you have disabled the adblocker for this site.
    I configured Google AdSense to show as few ADS as possible – I don’t want to bother you with lots of ads, but I still need to add some to pay for the resources for my site.

    Thank you for your understanding.
    Davide

    If you need to run operations before completing a Git commit, you can rely on Git Hooks.

    Git hooks are scripts that run automatically whenever a particular event occurs in a Git repository. They let you customize Git’s internal behaviour and trigger customizable actions at key points in the development life cycle.

    Extending Git hooks allows you to plug in custom functionalities to the regular Git flow, such as Git message validation, code formatting, etc.

    I’ve already described how to use Husky with NPM, but here I’m gonna use Husky.NET, the version of Husky created for .NET-based applications.

    Git hooks: a way to extend Git operations

    As we said, Git hooks are actions that run during specific phases of Git operations.

    Git hooks fall into 4 categories:

    • client-side hooks related to the committing workflow: they execute when you run git commit on your local repository;
    • client-side hooks related to the email workflow: they are executed when running git am, which is a command that allows you to integrate mails and Git repositories (I’ve never used it. If you are interested in this functionality, here’s the official documentation);
    • client-side hooks related to other operations: these hooks run on your local repository when performing operations like git rebase;
    • server-side hooks: they run after a commit is received on the remote repository, and they can reject a git push operation.

    Let’s focus on the client-side hooks that run when you commit changes using git commit.

    Hook name Description
    pre-commit This hook is the first invoked by git commit (if you don’t use the -m flag, it is invoked before asking you to insert a commit message) and can be used to inspect the snapshot that is about to be committed.
    prepare-commit-msg This hook is invoked by git commit and can be used to edit the default commit message when it is generated by an automated tool.
    commit-msg This hook is invoked by git commit and can be used to validate or modify the commit message after it is entered by the user.
    post-commit This hook is invoked after the git commit execution has run correctly, and it is generally used to fire notifications.

    How to install Husky.NET and its dependencies in a .NET Application

    Husky.NET must be installed in the root folder of the solution.

    You first have to create a tool-manifest file in the root folder by running:

    This command creates a file named dotnet-tools.json under the .config folder: here you can see the list of external tools used by dotnet.

    After running the command, you will see that the dotnet-tools.json file contains this element:

    {
      "version": 1,
      "isRoot": true,
      "tools": {}
    }
    

    Now you can add Husky as a dotnet tool by running:

    dotnet tool install Husky
    

    After running the command, the file will contain something like this:

    {
      "version": 1,
      "isRoot": true,
      "tools": {
        "husky": {
          "version": "0.6.2",
          "commands": ["husky"]
        }
      }
    }
    

    Now that we have added it to our dependencies, we can add Husky to an existing .NET application by running:

    If you open the root folder, you should be able to see these 3 folders:

    • .git, which contains the info about the Git repository;
    • .config that contains the description of the tools, such as dotnet-tools;
    • .husky that contains the files we are going to use to define our Git hooks.

    Finally, you can add a new hook by running, for example,

    dotnet husky add pre-commit -c "echo 'Hello world!'"
    git add .husky/pre-commit
    

    This command creates a new file, pre-commit (without file extension), under the .husky folder. By default, it appears like this:

    #!/bin/sh
    . "$(dirname "$0")/_/husky.sh"
    
    ## husky task runner examples -------------------
    ## Note : for local installation use 'dotnet' prefix. e.g. 'dotnet husky'
    
    ## run all tasks
    #husky run
    
    ### run all tasks with group: 'group-name'
    #husky run --group group-name
    
    ## run task with name: 'task-name'
    #husky run --name task-name
    
    ## pass hook arguments to task
    #husky run --args "$1" "$2"
    
    ## or put your custom commands -------------------
    #echo 'Husky.Net is awesome!'
    
    echo 'Hello world!'
    

    The default content is pretty useless; it’s time to customize that hook.

    Notice that the latest command has also generated a task-runner.json file; we will use it later.

    Your first pre-commit hook

    To customize the script, open the file located at .husky/pre-commit.

    Here, you can add whatever you want.

    In the example below, I run commands that compile the code, format the text (using dotnet format with the rules defined in the .editorconfig file), and then run all the tests.

    #!/bin/sh
    . "$(dirname "$0")/_/husky.sh"
    
    echo 'Building code'
    dotnet build
    
    echo 'Formatting code'
    dotnet format
    
    echo 'Running tests'
    dotnet test
    

    Then, add it to Git, and you are ready to go. 🚀 But wait…

    3 ways to manage dotnet format with Husky.NET

    There is a problem with the approach in the example above.

    Let’s simulate a usage flow:

    1. you modify a C# class;
    2. you run git commit -m "message";
    3. the pre-commit hook runs dotnet build;
    4. the pre-commit hook runs dotnet format;
    5. the pre-commit hook runs dotnet test;
    6. after the hooks, the commit is created.

    What is the final result?

    Since dotnet format modifies the source files, and given that the snapshot has already been created before executing the hook, all the modified files will not be part of the final commit!

    Also, dotnet format executes linting on every file in the solution, not only those that are part of the current snapshot. The operation might then take a lot of time, depending on the size of the repository, and most of the time, it will not update any file (because you’ve already formatted everything in a previous run).

    We have to work out a way to fix this issue. I’ll suggest three approaches.

    Include all the changes using Git add

    The first approach is quite simple: run git add . after dotnet format.

    So, the flow becomes:

    1. you modify a C# class;
    2. you run git commit -m "message";
    3. the pre-commit hook runs dotnet build;
    4. the pre-commit hook runs dotnet format;
    5. the pre-commit hook runs git add .;
    6. the pre-commit hook runs dotnet test;
    7. Git creates the commit.

    This is the most straightforward approach, but it has some downsides:

    • dotnet format is executed on every file in the solution. The more your project grows, the slower your commits become;
    • git add . adds to the current snapshot all the files modified, even those you did not add to this commit on purpose (maybe because you have updated many files and want to create two distinct commits).

    So, it works, but we can do better.

    Execute a dry run of dotnet-format

    You can add the --verify-no-changes to the dotnet format command: this flag returns an error if at least one file needs to be updated because of a formatting rule.

    Let’s see how the flow changes if one file needs to be formatted.

    1. you modify a C# class;
    2. you run git commit -m "message";
    3. the pre-commit hook runs dotnet build;
    4. the pre-commit hook runs dotnet format --verify-no-changes;
    5. the pre-commit hook returns an error and aborts the operation;
    6. you run dotnet format on the whole solution to fix all the formatting issues;
    7. you run git add .;
    8. you run git commit -m "message";
    9. the pre-commit hook runs dotnet build;
    10. the pre-commit hook runs dotnet format --verify-no-changes. Now, there is nothing to format, and we can proceed;
    11. the pre-commit hook runs dotnet test;
    12. Git creates the commit.

    Notice that, this way, if there is something to format, the whole commit is aborted. You will then have to run dotnet format on the entire solution, fix the errors, add the changes to the snapshot, and restart the flow.

    It’s a longer process, but it allows you to have complete control over the formatted files.

    Also, you won’t risk including in the snapshot the files you want to keep staged in order to add them to a subsequent commit.

    Run dotnet-format only on the staged files using Husky.NET Task Runner

    The third approach is the most complex but with the best result.

    If you recall, during the initialization, Husky added two files in the .husky folder: pre-commit and task-runner.json.

    The key to this solution is the task-runner.json file. This file allows you to create custom scripts with a name, a group, the command to be executed, and its related parameters.

    By default, you will see this content:

    {
      "tasks": [
        {
          "name": "welcome-message-example",
          "command": "bash",
          "args": ["-c", "echo Husky.Net is awesome!"],
          "windows": {
            "command": "cmd",
            "args": ["/c", "echo Husky.Net is awesome!"]
          }
        }
      ]
    }
    

    To make sure that dotnet format runs only on the staged files, you must create a new task like this:

    {
      "name": "dotnet-format-staged-files",
      "group": "pre-commit-operations",
      "command": "dotnet",
      "args": ["format", "--include", "${staged}"],
      "include": ["**/*.cs"]
    }
    

    Here, we have specified a name, dotnet-format-staged-files, the command to run, dotnet, with some parameters listed in the args array. Notice that we can filter the list of files to be formatted by using the ${staged} parameter, which is populated by Husky.NET.

    We have also added this task to a group named pre-commit-operations that we can use to reference a list of tasks to be executed together.

    If you want to run a specific task, you can use dotnet husky run --name taskname. In our example, the command would be dotnet husky run --name dotnet-format-staged-files.

    If you want to run a set of tasks belonging to the same group, you can run dotnet husky run --group groupname. In our example, the command would be dotnet husky run --group pre-commit-operations.

    The last step is to call these tasks from within our pre-commit file. So, replace the old dotnet format command with one of the above commands.

    Final result and optimizations of the pre-commit hook

    Now that everything is in place, we can improve the script to make it faster.

    Let’s see which parts we can optimize.

    The first step is the build phase. For sure, we have to run dotnet build to see if the project builds correctly. You can consider adding the --no-restore flag to skip the restore step before building.

    Then we have the format phase: we can avoid formatting every file using one of the steps defined before. I’ll replace the plain dotnet format with the execution of the script defined in the Task Runner (it’s the third approach we saw).

    Then, we have the test phase. We can add both the --no-restore and the --no-build flag to the command since we have already built everything before. But wait! The format phase updated the content of our files, so we still have to build the whole solution. Unless we swap the build and the format phases.

    So, here we have the final pre-commit file:

    #!/bin/sh
    . "$(dirname "$0")/_/husky.sh"
    
    echo 'Ready to commit changes!'
    
    echo 'Format'
    
    dotnet husky run --name dotnet-format-staged-files
    
    echo 'Build'
    
    dotnet build --no-restore
    
    echo 'Test'
    
    dotnet test --no-restore
    
    echo 'Completed pre-commit changes'
    

    Yes, I know that when you run the dotnet test command, you also build the solution, but I prefer having two separate steps just for clarity!

    Ah, and don’t remove the #!/bin/sh at the beginning of the script!

    How to skip Git hooks

    To trigger the hook, just run git commit -m "message". Before completing the commit, the hook will run all the commands. If one of them fails, the whole commit operation is aborted.

    There are cases when you have to skip the validation. For example, if you have integration tests that rely on an external source currently offline. In that case, some tests will fail, and you will be able to commit your code only once the external system gets working again.

    You can skip the commit validation by adding the --no-verify flag:

    git commit -m "my message" --no-verify
    

    Further readings

    Husky.NET is a porting of the Husky tool we already used in a previous article, using it as an NPM dependency. In that article, we also learned how to customize Conventional Commits using Git hooks.

    🔗 How to customize Conventional Commits in a .NET application using GitHooks | Code4IT

    As we learned, there are many more Git hooks that we can use. You can see the complete list on the Git documentation:

    🔗 Customizing Git – Git Hooks | Git docs

    This article first appeared on Code4IT 🐧

    Of course, if you want to get the best out of Husky.NET, I suggest you have a look at the official documentation:

    🔗 Husky.Net documentation

    One last thing: we installed Husky.NET using dotnet tools. If you want to learn more about this topic, I found an excellent article online that you might want to read:

    🔗 Using dotnet tools | Gustav Ehrenborg

    Wrapping up

    In this article, we learned how to create a pre-commit Git hook and validate all our changes before committing them to our Git repository.

    We also focused on the formatting of our code: how can we format only the files we have changed without impacting the whole solution?

    I hope you enjoyed this article! Let’s keep in touch on Twitter or LinkedIn! 🤜🤛

    Happy coding!

    🐧


    Source link

  • [ENG] .NET 5, 6, 7, and 8 for busy developers | .NET Community Austria


    [ENG] .NET 5, 6, 7, and 8 for busy developers | .NET Community Austria


    Source link

  • Top 6 Performance Tips when dealing with strings in C# 12 and .NET 8 &vert; Code4IT

    Top 6 Performance Tips when dealing with strings in C# 12 and .NET 8 | Code4IT


    Small changes sometimes make a huge difference. Learn these 6 tips to improve the performance of your application just by handling strings correctly.

    Table of Contents

    Just a second! 🫷
    If you are here, it means that you are a software developer.
    So, you know that storage, networking, and domain management have a cost .

    If you want to support this blog, please ensure that you have disabled the adblocker for this site.
    I configured Google AdSense to show as few ADS as possible – I don’t want to bother you with lots of ads, but I still need to add some to pay for the resources for my site.

    Thank you for your understanding.
    Davide

    Sometimes, just a minor change makes a huge difference. Maybe you won’t notice it when performing the same operation a few times. Still, the improvement is significant when repeating the operation thousands of times.

    In this article, we will learn five simple tricks to improve the performance of your application when dealing with strings.

    Note: this article is part of C# Advent Calendar 2023, organized by Matthew D. Groves: it’s maybe the only Christmas tradition I like (yes, I’m kind of a Grinch 😂).

    Benchmark structure, with dependencies

    Before jumping to the benchmarks, I want to spend a few words on the tools I used for this article.

    The project is a .NET 8 class library running on a laptop with an i5 processor.

    Running benchmarks with BenchmarkDotNet

    I’m using BenchmarkDotNet to create benchmarks for my code. BenchmarkDotNet is a library that runs your methods several times, captures some metrics, and generates a report of the executions. If you follow my blog, you might know I’ve used it several times – for example, in my old article “Enum.HasFlag performance with BenchmarkDotNet”.

    All the benchmarks I created follow the same structure:

    [MemoryDiagnoser]
    public class BenchmarkName()
    {
        [Params(1, 5, 10)] // clearly, I won't use these values
        public int Size;
    
        public string[] AllStrings { get; set; }
    
        [IterationSetup]
        public void Setup()
        {
            AllStrings = StringArrayGenerator.Generate(Size, "hello!", "HELLO!");
        }
    
        [Benchmark(Baseline=true)]
        public void FirstMethod()
        {
            //omitted
        }
    
        [Benchmark]
        public void SecondMethod()
        {
            //omitted
        }
    }
    

    In short:

    • the class is marked with the [MemoryDiagnoser] attribute: the benchmark will retrieve info for both time and memory usage;
    • there is a property named Size with the attribute [Params]: this attribute lists the possible values for the Size property;
    • there is a method marked as [IterationSetup]: this method runs before every single execution, takes the value from the Size property, and initializes the AllStrings array;
    • the methods that are parts of the benchmark are marked with the [Benchmark] attribute.

    Generating strings with Bogus

    I relied on Bogus to create dummy values. This NuGet library allows you to generate realistic values for your objects with a great level of customization.

    The string array generation strategy is shared across all the benchmarks, so I moved it to a static method:

     public static class StringArrayGenerator
     {
         public static string[] Generate(int size, params string[] additionalStrings)
         {
             string[] array = new string[size];
             Faker faker = new Faker();
    
             List<string> fixedValues = [
                 string.Empty,
                 "   ",
                 "\n  \t",
                 null
             ];
    
             if (additionalStrings != null)
                 fixedValues.AddRange(additionalStrings);
    
             for (int i = 0; i < array.Length; i++)
             {
                 if (Random.Shared.Next() % 4 == 0)
                 {
                     array[i] = Random.Shared.GetItems<string>(fixedValues.ToArray(), 1).First();
                 }
                 else
                 {
                     array[i] = faker.Lorem.Word();
                 }
             }
    
             return array;
         }
     }
    

    Here I have a default set of predefined values ([string.Empty, " ", "\n \t", null]), which can be expanded with the values coming from the additionalStrings array. These values are then placed in random positions of the array.

    In most cases, though, the value of the string is defined by Bogus.

    Generating plots with chartbenchmark.net

    To generate the plots you will see in this article, I relied on chartbenchmark.net, a fantastic tool that transforms the output generated by BenchmarkDotNet on the console in a dynamic, customizable plot. This tool created by Carlos Villegas is available on GitHub, and it surely deserves a star!

    Please note that all the plots in this article have a Log10 scale: this scale allows me to show you the performance values of all the executions in the same plot. If I used the Linear scale, you would be able to see only the biggest values.

    We are ready. It’s time to run some benchmarks!

    Tip #1: StringBuilder is (almost always) better than String Concatenation

    Let’s start with a simple trick: if you need to concatenate strings, using a StringBuilder is generally more efficient than concatenating string.

    [MemoryDiagnoser]
    public class StringBuilderVsConcatenation()
    {
        [Params(4, 100, 10_000, 100_000)]
        public int Size;
    
        public string[] AllStrings { get; set; }
    
        [IterationSetup]
        public void Setup()
        {
            AllStrings = StringArrayGenerator.Generate(Size, "hello!", "HELLO!");
        }
    
        [Benchmark]
        public void WithStringBuilder()
        {
            StringBuilder sb = new StringBuilder();
    
            foreach (string s in AllStrings)
            {
                sb.Append(s);
            }
    
            var finalString = sb.ToString();
        }
    
        [Benchmark]
        public void WithConcatenation()
        {
            string finalString = "";
            foreach (string s in AllStrings)
            {
                finalString += s;
            }
        }
    }
    

    Whenever you concatenate strings with the + sign, you create a new instance of a string. This operation takes some time and allocates memory for every operation.

    On the contrary, using a StringBuilder object, you can add the strings in memory and generate the final string using a performance-wise method.

    Here’s the result table:

    Method Size Mean Error StdDev Median Ratio RatioSD Allocated Alloc Ratio
    WithStringBuilder 4 4.891 us 0.5568 us 1.607 us 4.750 us 1.00 0.00 1016 B 1.00
    WithConcatenation 4 3.130 us 0.4517 us 1.318 us 2.800 us 0.72 0.39 776 B 0.76
    WithStringBuilder 100 7.649 us 0.6596 us 1.924 us 7.650 us 1.00 0.00 4376 B 1.00
    WithConcatenation 100 13.804 us 1.1970 us 3.473 us 13.800 us 1.96 0.82 51192 B 11.70
    WithStringBuilder 10000 113.091 us 4.2106 us 12.081 us 111.000 us 1.00 0.00 217200 B 1.00
    WithConcatenation 10000 74,512.259 us 2,111.4213 us 6,058.064 us 72,593.050 us 666.43 91.44 466990336 B 2,150.05
    WithStringBuilder 100000 1,037.523 us 37.1009 us 108.225 us 1,012.350 us 1.00 0.00 2052376 B 1.00
    WithConcatenation 100000 7,469,344.914 us 69,720.9843 us 61,805.837 us 7,465,779.900 us 7,335.08 787.44 46925872520 B 22,864.17

    Let’s see it as a plot.

    Beware of the scale in the diagram!: it’s a Log10 scale, so you’d better have a look at the value displayed on the Y-axis.

    StringBuilder vs string concatenation in C#: performance benchmark

    As you can see, there is a considerable performance improvement.

    There are some remarkable points:

    1. When there are just a few strings to concatenate, the + operator is more performant, both on timing and allocated memory;
    2. When you need to concatenate 100000 strings, the concatenation is ~7000 times slower than the string builder.

    In conclusion, use the StringBuilder to concatenate more than 5 or 6 strings. Use the string concatenation for smaller operations.

    Edit 2024-01-08: turn out that string.Concat has an overload that accepts an array of strings. string.Concat(string[]) is actually faster than using the StringBuilder. Read more this article by Robin Choffardet.

    Tip #2: EndsWith(string) vs EndsWith(char): pick the right overload

    One simple improvement can be made if you use StartsWith or EndsWith, passing a single character.

    There are two similar overloads: one that accepts a string, and one that accepts a char.

    [MemoryDiagnoser]
    public class EndsWithStringVsChar()
    {
        [Params(100, 1000, 10_000, 100_000, 1_000_000)]
        public int Size;
    
        public string[] AllStrings { get; set; }
    
        [IterationSetup]
        public void Setup()
        {
            AllStrings = StringArrayGenerator.Generate(Size);
        }
    
        [Benchmark(Baseline = true)]
        public void EndsWithChar()
        {
        foreach (string s in AllStrings)
        {
            _ = s?.EndsWith('e');
        }
        }
    
        [Benchmark]
        public void EndsWithString()
        {
        foreach (string s in AllStrings)
        {
            _ = s?.EndsWith("e");
        }
        }
    }
    

    We have the following results:

    Method Size Mean Error StdDev Median Ratio
    EndsWithChar 100 2.189 us 0.2334 us 0.6771 us 2.150 us 1.00
    EndsWithString 100 5.228 us 0.4495 us 1.2970 us 5.050 us 2.56
    EndsWithChar 1000 12.796 us 1.2006 us 3.4831 us 12.200 us 1.00
    EndsWithString 1000 30.434 us 1.8783 us 5.4492 us 29.250 us 2.52
    EndsWithChar 10000 25.462 us 2.0451 us 5.9658 us 23.950 us 1.00
    EndsWithString 10000 251.483 us 18.8300 us 55.2252 us 262.300 us 10.48
    EndsWithChar 100000 209.776 us 18.7782 us 54.1793 us 199.900 us 1.00
    EndsWithString 100000 826.090 us 44.4127 us 118.5465 us 781.650 us 4.14
    EndsWithChar 1000000 2,199.463 us 74.4067 us 217.0480 us 2,190.600 us 1.00
    EndsWithString 1000000 7,506.450 us 190.7587 us 562.4562 us 7,356.250 us 3.45

    Again, let’s generate the plot using the Log10 scale:

    EndsWith(char) vs EndsWith(string) in C# performance benchmark

    They appear to be almost identical, but look closely: based on this benchmark, when we have 10000, using EndsWith(string) is 10x slower than EndsWith(char).

    Also, here, the duration ratio on the 1.000.000-items array is ~3.5. At first, I thought there was an error on the benchmark, but when rerunning it on the benchmark, the ratio did not change.

    It looks like you have the best improvement ratio when the array has ~10.000 items.

    Tip #3: IsNullOrEmpty vs IsNullOrWhitespace vs IsNullOrEmpty + Trim

    As you might know, string.IsNullOrWhiteSpace performs stricter checks than string.IsNullOrEmpty.

    (If you didn’t know, have a look at this quick explanation of the cases covered by these methods).

    Does it affect performance?

    To demonstrate it, I have created three benchmarks: one for string.IsNullOrEmpty, one for string.IsNullOrWhiteSpace, and another one that lays in between: it first calls Trim() on the string, and then calls string.IsNullOrEmpty.

    [MemoryDiagnoser]
    public class StringEmptyBenchmark
    {
        [Params(100, 1000, 10_000, 100_000, 1_000_000)]
        public int Size;
    
        public string[] AllStrings { get; set; }
    
        [IterationSetup]
        public void Setup()
        {
            AllStrings = StringArrayGenerator.Generate(Size);
        }
    
        [Benchmark(Baseline = true)]
        public void StringIsNullOrEmpty()
        {
            foreach (string s in AllStrings)
            {
                _ = string.IsNullOrEmpty(s);
            }
        }
    
        [Benchmark]
        public void StringIsNullOrEmptyWithTrim()
        {
            foreach (string s in AllStrings)
            {
                _ = string.IsNullOrEmpty(s?.Trim());
            }
        }
    
        [Benchmark]
        public void StringIsNullOrWhitespace()
        {
            foreach (string s in AllStrings)
            {
                _ = string.IsNullOrWhiteSpace(s);
            }
        }
    }
    

    We have the following values:

    Method Size Mean Error StdDev Ratio
    StringIsNullOrEmpty 100 1.723 us 0.2302 us 0.6715 us 1.00
    StringIsNullOrEmptyWithTrim 100 2.394 us 0.3525 us 1.0282 us 1.67
    StringIsNullOrWhitespace 100 2.017 us 0.2289 us 0.6604 us 1.45
    StringIsNullOrEmpty 1000 10.885 us 1.3980 us 4.0781 us 1.00
    StringIsNullOrEmptyWithTrim 1000 20.450 us 1.9966 us 5.8240 us 2.13
    StringIsNullOrWhitespace 1000 13.160 us 1.0851 us 3.1482 us 1.34
    StringIsNullOrEmpty 10000 18.717 us 1.1252 us 3.2464 us 1.00
    StringIsNullOrEmptyWithTrim 10000 52.786 us 1.2208 us 3.5222 us 2.90
    StringIsNullOrWhitespace 10000 46.602 us 1.2363 us 3.4668 us 2.54
    StringIsNullOrEmpty 100000 168.232 us 12.6948 us 36.0129 us 1.00
    StringIsNullOrEmptyWithTrim 100000 439.744 us 9.3648 us 25.3182 us 2.71
    StringIsNullOrWhitespace 100000 394.310 us 7.8976 us 20.5270 us 2.42
    StringIsNullOrEmpty 1000000 2,074.234 us 64.3964 us 186.8257 us 1.00
    StringIsNullOrEmptyWithTrim 1000000 4,691.103 us 112.2382 us 327.4040 us 2.28
    StringIsNullOrWhitespace 1000000 4,198.809 us 83.6526 us 161.1702 us 2.04

    As you can see from the Log10 table, the results are pretty similar:

    string.IsNullOrEmpty vs string.IsNullOrWhiteSpace vs Trim in C#: performance benchmark

    On average, StringIsNullOrWhitespace is ~2 times slower than StringIsNullOrEmpty.

    So, what should we do? Here’s my two cents:

    1. For all the data coming from the outside (passed as input to your system, received from an API call, read from the database), use string.IsNUllOrWhiteSpace: this way you can ensure that you are not receiving unexpected data;
    2. If you read data from an external API, customize your JSON deserializer to convert whitespace strings as empty values;
    3. Needless to say, choose the proper method depending on the use case. If a string like “\n \n \t” is a valid value for you, use string.IsNullOrEmpty.

    Tip #4: ToUpper vs ToUpperInvariant vs ToLower vs ToLowerInvariant: they look similar, but they are not

    Even though they look similar, there is a difference in terms of performance between these four methods.

    [MemoryDiagnoser]
    public class ToUpperVsToLower()
    {
        [Params(100, 1000, 10_000, 100_000, 1_000_000)]
        public int Size;
    
        public string[] AllStrings { get; set; }
    
        [IterationSetup]
        public void Setup()
        {
            AllStrings = StringArrayGenerator.Generate(Size);
        }
    
        [Benchmark]
        public void WithToUpper()
        {
            foreach (string s in AllStrings)
            {
                _ = s?.ToUpper();
            }
        }
    
        [Benchmark]
        public void WithToUpperInvariant()
        {
            foreach (string s in AllStrings)
            {
                _ = s?.ToUpperInvariant();
            }
        }
    
        [Benchmark]
        public void WithToLower()
        {
            foreach (string s in AllStrings)
            {
                _ = s?.ToLower();
            }
        }
    
        [Benchmark]
        public void WithToLowerInvariant()
        {
            foreach (string s in AllStrings)
            {
                _ = s?.ToLowerInvariant();
            }
        }
    }
    

    What will this benchmark generate?

    Method Size Mean Error StdDev Median P95 Ratio
    WithToUpper 100 9.153 us 0.9720 us 2.789 us 8.200 us 14.980 us 1.57
    WithToUpperInvariant 100 6.572 us 0.5650 us 1.639 us 6.200 us 9.400 us 1.14
    WithToLower 100 6.881 us 0.5076 us 1.489 us 7.100 us 9.220 us 1.19
    WithToLowerInvariant 100 6.143 us 0.5212 us 1.529 us 6.100 us 8.400 us 1.00
    WithToUpper 1000 69.776 us 9.5416 us 27.833 us 68.650 us 108.815 us 2.60
    WithToUpperInvariant 1000 51.284 us 7.7945 us 22.860 us 38.700 us 89.290 us 1.85
    WithToLower 1000 49.520 us 5.6085 us 16.449 us 48.100 us 79.110 us 1.85
    WithToLowerInvariant 1000 27.000 us 0.7370 us 2.103 us 26.850 us 30.375 us 1.00
    WithToUpper 10000 241.221 us 4.0480 us 3.588 us 240.900 us 246.560 us 1.68
    WithToUpperInvariant 10000 339.370 us 42.4036 us 125.028 us 381.950 us 594.760 us 1.48
    WithToLower 10000 246.861 us 15.7924 us 45.565 us 257.250 us 302.875 us 1.12
    WithToLowerInvariant 10000 143.529 us 2.1542 us 1.910 us 143.500 us 146.105 us 1.00
    WithToUpper 100000 2,165.838 us 84.7013 us 223.137 us 2,118.900 us 2,875.800 us 1.66
    WithToUpperInvariant 100000 1,885.329 us 36.8408 us 63.548 us 1,894.500 us 1,967.020 us 1.41
    WithToLower 100000 1,478.696 us 23.7192 us 50.547 us 1,472.100 us 1,571.330 us 1.10
    WithToLowerInvariant 100000 1,335.950 us 18.2716 us 35.203 us 1,330.100 us 1,404.175 us 1.00
    WithToUpper 1000000 20,936.247 us 414.7538 us 1,163.014 us 20,905.150 us 22,928.350 us 1.64
    WithToUpperInvariant 1000000 19,056.983 us 368.7473 us 287.894 us 19,085.400 us 19,422.880 us 1.41
    WithToLower 1000000 14,266.714 us 204.2906 us 181.098 us 14,236.500 us 14,593.035 us 1.06
    WithToLowerInvariant 1000000 13,464.127 us 266.7547 us 327.599 us 13,511.450 us 13,926.495 us 1.00

    Let’s see it as the usual Log10 plot:

    ToUpper vs ToLower comparison in C#: performance benchmark

    We can notice a few points:

    1. The ToUpper family is generally slower than the ToLower family;
    2. The Invariant family is faster than the non-Invariant one; we will see more below;

    So, if you have to normalize strings using the same casing, ToLowerInvariant is the best choice.

    Tip #5: OrdinalIgnoreCase vs InvariantCultureIgnoreCase: logically (almost) equivalent, but with different performance

    Comparing strings is trivial: the string.Compare method is all you need.

    There are several modes to compare strings: you can specify the comparison rules by setting the comparisonType parameter, which accepts a StringComparison value.

    [MemoryDiagnoser]
    public class StringCompareOrdinalVsInvariant()
    {
        [Params(100, 1000, 10_000, 100_000, 1_000_000)]
        public int Size;
    
        public string[] AllStrings { get; set; }
    
        [IterationSetup]
        public void Setup()
        {
            AllStrings = StringArrayGenerator.Generate(Size, "hello!", "HELLO!");
        }
    
        [Benchmark(Baseline = true)]
        public void WithOrdinalIgnoreCase()
        {
            foreach (string s in AllStrings)
            {
                _ = string.Equals(s, "hello!", StringComparison.OrdinalIgnoreCase);
            }
        }
    
        [Benchmark]
        public void WithInvariantCultureIgnoreCase()
        {
            foreach (string s in AllStrings)
            {
                _ = string.Equals(s, "hello!", StringComparison.InvariantCultureIgnoreCase);
            }
        }
    }
    

    Let’s see the results:

    Method Size Mean Error StdDev Ratio
    WithOrdinalIgnoreCase 100 2.380 us 0.2856 us 0.8420 us 1.00
    WithInvariantCultureIgnoreCase 100 7.974 us 0.7817 us 2.3049 us 3.68
    WithOrdinalIgnoreCase 1000 11.316 us 0.9170 us 2.6603 us 1.00
    WithInvariantCultureIgnoreCase 1000 35.265 us 1.5455 us 4.4591 us 3.26
    WithOrdinalIgnoreCase 10000 20.262 us 1.1801 us 3.3668 us 1.00
    WithInvariantCultureIgnoreCase 10000 225.892 us 4.4945 us 12.5289 us 11.41
    WithOrdinalIgnoreCase 100000 148.270 us 11.3234 us 32.8514 us 1.00
    WithInvariantCultureIgnoreCase 100000 1,811.144 us 35.9101 us 64.7533 us 12.62
    WithOrdinalIgnoreCase 1000000 2,050.894 us 59.5966 us 173.8460 us 1.00
    WithInvariantCultureIgnoreCase 1000000 18,138.063 us 360.1967 us 986.0327 us 8.87

    As you can see, there’s a HUGE difference between Ordinal and Invariant.

    When dealing with 100.000 items, StringComparison.InvariantCultureIgnoreCase is 12 times slower than StringComparison.OrdinalIgnoreCase!

    Ordinal vs InvariantCulture comparison in C#: performance benchmark

    Why? Also, why should we use one instead of the other?

    Have a look at this code snippet:

    var s1 = "Aa";
    var s2 = "A" + new string('\u0000', 3) + "a";
    
    string.Equals(s1, s2, StringComparison.InvariantCultureIgnoreCase); //True
    string.Equals(s1, s2, StringComparison.OrdinalIgnoreCase); //False
    

    As you can see, s1 and s2 represent equivalent, but not equal, strings. We can then deduce that OrdinalIgnoreCase checks for the exact values of the characters, while InvariantCultureIgnoreCase checks the string’s “meaning”.

    So, in most cases, you might want to use OrdinalIgnoreCase (as always, it depends on your use case!)

    Tip #6: Newtonsoft vs System.Text.Json: it’s a matter of memory allocation, not time

    For the last benchmark, I created the exact same model used as an example in the official documentation.

    This benchmark aims to see which JSON serialization library is faster: Newtonsoft or System.Text.Json?

    [MemoryDiagnoser]
    public class JsonSerializerComparison
    {
        [Params(100, 10_000, 1_000_000)]
        public int Size;
        List<User?> Users { get; set; }
    
        [IterationSetup]
        public void Setup()
        {
            Users = UsersCreator.GenerateUsers(Size);
        }
    
        [Benchmark(Baseline = true)]
        public void WithJson()
        {
            foreach (User? user in Users)
            {
                var asString = System.Text.Json.JsonSerializer.Serialize(user);
    
                _ = System.Text.Json.JsonSerializer.Deserialize<User?>(asString);
            }
        }
    
        [Benchmark]
        public void WithNewtonsoft()
        {
            foreach (User? user in Users)
            {
                string asString = Newtonsoft.Json.JsonConvert.SerializeObject(user);
                _ = Newtonsoft.Json.JsonConvert.DeserializeObject<User?>(asString);
            }
        }
    }
    

    As you might know, the .NET team has added lots of performance improvements to the JSON Serialization functionalities, and you can really see the difference!

    Method Size Mean Error StdDev Median Ratio RatioSD Gen0 Gen1 Allocated Alloc Ratio
    WithJson 100 2.063 ms 0.1409 ms 0.3927 ms 1.924 ms 1.00 0.00 292.87 KB 1.00
    WithNewtonsoft 100 4.452 ms 0.1185 ms 0.3243 ms 4.391 ms 2.21 0.39 882.71 KB 3.01
    WithJson 10000 44.237 ms 0.8787 ms 1.3936 ms 43.873 ms 1.00 0.00 4000.0000 1000.0000 29374.98 KB 1.00
    WithNewtonsoft 10000 78.661 ms 1.3542 ms 2.6090 ms 78.865 ms 1.77 0.08 14000.0000 1000.0000 88440.99 KB 3.01
    WithJson 1000000 4,233.583 ms 82.5804 ms 113.0369 ms 4,202.359 ms 1.00 0.00 484000.0000 1000.0000 2965741.56 KB 1.00
    WithNewtonsoft 1000000 5,260.680 ms 101.6941 ms 108.8116 ms 5,219.955 ms 1.24 0.04 1448000.0000 1000.0000 8872031.8 KB 2.99

    As you can see, Newtonsoft is 2x slower than System.Text.Json, and it allocates 3x the memory compared with the other library.

    So, well, if you don’t use library-specific functionalities, I suggest you replace Newtonsoft with System.Text.Json.

    Wrapping up

    In this article, we learned that even tiny changes can make a difference in the long run.

    Let’s recap some:

    1. Using StringBuilder is generally WAY faster than using string concatenation unless you need to concatenate 2 to 4 strings;
    2. Sometimes, the difference is not about execution time but memory usage;
    3. EndsWith and StartsWith perform better if you look for a char instead of a string. If you think of it, it totally makes sense!
    4. More often than not, string.IsNullOrWhiteSpace performs better checks than string.IsNullOrEmpty; however, there is a huge difference in terms of performance, so you should pick the correct method depending on the usage;
    5. ToUpper and ToLower look similar; however, ToLower is quite faster than ToUpper;
    6. Ordinal and Invariant comparison return the same value for almost every input; but Ordinal is faster than Invariant;
    7. Newtonsoft performs similarly to System.Text.Json, but it allocates way more memory.

    This article first appeared on Code4IT 🐧

    My suggestion is always the same: take your time to explore the possibilities! Toy with your code, try to break it, benchmark it. You’ll find interesting takes!

    I hope you enjoyed this article! Let’s keep in touch on Twitter or LinkedIn! 🤜🤛

    Happy coding!

    🐧


    Source link

  • Upgrading a 20 year old University Project to .NET 6 with dotnet-upgrade-assistant

    Upgrading a 20 year old University Project to .NET 6 with dotnet-upgrade-assistant


    I wrote a Tiny Virtual Operating System for a 300-level OS class in C# for college back in 2001 (?) and later moved it to VB.NET in 2002. This is all pre-.NET Core, and on early .NET 1.1 or 2.0 on Windows. I moved it to GitHub 5 years ago and ported it to .NET Core 2.0 at the time. At this point it was 15 years old, so it was cool to see this project running on Windows, Linux, in Docker, and on a Raspberry Pi…a machine that didn’t exist when the project was originally written.

    NOTE: If the timeline is confusing, I had already been working in industry for years at this point but was still plugging away at my 4 year degree at night. It eventually took 11 years to complete my BS in Software Engineering.

    This evening, as the children slept, I wanted to see if I could run the .NET Upgrade Assistant on this now 20 year old app and get it running on .NET 6.

    Let’s start:

    $ upgrade-assistant upgrade .\TinyOS.sln
    -----------------------------------------------------------------------------------------------------------------
    Microsoft .NET Upgrade Assistant v0.3.256001+3c4e05c787f588e940fe73bfa78d7eedfe0190bd

    We are interested in your feedback! Please use the following link to open a survey: https://aka.ms/DotNetUASurvey
    -----------------------------------------------------------------------------------------------------------------

    [22:58:01 INF] Loaded 5 extensions
    [22:58:02 INF] Using MSBuild from C:\Program Files\dotnet\sdk\6.0.100\
    [22:58:02 INF] Using Visual Studio install from C:\Program Files\Microsoft Visual Studio\2022\Preview [v17]
    [22:58:06 INF] Initializing upgrade step Select an entrypoint
    [22:58:07 INF] Setting entrypoint to only project in solution: C:\Users\scott\TinyOS\src\TinyOSCore\TinyOSCore.csproj
    [22:58:07 INF] Recommending executable TFM net6.0 because the project builds to an executable
    [22:58:07 INF] Initializing upgrade step Select project to upgrade
    [22:58:07 INF] Recommending executable TFM net6.0 because the project builds to an executable
    [22:58:07 INF] Recommending executable TFM net6.0 because the project builds to an executable
    [22:58:07 INF] Initializing upgrade step Back up project

    See how the process is interactive at the command line, with color prompts and a series of dynamic multiple-choice questions?

    Updating .NET project with the upgrade assistant

    Interestingly, it builds on the first try, no errors.

    When I manually look at the .csproj I can see some weird version numbers, likely from some not-quite-baked version of .NET Core 2 I used many years ago. My spidey sense says this is wrong, and I’m assuming the upgrade assistant didn’t understand it.

        <!-- <PackageReference Include="ILLink.Tasks" Version="0.1.4-preview-906439" /> -->
    <PackageReference Include="Microsoft.Extensions.Configuration" Version="2.0.0-preview2-final" />
    <PackageReference Include="Microsoft.Extensions.Configuration.Json" Version="2.0.0-preview2-final" />
    <PackageReference Include="Microsoft.Extensions.DependencyInjection" Version="2.0.0-preview2-final" />
    <PackageReference Include="Microsoft.Extensions.Options.ConfigurationExtensions" Version="2.0.0-preview2-final" />

    I also note a commented-out reference to ILLink.Tasks which was a preview feature in Mono’s Linker to reduce the final size of apps and tree-trim them. Some of that functionality is built into .NET 6 now so I’ll use that during the build and packaging process later. The reference is not needed today.

    I’m gonna blindly upgrade them to .NET 6 and see what happens. I could do this by just changing the numbers and seeing if it restores and builds, but I can also try dotnet outdated which remains a lovely tool in the upgrader’s toolkit.

    image

    This “outdated” tool is nice as it talks to NuGet and confirms that there are newer versions of certain packages.

    In my tests – which were just batch files at this early time – I was calling my dotnet app like this:

    dotnet netcoreapp2.0/TinyOSCore.dll 512 scott13.txt  

    This will change to the modern form with just TinyOSCore.exe 512 scott13.txt with an exe and args and no ceremony.

    Publishing and trimming my TinyOS turns into just a 15 meg EXE. Nice considering that the .NET I need is in there with no separate install. I could turn this little synthetic OS into a microservice if I wanted to be totally extra.

    dotnet publish -r win-x64 --self-contained -p:PublishSingleFile=true -p:SuppressTrimAnalysisWarnings=true

    If I add

    -p:EnableCompressionInSingleFile=true

    Then it’s even smaller. No code changes. Run all my tests, looks good. My project from university from .NET 1.1 is now .NET 6.0, cross platform, self-contained in 11 megs in a single EXE. Sweet.


    Sponsor: At Rocket Mortgage® the work you do around here will be 100% impactful but won’t take all your free time, giving you the perfect work-life balance. Or as we call it, tech/life balance! Learn more.


    About Scott

    Scott Hanselman is a former professor, former Chief Architect in finance, now speaker, consultant, father, diabetic, and Microsoft employee. He is a failed stand-up comic, a cornrower, and a book author.

    facebook
    bluesky
    subscribe
    About   Newsletter

    Hosting By
    Hosted on Linux using .NET in an Azure App Service


    Source link

  • JavaScript and TypeScript Projects with React, Angular, or Vue in Visual Studio 2022 with or without .NET

    JavaScript and TypeScript Projects with React, Angular, or Vue in Visual Studio 2022 with or without .NET


    I was reading Gabby’s blog post about the new TypeScript/JavaScript project experience in Visual Studio 2022. You should read the docs on JavaScript and TypeScript in Visual Studio 2022.

    If you’re used to ASP.NET apps when you think about apps that are JavaScript heavy, “front end apps” or TypeScript focused, it can be confusing as to “where does .NET fit in?”

    You need to consider the responsibilities of your various projects or subsystems and the multiple totally valid ways you can build a web site or web app. Let’s consider just a few:

    1. An ASP.NET Web app that renders HTML on the server but uses TS/JS
      • This may have a Web API, Razor Pages, with or without the MVC pattern.
      • You maybe have just added JavaScript via <script> tags
      • Maybe you added a script minimizer/minifier task
      • Can be confusing because it can feel like your app needs to ‘build both the client and the server’ from one project
    2. A mostly JavaScript/TypeScript frontend app where the HTML could be served from any web server (node, kestrel, static web apps, nginx, etc)
      • This app may use Vue or React or Angular but it’s not an “ASP.NET app”
      • It calls backend Web APIs that may be served by ASP.NET, Azure Functions, 3rd party REST APIs, or all of the above
      • This scenario has sometimes been confusing for ASP.NET developers who may get confused about responsibility. Who builds what, where do things end up, how do I build and deploy this?

    VS2022 brings JavaScript and TypeScript support into VS with a full JavaScript Language Service based on TS. It provides a TypeScript NuGet Package so you can build your whole app with MSBuild and VS will do the right thing.

    NEW: Starting in Visual Studio 2022, there is a new JavaScript/TypeScript project type (.esproj) that allows you to create standalone Angular, React, and Vue projects in Visual Studio.

    The .esproj concept is great for folks familiar with Visual Studio as we know that a Solution contains one or more Projects. Visual Studio manages files for a single application in a Project. The project includes source code, resources, and configuration files. In this case we can have a .csproj for a backend Web API and an .esproj that uses a client side template like Angular, React, or Vue.

    Thing is, historically when Visual Studio supported Angular, React, or Vue, it’s templates were out of date and not updated enough. VS2022 uses the native CLIs for these front ends, solving that problem with Angular CLI, Create React App, and Vue CLI.

    If I am in VS and go “File New Project” there are Standalone templates that solve Example 2 above. I’ll pick JavaScript React.

    Standalone JavaScript Templates in VS2022

    Then I’ll click “Add integration for Empty ASP.NET Web API. This will give me a frontend with javascript ready to call a ASP.NET Web API backend. I’ll follow along here.

    Standalone JavaScript React Template

    It then uses the React CLI to make the front end, which again, is cool as it’s whatever version I want it to be.

    React Create CLI

    Then I’ll add my ASP.NET Web API backend to the same solution, so now I have an esproj and a csproj like this

    frontend and backend

    Now I have a nice clean two project system – in this case more JavaScript focused than .NET focused. This one uses npm to startup the project using their web development server and proxyMiddleware to proxy localhost:3000 calls over to the ASP.NET Web API project.

    Here is a React app served by npm calling over to the Weather service served from Kestrel on ASP.NET.

    npm app running in VS 2022 against an ASP.NET Web API

    This is inverted than most ASP.NET Folks are used to, and that’s OK. This shows me that Visual Studio 2022 can support either development style, use the CLI that is installed for whatever Frontend Framework, and allow me to choose what web server and web browser (via Launch.json) I want.

    If you want to flip it, and put ASP.NET Core as the primary and then bring in some TypeScript/JavaScript, follow this tutorial because that’s also possible!


    Sponsor: Make login Auth0’s problem. Not yours. Provide the convenient login features your customers want, like social login, multi-factor authentication, single sign-on, passwordless, and more. Get started for free.


    About Scott

    Scott Hanselman is a former professor, former Chief Architect in finance, now speaker, consultant, father, diabetic, and Microsoft employee. He is a failed stand-up comic, a cornrower, and a book author.

    facebook
    bluesky
    subscribe
    About   Newsletter

    Hosting By
    Hosted on Linux using .NET in an Azure App Service


    Source link

  • Updating to .NET 8, updating to IHostBuilder, and running Playwright Tests within NUnit headless or headed on any OS

    Updating to .NET 8, updating to IHostBuilder, and running Playwright Tests within NUnit headless or headed on any OS


    All the Unit Tests passI’ve been doing not just Unit Testing for my sites but full on Integration Testing and Browser Automation Testing as early as 2007 with Selenium. Lately, however, I’ve been using the faster and generally more compatible Playwright. It has one API and can test on Windows, Linux, Mac, locally, in a container (headless), in my CI/CD pipeline, on Azure DevOps, or in GitHub Actions.

    For me, it’s that last moment of truth to make sure that the site runs completely from end to end.

    I can write those Playwright tests in something like TypeScript, and I could launch them with node, but I like running end unit tests and using that test runner and test harness as my jumping off point for my .NET applications. I’m used to right clicking and “run unit tests” or even better, right click and “debug unit tests” in Visual Studio or VS Code. This gets me the benefit of all of the assertions of a full unit testing framework, and all the benefits of using something like Playwright to automate my browser.

    In 2018 I was using WebApplicationFactory and some tricky hacks to basically spin up ASP.NET within .NET (at the time) Core 2.1 within the unit tests and then launching Selenium. This was kind of janky and would require to manually start a separate process and manage its life cycle. However, I kept on with this hack for a number of years basically trying to get the Kestrel Web Server to spin up inside of my unit tests.

    I’ve recently upgraded my main site and podcast site to .NET 8. Keep in mind that I’ve been moving my websites forward from early early versions of .NET to the most recent versions. The blog is happily running on Linux in a container on .NET 8, but its original code started in 2002 on .NET 1.1.

    Now that I’m on .NET 8, I scandalously discovered (as my unit tests stopped working) that the rest of the world had moved from IWebHostBuilder to IHostBuilder five version of .NET ago. Gulp. Say what you will, but the backward compatibility is impressive.

    As such my code for Program.cs changed from this

    public static void Main(string[] args)
    {
    CreateWebHostBuilder(args).Build().Run();
    }

    public static IWebHostBuilder CreateWebHostBuilder(string[] args) =>
    WebHost.CreateDefaultBuilder(args)
    .UseStartup<Startup>();

    to this:

    public static void Main(string[] args)
    {
    CreateHostBuilder(args).Build().Run();
    }

    public static IHostBuilder CreateHostBuilder(string[] args) =>
    Host.CreateDefaultBuilder(args).
    ConfigureWebHostDefaults(WebHostBuilder => WebHostBuilder.UseStartup<Startup>());

    Not a major change on the outside but tidies things up on the inside and sets me up with a more flexible generic host for my web app.

    My unit tests stopped working because my Kestral Web Server hack was no longer firing up my server.

    Here is an example of my goal from a Playwright perspective within a .NET NUnit test.

    [Test]
    public async Task DoesSearchWork()
    {
    await Page.GotoAsync(Url);

    await Page.Locator("#topbar").GetByRole(AriaRole.Link, new() { Name = "episodes" }).ClickAsync();

    await Page.GetByPlaceholder("search and filter").ClickAsync();

    await Page.GetByPlaceholder("search and filter").TypeAsync("wife");

    const string visibleCards = ".showCard:visible";

    var waiting = await Page.WaitForSelectorAsync(visibleCards, new PageWaitForSelectorOptions() { Timeout = 500 });

    await Expect(Page.Locator(visibleCards).First).ToBeVisibleAsync();

    await Expect(Page.Locator(visibleCards)).ToHaveCountAsync(5);
    }

    I love this. Nice and clean. Certainly here we are assuming that we have a URL in that first line, which will be localhost something, and then we assume that our web application has started up on its own.

    Here is the setup code that starts my new “web application test builder factory,” yeah, the name is stupid but it’s descriptive. Note the OneTimeSetUp and the OneTimeTearDown. This starts my web app within the context of my TestHost. Note the :0 makes the app find a port which I then, sadly, have to dig out and put into the Url private for use within my Unit Tests. Note that the <Startup> is in fact my Startup class within Startup.cs which hosts my app’s pipeline and Configure and ConfigureServices get setup here so routing all works.

    private string Url;
    private WebApplication? _app = null;

    [OneTimeSetUp]
    public void Setup()
    {
    var builder = WebApplicationTestBuilderFactory.CreateBuilder<Startup>();

    var startup = new Startup(builder.Environment);
    builder.WebHost.ConfigureKestrel(o => o.Listen(IPAddress.Loopback, 0));
    startup.ConfigureServices(builder.Services);
    _app = builder.Build();

    // listen on any local port (hence the 0)
    startup.Configure(_app, _app.Configuration);
    _app.Start();

    //you are kidding me
    Url = _app.Services.GetRequiredService<IServer>().Features.GetRequiredFeature<IServerAddressesFeature>().Addresses.Last();
    }

    [OneTimeTearDown]
    public async Task TearDown()
    {
    await _app.DisposeAsync();
    }

    So what horrors are buried in WebApplicationTestBuilderFactory? The first bit is bad and we should fix it for .NET 9. The rest is actually every nice, with a hat tip to David Fowler for his help and guidance! This is the magic and the ick in one small helper class.

    public class WebApplicationTestBuilderFactory 
    {
    public static WebApplicationBuilder CreateBuilder<T>() where T : class
    {
    //This ungodly code requires an unused reference to the MvcTesting package that hooks up
    // MSBuild to create the manifest file that is read here.
    var testLocation = Path.Combine(AppContext.BaseDirectory, "MvcTestingAppManifest.json");
    var json = JsonObject.Parse(File.ReadAllText(testLocation));
    var asmFullName = typeof(T).Assembly.FullName ?? throw new InvalidOperationException("Assembly Full Name is null");
    var contentRootPath = json?[asmFullName]?.GetValue<string>();

    //spin up a real live web application inside TestHost.exe
    var builder = WebApplication.CreateBuilder(
    new WebApplicationOptions()
    {
    ContentRootPath = contentRootPath,
    ApplicationName = asmFullName
    });
    return builder;
    }
    }

    The first 4 lines are nasty. Because the test runs in the context of a different directory and my website needs to run within the context of its own content root path, I have to force the content root path to be correct and the only way to do that is by getting the apps base directory from a file generated within MSBuild from the (aging) MvcTesting package. The package is not used, but by referencing it it gets into the build and makes that file that I then use to pull out the directory.

    If we can get rid of that “hack” and pull the directory from context elsewhere, then this helper function turns into a single line and .NET 9 gets WAY WAY more testable!

    Now I can run my Unit Tests AND Playwright Browser Integration Tests across all OS’s, headed or headless, in docker or on the metal. The site is updated to .NET 8 and all is right with my code. Well, it runs at least. 😉


    About Scott

    Scott Hanselman is a former professor, former Chief Architect in finance, now speaker, consultant, father, diabetic, and Microsoft employee. He is a failed stand-up comic, a cornrower, and a book author.

    facebook
    bluesky
    subscribe
    About   Newsletter

    Hosting By
    Hosted on Linux using .NET in an Azure App Service


    Source link