برچسب: .NET

  • How to log Correlation IDs in .NET APIs with Serilog | Code4IT

    How to log Correlation IDs in .NET APIs with Serilog | Code4IT


    APIs often call other APIs to perform operations. If an error occurs in one of them, how can you understand the context that caused that error? You can use Correlation IDs in your logs!

    Table of Contents

    Just a second! 🫷
    If you are here, it means that you are a software developer.
    So, you know that storage, networking, and domain management have a cost .

    If you want to support this blog, please ensure that you have disabled the adblocker for this site.
    I configured Google AdSense to show as few ADS as possible – I don’t want to bother you with lots of ads, but I still need to add some to pay for the resources for my site.

    Thank you for your understanding.
    Davide

    Correlation IDs are values that are passed across different systems to correlate the operations performed during a “macro” operation.

    Most of the time they are passed as HTTP Headers – of course in systems that communicate via HTTP.

    In this article, we will learn how to log those Correlation IDs using Serilog, a popular library that helps handle logs in .NET applications.

    Setting up the demo dotNET project

    This article is heavily code-oriented. So, let me first describe the demo project.

    Overview of the project

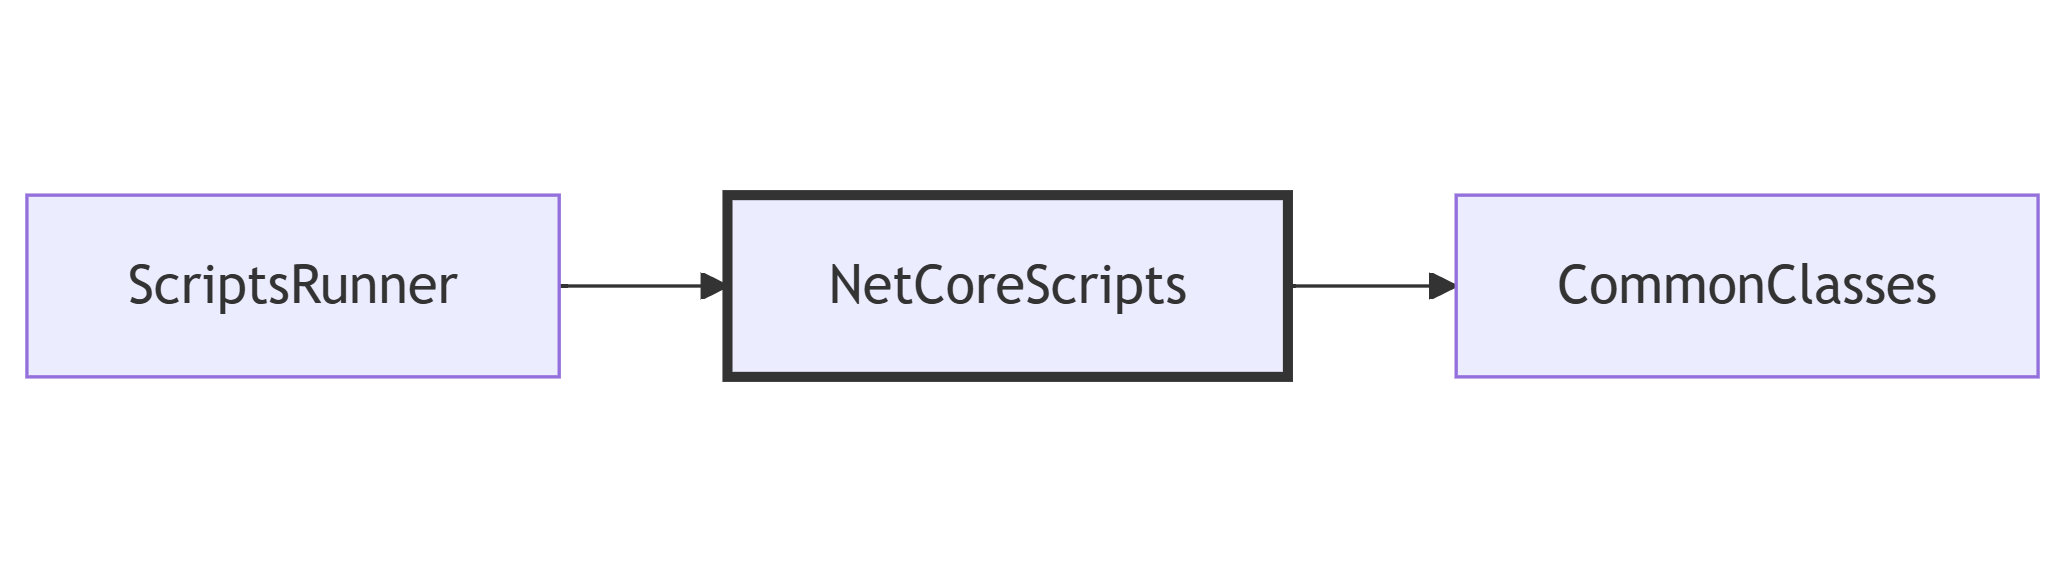
    To demonstrate how to log Correlation IDs and how to correlate logs generated by different systems, I’ve created a simple solution that handles bookings for a trip.

    The “main” project, BookingSystem, fetches data from external systems by calling some HTTP endpoints; it then manipulates the data and returns an aggregate object to the caller.

    BookingSystem depends on two projects, placed within the same solution: CarRentalSystem, which returns data about the available cars in a specified date range, and HotelsSystem, which does the same for hotels.

    So, this is the data flow:

    Operations sequence diagram

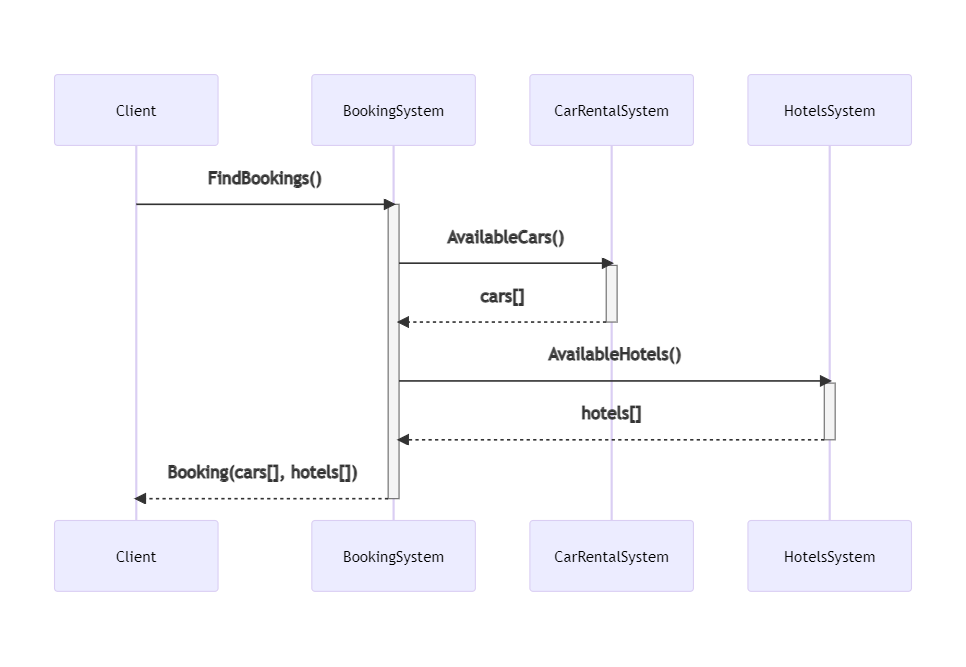
    If an error occurs in any of those systems, can we understand the full story of the failed request? No. Unless we use Correlation IDs!

    Let’s see how to add them and how to log them.

    We need to propagate HTTP Headers. You could implement it from scratch, as we’ve seen in a previous article. Or we could use a native library that does it all for us.

    Of course, let’s go with the second approach.

    For every project that will propagate HTTP headers, we have to follow these steps.

    First, we need to install Microsoft.AspNetCore.HeaderPropagation: this NuGet package allows us to add the .NET classes needed to propagate HTTP headers.

    Next, we have to update the part of the project that we use to configure our application. For .NET projects with Minimal APIs, it’s the Program class.

    Here we need to add the capability to read the HTTP Context, by using

    builder.Services.AddHttpContextAccessor();
    

    As you can imagine, this is needed because, to propagate HTTP Headers, we need to know which are the incoming HTTP Headers. And they can be read from the HttpContext object.

    Next, we need to specify, as a generic behavior, which headers must be propagated. For instance, to propagate the “my-custom-correlation-id” header, you must add

    builder.Services.AddHeaderPropagation(options => options.Headers.Add("my-custom-correlation-id"));
    

    Then, for every HttpClient that will propagate those headers, you have to add AddHeaderPropagation(), like this:

    builder.Services.AddHttpClient("cars_system", c =>
        {
            c.BaseAddress = new Uri("https://localhost:7159/");
        }).AddHeaderPropagation();
    

    Finally, one last instruction that tells the application that it needs to use the Header Propagation functionality:

    app.UseHeaderPropagation();
    

    To summarize, here’s the minimal configuration to add HTTP Header propagation in a dotNET API.

    public static void Main(string[] args)
    {
        var builder = WebApplication.CreateBuilder(args);
    
        builder.Services.AddControllers();
        builder.Services.AddHttpContextAccessor();
        builder.Services.AddHeaderPropagation(options => options.Headers.Add("my-custom-correlation-id"));
    
        builder.Services.AddHttpClient("cars_system", c =>
        {
            c.BaseAddress = new Uri("https://localhost:7159/");
        }).AddHeaderPropagation();
    
        var app = builder.Build();
        app.UseHeaderPropagation();
        app.MapControllers();
        app.Run();
    }
    

    We’re almost ready to go!

    But we’re missing the central point of this article: logging an HTTP Header as a Correlation ID!

    Initializing Serilog

    We’ve already met Serilog several times in this blog, so I won’t repeat how to install it and how to define logs the best way possible.

    We will write our logs on Seq, and we’re overriding the minimum level to skip the noise generated by .NET:

    builder.Host.UseSerilog((ctx, lc) => lc
        .WriteTo.Seq("http://localhost:5341")
        .MinimumLevel.Information()
        .MinimumLevel.Override("Microsoft", LogEventLevel.Warning)
        .MinimumLevel.Override("Microsoft.AspNetCore", LogEventLevel.Warning)
        .Enrich.FromLogContext();
    

    Since you probably know what’s going on, let me go straight to the point.

    Install Serilog Enricher for Correlation IDs

    We’re gonna use a specific library to log HTTP Headers treating them as Correlation IDs. To use it, you have to install the Serilog.Enrichers.CorrelationId package available on NuGet.

    Therefore, you can simply run

    dotnet add Serilog.Enrichers.CorrelationId
    

    to every .NET project that will use this functionality.

    Once we have that NuGet package ready, we can add its functionality to our logger by adding this line:

    .Enrich.WithCorrelationIdHeader("my-custom-correlation-id")
    

    This simple line tells dotnet that, when we see an HTTP Header named “my-custom-correlation-id”, we should log it as a Correlation ID.

    Run it all together

    Now we have everything in place – it’s time to run it!

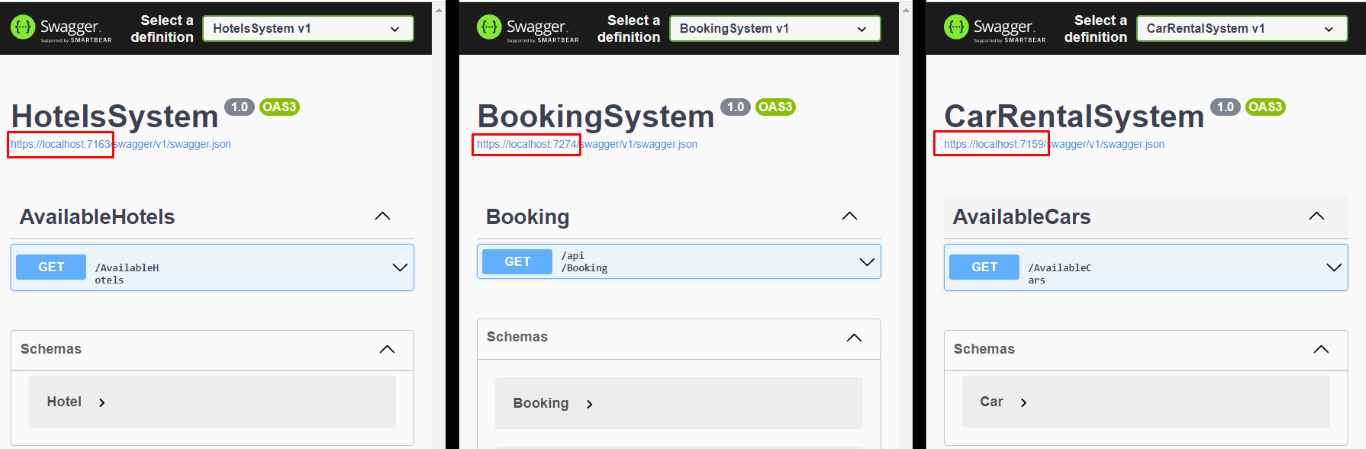
    We have to run all the 3 services at the same time (you can do it with VisualStudio or you can run them separately using a CMD), and we need to have Seq installed on our local machine.

    You will see 3 instances of Swagger, and each instance is running under a different port.

    Swagger pages of our systems

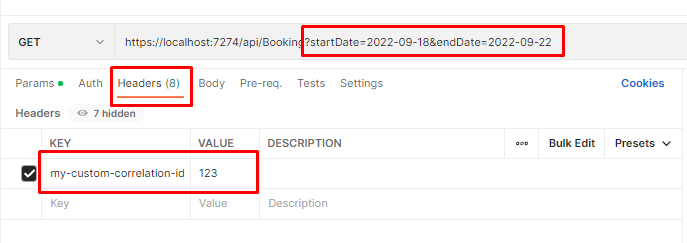
    Once we have all the 3 applications up and running, we can call the /Bookings endpoint passing it a date range and an HTTP Header with key “my-custom-correlation-id” and value = “123” (or whatever we want).

    How to use HTTP Headers with Postman

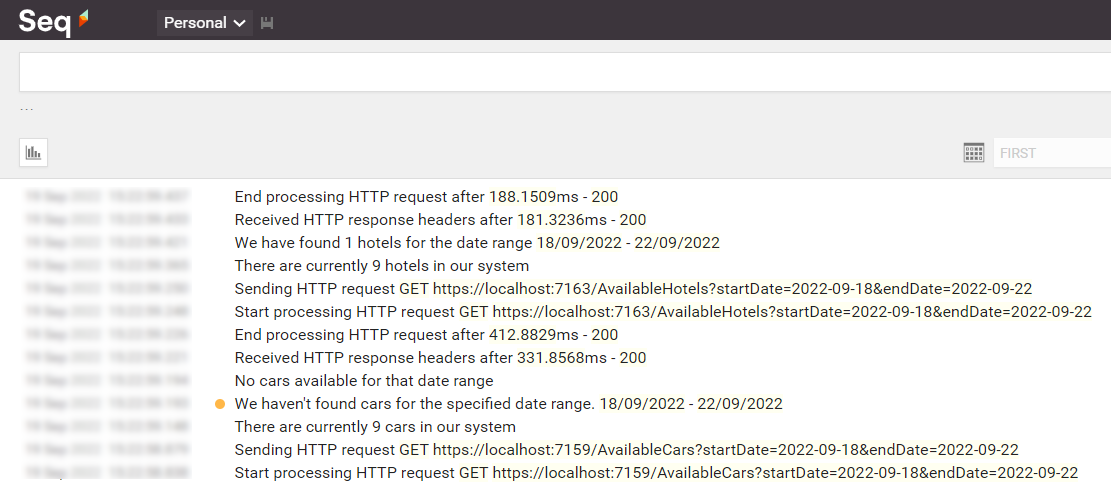
    If everything worked as expected, we can open Seq and see all the logs we’ve written in our applications:

    All logs in SEQ

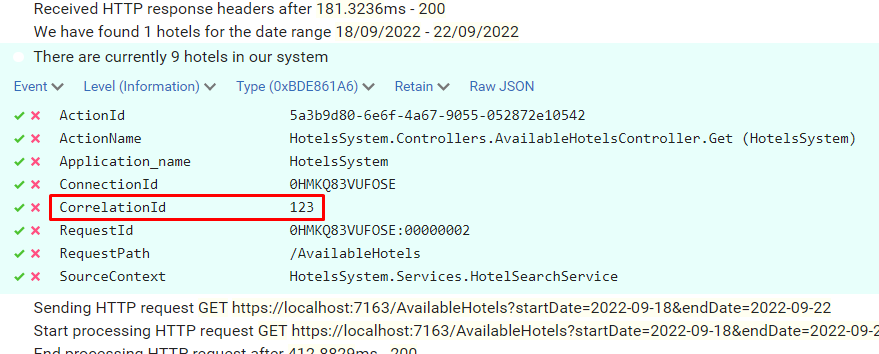
    Open one of them and have a look at the attributes of the logs: you will see a CorrelationId field with the value set to “123”.

    Our HTTP Header is now treated as Correlation ID

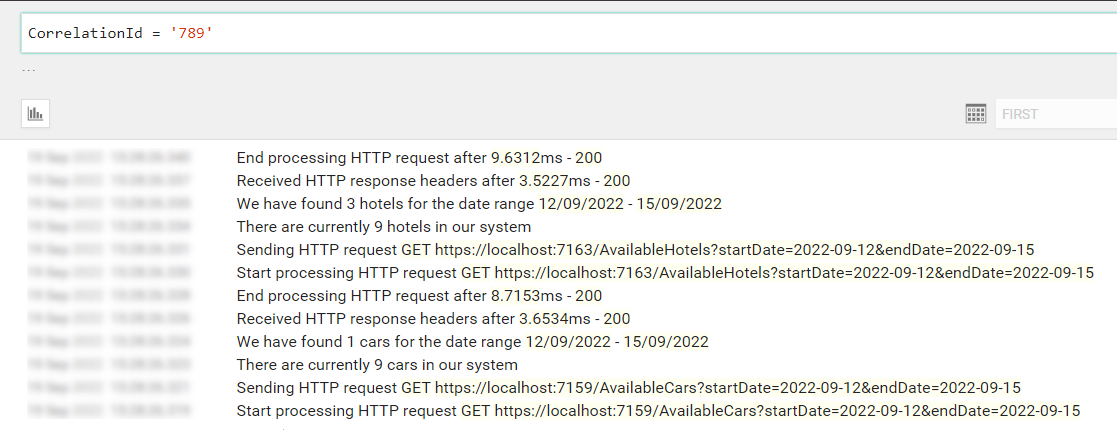
    Now, to better demonstrate how it works, call the endpoint again, but this time set “789” as my-custom-correlation-id, and specify a different date range. You should be able to see another set of logs generated by this second call.

    You can now apply filters to see which logs are related to a specific Correlation ID: open one log, click on the tick button and select “Find”.

    Filter button on SEQ

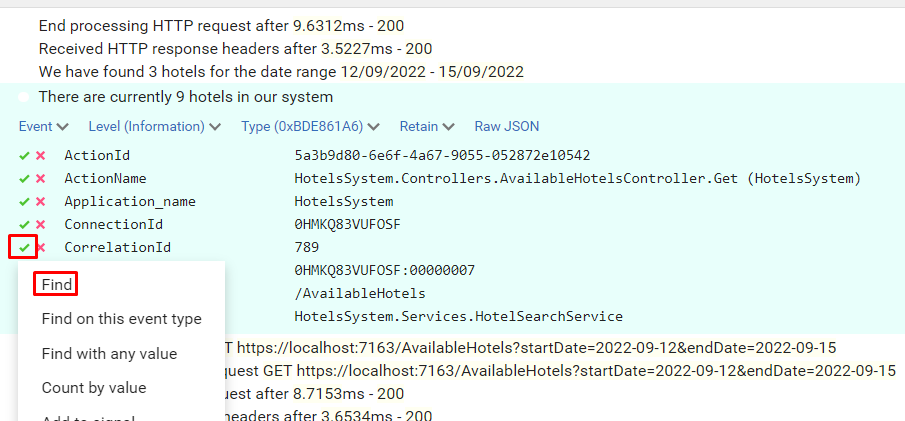
    You will then see all and only logs that were generated during the call with header my-custom-correlation-id set to “789”.

    List of all logs related to a specific Correlation ID

    Further readings

    That’s it. With just a few lines of code, you can dramatically improve your logging strategy.

    You can download and run the whole demo here:

    🔗 LogCorrelationId demo | GitHub

    To run this project you have to install both Serilog and Seq. You can do that by following this step-by-step guide:

    🔗 Logging with Serilog and Seq | Code4IT

    For this article, we’ve used the Microsoft.AspNetCore.HeaderPropagation package, which is ready to use. Are you interested in building your own solution – or, at least, learning how you can do that?

    🔗 How to propagate HTTP Headers (and Correlation IDs) using HttpClients in C# | Code4IT

    Lastly, why not use Serilog’s Scopes? And what are they? Check it out here:

    🔗 How to improve Serilog logging in .NET 6 by using Scopes | Code4IT

    Wrapping up

    This article concludes a sort of imaginary path that taught us how to use Serilog, how to correlate different logs within the same application using Scopes, and how to correlate logs from different services using Correlation IDs.

    Using these capabilities, you will be able to write logs that can help you understand the context in which a specific log occurred, thus helping you fix errors more efficiently.

    This article first appeared on Code4IT

    Happy coding!

    🐧


    Source link

  • The 2 secret endpoints I create in my .NET APIs | Code4IT

    The 2 secret endpoints I create in my .NET APIs | Code4IT


    In this article, I will show you two simple tricks that help me understand the deployment status of my .NET APIs

    Table of Contents

    Just a second! 🫷
    If you are here, it means that you are a software developer.
    So, you know that storage, networking, and domain management have a cost .

    If you want to support this blog, please ensure that you have disabled the adblocker for this site.
    I configured Google AdSense to show as few ADS as possible – I don’t want to bother you with lots of ads, but I still need to add some to pay for the resources for my site.

    Thank you for your understanding.
    Davide

    When I create Web APIs with .NET I usually add two “secret” endpoints that I can use to double-check the status of the deployment.

    I generally expose two endpoints: one that shows me some info about the current environment, and another one that lists all the application settings defined after the deployment.

    In this article, we will see how to create those two endpoints, how to update the values when building the application, and how to hide those endpoints.

    Project setup

    For this article, I will use a simple .NET 6 API project. We will use Minimal APIs, and we will use the appsettings.json file to load the application’s configuration values.

    Since we are using Minimal APIs, you will have the endpoints defined in the Main method within the Program class.

    To expose an endpoint that accepts the GET HTTP method, you can write

    endpoints.MapGet("say-hello", async context =>
    {
       await context.Response.WriteAsync("Hello, everybody!");
    });
    

    That’s all you need to know about .NET Minimal APIs for the sake of this article. Let’s move to the main topics ⏩

    How to show environment info in .NET APIs

    Let’s say that your code execution depends on the current Environment definition. Typical examples are that, if you’re running on production you may want to hide some endpoints otherwise visible in the other environments, or that you will use a different error page when an unhandled exception is thrown.

    Once the application has been deployed, how can you retrieve the info about the running environment?

    Here we go:

    app.MapGet("/env", async context =>
    {
        IWebHostEnvironment? hostEnvironment = context.RequestServices.GetRequiredService<IWebHostEnvironment>();
        var thisEnv = new
        {
            ApplicationName = hostEnvironment.ApplicationName,
            Environment = hostEnvironment.EnvironmentName,
        };
    
        var jsonSerializerOptions = new JsonSerializerOptions { WriteIndented = true };
        await context.Response.WriteAsJsonAsync(thisEnv, jsonSerializerOptions);
    });
    

    This endpoint is quite simple.

    The context variable, which is of type HttpContext, exposes some properties. Among them, the RequestServices property allows us to retrieve the services that have been injected when starting up the application. We can then use GetRequiredService to get a service by its type and store it into a variable.

    💡 GetRequiredService throws an exception if the service cannot be found. On the contrary, GetService returns null. I usually prefer GetRequiredService, but, as always, it depends on what you’re using it.

    Then, we create an anonymous object with the information of our interest and finally return them as an indented JSON.

    It’s time to run it! Open a terminal, navigate to the API project folder (in my case, SecretEndpoint), and run dotnet run. The application will compile and start; you can then navigate to /env and see the default result:

    The JSON result of the env endpoint

    How to change the Environment value

    While the applicationName does not change – it is the name of the running assembly, so any other value will make stop your application from running – you can (and, maybe, want to) change the Environment value.

    When running the application using the command line, you can use the --environment flag to specify the Environment value.

    So, running

    dotnet run --environment MySplendidCustomEnvironment
    

    will produce this result:

    MySplendidCustomEnvironment is now set as Environment

    There’s another way to set the environment: update the launchSettings.json and run the application using Visual Studio.

    To do that, open the launchSettings.json file and update the profile you are using by specifying the Environment name. In my case, the current profile section will be something like this:

    "profiles": {
    "SecretEntpoints": {
        "commandName": "Project",
        "dotnetRunMessages": true,
        "launchBrowser": true,
        "launchUrl": "swagger",
        "applicationUrl": "https://localhost:7218;http://localhost:5218",
        "environmentVariables":
            {
                "ASPNETCORE_ENVIRONMENT": "EnvByProfile"
            }
        },
    }
    

    As you can see, the ASPNETCORE_ENVIRONMENT variable is set to EnvByProfile.

    If you run the application using Visual Studio using that profile you will see the following result:

    EnvByProfile as defined in the launchSettings file

    How to list all the configurations in .NET APIs

    In my current company, we deploy applications using CI/CD pipelines.

    This means that final variables definition comes from the sum of 3 sources:

    • the project’s appsettings file
    • the release pipeline
    • the deployment environment

    You can easily understand how difficult it is to debug those applications without knowing the exact values for the configurations. That’s why I came up with these endpoints.

    To print all the configurations, we’re gonna use an approach similar to the one we’ve used in the previous example.

    The endpoint will look like this:

    app.MapGet("/conf", async context =>
    {
        IConfiguration? allConfig = context.RequestServices.GetRequiredService<IConfiguration>();
    
        IEnumerable<KeyValuePair<string, string>> configKv = allConfig.AsEnumerable();
    
        var jsonSerializerOptions = new JsonSerializerOptions { WriteIndented = true };
        await context.Response.WriteAsJsonAsync(configKv, jsonSerializerOptions);
    });
    

    What’s going on? We are retrieving the IConfiguration object, which contains all the configurations loaded at startup; then, we’re listing all the configurations as key-value pairs, and finally, we’re returning the list to the client.

    As an example, here’s my current appsettings.json file:

    {
      "ApiService": {
        "BaseUrl": "something",
        "MaxPage": 5,
        "NestedValues": {
          "Skip": 10,
          "Limit": 56
        }
      },
      "MyName": "Davide"
    }
    

    When I run the application and call the /conf endpoint, I will see the following result:

    Configurations printed as key-value pairs

    Notice how the structure of the configuration values changes. The value

    {
      "ApiService": {
        "NestedValues": {
          "Limit": 56
        }
    }
    

    is transformed into

    {
        "Key": "ApiService:NestedValues:Limit",
        "Value": "56"
    },
    

    That endpoint shows a lot more than you can imagine: take some time to have a look at those configurations – you’ll thank me later!

    How to change the value of a variable

    There are many ways to set the value of your variables.

    The most common one is by creating an environment-specific appsettings file that overrides some values.

    So, if your environment is called “EnvByProfile”, as we’ve defined in the previous example, the file will be named appsettings.EnvByProfile.json.

    There are actually some other ways to override application variables: we will learn them in the next article, so stay tuned! 😎

    3 ways to hide your endpoints from malicious eyes

    Ok then, we have our endpoints up and running, but they are visible to anyone who correctly guesses their addresses. And you don’t want to expose such sensitive info to malicious eyes, right?

    There are, at least, 3 simple values to hide those endpoints:

    • Use a non-guessable endpoint: you can use an existing word, such as “housekeeper”, use random letters, such as “lkfrmlvkpeo”, or use a Guid, such as “E8E9F141-6458-416E-8412-BCC1B43CCB24”;
    • Specify a key on query string: if that key is not found or it has an invalid value, return a 404-not found result
    • Use an HTTP header, and, again, return 404 if it is not valid.

    Both query strings and HTTP headers are available in the HttpContext object injected in the route definition.

    Now it’s your turn to find an appropriate way to hide these endpoints. How would you do that? Drop a comment below 📩

    Edit 2022-10-10: I thought it was quite obvious, but apparently it is not: these endpoints expose critical information about your applications and your infrastructure, so you should not expose them unless it is strictly necessary! If you have strong authentication in place, use it to secure those endpoints. If you don’t, hide those endpoints the best you can, and show only necessary data, and not everything. Strip out sensitive content. And, as soon as you don’t need that info anymore, remove those endpoints (comment them out or generate them only if a particular flag is set at compilation time). Another possible way is by using feature flags. In the end, take that example with a grain of salt: learn that you can expose them, but keep in mind that you should not expose them.

    Further readings

    We’ve used a quite new way to build and develop APIs with .NET, called “Minimal APIs”. You can read more here:

    🔗 Minimal APIs | Microsoft Learn

    If you are not using Minimal APIs, you still might want to create such endpoints. We’ve talked about accessing the HttpContext to get info about the HTTP headers and query string. When using Controllers, accessing the HttpContext requires some more steps. Here’s an article that you may find interesting:

    🔗 How to access the HttpContext in .NET API | Code4IT

    This article first appeared on Code4IT

    Wrapping up

    In this article, we’ve seen how two endpoints can help us with understanding the status of the deployments of our applications.

    It’s a simple trick that you can consider adding to your projects.

    Do you have some utility endpoints?

    Happy coding!

    🐧


    Source link

  • 3 (and more) ways to set configuration values in .NET &vert; Code4IT

    3 (and more) ways to set configuration values in .NET | Code4IT


    Every application relies on some configurations. Many devs set them up using only the appsettings file. But there’s more!

    Table of Contents

    Just a second! 🫷
    If you are here, it means that you are a software developer.
    So, you know that storage, networking, and domain management have a cost .

    If you want to support this blog, please ensure that you have disabled the adblocker for this site.
    I configured Google AdSense to show as few ADS as possible – I don’t want to bother you with lots of ads, but I still need to add some to pay for the resources for my site.

    Thank you for your understanding.
    Davide

    Needless to say, almost every application needs to deal with some configurations. There are tons of use cases, and you already have some of them in mind, don’t you?

    If you’re working with .NET, you’ve probably already used the appsettings.json file. It’s a good starting point, but it may be not enough in the case of complex applications (and complex deployments).

    In this article, we will learn some ways to set configurations in a .NET API application. We will use the appsettings file, of course, and some other ways such as the dotnet CLI. Let’s go! 🚀

    Project setup

    First things first: let’s set up the demo project.

    I have created a simple .NET 6 API application using Minimal APIs. This is my whole application (yes, less than 50 lines!)

    using Microsoft.Extensions.Options;
    
    namespace HowToSetConfigurations
    {
        public class Program
        {
            public static void Main(string[] args)
            {
                WebApplicationBuilder builder = WebApplication.CreateBuilder(args);
    
                builder.Services.Configure<MyRootConfig>(
                    builder.Configuration.GetSection("RootConfig")
                );
    
                builder.Services.Configure<JsonOptions>(o =>
                {
                    o.SerializerOptions.WriteIndented = true;
                });
    
                WebApplication app = builder.Build();
    
                app.MapGet("/config", (IOptionsSnapshot<MyRootConfig> options) =>
                {
                    MyRootConfig config = options.Value;
                    return config;
                });
    
                app.Run();
            }
        }
    
        public class MyRootConfig
        {
            public MyNestedConfig Nested { get; set; }
            public string MyName { get; set; }
        }
    
        public class MyNestedConfig
        {
            public int Skip { get; set; }
            public int Limit { get; set; }
        }
    }
    

    Nothing else! 🤩

    In short, I scaffold the WebApplicationBuilder, configure that I want to map the settings section with root named RootConfig to my class of type MyRootConfig, and then run the application.

    I then expose a single endpoint, /config, which returns the current configurations, wrapped within an IOptionsSnapshot<MyRootConfig> object.

    Where is the source of the application’s configurations?

    As stated on the Microsoft docs website, here 🔗, the WebApplicationBuilder

    Loads app configuration in the following order from:
    appsettings.json.
    appsettings.{Environment}.json.
    User secrets when the app runs in the Development environment using the entry assembly.
    Environment variables.
    Command-line arguments.

    So, yeah, we have several possible sources, and the order does matter.

    Let’s see a bunch of them.

    Define settings within the appsetting.json file

    The most common way is by using the appsettings.json file. Here, in a structured and hierarchical way, you can define all the logs used as a baseline for your application.

    A typical example is this one:

    {
      "Logging": {
        "LogLevel": {
          "Default": "Information",
          "Microsoft.AspNetCore": "Warning"
        }
      },
      "AllowedHosts": "*",
      "RootConfig": {
        "MyName": "Davide",
        "Nested": {
          "Skip": 2,
          "Limit": 3
        }
      }
    }
    

    With this file, all the fields within the RootConfig element will be mapped to the MyRootConfig class at startup. That object can then be returned using the /config endpoint.

    Running the application (using Visual Studio or the dotnet CLI) you will be able to call that endpoint and see the expected result.

    Configuration results from plain Appsettings file

    Use environment-specific appsettings.json

    Now, you probably know that you can use other appsettings files with a name such as appsettings.Development.json.

    appsettings.Development file

    With that file, you can override specific configurations using the same structure, but ignoring all the configs that don’t need to be changed.

    Let’s update the Limit field defined in the “base” appsettings. You don’t need to recreate the whole structure just for one key; you can use this JSON instead:

    {
      "RootConfig": {
        "Nested": {
          "Limit": 9
        }
      }
    }
    

    Now, if we run the application using VS we will see this result:

    The key defined in the appsettings.Development.json file is replaced in the final result

    Ok, but what made .NET understand that I wanted to use that file?? It’s a matter of Environment variables and Launch profiles.

    How to define profiles within the launchSettings.json file

    Within the Properties folder in your project, you can see a launchSettings.json file. As you might expect, that file describes how you can launch the application.

    launchSettings file location in the solution

    Here we have some Launch profiles, and each of them specifies an ASPNETCORE_ENVIRONMENT variable. By default, its value is set to Development.

    "profiles": {
        "HowToSetConfigurations": {
          "commandName": "Project",
          "dotnetRunMessages": true,
          "launchBrowser": true,
          "launchUrl": "config",
          "applicationUrl": "https://localhost:7280;http://localhost:5280",
          "environmentVariables": {
            "ASPNETCORE_ENVIRONMENT": "Development"
          }
        },
    }
    

    Now, recall that the environment-specific appsettings file name is defined as appsettings.{Environment}.json. Therefore, by running your application with Visual Studio using the HowToSetConfigurations launch profile, you’re gonna replace that {Environment} with Development, thus using the appsettings.Development.json.

    Ça va sans dire that you can use every value you prefer – such as Staging, MyCustomEnvironmentName, and so on.

    How to define the current Environment with the CLI

    If you are using the dotnet CLI you can set that environment variable as

    dotnet run --ASPNETCORE_ENVIRONMENT=Development
    

    or, in a simpler way, you can use

    dotnet run --environment Development
    

    and get the same result.

    How do nested configurations get resolved?

    As we’ve seen in a previous article, even if we are using configurations defined in a hierarchical structure, in the end, they are transformed into key-value pairs.

    The Limit key as defined here:

    {
      "RootConfig": {
        "Nested": {
          "Limit": 9
        }
      }
    }
    

    is transformed into

    {
        "Key": "RootConfig:Nested:Limit",
        "Value": "9"
    },
    

    with the : separator. We will use this info shortly.

    Define configurations in the launchSettings file

    As we’ve seen before, each profile defined in the launchSettings file describes a list of environment variables:

    "environmentVariables": {
      "ASPNETCORE_ENVIRONMENT": "Development"
    }
    

    This means that we can also define our configurations here, and have them loaded when using this specific profile.

    From these configurations

    "RootConfig": {
        "MyName": "Davide",
        "Nested": {
          "Skip": 2,
          "Limit": 3
        }
      }
    

    I want to update the MyName field.

    I can then update the current profile as such:

    "environmentVariables": {
      "ASPNETCORE_ENVIRONMENT": "Development",
      "RootConfig:MyName": "Mr Bellone"
    }
    

    so that, when I run the application using that profile, I will get this result:

    The RootConfig:MyName is replaced, its value is taken from the launchSettings file

    Have you noticed the key RootConfig:MyName? 😉

    🔎 Notice that now we have both MyName = Mr Bellone, as defined in the lauchSettings file, and Limit = 9, since we’re still using the appsettings.Development.json file (because of that “ASPNETCORE_ENVIRONMENT”: “Development” ).

    How to define the current profile with the CLI

    Clearly, we can use the dotnet CLI to load the whole environment profile. We just need to specify it using the --launch-profile flag:

    dotnet run --launch-profile=HowToSetConfigurations
    

    Define application settings using the dotnet CLI

    Lastly, we can specify config values directly using the CLI.

    It’s just a matter of specifying the key-value pairs as such:

    dotnet run --RootConfig:Nested:Skip=55
    

    And – TAH-DAH! – you will see this result:

    JSON result with the key specified on the CLI

    ❓ A question for you! Notice that, even though I specified only the Skip value, both Limit and MyName have the value defined before. Do you know why it happens? Drop a message below if you know the answer! 📩

    Further readings

    As always, there’s more!

    If you want to know more about how dotNET APIs load and start, you should have a look at this page:

    🔗 ASP.NET Core Web Host | Microsoft Docs

    Ok, now you know different approaches for setting configurations.
    How do you know the exact values that are set in your application?

    🔗 The 2 secret endpoints I create in my .NET APIs | Code4IT

    This article first appeared on Code4IT

    Wrapping up

    Ok then, in this article we’ve seen different approaches you can use to define configurations in your .NET API projects.

    Knowing what you can do with the CLI can be helpful especially when using CI/CD, in case you need to run the application using specific keys.

    Do you know any other ways to define configs?

    Happy coding!

    🐧


    Source link

  • How to deploy .NET APIs on Azure using GitHub actions &vert; Code4IT

    How to deploy .NET APIs on Azure using GitHub actions | Code4IT


    Building APIs with .NET is easy. Deploying them on Azure is easy too, with GitHub Actions!

    Table of Contents

    Just a second! 🫷
    If you are here, it means that you are a software developer.
    So, you know that storage, networking, and domain management have a cost .

    If you want to support this blog, please ensure that you have disabled the adblocker for this site.
    I configured Google AdSense to show as few ADS as possible – I don’t want to bother you with lots of ads, but I still need to add some to pay for the resources for my site.

    Thank you for your understanding.
    Davide

    With Continuous Delivery (CD), you can deploy your code in a fast-paced and stable way.

    To deploy applications, you’ll need workflows that run and automate the process. In that way, you don’t have to perform repetitive tasks and the whole process becomes less error-prone.

    In this article, we will learn how to implement CD pipelines using GitHub Actions. In particular, we will focus on the case of a .NET API application that will be deployed on Azure.

    Create a .NET API project

    Since the focus of this article is on the deployment part, we won’t create complex APIs. Just a simple Hello Word is enough.

    To do that, we’re gonna use dotnet Minimal API – a way to create APIs without scaffolding lots of files and configurations.

    Our API, the BooksAPI, has a single endpoint: /, the root, simply returns “Hello World!”.

    All our code is stored in the Program file:

    var builder = WebApplication.CreateBuilder(args);
    
    var app = builder.Build();
    
    app.UseHttpsRedirection();
    
    app.MapGet("/", () => "Hello World!");
    
    app.Run();
    

    Nothing fancy: run the application locally, and navigate to the root. You will see the Hello World message.

    Lastly, put your code on GitHub: initialize a repository and publish it on GitHub – it can either be a public or a private repository.

    Create an App Service on Azure

    Now, to deploy an application, we need to define its destination. We’re going to deploy it on Azure, so you need an Azure account before moving on.

    Open the Azure Portal, navigate to the App Service section, and create a new one.

    Configure it as you wish, and then proceed until you have it up and running.

    Once everything is done, you should have something like this:

    Azure App Service overview

    Now the application is ready to be used: we now need to deploy our code here.

    Generate the GitHub Action YAML file for deploying .NET APIs on Azure

    It’s time to create our Continuous Delivery pipeline.

    Luckily, GitHub already provides lots of templates for GitHub Actions. We will need one specific for our .NET APIs.

    On GitHub, navigate to your repository, head to the Actions menu, and select New workflow.

    New Workflow button on GitHub

    You will see several predefined actions that allow you to do stuff with your repository. We are now interested in the one called “Deploy a .NET Core app to an Azure Web App”:

    Template for deploying the .NET Application on Azure

    Clicking on “Configure” you will see a template. Read carefully the instructions, as they will guide you to the correct configuration of the GitHub action.

    In particular, you will have to update the environment variables specified in this section:

    env:
      AZURE_WEBAPP_NAME: your-app-name # set this to the name of your Azure Web App
      AZURE_WEBAPP_PACKAGE_PATH: "." # set this to the path to your web app project, defaults to the repository root
      DOTNET_VERSION: "5" # set this to the .NET Core version to use
    

    Clearly, AZURE_WEBAPP_NAME must match the name you’ve defined on Azure, while DOTNET_VERSION must match the version you’re using to create your dotnet APIs.

    For my specific project, I’ve replaced that section with

    env:
      AZURE_WEBAPP_NAME: BooksAPI<myName> # set this to the name of your Azure Web App
      AZURE_WEBAPP_PACKAGE_PATH: "." # set this to the path to your web app project, defaults to the repository root
      DOTNET_VERSION: "6.0" # set this to the .NET Core version to use
    

    🟧 DOTNET_VERSION requires also the minor version of dotnet. Setting 6 will now work: you need to specify 6.0. 🟧

    Now you can save your YAML file in your repository: it will be saved under ./.github/workflows.

    So, as a reference, here’s the full YAML file I’m using to deploy my APIs:

    name: Build and deploy ASP.Net Core app to an Azure Web App
    
    env:
      AZURE_WEBAPP_NAME: BooksAPI<myName>
      AZURE_WEBAPP_PACKAGE_PATH: "."
      DOTNET_VERSION: "6.0"
    
    on:
      push:
        branches: ["master"]
      workflow_dispatch:
    
    permissions:
      contents: read
    
    jobs:
      build:
        runs-on: ubuntu-latest
    
        steps:
          - uses: actions/checkout@v3
    
          - name: Set up .NET Core
            uses: actions/setup-dotnet@v2
            with:
              dotnet-version: ${{ env.DOTNET_VERSION }}
    
          - name: Set up dependency caching for faster builds
            uses: actions/cache@v3
            with:
              path: ~/.nuget/packages
              key: ${{ runner.os }}-nuget-${{ hashFiles('**/packages.lock.json') }}
              restore-keys: |
                            ${{ runner.os }}-nuget-
    
          - name: Build with dotnet
            run: dotnet build --configuration Release
    
          - name: dotnet publish
            run: dotnet publish -c Release -o ${{env.DOTNET_ROOT}}/myapp
    
          - name: Upload artifact for deployment job
            uses: actions/upload-artifact@v3
            with:
              name: .net-app
              path: ${{env.DOTNET_ROOT}}/myapp
    
      deploy:
        permissions:
          contents: none
        runs-on: ubuntu-latest
        needs: build
        environment:
          name: "Development"
          url: ${{ steps.deploy-to-webapp.outputs.webapp-url }}
    
        steps:
          - name: Download artifact from build job
            uses: actions/download-artifact@v3
            with:
              name: .net-app
    
          - name: Deploy to Azure Web App
            id: deploy-to-webapp
            uses: azure/webapps-deploy@v2
            with:
              app-name: ${{ env.AZURE_WEBAPP_NAME }}
              publish-profile: ${{ secrets.AZURE_WEBAPP_PUBLISH_PROFILE }}
              package: ${{ env.AZURE_WEBAPP_PACKAGE_PATH }}
    

    As you can see, we have 2 distinct steps: build and deploy.

    In the build phase, we check out our code, restore the NuGet dependencies, build the project, pack it and store the final result as an artifact.

    In the deploy step, we retrieve the newly created artifact and publish it on Azure.

    Store the Publish profile as GitHub Secret

    As you can see in the instructions of the workflow file, you have to

    Create a secret in your repository named AZURE_WEBAPP_PUBLISH_PROFILE, paste the publish profile contents as the value of the secret.

    That Create a secret in your repository named AZURE_WEBAPP_PUBLISH_PROFILE statement was not clear to me: I thought you had to create that key within your .NET project. Turns out you can create secrets related to repositories on GitHub (so, it’s language-agnostic).

    A Publish profile is a file that contains information and settings used to deploy applications to Azure. It’s nothing but an XML file that lists the possible ways to deploy your application, such as FTP, Web Deploy, Zip Deploy, and so on.

    We have to get our publish profile and save it into GitHub secrets.

    To retrieve the Publish profile, head to the Azure App Service page and click Get publish profile to download the file.

    Get Publish Profile button on Azure Portal

    Now, get back on GitHub, Head to Settings > Security > Secrets > Actions.

    Here you can create a new secret related to your repository.

    Create a new one, name it AZURE_WEBAPP_PUBLISH_PROFILE, and paste the content of the Publish profile file you’ve just downloaded.

    You will then see something like this:

    GitHub secret for Publish profile

    Notice that the secret name must be AZURE_WEBAPP_PUBLISH_PROFILE. That constraint is set because we are accessing the Publish profile by key:

    - name: Deploy to Azure Web App
        id: deploy-to-webapp
        uses: azure/webapps-deploy@v2
        with:
            app-name: ${{ env.AZURE_WEBAPP_NAME }}
            publish-profile: ${{ secrets.AZURE_WEBAPP_PUBLISH_PROFILE }}
            package: ${{ env.AZURE_WEBAPP_PACKAGE_PATH }}
    

    In particular, notice the publish-profile: ${{ secrets.AZURE_WEBAPP_PUBLISH_PROFILE }} part.

    Clearly, the two names must match: nothing stops you from changing the name of the secret in both the YAML file and the GitHub Secret page.

    Final result

    It’s time to see the final result.

    Update the application code (I’ve slightly modified the Hello world message), and push your changes to GitHub.

    Under the Actions tab, you will see your CD pipeline run.

    CD workflow run

    Once it’s completed, you can head to your application root and see the final result.

    Final result of the API

    Further readings

    Automating repetitive tasks allows you to perform more actions with fewer errors. Generally speaking, the more stuff you can automate, the better.

    My own blog heavily relies on automation: scaffolding content, tracking ideas, and publishing online…

    If you want to peek at what I do, here are my little secrets:

    🔗 From idea to publishing, and beyond: how I automated my blogging workflow with GitHub, PowerShell, and Azure | Code4IT

    In this article, we’ve only built and deployed our application. We can do more: run tests and keep track of code coverage. If you want to learn how you can do it using Azure DevOps, here we go:

    🔗 Cobertura, YAML, and Code Coverage Protector: how to view Code Coverage report on Azure DevOps | Code4IT

    This article first appeared on Code4IT 🐧

    Wrapping up

    I have to admit that I struggled a lot in setting up the CD pipeline. I was using the one proposed by default on Visual Studio – but it didn’t work.

    Using the template found on GitHub worked almost instantly – I just had to figure out what did they mean by repository secrets.

    Now we have everything in place. Since the workflow is stored in a text file within my repository, if I have to create and deploy a new API project I can simply do that by copying that file and fixing the references.

    Nice and easy, right? 😉

    Happy coding!

    🐧


    Source link

  • Book Review: C# 11 and .NET 7

    Book Review: C# 11 and .NET 7


    It’s time to review this book!

    • Book title: C# 11 and .NET 7 – Modern Cross-Platform Development Fundamentals
    • Author(s): Mark J. Price (LinkedIn, Twitter)
    • Published year: 2022
    • Publisher: Packt
    • Links: Amazon, Packt

    What can we say?

    “C# 11 and .NET 7 – Modern Cross-Platform Development Fundamentals” is a HUGE book – ~750 pages – that guides readers from the very basics of C# and dotnet to advanced topics and approaches.

    This book starts from the very beginning, explaining the history of C# and .NET, then moving to C# syntax and exploring OOP topics.

    If you already have some experience with C#, you might be tempted to skip those chapters. Don’t skip them! Yes, they’re oriented to newbies, but you’ll find some gems that you might find interesting or that you might have ignored before.

    Then, things get really interesting: some of my favourite topics were:

    • how to build and distribute packages;
    • how to publish Console Apps;
    • Entity Framework (which I used in the past, before ASP.NET Core, so it was an excellent way to see how things evolved);
    • Blazor

    What I liked

    • the content is well explained;
    • you have access to the code example to follow along (also, the author explains how to install and configure stuff necessary to follow along, such as SQL Lite when talking about Entity Framework)
    • it also teaches you how to use Visual Studio

    What I did not like

    • in the printed version, some images are not that readable
    • experienced developers might find some chapters boring (well, they’re not the target audience of the book, so it makes sense 🤷‍♂️ )

    This article first appeared on Code4IT 🐧

    Wrapping up

    Have you read it? What do you think of this book?

    I hope you enjoyed this article! Let’s keep in touch on LinkedIn or Twitter! 🤜🤛

    Happy coding!

    🐧


    Source link

  • PriorityQueues on .NET 7 and C# 11 &vert; Code4IT

    PriorityQueues on .NET 7 and C# 11 | Code4IT


    A PriorityQueue represents a collection of items that have a value and a priority. Now this data structure is built-in in dotNET!

    Table of Contents

    Just a second! 🫷
    If you are here, it means that you are a software developer.
    So, you know that storage, networking, and domain management have a cost .

    If you want to support this blog, please ensure that you have disabled the adblocker for this site.
    I configured Google AdSense to show as few ADS as possible – I don’t want to bother you with lots of ads, but I still need to add some to pay for the resources for my site.

    Thank you for your understanding.
    Davide

    Starting from .NET 6 and C# 10, we finally have built-in support for PriorityQueues 🥳

    A PriorityQueue is a collection of items that have a value and a priority; as you can imagine, they act as a queue: the main operations are “add an item to the queue”, called Enqueue, and “remove an item from the queue”, named Dequeue. The main difference from a simple Queue is that on dequeue, the item with lowest priority is removed.

    In this article, we’re gonna use a PriorityQueue and wrap it into a custom class to solve one of its design issues (that I hope they’ll be addressed in a future release of dotNET).

    Welcoming Priority Queues in .NET

    Defining a priority queue is straightforward: you just have to declare it specifying the type of items and the type of priority.

    So, if you need a collection of Child items, and you want to use int as a priority type, you can define it as

    PriorityQueue<Child, int> pq = new PriorityQueue<Child, int>();
    

    Now you can add items using the Enqueue method:

    Child child = //something;
    int priority = 3;
    queue.Enqueue(child, priority);
    

    And you can retrieve the one on the top of the queue by calling Peek(), if you want to just look at the first item without removing it from the queue:

    Child child3 = BuildChild3();
    Child child2 = BuildChild2();
    Child child1 = BuildChild1();
    
    queue.Enqueue(child3, 3);
    queue.Enqueue(child1, 1);
    queue.Enqueue(child2, 2);
    
    //queue.Count = 3
    
    Child first = queue.Peek();
    //first will be child1, because its priority is 1
    //queue.Count = 3, because we did not remove the item on top
    

    or Dequeue if you want to retrieve it while removing it from the queue:

    Child child3 = BuildChild3();
    Child child2 = BuildChild2();
    Child child1 = BuildChild1();
    
    queue.Enqueue(child3, 3);
    queue.Enqueue(child1, 1);
    queue.Enqueue(child2, 2);
    
    //queue.Count = 3
    
    Child first = queue.Dequeue();
    //first will be child1, because its priority is 1
    //queue.Count = 2, because we removed the item with the lower priority
    

    This is the essence of a Priority Queue: insert items, give them a priority, then remove them starting from the one with lower priority.

    Creating a Wrapper to automatically handle priority in Priority Queues

    There’s a problem with this definition: you have to manually specify the priority of each item.

    I don’t like it that much: I’d like to automatically assign each item a priority. So we have to wrap it in another class.

    Since we’re near Christmas, and this article is part of the C# Advent 2022, let’s use an XMAS-themed example: a Christmas list used by Santa to handle gifts for children.

    Let’s assume that the Child class has this shape:

    public class Child
    {
        public bool HasSiblings { get; set; }
        public int Age { get; set; }
        public List<Deed> Deeds { get; set; }
    }
    
    public abstract class Deed
    {
        public string What { get; set; }
    }
    
    public class GoodDeed : Deed
    { }
    
    public class BadDeed : Deed
    { }
    

    Now we can create a Priority Queue of type <Child, int>:

    PriorityQueue<Child, int> pq = new PriorityQueue<Child, int>();
    

    And wrap it all within a ChristmasList class:

    public class ChristmasList
    {
        private readonly PriorityQueue<Child, int> queue;
    
        public ChristmasList()
        {
            queue = new PriorityQueue<Child, int>();
        }
    
        public void Add(Child child)
        {
            int priority =// ??;
            queue.Enqueue(child, priority);
        }
    
         public Child Get()
        {
            return queue.Dequeue();
        }
    }
    

    A question for you: what happens when we call the Get method on an empty queue? What should we do instead? Drop a message below! 📩

    We need to define a way to assign each child a priority.

    Define priority as private behavior

    The easiest way is to calculate the priority within the Add method: define a function that accepts a Child and returns an int, and then pass that int value to the Enqueue method.

    public void Add(Child child)
    {
        int priority = GetPriority(child);
        queue.Enqueue(child, priority);
    }
    

    This approach is useful because you’re encapsulating the behavior in the ChristmasList class, but has the downside that it’s not extensible, and you cannot use different priority algorithms in different places of your application. On the other side, GetPriority is a private operation within the ChristmasList class, so it can be fine for our example.

    Pass priority calculation from outside

    We can then pass a Func<Child, int> in the ChristmasList constructor, centralizing the priority definition and giving the caller the responsibility to define it:

    public class ChristmasList
    {
        private readonly PriorityQueue<Child, int> queue;
        private readonly Func<Child, int> _priorityCalculation;
    
        public ChristmasList(Func<Child, int> priorityCalculation)
        {
            queue = new PriorityQueue<Child, int>();
            _priorityCalculation = priorityCalculation;
        }
    
    
        public void Add(Child child)
        {
            int priority = _priorityCalculation(child);
            queue.Enqueue(child, priority);
        }
    
         public Child Get()
        {
            return queue.Dequeue();
        }
    }
    

    This implementation presents the opposite problems and solutions we saw in the previous example.

    What I’d like to see in the future

    This is a personal thought: it’d be great if we had a slightly different definition of PriorityQueue to automate the priority definition.

    One idea could be to add in the constructor a parameter that we can use to calculate the priority, just to avoid specifying it explicitly. So, I’d expect that the current definition of the constructor and of the Enqueue method change from this:

    PriorityQueue<Child, int> pq = new PriorityQueue<Child, int>();
    
    int priority = _priorityCalculation(child);
    queue.Enqueue(child, priority);
    

    to this:

    PriorityQueue<Child, int> pq = new PriorityQueue<Child, int>(_priorityCalculation);
    
    queue.Enqueue(child);
    

    It’s not perfect, and it raises some new problems.

    Another way could be to force the item type to implement an interface that exposes a way to retrieve its priority, such as

    public interface IHavePriority<T>{
        public T GetPriority();
    }
    
    public class Child : IHavePriority<int>{}
    

    Again, this approach is not perfect but can be helpful.

    Talking about its design, which approach would you suggest, and why?

    Further readings

    As usual, the best way to learn about something is by reading its official documentation:

    🔗 PriorityQueue documentation | Microsoft Learn

    This article is part of the 2022 C# Advent (that’s why I chose a Christmas-ish topic for this article),

    🔗 C# Advent Calendar 2022

    This article first appeared on Code4IT 🐧

    Conclusion

    PriorityQueue is a good-to-know functionality that is now out-of-the-box in dotNET. Do you like its design? Have you used another library to achieve the same result? In what do they differ?

    Let me know in the comments section! 📩

    For now, happy coding!

    🐧


    Source link

  • How to customize Swagger UI with custom CSS in .NET 7 &vert; Code4IT

    How to customize Swagger UI with custom CSS in .NET 7 | Code4IT


    Exposing Swagger UI is a good way to help developers consume your APIs. But don’t be boring: customize your UI with some fancy CSS

    Table of Contents

    Just a second! 🫷
    If you are here, it means that you are a software developer.
    So, you know that storage, networking, and domain management have a cost .

    If you want to support this blog, please ensure that you have disabled the adblocker for this site.
    I configured Google AdSense to show as few ADS as possible – I don’t want to bother you with lots of ads, but I still need to add some to pay for the resources for my site.

    Thank you for your understanding.
    Davide

    Brace yourself, Christmas is coming! 🎅

    If you want to add a more festive look to your Swagger UI, it’s just a matter of creating a CSS file and injecting it.

    You should create a custom CSS for your Swagger endpoints, especially if you are exposing them outside your company: if your company has a recognizable color palette, using it in your Swagger pages can make your brand stand out.

    In this article, we will learn how to inject a CSS file in the Swagger UI generated using .NET Minimal APIs.

    How to add Swagger in your .NET Minimal APIs

    There are plenty of tutorials about how to add Swagger to your APIs. I wrote some too, where I explained how every configuration impacts what you see in the UI.

    That article was targeting older dotNET versions without Minimal APIs. Now everything’s easier.

    When you create your API project, Visual Studio asks you if you want to add OpenAPI support (aka Swagger). By adding it, you will have everything in place to get started with Swagger.

    You Minimal APIs will look like this:

    public static void Main(string[] args)
    {
        var builder = WebApplication.CreateBuilder(args);
    
        builder.Services.AddEndpointsApiExplorer();
        builder.Services.AddSwaggerGen();
    
        var app = builder.Build();
    
        app.UseSwagger();
        app.UseSwaggerUI();
    
    
        app.MapGet("/weatherforecast", (HttpContext httpContext) =>
        {
            // return something
        })
        .WithName("GetWeatherForecast")
        .WithOpenApi();
    
        app.Run();
    }
    

    The key parts are builder.Services.AddEndpointsApiExplorer(), builder.Services.AddSwaggerGen(), app.UseSwagger(), app.UseSwaggerUI() and WithOpenApi(). Do you know that those methods do? If so, drop a comment below! 📩

    Now, if we run our application, we will see a UI similar to the one below.

    Basic Swagger UI

    That’s a basic UI. Quite boring, uh? Let’s add some style

    Create the CSS file for Swagger theming

    All the static assets must be stored within the wwwroot folder. It does not exist by default, so you have to create it manually. Click on the API project, add a new folder, and name it “wwwroot”. Since it’s a special folder, by default Visual Studio will show it with a special icon (it’s a sort of blue world, similar to 🌐).

    Now you can add all the folders and static resources needed.

    I’ve created a single CSS file under /wwwroot/assets/css/xmas-style.css. Of course, name it as you wish – as long as it is within the wwwroot folder, it’s fine.

    My CSS file is quite minimal:

    body {
      background-image: url("../images/snowflakes.webp");
    }
    
    div.topbar {
      background-color: #34a65f !important;
    }
    
    h2,
    h3 {
      color: #f5624d !important;
    }
    
    .opblock-summary-get > button > span.opblock-summary-method {
      background-color: #235e6f !important;
    }
    
    .opblock-summary-post > button > span.opblock-summary-method {
      background-color: #0f8a5f !important;
    }
    
    .opblock-summary-delete > button > span.opblock-summary-method {
      background-color: #cc231e !important;
    }
    

    There are 3 main things to notice:

    1. the element selectors are taken directly from the Swagger UI – you’ll need a bit of reverse-engineering skills: just open the Browser Console and find the elements you want to update;
    2. unless the element does not already have the rule you want to apply, you have to add the !important CSS operator. Otherwise, your code won’t affect the UI;
    3. you can add assets from other folders: I’ve added background-image: url("../images/snowflakes.webp"); to the body style. That image is, as you can imagine, under the wwwroot folder we created before.

    Just as a recap, here’s my project structure:

    Static assets files

    Of course, it’s not enough: we have to tell Swagger to take into consideration that file

    How to inject a CSS file in Swagger UI

    This part is quite simple: you have to update the UseSwaggerUI command within the Main method:

    app.UseSwaggerUI(c =>
    +   c.InjectStylesheet("/assets/css/xmas-style.css")
    );
    

    Notice how that path begins: no wwwroot, no ~, no .. It starts with /assets.

    One last step: we have to tell dotNET to consider static files when building and running the application.

    You just have to add UseStaticFiles()

    After builder.Build():

    var app = builder.Build();
    + app.UseStaticFiles();
    
    app.UseSwagger();
    app.UseSwaggerUI(c =>
        c.InjectStylesheet("/assets/css/xmas-style.css")
    );
    

    Now we can run our APIs as admire our wonderful Xmas-style UI 🎅

    XMAS-style Swagger UI

    Further readings

    This article is part of 2022 .NET Advent, created by Dustin Moris 🐤:

    🔗 dotNET Advent Calendar 2022

    CSS is not the only part you can customize, there’s way more. Here’s an article I wrote about Swagger integration in .NET Core 3 APIs, but it’s still relevant (I hope! 😁)

    🔗 Understanding Swagger integration in .NET Core | Code4IT

    This article first appeared on Code4IT

    Wrapping up

    Theming is often not considered an important part of API development. That’s generally correct: why should I bother adding some fancy colors to APIs that are not expected to have a UI?

    This makes sense if you’re working on private APIs. In fact, theming is often useful to improve brand recognition for public-facing APIs.

    You should also consider using theming when deploying APIs to different environments: maybe Blue for Development, Yellow for Staging, and Green for Production. That way your developers can understand which environment they’re exploring right easily.

    Happy coding!
    🐧


    Source link

  • Build your own Static Code Analysis tool in .NET by knowing how Assembly, Type, MethodInfo, ParameterInfo work. &vert; Code4IT

    Build your own Static Code Analysis tool in .NET by knowing how Assembly, Type, MethodInfo, ParameterInfo work. | Code4IT


    Why buy a whole tool when you can build your own? Learn how the Type system works in .NET, and create your own minimal type analyser.

    Table of Contents

    Just a second! 🫷
    If you are here, it means that you are a software developer.
    So, you know that storage, networking, and domain management have a cost .

    If you want to support this blog, please ensure that you have disabled the adblocker for this site.
    I configured Google AdSense to show as few ADS as possible – I don’t want to bother you with lots of ads, but I still need to add some to pay for the resources for my site.

    Thank you for your understanding.
    Davide

    Analysing your code is helpful to get an idea of the overall quality. At the same time, having an automatic tool that identifies determinate characteristics or performs some analysis for you can be useful.

    Sure, there are many fantastic tools available, but having a utility class that you can build as needed and run without setting up a complex infrastructure is sufficient.

    In this article, we are going to see how to navigate assemblies, classes, methods and parameters to perfor some custom analysis.

    For this article, my code is structured into 3 Assemblies:

    • CommonClasses, a Class Library that contains some utility classes;
    • NetCoreScripts, a Class Library that contains the code we are going to execute;
    • ScriptsRunner, a Console Application that runs the scripts defined in the NetCoreScripts library.

    The dependencies between the modules are shown below: ScriptsRunner depends on NetCoreScripts, and NetCoreScripts depends on CommonClasses.

    Class library dependencies

    In this article, we are going to write the examples in the NetCoreScripts class library, in a class named AssemblyAnalysis.

    How to load an Assembly in C#, with different methods

    The starting point to analyse an Assembly is, well, to have an Assembly.

    So, in the Scripts Class Library (the middle one), I wrote:

    var assembly = DefineAssembly();
    

    In the DefineAssembly method we can choose the Assembly we are going to analyse.

    Load the Assembly containing a specific class

    The easiest way is to do something like this:

    private static Assembly DefineAssembly()
        => typeof(AssemblyAnalysis).Assembly;
    

    Where AssemblyAnalysis is the class that contains our scripts.

    Similarly, we can get the Assembly info for a class belonging to another Assembly, like this:

    private static Assembly DefineAssembly()
        => typeof(CommonClasses.BaseExecutable).Assembly;
    

    In short, you can access the Assembly info of whichever class you know – if you can reference it directly, of course!

    Load the current, the calling, and the executing Assembly

    The Assembly class provides you with some methods that may look similar, but give you totally different info depending on how your code is structured.

    Remember the ScriptsRunner –> NetCoreScripts –> CommonClasses sequence? To better explain how things work, let’s run the following examples in a method in the CommonClasses class library (the last one in the dependency chain).

    var executing = System.Reflection.Assembly.GetExecutingAssembly();
    var calling = System.Reflection.Assembly.GetCallingAssembly();
    var entry = System.Reflection.Assembly.GetEntryAssembly();
    

    Assembly.GetExecutingAssembly returns the Assembly that contains the actual code instructions (so, in short, the Assembly that actually contains the code). In this case, it’s the CommonClasses Assembly.

    Assembly.GetCallingAssembly returns the caller Assembly, so the one that references the Executing Assembly. In this case, given that the CommonClasses library is referenced only by the NetCoreScripts library, well, we are getting info about the NetCoreScripts class library.

    Assembly.GetEntryAssembly returns the info of the Assembly that is executing the whole application – so, the entry point. In our case, it’s the ScriptsRunner Console Application.

    Deciding which one to choose is crucial, especially when you are going to distribute your libraries, for example, as NuGet packages. For sure, you’ll know the Executing Assembly. Most probably, depending on how the project is structured, you’ll also know the Calling Assembly. But almost certainly you won’t know the Entry Assembly.

    Method name Meaning In this example…
    GetExecutingAssembly The current Assembly CommonClasses
    GetCallingAssembly The caller Assembly NetCoreScripts
    GetEntryAssembly The top-level executor ScriptsRunner

    How to retrieve classes of a given .NET Assembly

    Now you have an Assembly to analyse. It’s time to load the classes belonging to your Assembly.

    You can start with assembly.GetTypes(): this method returns all the types (in the form of a Type array) belonging to the Assembly.

    For each Type you can access several properties, such as IsClass, IsPublic, IsAbstract, IsGenericType, IsEnum and so on. The full list of properties of a Type is available 🔗here.

    You may want to analyse public classes: therefore, you can do something like:

    private static List<Type> GetAllPublicTypes(Assembly assembly) => assembly
                .GetTypes()
                .Where(t => t.IsClass && t.IsPublic)
                .ToList();
    

    How to list the Methods belonging to a C# Type

    Given a Type, you can extract the info about all the available methods.

    The Type type contains several methods that can help you find useful information, such as GetConstructors.

    In our case, we are only interested in public methods, declared in that class (and not inherited from a base class):

    private static MethodInfo[] GetPublicMethods(Type type) =>
        type.GetMethods(BindingFlags.Instance | BindingFlags.Static | BindingFlags.Public | BindingFlags.DeclaredOnly);
    

    The BindingFlags enum is a 🔗Flagged Enum: it’s an enum with special values that allow you to perform an OR operation on the values.

    Value Description Example
    Public Includes public members. public void Print()
    NonPublic Includes non-public members (private, protected, etc.). private void Calculate()
    Instance Includes instance (non-static) members. public void Save()
    Static Includes static members. public static void Log(string msg)
    FlattenHierarchy Includes static members up the inheritance chain. public static void Helper() (this method exists in the base class)
    DeclaredOnly Only members declared in the given type, not inherited. public void MyTypeSpecific() (this method does not exist in the base class)

    How to get the parameters of a MethodInfo object

    The final step is to retrieve the list of parameters from a MethodInfo object.

    This step is pretty easy: just call the GetParameter() method:

    public ParameterInfo[] GetParameters(MethodInfo method) => method.GetParameters();
    

    A ParameterInfo object contains several pieces of information, such as the name, the type and the default value of the parameter.

    Let’s consider this silly method:

    public static void RandomCity(string[] cities, string fallback = "Rome")
    { }
    

    If we have a look at its parameters, we will find the following values:

    Properties of a ParameterInfo object

    Bonus tip: Auto-properties act as Methods

    Let’s focus a bit more on the properties of a class.

    Consider this class:

    public class User
    {
      public string Name { get; set; }
    }
    

    There are no methods; only one public property.

    But hey! It turns out that properties, under the hood, are treated as methods. In fact, you can find two methods, named get_Name and set_Name, that act as an access point to the Name property.

    Automatic Getter and Setter of the Name property in C#

    Further readings

    Do you remember that exceptions are, in the end, Types?

    And that, in the catch block, you can filter for exceptions of a specific type or with a specific condition?

    If not, check this article out!

    🔗 Exception handling with WHEN clause | Code4IT

    This article first appeared on Code4IT 🐧

    Wrapping up (plus the full example)

    From here, you can use all this info to build whatever you want. Personally, I used it to analyse my current project, checking how many methods accept more than N parameters as input, and which classes have the highest number of public methods.

    In short, an example of a simple code analyser can be this one:

    public void Execute()
    {
        var assembly = DefineAssembly();
        var paramsInfo = AnalyzeAssembly(assembly);
    
        AnalyzeParameters(paramsInfo);
    }
    
    private static Assembly DefineAssembly()
        => Assembly.GetExecutingAssembly();
    
    public static List<ParamsMethodInfo> AnalyzeAssembly(Assembly assembly)
    {
        List<ParamsMethodInfo> all = new List<ParamsMethodInfo>();
        var types = GetAllPublicTypes(assembly);
    
        foreach (var type in types)
        {
            var publicMethods = GetPublicMethods(type);
    
            foreach (var method in publicMethods)
            {
                var parameters = method.GetParameters();
                if (parameters.Length > 0)
                {
                    var f = parameters.First();
                }
    
                all.Add(new ParamsMethodInfo(
                    assembly.GetName().Name,
                    type.Name,
                    method
                    ));
            }
        }
        return all;
    }
    
    private static MethodInfo[] GetPublicMethods(Type type) =>
        type.GetMethods(BindingFlags.Instance | BindingFlags.Static | BindingFlags.Public | BindingFlags.DeclaredOnly);
    
    private static List<Type> GetAllPublicTypes(Assembly assembly) => assembly.GetTypes()
                .Where(t => t.IsClass && t.IsPublic)
                .ToList();
    
    public class ParamsMethodInfo(string AssemblyName, string ClassName, MethodInfo Method)
    {
        public string MethodName => Method.Name;
        public ParameterInfo[] Parameters => Method.GetParameters();
    }
    

    And then, in the AnalyzeParameters, you can add your own logic.

    As you can see, you don’t need to adopt complex tools to perform operations like this: just knowing that you can access the static details of each class and method can be enough (of course, it depends on the use!).

    I hope you enjoyed this article! Let’s keep in touch on LinkedIn, Twitter or BlueSky! 🤜🤛

    Happy coding!

    🐧


    Source link

  • How to customize Conventional Commits in a .NET application using GitHooks &vert; Code4IT

    How to customize Conventional Commits in a .NET application using GitHooks | Code4IT


    Using Conventional Commits you can define a set of rules useful for writing meaningful commit messages. Using NPM. Yes, in a dotNET application!

    Table of Contents

    Just a second! 🫷
    If you are here, it means that you are a software developer.
    So, you know that storage, networking, and domain management have a cost .

    If you want to support this blog, please ensure that you have disabled the adblocker for this site.
    I configured Google AdSense to show as few ADS as possible – I don’t want to bother you with lots of ads, but I still need to add some to pay for the resources for my site.

    Thank you for your understanding.
    Davide

    Setting teams conventions is a crucial step to have the project prepared to live long and prosper 🖖

    A good way to set some clarity is by enforcing rules on GIT commit messages: you can enforce devs to specify the reason behind some code changes so that you can understand the history and the reason for each of those commits. Also, if you have well-crafted commit messages, Pull Requests become easier to understand, leading to better code.

    Conventional Commits help you set such rules, and help you level up your commit history. In this article, we will learn how to add Conventional Commits in a .NET application.

    Conventional Commits

    Conventional Commits are a set of rules that help you write commit messages using a format that has multiple purposes:

    • they help developers understand the history of a git branch;
    • they help PR reviewers focus on the Pull Request by understanding the changes proposed by the developer;
    • using automated tools, they help versioning the application – this is useful when using Semantic Versioning;
    • they allow you to create automated Changelog files.

    So, what does an average Conventional Commit look like?

    There’s not just one way to specify such formats.

    For example, you can specify that you’ve added a new feature (feat) to your APIs and describe it shortly:

    feat(api): send an email to the customer
    

    Or you can explain that you’ve fixed a bug (using fix) and add a full description of the scope of the commit.

    fix: prevent racing condition
    
    Introduce a request id and a reference to latest request. Dismiss
    incoming responses other than from latest request.
    

    There are several types of commits that you can support, such as:

    • feat, used when you add a new feature to the application;
    • fix, when you fix a bug;
    • docs, used to add or improve documentation to the project;
    • refactor, used – well – after some refactoring;
    • test, when adding tests or fixing broken ones

    All of this prevents developers write commit messages such as “something”, “fixed bug”, “some stuff”.

    Some Changes

    So, now, it’s time to include Conventional Commits in our .NET applications.

    What is our goal?

    For the sake of this article, I’m going to add Conventional Commits in a .NET 7 API project. The same approach works for all the other types of .NET projects: as long as you have a Solution to work with, I’ve got you covered.

    Well, actually, the following approach can be used by every project, not only those based on .NET: the reason I wrote this article is that many dotnet developers are not confident in using and configuring NPM packages, so my personal goal with this article is to give you the basics of such tools and configurations.

    For the sake of this article, I’m going to explain how to add Conventional Commits with a custom format.

    Say that you want to associate each commit to a Jira task. As you may know, Jira tasks have an ID composed of a project prefix and a numeric Id. So, for a project named FOO, you can have a task with Id FOO-123.

    The goal of this article is, then, to force developers to create Commit messages such as

    feat/FOO-123: commit short description
    

    or, if you want to add a full description of the commit,

    feat/FOO-123: commit short description
    
    Here we can have the full description of the task.
    And it can also be on multiple lines.
    

    We are going to work at Solution level; you don’t even need an IDE: just Notepad and a Terminal are fine. Before continuing, open your solution folder and a Console pointing to the same folder.

    Install NPM in your folder

    Yes, even if the main application is built with .NET, we are gonna need some NPM packages to set up our Conventional Commits.

    First things first: head to the Command Line and run

    After specifying some configurations (Package name? Licence? Author?), you will have a brand new package.json file.

    Now we can move on and add a GIT Hook.

    Husky: integrate GIT Hooks to improve commit messages

    To use conventional commits we have to “intercept” our GIT actions: we will need to run a specific tool right after having written a commit message; we have to validate it and, in case it does not follow the rules we’ve set, abort the operations.

    We will use Husky 🔗: it’s a facility package that allows us to do stuff with our commit messages and, in general, integrate work with Git Hooks.

    Head to the terminal, and install Husky by running

    npm install husky --save-dev
    

    This command will add a dependency to Husky, as you can see from the new item listed in the package.json file:

    "devDependencies": {
        "husky": "^8.0.3"
    }
    

    Finally, to enable Git Hooks, we have to run

    npm pkg set scripts.prepare="husky install"
    

    and notice the new section in the package.json.

    "scripts": {
        "prepare": "husky install"
    },
    

    Even with just these simple steps, we can see a first result: if you run git commit you will see a text editor open. Here you can write your commit message.

    Git commit message editor

    Save and close the file. The commit message has been applied, as you can see by running git log --oneline.

    CommitLint: a package to validate Commit messages

    We need to install and configure CommitLint, the NPM package that does the dirty job.

    On the same terminal as before, run

    npm install --save-dev @commitlint/config-conventional @commitlint/cli
    

    to install both commitlint/config-conventional, which add the generic functionalities, and commitlint/cli, which allows us to run the scripts via CLI.

    You will see both packages listed in your package.json file:

    "devDependencies": {
        "@commitlint/cli": "^17.4.2",
        "@commitlint/config-conventional": "^17.4.2",
        "husky": "^8.0.3"
    }
    

    Next step: scaffold the file that handles the configurations on how we want our Commit Messages to be structured.

    On the root, create a brand new file, commitlint.config.js, and paste this snippet:

    module.exports = {
      extends: ["@commitlint/config-conventional"],
    }
    

    This snippet tells Commitlint to use the default conventions, such as feat(api): send an email.

    To test the default rules without issuing any real commit, we have to install the previous packages globally, so that they can be accessed outside the scope of the git hooks:

    npm install -g @commitlint/cli @commitlint/config-conventional
    

    and, in a console, we can run

    echo 'foo: a message with wrong format' | commitlint
    

    and see the error messages

    Testing commitlint with errors

    At this point, we still don’t have CommitLint ready to validate our commit messages. In fact, if you try to commit your changes with an invalid message, you will see that the message passes the checks (because there are no checks!), and your changes get committed.

    We need to do some more steps.

    First of all, we have to create a folder named .husky that will be used by Husky to understand which commands are supported.

    Notice: you have to keep the dot at the beginning of the folder name: it’s .husky, not husky.

    Then we need to add a new file within that folder to tell Husky that it needs to run CommitLint.

    npx husky add .husky/commit-msg  'npx --no -- commitlint --edit ${1}'
    

    We’re almost ready: everything is set, but we need to activate the functionality. So you just have to run

    to see it working:

    CommitLint correctly validates the commit message

    Commitlint.config.js: defining explicit rules on Git Messages

    Now, remember that we want to enforce certain rules on the commit message.

    We don’t want them to be like

    feat(api): send an email to the customer when a product is shipped
    

    but rather like

    feat/FOO-123: commit short description
    
    Here we can have the full description of the task.
    And it can also be on multiple lines.
    

    This means that we have to configure the commitlint.config.js file to override default values.

    Let’s have a look at a valid Commitlint file:

    module.exports = {
      extends: ["./node_modules/@commitlint/config-conventional"],
      parserPreset: {
        parserOpts: {
          headerPattern: /^(\w*)\/FOO-(\w*): (.*)$/,
          headerCorrespondence: ["type", "scope", "subject"],
        },
      },
      rules: {
        "type-enum": [2, "always", ["feat", "fix", "hot", "chore"]],
        "header-min-length": [2, "always", 10],
        "header-max-length": [2, "always", 50],
        "body-max-line-length": [2, "always", 72],
        "subject-case": [
          2,
          "never",
          ["sentence-case", "start-case", "pascal-case", "upper-case"],
        ],
      },
    }
    

    Time to deep dive into those sections:

    The ParserOpts section: define how CommitList should parse text

    The first part tells the parser how to parse the header message:

    parserOpts: {
        headerPattern: /^(\w*)\/FOO-(\w*): (.*)$/,
        headerCorrespondence: ["type", "scope", "subject"],
    },
    

    It’s a regular expression, where every matching part has its correspondence in the headerCorrespondence array:

    So, in the message hello/FOO-123: my tiny message, we will have type=hello, scope=123, subject=my tiny message.

    Rules: define specific rules for each message section

    The rules section defines the rules to be applied to each part of the message structure.

    rules:
    {
        "type-enum": [2, "always", ["feat", "fix", "hot", "chore"]],
        "header-min-length": [2, "always", 10],
        "header-max-length": [2, "always", 50],
        "body-max-line-length": [2, "always", 72],
        "subject-case": [
            2,
            "never",
            ["sentence-case", "start-case", "pascal-case", "upper-case"],
        ],
    },
    

    The first value is a number that expresses the severity of the rule:

    • 0: the rule is disabled;
    • 1: show a warning;
    • 2: it’s an error.

    The second value defines if the rule must be applied (using always), or if it must be reversed (using never).

    The third value provides generic arguments for the related rule. For example, "header-max-length": [2, "always", 50], tells that the header must always have a length with <= 50 characters.

    You can read more about each and every configuration on the official documentation 🔗.

    Setting the commit structure using .gitmessage

    Now that everything is set, we can test it.

    But not before helping devs with a simple trick! As you remember, when you run git commit without specifying the message, an editor appears with some hints about the structure of the commit message.

    Default commit editor

    You can set your own text with hints about the structure of the messages.

    You just need to create a file named .gitmessage and put some text in it, such as:

    # <type>/FOO-<jira-ticket-id>: <title>
    # YOU CAN WRITE WHATEVER YOU WANT HERE
    # allowed types: feat | fix | hot | chore
    # Example:
    #
    # feat/FOO-01: first commit
    #
    # No more than 50 chars. #### 50 chars is here:  #
    
    # Remember blank line between title and body.
    
    # Body: Explain *what* and *why* (not *how*)
    # Wrap at 72 chars. ################################## which is here:  #
    #
    

    Now, we have to tell Git to use that file as a template:

    git config commit.template ./.gitmessage
    

    and.. TA-DAH! Here’s your message template!

    Customized message template

    Putting all together

    Finally, we have everything in place: git hooks, commit template, and template hints.

    If we run git commit, we will see an IDE open and the message we’ve defined before. Now, type A message with wrong format, save, close the editor, and you’ll see that the commit is aborted.

    Commit message with wrong format gets rejected

    Now you run git commit again, you’ll see again the IDE, and type feat/FOO-123: a valid message, and you’ll see it working

    Further readings

    Conventional Commits is a project that lists a set of specifications for writing such good messages. You can read more here:

    🔗 Conventional Commits

    As we saw before, there are a lot of configurations that you can set for your commits. You can see the full list here:

    🔗 CommitLint rules

    This article first appeared on Code4IT 🐧

    This new kind of commit message works well with Semantic Versioning, which can be useful to publish package versions with a meaningful version number, such as 2.0.1:
    🔗 Semantic Versioning

    And, to close the loop, Semantic Versioning can be easily integrated with CI pipelines. If you use .NET APIs and want to deploy your APIs to Azure using GitHub Actions, you can start from this article and add SemVer:
    🔗 How to deploy .NET APIs on Azure using GitHub actions

    Wrapping up

    In this article, we’ve learned what are Conventional Commits, how to add them using Husky and NPM, and how to configure our folder to use such tools.

    The steps we’ve seen before work for every type of application, even not related to dotnet.

    So, to recap everything, we have to:

    1. Install NPM: npm init;
    2. Install Husky: npm install husky --save-dev;
    3. Enable Husky: npm pkg set scripts.prepare="husky install";
    4. Install CommitLint: npm install --save-dev @commitlint/config-conventional @commitlint/cli;
    5. Create the commitlint.config.js file: module.exports = { extends: '@commitlint/config-conventional']};;
    6. Create the Husky folder: mkdir .husky;
    7. Link Husky and CommitLint: npx husky add .husky/commit-msg 'npx --no -- commitlint --edit ${1}';
    8. Activate the whole functionality: npx husky install;

    Then, you can customize the commitlint.config.js file and, if you want, create a better .gitmessage file.

    I hope you enjoyed this article! Let’s keep in touch on Twitter or on LinkedIn, if you want! 🤜🤛

    Happy coding!

    🐧


    Source link

  • Understanding IOptions, IOptionsMonitor, and IOptionsSnapshot in .NET 7 &vert; Code4IT

    Understanding IOptions, IOptionsMonitor, and IOptionsSnapshot in .NET 7 | Code4IT


    There are several ways to handle configurations in a .NET Application. In this article, we’re going to learn how to use IOptions<T>, IOptionsSnapshot<T>, and IOptionsMonitor<T>

    Table of Contents

    Just a second! 🫷
    If you are here, it means that you are a software developer.
    So, you know that storage, networking, and domain management have a cost .

    If you want to support this blog, please ensure that you have disabled the adblocker for this site.
    I configured Google AdSense to show as few ADS as possible – I don’t want to bother you with lots of ads, but I still need to add some to pay for the resources for my site.

    Thank you for your understanding.
    Davide

    When dealing with configurations in a .NET application, we can choose different strategies. For example, you can simply inject an IConfiguration instance in your constructor, and retrieve every value by name.

    Or you can get the best out of Strongly Typed Configurations – you won’t have to care about casting those values manually because everything is already done for you by .NET.

    In this article, we are going to learn about IOptions, IOptionsSnapshot, and IOptionsMonitor. They look similar, but there are some key differences that you need to understand to pick the right one.

    For the sake of this article, I’ve created a dummy .NET API that exposes only one endpoint.

    In my appsettings.json file, I added a node:

    {
      "MyConfig": {
        "Name": "Davide"
      }
    }
    

    that will be mapped to a POCO class:

    public class GeneralConfig
    {
        public string Name { get; set; }
    }
    

    To add it to the API project, we can add this line to the Program.cs file:

    builder.Services.Configure<GeneralConfig>(builder.Configuration.GetSection("MyConfig"));
    

    As you can see, it takes the content with the name “MyConfig” and maps it to an object of type GeneralConfig.

    To test such types, I’ve created a set of dummy API Controllers. Each Controller exposes one single method, Get(), that reads the value from the configuration and returns it in an object.

    We are going to inject IOptions, IOptionsSnapshot, and IOptionsMonitor into the constructor of the related Controllers so that we can try the different approaches.

    IOptions: Simple, Singleton, doesn’t support config reloads

    IOptions<T> is the most simple way to inject such configurations. We can inject it into our constructors and access the actual value using the Value property:

    private readonly GeneralConfig _config;
    
    public TestingController(IOptions<GeneralConfig> config)
    {
        _config = config.Value;
    }
    

    Now we have direct access to the GeneralConfig object, with the values populated as we defined in the appsettings.json file.

    There are a few things to consider when using IOptions<T>:

    • This service is injected as a Singleton instance: the whole application uses the same instance, and it is valid throughout the whole application lifetime.
    • all the configurations are read at startup time. Even if you update the appsettings file while the application is running, you won’t see the values updated.

    Some people prefer to store the IOptions<T> instance as a private field, and access the value when needed using the Value property, like this:

    private readonly IOptions<GeneralConfig> _config;
    private int updates = 0;
    
    public TestingController(IOptions<GeneralConfig> config)
    {
        _config = config;
    }
    
    [HttpGet]
    public ActionResult<Result> Get()
    {
        var name = _config.Value.Name;
        return new Result
        {
            MyName = name,
            Updates = updates
        };
    }
    

    It works, but it’s useless: since IOptions<T> is a Singleton, we don’t need to access the Value property every time. It won’t change over time, and accessing it every single time is a useless operation. We can use the former approach: it’s easier to write and (just a bit) more performant.

    One more thing.
    When writing Unit Tests, we can inject an IOptions<T> in the system under test using a static method, Options.Create<T>, and pass it an instance of the required type.

    [SetUp]
    public void Setup()
    {
        var config = new GeneralConfig { Name = "Test" };
    
        var options = Options.Create(config);
    
        _sut = new TestingController(options);
    }
    

    Demo: the configuration does not change at runtime

    Below you can find a GIF that shows that the configurations do not change when the application is running.

    With IOptions the configuration does not change at runtime

    As you can see, I performed the following steps:

    1. start the application
    2. call the /TestingIOptions endpoint: it returns the name Davide
    3. now I update the content of the appsettings.json file, setting the name to Davide Bellone.
    4. when I call again the same endpoint, I don’t see the updated value.

    IOptionsSnapshot: Scoped, less-performant, supports config reload

    Similar to IOptions<T> we have IOptionsSnapshot<T>. They work similarly, but there is a huge difference: IOptionsSnapshot<T> is recomputed at every request.

    public TestingController(IOptionsSnapshot<GeneralConfig> config)
    {
        _config = config.Value;
    }
    

    With IOptionsSnapshot<T> you have always the most updated values: this service is injected with a Scoped lifetime, meaning that the values are read from configuration at every HTTP request. This also means that you can update the settings values while the application is running, and you’ll be able to see the updated results.

    Since .NET rebuilds the configurations at every HTTP call, there is a slight performance overhead. So, if not necessary, always use IOptions<T>.

    There is no way to test an IOptionsSnapshot<T> as we did with IOptions<T>, so you have to use stubs or mocks (maybe with Moq or NSubstitute 🔗).

    Demo: the configuration changes while the application is running

    Look at the GIF below: here I run the application and call the /TestingIOptionsSnapshot endpoint.

    With IOptionsSnapshot the configuration changes while the application is running

    I performed the following steps:

    1. run the application
    2. call the /TestingIOptionsSnapshot endpoint. The returned value is the same on the appsettings.json file: Davide Bellone.
    3. I then update the value on the configuration file
    4. when calling again /TestingIOptionsSnapshot, I can see that the returned value reflects the new value in the appsettings file.

    IOptionsMonitor: Complex, Singleton, supports config reload

    Finally, the last one of the trio: IOptionsMonitor<T>.

    Using IOptionsMonitor<T> you can have the most updated value on the appsettings.json file.

    We also have a callback event that is triggered every time the configuration file is updated.

    It’s injected as a Singleton service, so the same instance is shared across the whole application lifetime.

    There are two main differences with IOptions<T>:

    1. the name of the property that stores the config value is CurrentValue instead of Value;
    2. there is a callback that is called every time you update the settings file: OnChange(Action<TOptions, string?> listener). You can use it to perform operations that must be triggered every time the configuration changes.

    Note: OnChange returns an object that implements IDisposable that you need to dispose. Otherwise, as Chris Elbert noticed (ps: follow him on Twitter!) , the instance of the class that uses IOptionsMonitor<T> will never be disposed.

    Again, there is no way to test an IOptionsMonitor<T> as we did with IOptions<T>. So you should rely on stubs and mocks (again, maybe with Moq or NSubstitute 🔗).

    Demo: the configuration changes, and the callback is called

    In the GIF below I demonstrate the usage of IOptionsMonitor.

    I created an API controller that listens to changes in the configuration, updates a static counter, and returns the final result from the API:

    public class TestingIOptionsMonitorController : ControllerBase
    {
        private static int updates = 0;
        private readonly GeneralConfig _config;
    
        public TestingIOptionsMonitorController(IOptionsMonitor<GeneralConfig> config)
        {
            _config = config.CurrentValue;
            config.OnChange((_, _) => updates++);
        }
    
        [HttpGet]
        public ActionResult<Result> Get() => new Result
        {
            MyName = _config.Name,
            Updates = updates
        };
    }
    

    By running it and modifying the config content while the application is up and running, you can see the full usage of IOptionsMonitor<T>:

    With IOptionsMonitor the configuration changes, the callback is called

    As you can see, I performed these steps:

    1. run the application
    2. call the /TestionIOptionsMonitor endpoint. The MyName field is read from config, and Updates is 0;
    3. I then update and save the config file. In the background, the OnChange callback is fired, and the Updates value is updated;

    Oddly, the callback is called more times than expected. I updated the file only twice, but the counter is set to 6. That’s weird behavior. If you know why it happens, drop a message below 📩

    IOptions vs IOptionsSnapshot vs IOptionsMonitor in .NET

    We’ve seen a short introduction to IOptions, IOptionsSnapshot, and IOptionsMonitor.

    There are some differences, of course. Here’s a table with a recap of what we learned from this article.

    Type DI Lifetime Best way to inject in unit tests Allows live reload Has callback function
    IOptions<T> Singleton Options.Create<T>
    IOptionsSnapshot<T> Scoped Stub / Mock 🟢
    IOptionsMonitor<T> Singleton Stub / Mock 🟢 🟢

    There’s actually more: for example, with IOptionsSnapshot and IOptionsMonitor you can use named options, so that you can inject more instances of the same type that refer to different nodes in the JSON file.

    But that will be the topic for a future article, so stay tuned 😎

    Further readings

    There is a lot more about how to inject configurations.

    For sure, one of the best resources is the official documentation:

    🔗 Options pattern in ASP.NET Core | Microsoft docs

    I insisted on explaining that IOptions and IOptionsMonitor are Singleton, while IOptionsSnapshot is Scoped.
    If you don’t know what they mean, here’s a short but thorough explanation:

    🔗 Dependency Injection lifetimes in .NET | Code4IT

    In particular, I want you to focus on the Bonus tip, where I explain the problems of having Transient or Scoped services injected into a Singleton service:

    🔗Bonus tip: Transient dependency inside a Singleton | Code4IT

    This article first appeared on Code4IT 🐧

    In this article, I stored my configurations in an appsettings.json file. There are more ways to set configuration values – for example, Environment Variables and launchSettings.json.

    🔗 3 (and more) ways to set configuration values in .NET | Code4IT

    Wrapping up

    In this article, we learned how to use IOptions<T>, IOptionsSnapshot<T>, and IOptionsMonitor<T> in a .NET 7 application.

    There are many other ways to handle configurations: for instance, you can simply inject the whole object as a singleton, or use IConfiguration to get single values.

    When would you choose an approach instead of another? Drop a comment below! 📩

    I hope you enjoyed this article! Let’s keep in touch on Twitter or LinkedIn! 🤜🤛

    Happy coding!

    🐧


    Source link