Just a second! 🫷 If you are here, it means that you are a software developer.
So, you know that storage, networking, and domain management have a cost .
If you want to support this blog, please ensure that you have disabled the adblocker for this site. I configured Google AdSense to show as few ADS as possible – I don’t want to bother you with lots of ads, but I still need to add some to pay for the resources for my site.
Thank you for your understanding. – Davide
Ok, you write code. Maybe alone. But what happens when you have to talk about the code with someone else? To help clear communication, you should always use easily pronounceable name.
Choosing names with this characteristic is underrated, but often a game-changer.
No, I don’t think so. That’s unnatural. Even worse for the other field, Awbtu. Aw-b-too or a-w-b-t-u? Neither of them makes sense when speaking aloud. That’s because this is a meaningless abbreviation.
Avoid using uncommon acronyms or unreadable abbreviations: this helps readers understand better the meaning of your code, helps you communicate by voice with your colleagues or searching for a specific field using your IDE
Code is meant to be read by humans, computers do not care about the length of a field name. Don’t be afraid of using long names to help clarity.
Use full names, like in this example:
classDisneyPlusContent{
int VideoID { get; set; }
long VideoDurationInMs { get; set; }
bool AlreadyWatchedByThisUser { get; set; }
}
Yes, ID and Ms are still abbreviations for Identifier and Milliseconds. But they are obvious, so you don’t have to use complete words.
Of course, all those considerations are valid not only for pronouncing names but also for searching (and remembering) them. Would you rather search VideoID or Vid in your text editor?
What do you prefer? Short or long names?
👉 Let’s discuss it on Twitter or on the comment section below!
Just a second! 🫷 If you are here, it means that you are a software developer.
So, you know that storage, networking, and domain management have a cost .
If you want to support this blog, please ensure that you have disabled the adblocker for this site. I configured Google AdSense to show as few ADS as possible – I don’t want to bother you with lots of ads, but I still need to add some to pay for the resources for my site.
Thank you for your understanding. – Davide
As I always say, naming things is hard. We’ve already talked about this in a previous article.
By creating a simple and coherent dictionary, your classes will have better names because you are representing the same idea with the same name. This improves code readability and searchability. Also, by simply looking at the names of your classes you can grasp the meaning of them.
Say that we have 3 objects that perform similar operations: they download some content from external sources.
It’s as simple as that! Just a small change can drastically improve the readability and usability of your code!
So, consider also this small kind of issue when reviewing PRs.
Conclusion
A common dictionary helps to understand the code without misunderstandings. Of course, this tip does not refer only to class names, but to variables too. Avoid using synonyms for objects (eg: video and clip). Instead of synonyms, use more specific names (YouTubeVideo instead of Video).
Any other ideas?
👉 Let’s discuss it on Twitter or on the comment section below!
Just a second! 🫷 If you are here, it means that you are a software developer.
So, you know that storage, networking, and domain management have a cost .
If you want to support this blog, please ensure that you have disabled the adblocker for this site. I configured Google AdSense to show as few ADS as possible – I don’t want to bother you with lots of ads, but I still need to add some to pay for the resources for my site.
Thank you for your understanding. – Davide
What if you wanted to see if a remote website is up and running?
Probably, the first thing that may come to your mind is to use a common C# class: HttpClient. But it may cause you some trouble.
There is another way to ping an endpoint: using the Ping class.
Why not using HttpClient
Say that you need to know if the host at code4it.dev is live. With HttpClient you might use something like this:
async Task Main()
{
var url = "https://code4it.dev";
var isUp = await IsWebsiteUp_Get(url);
Console.WriteLine("The website is {0}", isUp ? "up" : "down");
}
privateasync Task<bool> IsWebsiteUp_Get(string url)
{
var httpClient = new HttpClient(); // yes, I know, I should use HttpClientFactory!var httpResponse = await httpClient.GetAsync(url);
return httpResponse.IsSuccessStatusCode;
}
There are some possible issues with this approach: what if there is no resource available in the root? You will have to define a specific path. And what happens if the defined resource is under authentication? IsWebsiteUp_Get will always return false. Even when the site is correctly up.
Also, it is possible that the endpoint does not accept HttpGet requests. So, we can use HttpHead instead:
privateasync Task<bool> IsWebsiteUp_Head(string url)
{
var httpClient = new HttpClient();
HttpRequestMessage request = new HttpRequestMessage
{
RequestUri = new Uri(url),
Method = HttpMethod.Head // Not GET, but HEAD };
var result = await httpClient.SendAsync(request);
return result.IsSuccessStatusCode;
}
We have the same issues described before, but at least we are not bound to a specific HTTP verb.
By the way, we need to find another way.
How to use Ping
By using the Ping class, we can get rid of those checks and evaluate the status of the Host, not of a specific resource.
privateasync Task<bool> IsWebsiteUp_Ping(string url)
{
Ping ping = new Ping();
var hostName = new Uri(url).Host;
PingReply result = await ping.SendPingAsync(hostName);
return result.Status == IPStatus.Success;
}
The Ping class comes in the System.Net.NetworkInformation namespace, and allows you to perform the same operations of the ping command you usually send via command line.
Conclusion
We’ve seen why you should use Ping instead of HttpClient to perform a ping-like operation.
Just a second! 🫷 If you are here, it means that you are a software developer.
So, you know that storage, networking, and domain management have a cost .
If you want to support this blog, please ensure that you have disabled the adblocker for this site. I configured Google AdSense to show as few ADS as possible – I don’t want to bother you with lots of ads, but I still need to add some to pay for the resources for my site.
Thank you for your understanding. – Davide
Many times, we tend to add too many parameters to a function. But that’s not the best idea: on the contrary, when a function requires too many arguments, grouping them into coherent objects helps writing simpler code.
Why? How can we do it? What are the main issues with having too many params? Have a look at the following snippet:
If you need to use another field about the address or the person, you will need to add a new parameter and update all the existing methods to match the new function signature.
What if we added a State argument? Is this part of the address (state = “Italy”) or something related to the package (state = Damaged)?
Storing this field in the correct object helps understanding its meaning.
Another reason to avoid using lots of parameters? To avoid merge conflicts.
Say that two devs, Alice and Bob, are working on some functionalities that impact the SendPackage method. Alice, on her branch, adds a new param, bool withPriority. In the meanwhile, Bob, on his branch, adds bool applyDiscount. Then, both Alice and Bob merge together their branches on the main one. What’s the result? Of course, a conflict: the method now has two boolean parameters, and the order by which they are added to the final result may cause some troubles. Even more, because every call to the SendPackage method has now one (or two) new params, whose value depends on the context. So, after the merge, the value that Bob defined for the applyDiscount parameter might be used instead of the one added by Alice.
Conclusion
To recap, why do we need to reduce the number of parameters?
to give context and meaning to those parameters
to avoid errors for positional parameters
to avoid merge conflicts
👉 Let’s discuss it on Twitter or on the comment section below!
Using the right data structure is crucial to building robust and efficient applications. So, why use a List or a HashSet to sort items (and remove duplicates) when you have a SortedSet?
Table of Contents
Just a second! 🫷 If you are here, it means that you are a software developer.
So, you know that storage, networking, and domain management have a cost .
If you want to support this blog, please ensure that you have disabled the adblocker for this site. I configured Google AdSense to show as few ADS as possible – I don’t want to bother you with lots of ads, but I still need to add some to pay for the resources for my site.
Thank you for your understanding. – Davide
As you probably know, you can create collections of items without duplicates by using a HashSet<T> object.
It is quite useful to remove duplicates from a list of items of the same type.
How can we ensure that we always have sorted items? The answer is simple: SortedSet<T>!
HashSet: a collection without duplicates
A simple HashSet creates a collection of unordered items without duplicates.
This example
var hashSet = new HashSet<string>();
hashSet.Add("Turin");
hashSet.Add("Naples");
hashSet.Add("Rome");
hashSet.Add("Bari");
hashSet.Add("Rome");
hashSet.Add("Turin");


var resultHashSet = string.Join(',', hashSet);
Console.WriteLine(resultHashSet);
prints this string: Turin,Naples,Rome,Bari. The order of the inserted items is maintained.
SortedSet: a sorted collection without duplicates
To sort those items, we have two approaches.
You can simply sort the collection once you’ve finished adding items:
var hashSet = new HashSet<string>();
hashSet.Add("Turin");
hashSet.Add("Naples");
hashSet.Add("Rome");
hashSet.Add("Bari");
hashSet.Add("Rome");
hashSet.Add("Turin");

var items = hashSet.ToList<string>().OrderBy(s => s);


var resultHashSet = string.Join(',', items);
Console.WriteLine(resultHashSet);
Or, even better, use the right data structure: a SortedSet<T>
var sortedSet = new SortedSet<string>();

sortedSet.Add("Turin");
sortedSet.Add("Naples");
sortedSet.Add("Rome");
sortedSet.Add("Bari");
sortedSet.Add("Rome");
sortedSet.Add("Turin");


var resultSortedSet = string.Join(',', sortedSet);
Console.WriteLine(resultSortedSet);
Both results print Bari,Naples,Rome,Turin. But the second approach does not require you to sort a whole list: it is more efficient, both talking about time and memory.
Use custom sorting rules
What if we wanted to use a SortedSet with a custom object, like User?
Choosing the right data type is crucial for building robust and performant applications.
In this article, we’ve used a SortedSet to insert items in a collection and expect them to be sorted and without duplicates.
I’ve never used it in a project. So, how did I know that? I just explored the libraries I was using!
From time to time, spend some minutes reading the documentation, have a glimpse of the most common libraries, and so on: you’ll find lots of stuff that you’ve never thought existed!
Yield is a keyword that allows you to return an item at the time instead of creating a full list and returning it as a whole.
Table of Contents
Just a second! 🫷 If you are here, it means that you are a software developer.
So, you know that storage, networking, and domain management have a cost .
If you want to support this blog, please ensure that you have disabled the adblocker for this site. I configured Google AdSense to show as few ADS as possible – I don’t want to bother you with lots of ads, but I still need to add some to pay for the resources for my site.
Thank you for your understanding. – Davide
To me, yield return has always been one of the most difficult things to understand.
Now that I’ve understood it (not thoroughly, but enough to explain it), it’s my turn to share my learnings.
So, what does yield return mean? How is it related to collections of items?
Using Lists
Say that you’re returning a collection of items and that you need to iterate over them.
A first approach could be creating a list with all the items, returning it to the caller, and iterating over the collection:
IEnumerable<int> WithList()
{
    List<int> items = new List<int>();

    for (int i = 0; i < 10; i++)
    {
        Console.WriteLine($"Added item {i}");
        items.Add(i);
    }

    return items;
}

void Main()
{
    var items = WithList();

    foreach (var i in items)
    {
        Console.WriteLine($"This is Mambo number {i}");
    }
}
This snippet creates the whole collection and then prints the values inside that list. On the console, you’ll see this text:
Added item 0
Added item 1
Added item 2
Added item 3
Added item 4
Added item 5
Added item 6
Added item 7
Added item 8
Added item 9
This is Mambo number 0
This is Mambo number 1
This is Mambo number 2
This is Mambo number 3
This is Mambo number 4
This is Mambo number 5
This is Mambo number 6
This is Mambo number 7
This is Mambo number 8
This is Mambo number 9
This means that, if you need to operate over a collection with 1 million items, at first you’ll create ALL the items, and then you’ll perform operations on each of them. This approach has two main disadvantages: it’s slow (especially if you only need to work with a subset of those items), and occupies a lot of memory.
With Yield
We can use another approach: use the yield return keywords:
IEnumerable<int> WithYield()
{
for (int i = 0; i < 10; i++)
{
Console.WriteLine($"Returning item {i}");
yieldreturn i;
}
}
void Main()
{
var items = WithYield();
foreach (var i in items)
{
Console.WriteLine($"This is Mambo number {i}");
}
}
With this method, the order of messages is different:
Returning item 0
This is Mambo number 0
Returning item 1
This is Mambo number 1
Returning item 2
This is Mambo number 2
Returning item 3
This is Mambo number 3
Returning item 4
This is Mambo number 4
Returning item 5
This is Mambo number 5
Returning item 6
This is Mambo number 6
Returning item 7
This is Mambo number 7
Returning item 8
This is Mambo number 8
Returning item 9
This is Mambo number 9
So, instead of creating the whole list, we create one item at a time, and only when needed.
Benefits of Yield
As I said before, there are several benefits with yield: the application is more performant when talking about both the execution time and the memory usage.
It’s like an automatic iterator: every time you get a result, the iterator advances to the next item.
Just a note: yield works only for methods that return IAsyncEnumerable<T>, IEnumerable<T>, IEnumerable, IEnumerator<T>, or IEnumerator.
You cannot use it with a method that returns, for instance, List<T>, because, as the error message says,
The body of X cannot be an iterator block because List<int> is not an iterator interface type
A real use case
If you use NUnit as a test suite, you’ve probably already used this keyword.
In particular, when using the TestCaseSource attribute, you specify the name of the class that outputs the test cases.
publicclassMyTestClass{
[TestCaseSource(typeof(DivideCases))]publicvoid DivideTest(int n, int d, int q)
{
Assert.AreEqual(q, n / d);
}
}
classDivideCases : IEnumerable
{
public IEnumerator GetEnumerator()
{
yieldreturnnewobject[] { 12, 3, 4 };
yieldreturnnewobject[] { 12, 2, 6 };
yieldreturnnewobject[] { 12, 4, 3 };
}
}
When executing the tests, an iterator returns a test case at a time, without creating a full list of test cases.
The previous snippet is taken directly from NUnit’s documentation for the TestCaseSource attribute, that you can find here.
Wrapping up
Yes, yield is a quite difficult keyword to understand.
It would be great if we could break the debugging flow if a condition is (not) met. Can we? Of course!
Table of Contents
Just a second! 🫷 If you are here, it means that you are a software developer.
So, you know that storage, networking, and domain management have a cost .
If you want to support this blog, please ensure that you have disabled the adblocker for this site. I configured Google AdSense to show as few ADS as possible – I don’t want to bother you with lots of ads, but I still need to add some to pay for the resources for my site.
Thank you for your understanding. – Davide
Sometimes, while debugging, you want to check if the state of your code is still valid, or, at least, it corresponds to some expectations.
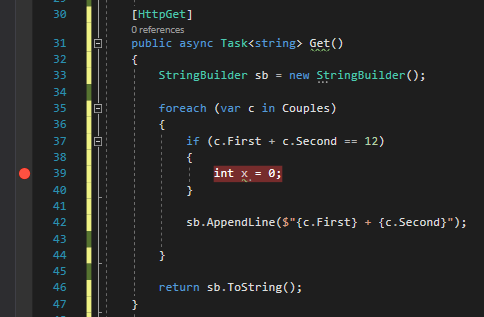
A simple approach to this problem is to add an if statement with the condition you need to check and place a dummy instruction just to be marked with a breakpoint.
[HttpGet]publicasync Task<string> Get()
{
StringBuilder sb = new StringBuilder();
foreach (var c in Couples)
{
if(c.First + c.Second == 12)
{
int x = 0;
// just to put here the debugger// or place a Console.WriteLine,// which in most of the cases// is not available }
sb.AppendLine($"{c.First} + {c.Second}");
}
return sb.ToString();
}
Which is fine, but it clutters your code.
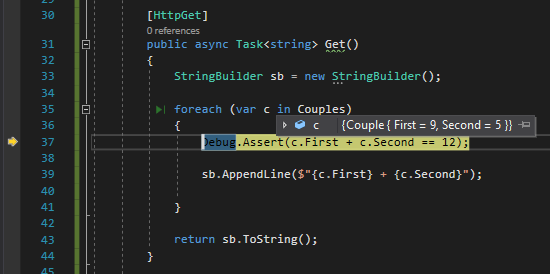
Instead of placing breakpoints all over your code to manually check the application state (or use conditional breakpoints), you can create assertions that break your code only if launched in Debug mode.
[HttpGet]publicasync Task<string> Get()
{
StringBuilder sb = new StringBuilder();
foreach (var c in Couples)
{
Debug.Assert(c.First + c.Second == 12);
sb.AppendLine($"{c.First} + {c.Second}");
}
return sb.ToString();
}
⚠ Note: Debug, not Debugger!
With Debug.Assert can define a custom condition to be evaluated. If the check fails, the debugger automatically stops there to allow you to check the locals.
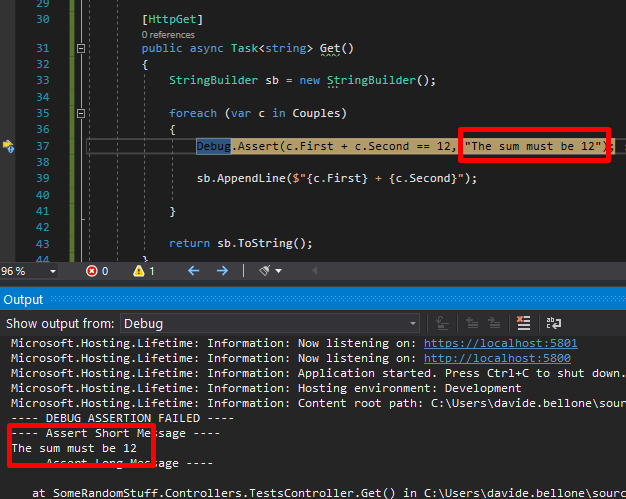
You can also add a message that can help you understand why the check fails:
foreach (var c in Couples)
{
    Debug.Assert(c.First + c.Second == 12, "The sum must be 12");

    sb.AppendLine($"{c.First} + {c.Second}");
}
To see the error message, you have to navigate to Debug > Windows > Output
where you can see the message you’ve defined before.
Note: the messages are sent to the System.Diagnostics.Trace.Listeners collection. If you have another listener, you can use it to intercept those messages.
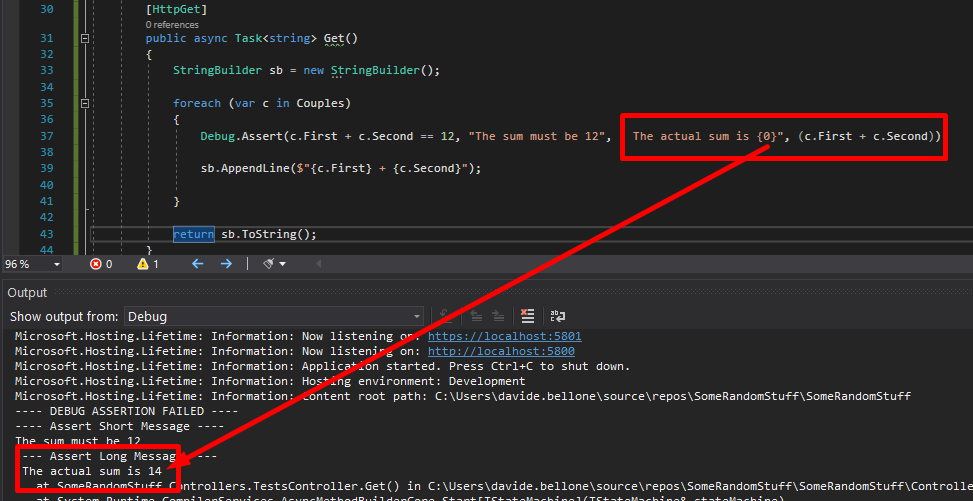
Then you can add more details to that message, and you can also more info to the detailed message by adding additional parameters to it as if you were using String.Format.
foreach (var c in Couples)
{
    Debug.Assert(c.First + c.Second == 12, "The sum must be 12", " The actual sum is {0}", (c.First + c.Second));

    sb.AppendLine($"{c.First} + {c.Second}");
}
Again, run the application and have a look at the Output folder:
Debug.Assert works only in DEBUG mode – or, at least, when the DEBUG variable is defined. Otherwise, all those checks will simply get removed from the build result, so they will not impact your application when running in RELEASE mode.
Just a second! 🫷 If you are here, it means that you are a software developer.
So, you know that storage, networking, and domain management have a cost .
If you want to support this blog, please ensure that you have disabled the adblocker for this site. I configured Google AdSense to show as few ADS as possible – I don’t want to bother you with lots of ads, but I still need to add some to pay for the resources for my site.
Thank you for your understanding. – Davide
The problem with HttpClient
When you create lots of HttpClient instances, you may incur Socket Exhaustion.
This happens because sockets are a finite resource, and they are not released exactly when you ‘Dispose’ them, but a bit later. So, when you create lots of clients, you may terminate the available sockets.
Even with using statements you may end up with Socket Exhaustion.
classResourceChecker{
publicasync Task<bool> ResourceExists(string url)
{
using (HttpClient client = new HttpClient())
{
var response = await client.GetAsync(url);
return response.IsSuccessStatusCode;
}
}
}
Actually, the real issue lies in the disposal of HttpMessageHandler instances. With simple HttpClient objects, you have no control over them.
Introducing HttpClientFactory
The HttpClientFactory class creates HttpClient instances for you.
The purpose of IHttpClientFactory is to solve that issue with HttpMessageHandler.
An interesting feature of IHttpClientFactory is that you can customize it with some general configurations that will be applied to all the HttpClient instances generated in a certain way. For instance, you can define HTTP Headers, Base URL, and other properties in a single point, and have those properties applied everywhere.
How to add it to .NET Core APIs or Websites
How can you use HttpClientFactory in your .NET projects?
If you have the Startup class, you can simply add an instruction to the ConfigureServices method:
Just a second! 🫷 If you are here, it means that you are a software developer.
So, you know that storage, networking, and domain management have a cost .
If you want to support this blog, please ensure that you have disabled the adblocker for this site. I configured Google AdSense to show as few ADS as possible – I don’t want to bother you with lots of ads, but I still need to add some to pay for the resources for my site.
Thank you for your understanding. – Davide
Do you need to tune up the performance of your code? You can create some StopWatch objects and store the execution times or rely on external libraries like MiniProfiler.
Note: of course, we’re just talking about time duration, and not about memory usage!
How to profile code using Stopwatch
A Stopwatch object acts as a (guess what?) stopwatch.
You can manually make it start and stop, and keep track of the elapsed time:
It’s useful, but you have to do it manually. There’s a better choice.
How to profile code using MiniProfiler
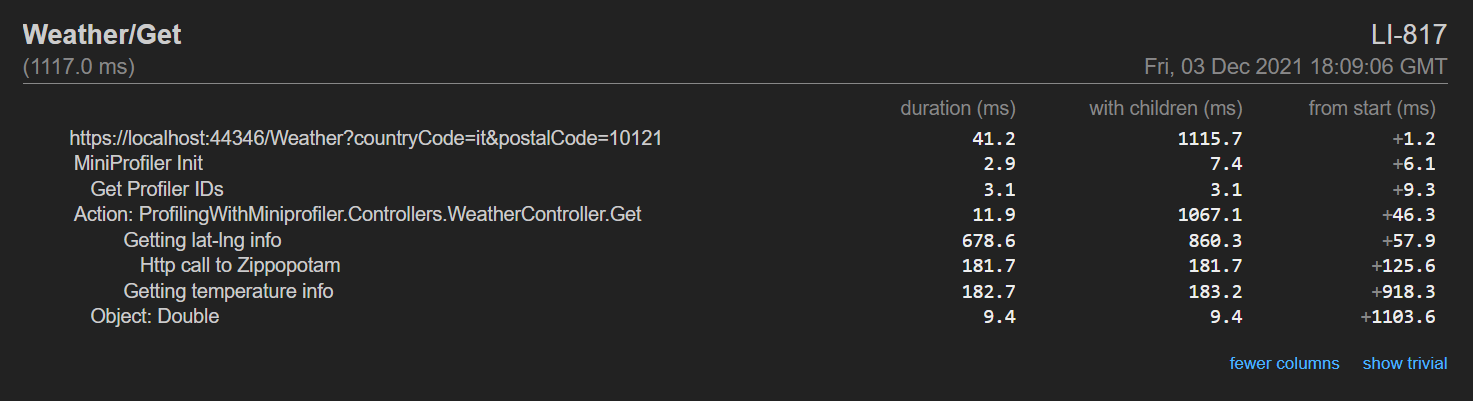
A good alternative is MiniProfiler: you can create a MiniProfiler object that holds all the info related to the current code execution. You then can add some Steps, which can have a name, and even nest them.
Finally, you can print the result using RenderPlainText.
MiniProfiler profiler = MiniProfiler.StartNew();

using (profiler.Step("With 100"))
{
    DoSomeOperations(100);
}


using (profiler.Step("With 2000"))
{
    DoSomeOperations(2000);
}

Console.WriteLine(profiler.RenderPlainText());
You won’t anymore stop and start any StopWatch instance.
You can even use inline steps, to profile method execution and store its return value:
Here I decided to print the result on the Console. You can even create HTML reports, which are quite useful when profiling websites. You can read more here, where I experimented with MiniProfiler in a .NET API project.
Here’s an example of what you can get:
Further readings
We’ve actually already talked about MiniProfiler in an in-depth article you can find here:
In the ever-evolving cybersecurity landscape, attackers constantly seek new ways to bypass traditional defences. One of the latest and most insidious methods involves using Scalable Vector Graphics (SVG)—a file format typically associated with clean, scalable images for websites and applications. But beneath their seemingly harmless appearance, SVGs can harbour threatening scripts capable of executing sophisticated phishing attacks.
This blog explores how SVGs are weaponized, why they often evade detection, and what organizations can do to protect themselves.
SVGs: More Than Just Images
SVG files differ fundamentally from standard image formats like JPEG or PNG. Instead of storing pixel data, SVGs use XML-based code to define vector paths, shapes, and text. This makes them ideal for responsive design, as they scale without losing quality. However, this same structure allows SVGs to contain embedded JavaScript, which can execute when the file is opened in a browser—something that happens by default on many Windows systems.
Delivery
Email Attachments: Sent via spear-phishing emails with convincing subject lines and sender impersonation.
Cloud Storage Links: Shared through Dropbox, Google Drive, OneDrive, etc., often bypassing email filters.
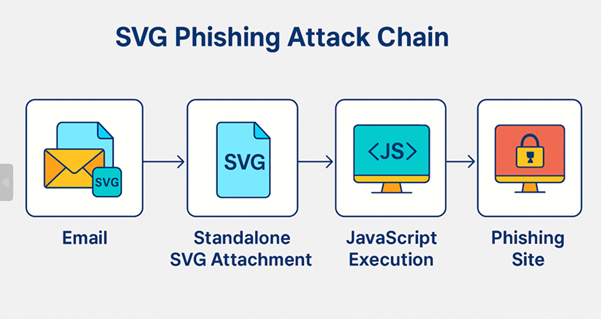
Fig:1 Attack chain of SVG campaign
The image illustrates the SVG phishing attack chain in four distinct stages: it begins with an email containing a seemingly harmless SVG attachment, which, when opened, triggers JavaScript execution in the browser, ultimately redirecting the user to a phishing site designed to steal credentials.
How the attack works:
When a target receives an SVG attachment and opens an email, the file typically launches in their default web browser—unless they have a specific application set to handle SVG files—allowing any embedded scripts to execute immediately.
Fig2: Phishing Email of SVG campaign
Attackers commonly send phishing emails with deceptive subject lines like “Reminder for your Scheduled Event 7212025.msg” or “Meeting-Reminder-7152025.msg”, paired with innocuous-looking attachments named “Upcoming Meeting.svg” or “Your-to-do-List.svg” to avoid raising suspicion. Once opened, the embedded JavaScript within the SVG file silently redirects the victim to a phishing site that closely mimics trusted services like Microsoft 365 or Google Workspace. As shown in fig.
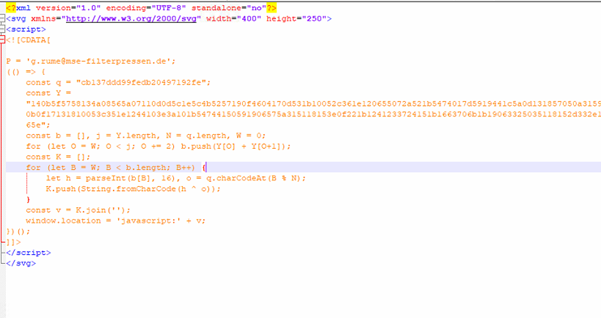
Fig3: Malicious SVG code.
In the analyzed SVG sample, the attacker embeds a <script> tag within the SVG, using a CDATA section to hide malicious logic. The code includes a long hex-encoded string (Y) and a short XOR key (q), which decodes into a JavaScript payload when processed. This decoded payload is then executed using window.location = ‘javascript:’ + v;, effectively redirecting the victim to a phishing site upon opening the file. An unused email address variable (g.rume@mse-filterpressen.de) is likely a decoy or part of targeted delivery.
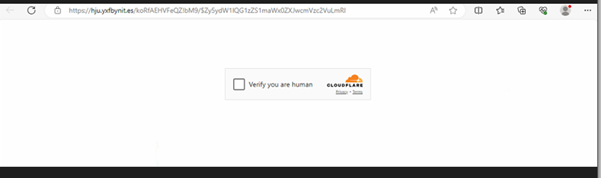
Upon decryption, we found the c2c phishing link as
hxxps://hju[.]yxfbynit[.]es/koRfAEHVFeQZ!bM9
Fig4: Cloudflare CAPTCHA gate
The link directs to a phishing site protected by a Cloudflare CAPTCHA gate. After you check the box to verify, you’re human then you’re redirected to a malicious page controlled by the attackers.
Fig5: Office 365 login form
This page embeds a genuine-looking Office 365 login form, allowing the phishing group to capture and validate your email and password credentials simultaneously.
Conclusion: Staying Ahead of SVG-Based Threats
As attackers continue to innovate, organizations must recognize the hidden risks in seemingly benign file formats like SVG. Security teams should:
Implement deep content inspection for SVG files.
Disable automatic browser rendering of SVGs from untrusted sources.
Educate employees about the risks of opening unfamiliar attachments.
Monitor for unusual redirects and script activity in email and web traffic.
SVGs may be powerful tools for developers, but in the wrong hands, they can become potent weapons for cybercriminals. Awareness and proactive defense are key to staying ahead of this emerging threat.