Just a second! 🫷 If you are here, it means that you are a software developer.
So, you know that storage, networking, and domain management have a cost .
If you want to support this blog, please ensure that you have disabled the adblocker for this site. I configured Google AdSense to show as few ADS as possible – I don’t want to bother you with lots of ads, but I still need to add some to pay for the resources for my site.
Thank you for your understanding. – Davide
You already know it: using meaningful names for variables, methods, and classes allows you to write more readable and maintainable code.
It may happen that a good name for your business entity matches one of the reserved keywords in C#.
What to do, now?
There are tons of reserved keywords in C#. Some of these are
int
interface
else
null
short
event
params
Some of these names may be a good fit for describing your domain objects or your variables.
Talking about variables, have a look at this example:
var eventList = GetFootballEvents();
foreach(vareventin eventList)
{
// do something}
That snippet will not work, since event is a reserved keyword.
You can solve this issue in 3 ways.
You can use a synonym, such as action:
var eventList = GetFootballEvents();
foreach(var action in eventList)
{
// do something}
But, you know, it doesn’t fully match the original meaning.
You can use the my prefix, like this:
var eventList = GetFootballEvents();
foreach(var myEvent in eventList)
{
// do something}
But… does it make sense? Is it really your event?
The third way is by using the @ prefix:
var eventList = GetFootballEvents();
foreach(var @event in eventList)
{
// do something}
That way, the code is still readable (even though, I admit, that @ is a bit weird to see around the code).
Of course, the same works for every keyword, like @int, @class, @public, and so on
Further readings
If you are interested in a list of reserved keywords in C#, have a look at this article:
In C#, nameof can be quite useful. But it has some drawbacks, if used the wrong way.
Table of Contents
Just a second! 🫷 If you are here, it means that you are a software developer.
So, you know that storage, networking, and domain management have a cost .
If you want to support this blog, please ensure that you have disabled the adblocker for this site. I configured Google AdSense to show as few ADS as possible – I don’t want to bother you with lots of ads, but I still need to add some to pay for the resources for my site.
Thank you for your understanding. – Davide
As per Microsoft’s definition,
A nameof expression produces the name of a variable, type, or member as the string constant.
that will print “items”, and not “hello”: this is because we are printing the name of the variable, items, and not its runtime value.
A real example I saw in my career
In some of the projects I’ve worked on during these years, I saw an odd approach that I highly recommend NOT to use: populate constants with the name of the constant itself:
conststring User_Table = nameof(User_Table);
and then use the constant name to access stuff on external, independent systems, such as API endpoints or Databases:
conststring User_Table = nameof(User_Table);
var users = db.GetAllFromTable(User_Table);
The reasons behind this, in my teammates opinion, are that:
It’s easier to write
It’s more performant: we’re using constants that are filled at compile time, not at runtime
You can just rename the constant if you need to access a new database table.
I do not agree with them: expecially the third point is pretty problematic.
Why this approach should not be used
We are binding the data access to the name of a constant, and not to its value.
We could end up in big trouble because if, from one day to the next, the system might not be able to reach the User table because the name does not exist.
How is it possible? It’s a constant, it can’t change! No: it’s a constant whose value changes if the contant name changes.
It can change for several reasons:
A developer, by mistake, renames the constant. For example, from User_Table to Users_Table.
An automatic tool (like a Linter) with wrong configurations updates the constants’ names: from User_Table to USER_TABLE.
New team styleguides are followed blindly: if the new rule is that “constants must not contain hyphens” and you apply it everywhere, you’ll end in trouble.
To me, those are valid reasons not to use nameof to give a value to a constant.
How to overcome it
If this approach is present in your codebase and it’s too time-consuming to update it everywhere, not everything is lost.
You must absolutely do just one thing to prevent all the issues I listed above: add tests, and test on the actual value.
If you’re using Moq, for instance, you should test the database access we saw before as:
// initialize and run the method[...]// test for the Table name_mockDb.Verify(db => db.GetAllFromTable("User_Table"));
Notice that here you must test against the actual name of the table: if you write something like
_mockDb.Verify(db => db.GetAllFromTable(DbAccessClass.User_Table));
//say that DbAccessClass is the name of the class the uses the data access showed above
When writing unit tests, there are smarter ways to check if two objects are equal than just comparing every field one by one.
Table of Contents
Just a second! 🫷 If you are here, it means that you are a software developer.
So, you know that storage, networking, and domain management have a cost .
If you want to support this blog, please ensure that you have disabled the adblocker for this site. I configured Google AdSense to show as few ADS as possible – I don’t want to bother you with lots of ads, but I still need to add some to pay for the resources for my site.
Thank you for your understanding. – Davide
When writing unit tests, you might want to check that the result returned by a method is equal to the one you’re expecting.
publicstatic Player GetClone(Player source)
=> new Player
{
Id = source.Id,
UserName = source.UserName,
Score = source.Score
};
and call it this way:
[Test]publicvoid GetClone()
{
var originalPlayer = new Player { Id = 1, UserName = "me", Score = 1 };
var clonedPlayer = MyUtils.GetClone(originalPlayer);
Assert.That(clonedPlayer, Is.EqualTo(originalPlayer));
}
Even though logically originalPlayer and clonedPlayer are equal, they are not the same: the test will fail!
Lucky for us, we can specify the comparison rules!
Equality function: great for simple checks
Say that we don’t want to check that all the values match. We only care about Id and UserName.
When we have just a few fields to check, we can use a function to specify that two items are equal:
[Test]publicvoid GetClone_WithEqualityFunction()
{
var originalPlayer = new Player { Id = 1, UserName = "me", Score = 1 };
var clonedPlayer = MyUtils.GetClone(originalPlayer);
Assert.That(clonedPlayer, Is.EqualTo(originalPlayer).Using<Player>(
(Player a, Player b) => a.Id == b.Id && a.UserName == b.UserName)
);
}
Clearly, if the method becomes unreadable, you can refactor the comparer function as so:
[Test]publicvoid GetClone_WithEqualityFunction()
{
var originalPlayer = new Player { Id = 1, UserName = "me", Score = 1 };
var clonedPlayer = MyUtils.GetClone(originalPlayer);
Func<Player, Player, bool> comparer = (Player a, Player b) => a.Id == b.Id && a.UserName == b.UserName;
Assert.That(clonedPlayer, Is.EqualTo(originalPlayer).Using<Player>(comparer));
}
EqualityComparer class: best for complex scenarios
If you have a complex scenario to validate, you can create a custom class that implements the IEqualityComparer interface. Here, you have to implement two methods: Equals and GetHashCode.
Instead of just implementing the same check inside the Equals method, we’re gonna try a different approach: we’re gonna use GetHashCode to determine how to identify a Player, by generating a string used as a simple identifier, and then we’re gonna use the HashCode of the result string for the actual comparison:
Clearly, I’ve also added a check on nullability: (x is null && y is null).
Now we can instantiate a new instance of PlayersComparer and use it to check whether two players are equivalent:
[Test]publicvoid GetClone_WithEqualityComparer()
{
var originalPlayer = new Player { Id = 1, UserName = "me", Score = 1 };
var clonedPlayer = MyUtils.GetClone(originalPlayer);
Assert.That(clonedPlayer, Is.EqualTo(originalPlayer).Using<Player>(new PlayersComparer()));
}
Of course, you can customize the Equals method to use whichever condition to validate the equivalence of two instances, depending on your business rules. For example, you can say that two vectors are equal if they have the exact same length and direction, even though the start and end points are different.
❓ A question for you: where would you put the equality check: in the production code or in the tests project?
Wrapping up
As we’ve learned in this article, there are smarter ways to check if two objects are equal than just comparing every field one by one.
I hope you enjoyed this article! Let’s keep in touch on Twitter or LinkedIn! 🤜🤛
Hello Robo is a New York based digital product design agency that turns complex technology into intuitive, usable interfaces. We work with forward-thinking teams to create market-ready digital products that are easy to use and hard to ignore.
Earlier this year, the design team at Hello Robo decided to update our brand and website site to speak the language of our current clients — AI, space, aviation, and robotics — after realizing the old, “startup-y” look sold us short.
The new design and copy showcase our ability to tame complex systems with clear thinking and precise interfaces, signaling to deep-tech teams that we understand their world and can make their products make sense.
We wanted our site to do only 2 things but well:
Have the design language to appeal to our existing and new target clients
Most of our work is not allowed to be shared. Our second goal was to let design, motion and interaction give our visitors a sense of what we are great at.
Research
Before we sketching a single screen, our design lead on this project Daria Krauskopf, did what we do before we starting any project at Hello Robo. She decided to talk with our customers. We asked every existing client two questions:
What do you think we do?
What’s one thing you think we’re absolutely great at?
The replies were almost word-for-word:
“You do excellent product design—not crazy, unachievable vision design, and not MVPs either. You’re absolutely great at taking complex, technical systems and turning them into beautiful interfaces that our users actually love to use.”
That became the foundation for how we approached the new site.
Design & Art Direction
We love robots—and robotics inspires everything we do. For the new site, we moved away from soft colors and rounded corners and leaned into a more hi-tech visual language: dark backgrounds, thin lines, sharper shapes. Daria wanted the design to feel more precise, more engineered—something that would resonate with the kind of clients we work with in aviation, robotics, and defense. Every visual choice was about clarity, control, and intention.
A few boards from Hello Robo new brand, reimagined by our design Hanna Shpak
Animation and Interaction
All of our interface work is rooted in interaction and motion—because real-world products aren’t static. They always change and respond to users input and actions. We wanted the site to reflect that. Not with flashy effects or distracting transitions, but with just enough subtle animation to guide, respond, and feel alive. Everything moves with purpose—quiet, responsive, and smooth.
Case Studies
We didn’t want our case studies to be just a scroll of pretty images. Each one is built as a story—showing not just what we made, but how it worked and why it mattered. We walk through key features, the thinking behind UX decisions, and the problems we solved for each client. It’s less about showing off visuals, and more about showing how we think.
Final words
In the end, we got what we set out to build: a clearer visual and verbal language that reflects who we are and who we work with. The site feels more aligned with the complexity and ambition of our clients—and with the way we approach design: thoughtful, precise, and grounded in real product work. It’s not trying to impress with noise. It’s built to resonate with the kind of teams who care about clarity, systems, and getting things right.
Just a second! 🫷 If you are here, it means that you are a software developer.
So, you know that storage, networking, and domain management have a cost .
If you want to support this blog, please ensure that you have disabled the adblocker for this site. I configured Google AdSense to show as few ADS as possible – I don’t want to bother you with lots of ads, but I still need to add some to pay for the resources for my site.
Thank you for your understanding. – Davide
In my opinion, Unit tests should be well structured and written even better than production code.
In fact, Unit Tests act as a first level of documentation of what your code does and, if written properly, can be the key to fixing bugs quickly and without adding regressions.
One way to improve readability is by grouping similar tests that only differ by the initial input but whose behaviour is the same.
Let’s use a dummy example: some tests on a simple Calculator class that only performs sums on int values.
publicstaticclassCalculator{
publicstaticint Sum(int first, int second) => first + second;
}
One way to create tests is by creating one test for each possible combination of values:
publicclassSumTests{
[Test]publicvoid SumPositiveNumbers()
{
var result = Calculator.Sum(1, 5);
Assert.That(result, Is.EqualTo(6));
}
[Test]publicvoid SumNegativeNumbers()
{
var result = Calculator.Sum(-1, -5);
Assert.That(result, Is.EqualTo(-6));
}
[Test]publicvoid SumWithZero()
{
var result = Calculator.Sum(1, 0);
Assert.That(result, Is.EqualTo(1));
}
}
However, it’s not a good idea: you’ll end up with lots of identical tests (DRY, remember?) that add little to no value to the test suite. Also, this approach forces you to add a new test method to every new kind of test that pops into your mind.
When possible, we should generalize it. With NUnit, we can use the TestCase attribute to specify the list of parameters passed in input to our test method, including the expected result.
We can then simplify the whole test class by creating only one method that accepts the different cases in input and runs tests on those values.
[Test][TestCase(1, 5, 6)][TestCase(-1, -5, -6)][TestCase(1, 0, 1)]publicvoid SumWorksCorrectly(int first, int second, int expected)
{
var result = Calculator.Sum(first, second);
Assert.That(result, Is.EqualTo(expected));
}
By using TestCase, you can cover different cases by simply adding a new case without creating new methods.
Clearly, don’t abuse it: use it only to group methods with similar behaviour – and don’t add if statements in the test method!
There is a more advanced way to create a TestCase in NUnit, named TestCaseSource – but we will talk about it in a future C# tip 😉
Further readings
If you are using NUnit, I suggest you read this article about custom equality checks – you might find it handy in your code!
With HashSet, you can get a list of different items in a performant way. What if you need a custom way to define when two objects are equal?
Table of Contents
Just a second! 🫷 If you are here, it means that you are a software developer.
So, you know that storage, networking, and domain management have a cost .
If you want to support this blog, please ensure that you have disabled the adblocker for this site. I configured Google AdSense to show as few ADS as possible – I don’t want to bother you with lots of ads, but I still need to add some to pay for the resources for my site.
Thank you for your understanding. – Davide
Sometimes, object instances can be considered equal even though some of their properties are different. Consider a movie translated into different languages: the Italian and French versions are different, but the movie is the same.
If we want to store unique values in a collection, we can use a HashSet<T>. But how can we store items in a HashSet when we must follow a custom rule to define if two objects are equal?
In this article, we will learn two ways to add custom equality checks when using a HashSet.
Let’s start with a dummy class: Pirate.
publicclassPirate{
publicint Id { get; }
publicstring Name { get; }
public Pirate(int id, string username)
{
Id = id;
Name = username;
}
}
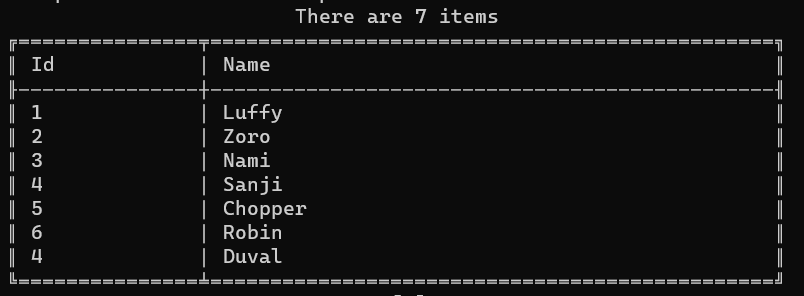
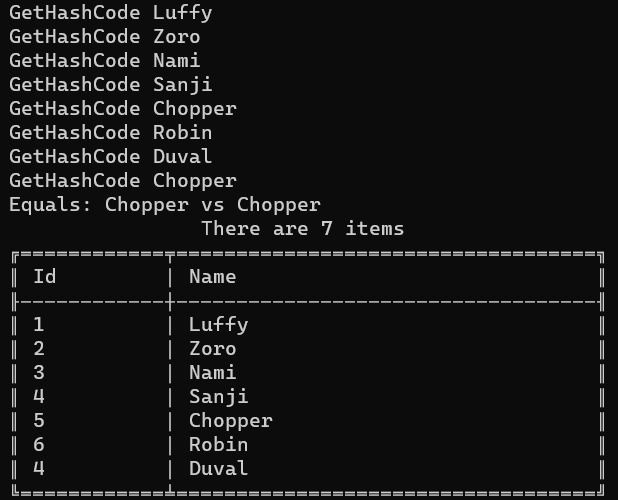
I’m going to add some instances of Pirate to a HashSet. Please, note that there are two pirates whose Id is 4:
List<Pirate> mugiwara = new List<Pirate>()
{
new Pirate(1, "Luffy"),
new Pirate(2, "Zoro"),
new Pirate(3, "Nami"),
new Pirate(4, "Sanji"), // This ...new Pirate(5, "Chopper"),
new Pirate(6, "Robin"),
new Pirate(4, "Duval"), // ... and this};
HashSet<Pirate> hashSet = new HashSet<Pirate>();
foreach (var pirate in mugiwara)
{
hashSet.Add(pirate);
}
_output.WriteAsTable(hashSet);
(I really hope you’ll get the reference 😂)
Now, what will we print on the console? (ps: output is just a wrapper around some functionalities provided by Spectre.Console, that I used here to print a table)
As you can see, we have both Sanji and Duval: even though their Ids are the same, those are two distinct objects.
Also, we haven’t told HashSet that the Id property must be used as a discriminator.
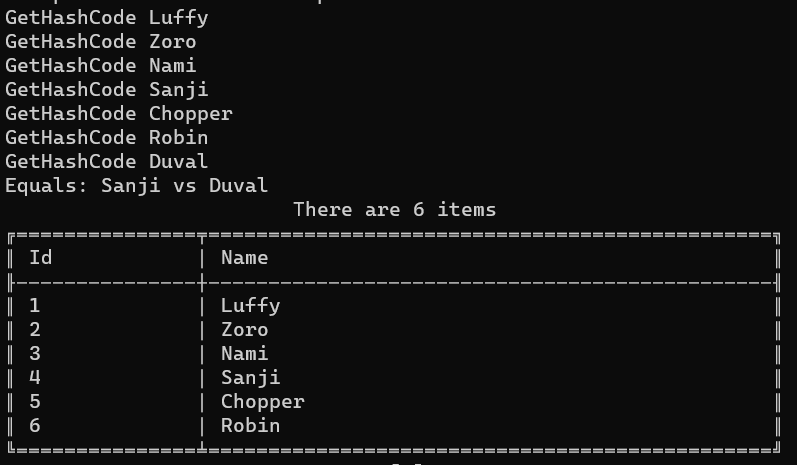
Define a custom IEqualityComparer in a C# HashSet
In order to add a custom way to tell the HashSet that two objects can be treated as equal, we can define a custom equality comparer: it’s nothing but a class that implements the IEqualityComparer<T> interface, where T is the name of the class we are working on.
The first method, Equals, compares two instances of a class to tell if they are equal, following the custom rules we write.
The second method, GetHashCode, defines a way to build an object’s hash code given its internal status. In this case, I’m saying that the hash code of a Pirate object is just the hash code of its Id property.
To include this custom comparer, you must add a new instance of PirateComparer to the HashSet declaration:
HashSet<Pirate> hashSet = new HashSet<Pirate>(new PirateComparer());
Let’s rerun the example, and admire the result:
As you can see, there is only one item whose Id is 4: Sanji.
Let’s focus a bit on the messages printed when executing Equals and GetHashCode.
GetHashCode Luffy
GetHashCode Zoro
GetHashCode Nami
GetHashCode Sanji
GetHashCode Chopper
GetHashCode Robin
GetHashCode Duval
Equals: Sanji vs Duval
Every time we insert an item, we call the GetHashCode method to generate an internal ID used by the HashSet to check if that item already exists.
Two objects that are equal return hash codes that are equal. However, the reverse is not true: equal hash codes do not imply object equality, because different (unequal) objects can have identical hash codes.
This means that if the Hash Code is already used, it’s not guaranteed that the objects are equal. That’s why we need to implement the Equals method (hint: do not just compare the HashCode of the two objects!).
Is implementing a custom IEqualityComparer the best choice?
As always, it depends.
On the one hand, using a custom IEqualityComparer has the advantage of allowing you to have different HashSets work differently depending on the EqualityComparer passed in input; on the other hand, you are now forced to pass an instance of IEqualityComparer everywhere you use a HashSet — and if you forget one, you’ll have a system with inconsistent behavior.
There must be a way to ensure consistency throughout the whole codebase.
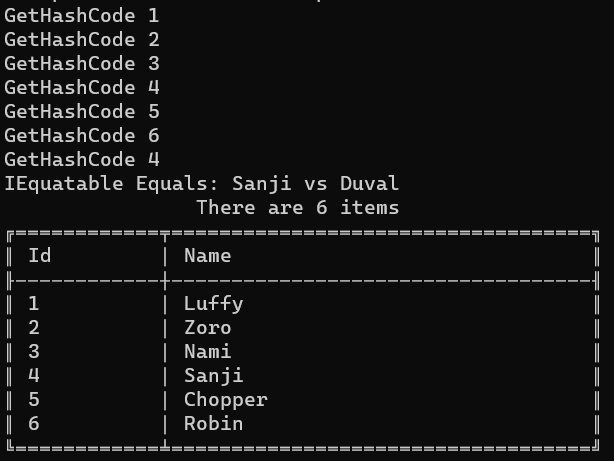
Implement the IEquatable interface
It makes sense to implement the equality checks directly inside the type passed as a generic type to the HashSet.
To do that, you need to have that class implement the IEquatable<T> interface, where T is the class itself.
Let’s rework the Pirate class, letting it implement the IEquatable<Pirate> interface.
publicclassPirate : IEquatable<Pirate>
{
publicint Id { get; }
publicstring Name { get; }
public Pirate(int id, string username)
{
Id = id;
Name = username;
}
bool IEquatable<Pirate>.Equals(Pirate? other)
{
Console.WriteLine($"IEquatable Equals: {this.Name} vs {other.Name}");
returnthis.Id == other.Id;
}
publicoverridebool Equals(object obj)
{
Console.WriteLine($"Override Equals {this.Name} vs {(obj as Pirate).Name}");
return Equals(obj as Pirate);
}
publicoverrideint GetHashCode()
{
Console.WriteLine($"GetHashCode {this.Id}");
return (Id).GetHashCode();
}
}
The IEquatable interface forces you to implement the Equals method. So, now we have two implementations of Equals (the one for IEquatable and the one that overrides the default implementation). Which one is correct? Is the GetHashCode really used?
Let’s see what happens in the next screenshot:
As you could’ve imagined, the Equals method called in this case is the one needed to implement the IEquatable interface.
Please note that, as we don’t need to use the custom comparer, the HashSet initialization becomes:
HashSet<Pirate> hashSet = new HashSet<Pirate>();
What has the precedence: IEquatable or IEqualityComparer?
What happens when we use both IEquatable and IEqualityComparer?
Let’s quickly demonstrate it.
First of all, keep the previous implementation of the Pirate class, where the equality check is based on the Id property:
publicclassPirate : IEquatable<Pirate>
{
publicint Id { get; }
publicstring Name { get; }
public Pirate(int id, string username)
{
Id = id;
Name = username;
}
bool IEquatable<Pirate>.Equals(Pirate? other)
{
Console.WriteLine($"IEquatable Equals: {this.Name} vs {other.Name}");
returnthis.Id == other.Id;
}
publicoverrideint GetHashCode()
{
Console.WriteLine($"GetHashCode {this.Id}");
return (Id).GetHashCode();
}
}
Now, create a new IEqualityComparer where the equality is based on the Name property.
Now we have custom checks on both the Name and the Id.
It’s time to add a new pirate to the list, and initialize the HashSet by passing in the constructor an instance of PirateComparerByName.
List<Pirate> mugiwara = new List<Pirate>()
{
new Pirate(1, "Luffy"),
new Pirate(2, "Zoro"),
new Pirate(3, "Nami"),
new Pirate(4, "Sanji"), // Id = 4new Pirate(5, "Chopper"), // Name = Choppernew Pirate(6, "Robin"),
new Pirate(4, "Duval"), // Id = 4new Pirate(7, "Chopper") // Name = Chopper};
HashSet<Pirate> hashSet = new HashSet<Pirate>(new PirateComparerByName());
foreach (var pirate in mugiwara)
{
hashSet.Add(pirate);
}
We now have two pirates with ID = 4 and two other pirates with Name = Chopper.
Can you foresee what will happen?
The checks on the ID are totally ignored: in fact, the final result contains both Sanji and Duval, even if their IDs are the same. The custom IEqualityComparer has the precedence over the IEquatable interface.
In an era of digital banking, cloud migration, and a growing cyber threat landscape, traditional perimeter-based security models are no longer sufficient for the Banking, Financial Services, and Insurance (BFSI) sector. Enter Zero Trust Network Access (ZTNA) — a modern security framework that aligns perfectly with the BFSI industry’s need for robust, scalable, and compliant cybersecurity practices.
This blog explores the key use cases and benefits of ZTNA for BFSI organizations.
ZTNA Use Cases for BFSI
Secure Remote Access for Employees
With hybrid and remote work becoming the norm, financial institutions must ensure secure access to critical applications and data outside corporate networks. ZTNA allows secure, identity-based access without exposing internal resources to the public internet. This ensures that only authenticated and authorized users can access specific resources, reducing attack surfaces and preventing lateral movement by malicious actors.
Protect Customer Data Using Least Privileged Access
ZTNA enforces the principle of least privilege, granting users access only to the resources necessary for their roles. This granular control is vital in BFSI, where customer financial data is highly sensitive. By limiting access based on contextual parameters such as user identity, device health, and location, ZTNA drastically reduces the chances of data leakage or internal misuse.
Compliance with Regulatory Requirements
The BFSI sector is governed by stringent regulations such as RBI guidelines, PCI DSS, GDPR, and more. ZTNA provides centralized visibility, detailed audit logs, and fine-grained access control—all critical for meeting regulatory requirements. It also helps institutions demonstrate proactive data protection measures during audits and assessments.
Vendor and Third-Party Access Management
Banks and insurers frequently engage with external vendors, consultants, and partners. Traditional VPNs provide broad access once a connection is established, posing a significant security risk. ZTNA addresses this by granting secure, time-bound, and purpose-specific access to third parties—without ever bringing them inside the trusted network perimeter.
Key Benefits of ZTNA for BFSI
Reduced Risk of Data Breaches
By minimizing the attack surface and verifying every user and device before granting access, ZTNA significantly lowers the risk of unauthorized access and data breaches. Since applications are never directly exposed to the internet, ZTNA also protects against exploitation of vulnerabilities in public-facing assets.
Improved Compliance Posture
ZTNA simplifies compliance by offering audit-ready logs, consistent policy enforcement, and better visibility into user activity. BFSI firms can use these capabilities to ensure adherence to local and global regulations and quickly respond to compliance audits with accurate data.
Enhanced Customer Trust and Loyalty
Security breaches in financial institutions can erode customer trust instantly. By adopting a Zero Trust approach, organizations can demonstrate their commitment to customer data protection, thereby enhancing credibility, loyalty, and long-term customer relationships.
Cost Savings on Legacy VPNs
Legacy VPN solutions are often complex, expensive, and challenging to scale. ZTNA offers a modern alternative that is more efficient and cost-effective. It eliminates the need for dedicated hardware and reduces operational overhead by centralizing policy management in the cloud.
Scalability for Digital Transformation
As BFSI institutions embrace digital transformation—be it cloud adoption, mobile banking, or FinTech partnerships—ZTNA provides a scalable, cloud-native security model that grows with the business. It supports rapid onboarding of new users, apps, and services without compromising on security.
Final Thoughts
ZTNA is more than just a security upgrade—it’s a strategic enabler for BFSI organizations looking to build resilient, compliant, and customer-centric digital ecosystems. With its ability to secure access for employees, vendors, and partners while ensuring regulatory compliance and data privacy, ZTNA is fast becoming the cornerstone of modern cybersecurity strategies in the financial sector.
Ready to embrace Zero Trust? Identify high-risk access points and gradually implement ZTNA for your most critical systems. The transformation may be phased, but the security gains are immediate and long-lasting.
Seqrite’s Zero Trust Network Access (ZTNA) solution empowers BFSI organizations with secure, seamless, and policy-driven access control tailored for today’s hybrid and regulated environments. Partner with Seqrite to strengthen data protection, streamline compliance, and accelerate your digital transformation journey.
WireMock.NET is a popular library used to simulate network communication through HTTP. But there is no simple way to integrate the generated in-memory server with an instance of IHttpClientFactory injected via constructor. Right? Wrong!
Table of Contents
Just a second! 🫷 If you are here, it means that you are a software developer.
So, you know that storage, networking, and domain management have a cost .
If you want to support this blog, please ensure that you have disabled the adblocker for this site. I configured Google AdSense to show as few ADS as possible – I don’t want to bother you with lots of ads, but I still need to add some to pay for the resources for my site.
Thank you for your understanding. – Davide
Testing the integration with external HTTP clients can be a cumbersome task, but most of the time, it is necessary to ensure that a method is able to perform correct operations – not only sending the right information but also ensuring that we are able to read the content returned from the called API.
Instead of spinning up a real server (even if in the local environment), we can simulate a connection to a mock server. A good library for creating temporary in-memory servers is WireMock.NET.
Many articles I read online focus on creating a simple HttpClient, using WireMock.NET to drive its behaviour. In this article, we are going to do a little step further: we are going to use WireMock.NET to handle HttpClients generated, using Moq, via IHttpClientFactory.
Explaining the dummy class used for the examples
As per every practical article, we must start with a dummy example.
For the sake of this article, I’ve created a dummy class with a single method that calls an external API to retrieve details of a book and then reads the returned content. If the call is successful, the method returns an instance of Book; otherwise, it throws a BookServiceException exception.
Just for completeness, here’s the Book class:
publicclassBook{
publicint Id { get; set; }
publicstring Title { get; set; }
}
publicclassBookService{
privatereadonly IHttpClientFactory _httpClientFactory;
public BookService(IHttpClientFactory httpClientFactory)
{
_httpClientFactory = httpClientFactory;
}
publicasync Task<Book> GetBookById(int id)
{
string url = $"/api/books/{id}";
HttpClient httpClient = _httpClientFactory.CreateClient("books_client");
try {
Book? book = await httpClient.GetFromJsonAsync<Book>(url);
return book;
}
catch (Exception ex)
{
thrownew BookServiceException($"There was an error while getting info about the book {id}", ex);
}
}
}
There are just two things to notice:
We are injecting an instance of IHttpClientFactory into the constructor.
We are generating an instance of HttpClient by passing a name to the CreateClient method of IHttpClientFactory.
Now that we have our cards on the table, we can start!
WireMock.NET, a library to simulate HTTP calls
WireMock is an open-source platform you can install locally to create a real mock server. You can even create a cloud environment to generate and test HTTP endpoints.
However, for this article we are interested in the NuGet package that takes inspiration from the WireMock project, allowing .NET developers to generate disposable in-memory servers: WireMock.NET.
To add the library, you must add the WireMock.NET NuGet package to your project, for example using dotnet add package WireMock.Net.
Once the package is ready, you can generate a test server in your Unit Tests class:
You can instantiate a new instance of WireMockServer in the OneTimeSetUp step, store it in a private field, and make it accessible to every test in the test class.
Before each test run, you can reset the internal status of the mock server by running the Reset() method. I’d suggest you reset the server to avoid unintentional internal status, but it all depends on what you want to do with the server instance.
Finally, remember to free up resources by calling the Stop() method in the OneTimeTearDown phase (but not during the TearDown phase: you still need the server to be on while running your tests!).
Basic configuration of HTTP requests and responses with WireMock.NET
The basic structure of the definition of a mock response using WireMock.NET is made of two parts:
Within the Given method, you define the HTTP Verb and URL path whose response is going to be mocked.
Using RespondWith you define what the mock server must return when the endpoint specified in the Given step is called.
In the next example, you can see that the _server instance (the one I instantiated in the OneTimeSetUp phase, remember?) must return a specific body (responseBody) and the 200 HTTP Status Code when the /api/books/42 endpoint is called.
All in all, both the request and the response are highly customizable: you can add HTTP Headers, delays, cookies, and much more.
Look closely; there’s one part that is missing: What is the full URL? We have declared only the path (/api/books/42) but have no info about the hostname and the port used to communicate.
How to integrate WireMock.NET with a Moq-driven IHttpClientFactory
In order to have WireMock.NET react to an HTTP call, we have to call the exact URL – even the hostname and port must match. But when we create a mocked HttpClient – like we did in this article – we don’t have a real hostname. So, how can we have WireMock.NET and HttpClient work together?
The answer is easy: since WireMockServer.Start() automatically picks a free port in your localhost, you don’t have to guess the port number, but you can reference the current instance of _server.
Once the WireMockServer is created, internally it contains the reference to one or more URLs it will use to listen for HTTP requests, intercepting the calls and replying in place of a real server. You can then use one of these ports to configure the HttpClient generated by the HttpClientFactory.
Let’s see the code:
[Test]publicasync Task GetBookById_Should_HandleBadRequests()
{
string baseUrl = _server.Url;
HttpClient myHttpClient = new HttpClient() { BaseAddress = new Uri(baseUrl) };
Mock<IHttpClientFactory> mockFactory = new Mock<IHttpClientFactory>();
mockFactory.Setup(_ => _.CreateClient("books_client")).Returns(myHttpClient);
_server
.Given(Request.Create().WithPath("/api/books/42").UsingGet())
.RespondWith(
  Response.Create()
 .WithStatusCode(404)
);
BookService service = new BookService(mockFactory.Object);
Assert.CatchAsync<BookServiceException>(() => service.GetBookById(42));
}
First we access the base URL used by the mock server by accessing _server.Url.
We use that URL as a base address for the newly created instance of HttpClient.
Then, we create a mock of IHttpClientFactory and configure it to return the local instance of HttpClient whenever we call the CreateClient method with the specified name.
In the meanwhile, we define how the mock server must behave when an HTTP call to the specified path is intercepted.
Finally, we can pass the instance of the mock IHttpClientFactory to the BookService.
So, the key part to remember is that you can simply access the Url property (or, if you have configured it to handle many URLs, you can access the Urls property, that is an array of strings).
Let WireMock.NET create the HttpClient for you
As suggested by Stef in the comments to this post, there’s actually another way to generate the HttpClient with the correct URL: let WireMock.NET do it for you.
Instead of doing
string baseUrl = _server.Url;

HttpClient myHttpClient = new HttpClient() { BaseAddress = new Uri(baseUrl) };
you can simplify the process by calling the CreateClient method:
HttpClient myHttpClient = _server.CreateClient();
Of course, you will still have to pass the instance to the mock of IHttpClientFactory.
Further readings
It’s important to notice that WireMock and WireMock.NET are two totally distinct things: one is a platform, and one is a library, owned by a different group of people, that mimics some functionalities from the platform to help developers write better tests.
WireMock.NET is greatly integrated with many other libraries, such as xUnit, FluentAssertions, and .NET Aspire.
It’s important to remember that using an HttpClientFactory is generally more performant than instantiating a new HttpClient. Ever heard of socket exhaustion?
Finally, for the sake of this article I’ve used Moq. However, there’s a similar library you can use: NSubstitute. The learning curve is quite flat: in the most common scenarios, it’s just a matter of syntax usage.
In this article, we almost skipped all the basic stuff about WireMock.NET and tried to go straight to the point of integrating WireMock.NET with IHttpClientFactory.
There are lots of articles out there that explain how to use WireMock.NET – just remember that WireMock and WireMock.NET are not the same thing!
I hope you enjoyed this article! Let’s keep in touch on LinkedIn or Twitter! 🤜🤛
OpenAI’s backend converting messy unstructured data to structured data via functions
OpenAI’s “Function Calling” might be the most groundbreaking yet under appreciated feature released by any software company… ever.
Functions allow you to turn unstructured data into structured data. This might not sound all that groundbreaking but when you consider that 90% of data processing and data entry jobs worldwide exist for this exact reason, it’s quite a revolutionary feature that went somewhat unnoticed.
Have you ever found yourself begging GPT (3.5 or 4) to spit out the answer you want and absolutely nothing else? No “Sure, here is your…” or any other useless fluff surrounding the core answer. GPT Functions are the solution you’ve been looking for.
How are Functions meant to work?
OpenAI’s docs on function calling are extremely limited. You’ll find yourself digging through their developer forum for examples of how to use them. I dug around the forum for you and have many example coming up.
Here’s one of the only examples you’ll be able to find in their docs:
functions = [
{
"name": "get_current_weather",
"description": "Get the current weather in a given location",
"parameters": {
"type": "object",
"properties": {
"location": {
"type": "string",
"description": "The city and state, e.g. San Francisco, CA",
},
"unit": {"type": "string", "enum": ["celsius", "fahrenheit"]},
},
"required": ["location"],
},
}
]
A function definition is a rigid JSON format that defines a function name, description and parameters. In this case, the function is meant to get the current weather. Obviously GPT isn’t able to call this actual API (since it doesn’t exist) but using this structured response you’d be able to connect the real API hypothetically.
At a high level however, functions provide two layers of inference:
Picking the function itself:
You may notice that functions are passed into the OpenAI API call as an array. The reason you provide a name and description to each function are so GPT can decide which to use based on a given prompt. Providing multiple functions in your API call is like giving GPT a Swiss army knife and asking it to cut a piece of wood in half. It knows that even though it has a pair of pliers, scissors and a knife, it should use the saw!
Function definitions contribute towards your token count. Passing in hundreds of functions would not only take up the majority of your token limit but also result in a drop in response quality. I often don’t even use this feature and only pass in 1 function that I force it to use. It is very nice to have in certain use cases however.
Picking the parameter values based on a prompt:
This is the real magic in my opinion. GPT being able to choose the tool in it’s tool kit is amazing and definitely the focus of their feature announcement but I think this applies to more use cases.
You can imagine a function like handing GPT a form to fill out. It uses its reasoning, the context of the situation and field names/descriptions to decide how it will fill out each field. Designing the form and the additional information you pass in is where you can get creative.
GPT filling out your custom form (function parameters)
One of the most common things I use functions for to extract specific values from a large chunk of text. The sender’s address from an email, a founders name from a blog post, a phone number from a landing page.
I like to imagine I’m searching for a needle in a haystack except the LLM burns the haystack, leaving nothing but the needle(s).
GPT Data Extraction Personified.
Use case: Processing thousands of contest submissions
I built an automation that iterated over thousands of contest submissions. Before storing these in a Google sheet I wanted to extract the email associated with the submission. Heres the function call I used for extracting their email.
{
"name":"update_email",
"description":"Updates email based on the content of their submission.",
"parameters":{
"type":"object",
"properties":{
"email":{
"type":"string",
"description":"The email provided in the submission"
}
},
"required":[
"email"
]
}
}
Assigning unstructured data a score based on dynamic, natural language criteria is a wonderful use case for functions. You could score comments during sentiment analysis, essays based on a custom grading rubric, a loan application for risk based on key factors. A recent use case I applied scoring to was scoring of sales leads from 0–100 based on their viability.
Use Case: Scoring Sales leads
We had hundreds of prospective leads in a single google sheet a few months ago that we wanted to tackle from most to least important. Each lead contained info like company size, contact name, position, industry etc.
Using the following function we scored each lead from 0–100 based on our needs and then sorted them from best to worst.
{
"name":"update_sales_lead_value_score",
"description":"Updates the score of a sales lead and provides a justification",
"parameters":{
"type":"object",
"properties":{
"sales_lead_value_score":{
"type":"number",
"description":"An integer value ranging from 0 to 100 that represents the quality of a sales lead based on these criteria. 100 is a perfect lead, 0 is terrible. Ideal Lead Criteria:\n- Medium sized companies (300-500 employees is the best range)\n- Companies in primary resource heavy industries are best, ex. manufacturing, agriculture, etc. (this is the most important criteria)\n- The higher up the contact position, the better. VP or Executive level is preferred."
},
"score_justification":{
"type":"string",
"description":"A clear and conscise justification for the score provided based on the custom criteria"
}
}
},
"required":[
"sales_lead_value_score",
"score_justification"
]
}
Define custom buckets and have GPT thoughtfully consider each piece of data you give it and place it in the correct bucket. This can be used for labelling tasks like selecting the category of youtube videos or for discrete scoring tasks like assigning letter grades to homework assignments.
Use Case: Labelling news articles.
A very common first step in data processing workflows is separating incoming data into different streams. A recent automation I built did exactly this with news articles scraped from the web. I wanted to sort them based on the topic of the article and include a justification for the decision once again. Here’s the function I used:
{
"name":"categorize",
"description":"Categorize the input data into user defined buckets.",
"parameters":{
"type":"object",
"properties":{
"category":{
"type":"string",
"enum":[
"US Politics",
"Pandemic",
"Economy",
"Pop culture",
"Other"
],
"description":"US Politics: Related to US politics or US politicians, Pandemic: Related to the Coronavirus Pandemix, Economy: Related to the economy of a specific country or the world. , Pop culture: Related to pop culture, celebrity media or entertainment., Other: Doesn't fit in any of the defined categories. "
},
"justification":{
"type":"string",
"description":"A short justification explaining why the input data was categorized into the selected category."
}
},
"required":[
"category",
"justification"
]
}
}
Often times when processing data, I give GPT many possible options and want it to select the best one based on my needs. I only want the value it selected, no surrounding fluff or additional thoughts. Functions are perfect for this.
Use Case: Finding the “most interesting AI news story” from hacker news
I wrote another medium article here about how I automated my entire Twitter account with GPT. Part of that process involves selecting the most relevant posts from the front pages of hacker news. This post selection step leverages functions!
To summarize the functions portion of the use case, we would scrape the first n pages of hacker news and ask GPT to select the post most relevant to “AI news or tech news”. GPT would return only the headline and the link selected via functions so that I could go on to scrape that website and generate a tweet from it.
I would pass in the user defined query as part of the message and use the following function definition:
{
"name":"find_best_post",
"description":"Determine the best post that most closely reflects the query.",
"parameters":{
"type":"object",
"properties":{
"best_post_title":{
"type":"string",
"description":"The title of the post that most closely reflects the query, stated exactly as it appears in the list of titles."
}
},
"required":[
"best_post_title"
]
}
}
Filtering is a subset of categorization where you categorize items as either true or false based on a natural language condition. A condition like “is Spanish” will be able to filter out all Spanish comments, articles etc. using a simple function and conditional statement immediately after.
Use Case: Filtering contest submission
The same automation that I mentioned in the “Data Extraction” section used ai-powered-filtering to weed out contest submissions that didn’t meet the deal-breaking criteria. Things like “must use typescript” were absolutely mandatory for the coding contest at hand. We used functions to filter out submissions and trim down the total set being processed by 90%. Here is the function definition we used.
{
"name":"apply_condition",
"description":"Used to decide whether the input meets the user provided condition.",
"parameters":{
"type":"object",
"properties":{
"decision":{
"type":"string",
"enum":[
"True",
"False"
],
"description":"True if the input meets this condition 'Does submission meet the ALL these requirements (uses typescript, uses tailwindcss, functional demo)', False otherwise."
}
},
"required":[
"decision"
]
}
}
If you’re curious why I love functions so much or what I’ve built with them you should check out AgentHub!
AgentHub is the Y Combinator-backed startup I co-founded that let’s you automate any repetitive or complex workflow with AI via a simple drag and drop no-code platform.
“Imagine Zapier but AI-first and on crack.” — Me
Automations are built with individual nodes called “Operators” that are linked together to create power AI pipelines. We have a catalogue of AI powered operators that leverage functions under the hood.
Our current AI-powered operators that use functions!
If you want to start building AgentHub is live and ready to use! We’re very active in our discord community and are happy to help you build your automations if needed.