Revise PowerShell basics with a simple script that opens a browser for each specified URL. We’re gonna cover how to declare variables, define arrays, concatenate strings and run CMD commands.
Table of Contents
Just a second! 🫷 If you are here, it means that you are a software developer.
So, you know that storage, networking, and domain management have a cost .
If you want to support this blog, please ensure that you have disabled the adblocker for this site. I configured Google AdSense to show as few ADS as possible – I don’t want to bother you with lots of ads, but I still need to add some to pay for the resources for my site.
Thank you for your understanding. – Davide
Say that your project is already deployed on multiple environments: dev, UAT, and production; now you want to open the same page from all the environments.
You could do it manually, by composing the URL on a notepad. Or you could create a PowerShell script that opens them for you.
In this article, I’m going to share with you a simple script to open multiple browsers with predefined URLs. First of all, I’ll show you the completed script, then I’ll break it down to understand what’s going on and to brush up on some basic syntax for PowerShell.
Understanding the problem: the full script
I have a website deployed on 3 environments: dev, UAT, and production, and I want to open all of them under the same page, in this case under “/Image?w=60”.
So, here’s the script that opens 3 instances of my default browser, each with the URL of one of the environments:
In fact, to declare an array you must simply separate each string with ,.
Foreach loops in PowerShell
Among the other loops (while, do-while, for), the foreach loop is probably the most used.
Even here, it’s really simple:
foreach($baseUrl in $baseUrls)
{

}
As we’ve already seen before, there is no type declaration for the current item.
Just like C#, the keyword used in the body of the loop definition is in.
foreach (var item in collection)
{
// In C# we use the `var` keyword to declare the variable}
String concatenation in PowerShell
The $fullUrl variable is the concatenation of 2 string variables: $baseUrl and $path.
$fullUrl = "$($baseUrl)$($path)";
We can see that to declare this new string we must wrap it between "...".
More important, every variable that must be interpolated is wrapped in a $() block.
How to run a command with PowerShell
The key part of this script is for sure this line:
Invoke-Expression "cmd.exe /C start $($fullUrl)"
The Invoke-Expression cmdlet evaluates and runs the specified string in your local machine.
The command cmd.exe /C start $($fullUrl) just tells the CMD to open the link stored in the $fullUrl variable with the default browser.
Wrapping up
We learned how to open multiple browser instances with PowerShell. As you can understand, this was just an excuse to revise some basic concepts of PowerShell.
I think that many of us are too focused on our main language (C#, Java, JavaScript, and so on) that we forget to learn something different that may help us with our day-to-day job.
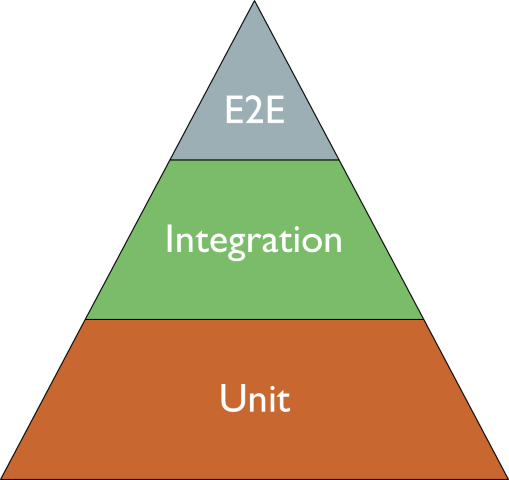
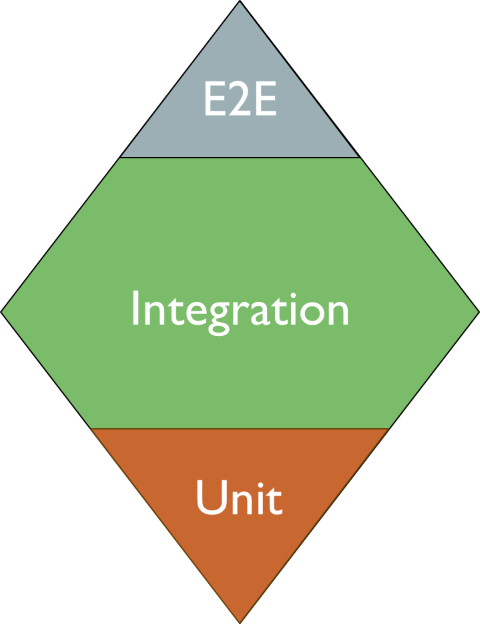
The Testing Pyramid focuses on Unit Tests; the Testing Diamond focuses on Integration Tests; and what about the Testing Vial?
Table of Contents
Just a second! 🫷 If you are here, it means that you are a software developer.
So, you know that storage, networking, and domain management have a cost .
If you want to support this blog, please ensure that you have disabled the adblocker for this site. I configured Google AdSense to show as few ADS as possible – I don’t want to bother you with lots of ads, but I still need to add some to pay for the resources for my site.
Thank you for your understanding. – Davide
Testing is crucial in any kind of application. It can also be important in applications that are meant to be thrown away: in fact, with a proper testing strategy, you can ensure that the application will do exactly what you expect it to do; instead of running it over and over again to fix the parts, by adding some specific tests, you will speed up the development of that throwaway project.
The most common testing strategies are the Testing Pyramid and the Testing Diamond. They are both useful, but I think that they are not perfect.
That’s why I came up with a new testing strategy that I called “the Testing Vial”: in this article, I’m going to introduce it and explain the general idea.
Since it’s a new idea, I’d like to hear your honest feedback. Don’t be afraid to tell me that this is a terrible idea – let’s work on it together!
The Testing Pyramid: the focus is on Unit Tests
The Testing Pyramid is a testing strategy where the focus is on Unit Tests.
Unit Tests are easy to write (well, they are often easy to write: it depends on whether your codebase is a mess!), they are fast to execute, so they provide immediate feedback.
So, the focus here is on technical details: if you create a class named Foo, most probably you will have its sibling class FooTests. And the same goes for each (public) method in it.
Yes, I know: unit tests can operate across several methods of the same class, as long as it is considered a “unit”. But let’s be real: most of the time, we write tests against each single public method. And, even worse, we are overusing mocks.
Problems with the Testing Pyramid
The Testing Pyramid relies too much on unit tests.
But Unit Tests are not perfect:
They often rely too much on mocks: tests might not reflect the real execution of the system;
They are too closely coupled with the related class and method: if you add one parameter to one single method, you most probably will have to update tens of test methods;
They do not reflect the business operations: you might end up creating the strongest code ever, but missing the point of the whole business meaning. Maybe, because you focused too much on technical details and forgot to evaluate all the acceptance criteria.
Now, suppose that you have to change something big, like
add OpenTelemetry support on the whole system;
replace SQL with MongoDB;
refactor a component, replacing a huge internal switch-case block with the Chain Of Responsibility pattern.
Well, in this case, you will have to update or delete a lot of Unit Tests. And, still, you might not be sure you haven’t added regressions. This is one of the consequences of focusing too much on Unit Tests.
The Testing Diamond: the focus is on Integration Tests
The Testing Diamond emphasises the importance of Integration Tests.
So, when using this testing strategy, you are expected to write many more Integration Tests and way fewer Unit Tests.
In my opinion, this is a better approach to testing: this way, you can focus more on the business value and less on the technical details.
Using this approach, you may refactor huge parts of the system without worrying too much about regressions and huge changes in tests: in fact, Integration Tests will give you a sort of safety net, ensuring that the system still works as expected.
So, if I had to choose, I’d go with the Testing Diamond: implementations may change, while the overall application functionality will still be preserved.
Problems with the Testing Diamond
Depending on the size of the application and on how it is structured, Integration Tests may be time-consuming and hard to spin up.
Maybe you have a gigantic monolith that takes minutes to start up: in this case, running Integration Tests may take literally hours.
Also, there is a problem with data: if you are going to write data to a database (or an external resource), how can you ensure that the operation does not insert duplicate or dirty data?
For this problem, there are several solutions, such as:
using Ephemeral Environments specifically to run these tests;
using TestContainers to create a sandbox environment;
replacing some specific operations (like saving data on the DB or sending HTTP requests) by using a separate, standalone service (as we learned in this article, where we customised a WebApplicationFactory).
Those approaches may not be easy to implement, I know.
Also, Integration Tests alone may not cover all the edge cases, making your application less robust.
Introducing the Testing Vial: the focus is on business entities
Did you notice? Both the Testing Pyramid and the Testing Diamond focus on the technical aspects of the tests, and not on the meaning for the business.
I think that is a wrong approach, and that we should really shift our focus from the number of tests of a specific type (more Unit Tests or more Integration Tests?) to the organisational value they bring: that’s why I came up with the idea of the Testing Vial.
You can imagine tests to be organised into sealed vials.
In each vial, you have
E2E tests: to at least cover the most critical flows
Integration tests: to cover at least all the business requirements as they are described in the Acceptance Criteria of your User Stories (or, in general, to cover all Happy Paths and the most common Unhappy Paths);
Unit test: to cover at least all the edge cases that are hard to reproduce with Integration tests.
So, using the Testing Vial, you don’t have to worry about the number of tests of a specific type: you only care that, regardless of their number, tests are focused on Business concerns.
But, ok, nothing fancy: it’s just common sense.
To make the Testing Vial effective, there are two more parts to add.
Architectural tests, to validate that the system design hasn’t changed
After you have all these tests, in a variable number which depends solely on what is actually helpful for you, you also write some Architectural Tests, for example by using ArchUnit, for Java, or ArchUnit.NET for .NET applications.
This way, other than focusing on the business value (regardless of this goal being achieved by Unit Tests or Integration Tests), you also validate that the system hasn’t changed in unexpected ways. For example, you might have added a dependency between modules, making the system more coupled and less maintainable.
Generally speaking, Architectural Tests should be written in the initial phases of a project, so that, by running them from time to time, they can ensure that nothing has changed.
With Architectural Tests, which act as a cap for the vial, you ensure that the tests are complete, valid, and that the architecture-wise maintainability of the system is preserved.
But that’s not enough!
Categories, to identify and isolate areas of your application
All of this makes sense if you add one or more tags to your tests: these tags should identify the business entity the test is referring to. For example, in an e-shop application, you should add categories about “Product”, “Cart”, “User”, and so on. This is way easier if you already do DDD, clearly.
In C# you can categorise tests by using TestCategory if you use MSTest or NUnit, or Trait if you use xUnit.*
Well, categorising tests allows you to keep track of the impacts of a change more broadly. Especially at the beginning, you might notice that too many tests are marked with too many categories: this might be a sign of a poor design, and you might want to work to improve it.
Also, by grouping by category, you can have a complete view of everything that happens in the system about that specific Entity, regardless of the type of test.
Did you know that in Visual Studio you can group tests by Category (called Traits), so that you can see and execute all the tests related to a specific Category?
By using Code Coverage tools wisely – executing them in combination with tests of a specific category – you can identify all the parts of the application that are affected by such tests. This is especially true if you have many Integration Tests: just by looking at the executed methods, you can have a glimpse of all the parts touched by that test. This simple trick can also help you out with reorganising the application (maybe by moving from monolith to modular monolith).
Finally, having tests tagged, allows you to have a catalogue of all the Entities and their dependencies. And, in case you need to work on a specific activity that changes something about an Entity, you can perform better analyses to find potential, overlooked impacts.
Further readings
There is a lot of content about tests and testing strategies, so here are some of them.
Then, I clearly changed my mind and came up with the idea of the Testing Vial.
Wrapping up
With the Testing Vial approach, the shift moves from technical to business concerns: you don’t really care if you’ve written more Unit Tests or more Integration tests; you only care that you have covered everything that the business requires, and that by using Architecture Tests and Test Categories you can make sure that you are not introducing unwanted dependencies between modules, improving maintainability.
Vials are meant to be standalone: by accessing the content of a vial, you can see everything related to it: its dependencies, its architecture, main user cases and edge cases.
Clearly, the same test may appear in multiple vials, but that’s not a problem.
I came up with this idea recently, so I want to hear from you what you think about it. I’m sure there are areas of improvement!
Let me know!
I hope you enjoyed this article! Let’s keep in touch on LinkedIn, Twitter or BlueSky! 🤜🤛
When performing a talk, the audience experience is as important as the content. They must be focused on what you say, and not get distracted by external outputs. So, here’s 10 tips to rock your next virtual talk.
Table of Contents
Just a second! 🫷 If you are here, it means that you are a software developer.
So, you know that storage, networking, and domain management have a cost .
If you want to support this blog, please ensure that you have disabled the adblocker for this site. I configured Google AdSense to show as few ADS as possible – I don’t want to bother you with lots of ads, but I still need to add some to pay for the resources for my site.
Thank you for your understanding. – Davide
More and more developers crave to be also tech speakers. We can see every day dozens of meetups, live streaming, and YouTube videos by developers from all over the world. But regardless of the topic and the type of talk you’re doing, there are a few tips you should keep in mind to rock the execution.
Those tips are not about the content, but about the presentation itself. So, maybe, consider re-reading this checklist about 30 minutes before your next virtual conference.
1- Hide desktop icons
Many of you have lots of icons on your desktop, right? Me too. I often save on Desktop temporary files (that I always forget to move or delete) and many program icons, like Postman, Fiddler, Word, and so on.
They are just a distraction to your audience. You should keep the desktop as clean as possible.
You can do it in 2 ways: hide all the icons (on Windows: right-click > View > untick Show desktop icons) or just remove the ones that are not necessary.
The second option is better if you have lots of content to show from different sources, like images, plots, demo with different tools, and so on.
If you have everything under a single folder, you can simply hide all icons and pin that folder on Quick Access.
2- Choose a neutral desktop background
Again, your audience should focus on your talk, not on your desktop. So just remove funny or distracting background images.
Even more, if you use memes or family photos as desktop background.
A good idea is to create a custom desktop background for the event you are participating in: a simple image with the name of the talk, your name, and your social contacts.
3- Mute your phone
Avoid all the possible distractions. WhatsApp notifications, calls from Call Centres, alarm clocks you forgot to turn off…
So, just use Airplane mode.
4- Remove useless bookmarks (or use a different browser)
Just as desktop icons, bookmarks can distract your audience.
You don’t want to show everyone which social networks are you using, what are the projects you’re currently working on, and other private info about you.
A good alternative is to use a different browser. But remember to do a rehearsal with that browser: sometimes some JavaScript and CSS functionalities are not available on every browser, so don’t take anything for granted.
5- Close background processes
What if you get an awkward message on Skype or Slack while you’re sharing your screen?
So, remember to close all useless background processes: all the chats (Skype, Discord, Telegram…) and all the backup platforms (OneDrive, Dropbox, and so on).
A risk: unwanted notifications that appear while sharing your screen. And even worse, all those programs require network bandwidth and use CPU and Memory: shutting them down will boost the other applications and make everything run smoother.
6- Check font size and screen resolution
You don’t know the device your audience will use. Some of them will watch you talk on a smartphone, some others on a 60″ TV.
So, even if you’re used to small fonts and icons, make everything bigger. Start with screen resolution. If it is OK, now increase the font size for both your slides and your IDE.
Make sure everyone can read it. If you can, during the rehearsals share your screen with a smartphone and a big TV, and find the balance.
7- Disable dark mode
Accessibility is the key, even more for virtual events. And not everyone can see everything as you do. So, switch everything to light mode: IDEs, websites, tools. Everything that natively comes with light mode.
8- Check mic volume
This is simple: if your mic volume is too low, your audience won’t hear a word from you. So, instead of screaming for one hour, just put your mic near you or increase the volume.
9- Use ZoomIt to draw on your screen
«Ok, now, I click on this button on the top-left corner with the Home icon».
How many times have you heard this phrase? It’s not wrong to say so, but you can simply show it. Remember, show, don’t tell!
For Windows, you can install a small tool, ZoomIt, that allows you to draw lines, arrows, and shapes on your screen.
You can read more on this page by Microsoft, where you can find the download file, some shortcuts, and more info.
So, download it, try out some shortcuts (eg: R, G, B to use a red, green, or blue pen, and Hold Ctrl + Shift to draw an arrow) and use it to help your audience see what you’re indicating with your mouse.
10- Have a backup in case of network failures
Your internet connection goes down during the live. First reaction: shock. But then, you remember you have everything under control: you can use your smartphone as a hotspot and use that connection to move on with your talk. So, always have a plan B.
And what if the site you’re showing for your demos goes down? Say that you’re explaining what are Azure Functions, and suddenly the Azure Dashboard becomes unavailable. How to prevent this situation?
You can’t. But you can have a backup plan: save screenshots and screencasts, and show them if you cannot access the original sites.
Wrapping up
We’ve seen that there are lots of things to do to improve the quality of your virtual talks. If you have more tips to share, share them in the comment section below or on this discussion on Twitter.
Performing your first talks is really challenging, I know. But it’s worth a try. If you want to read more about how to be ready for it, here’s the recap of what I’ve learned after my very first public speech.
Tests are as important as production code. Well, they are even more important! So writing them well brings lots of benefits to your projects.
Table of Contents
Just a second! 🫷 If you are here, it means that you are a software developer.
So, you know that storage, networking, and domain management have a cost .
If you want to support this blog, please ensure that you have disabled the adblocker for this site. I configured Google AdSense to show as few ADS as possible – I don’t want to bother you with lots of ads, but I still need to add some to pay for the resources for my site.
Thank you for your understanding. – Davide
Clean code principles apply not only to production code but even to tests. Indeed, a test should be even more clean, easy-to-understand, and meaningful than production code.
In fact, tests not only prevent bugs: they even document your application! New team members should look at tests to understand how a class, a function, or a module works.
So, every test must have a clear meaning, must have its own raison d’être, and must be written well enough to let the readers understand it without too much fuss.
In this last article of the Clean Code Series, we’re gonna see some tips to improve your tests.
If you are interested in more tips about Clean Code, here are the other articles:
As I said before, tests are also meant to document your code: given a specific input or state, they help you understand what the result will be in a deterministic way.
But, since tests are dependent on the production code, you should adapt them when the production code changes: this means that tests must be clean and flexible enough to let you update them without big issues.
If your test suite is a mess, even the slightest update in your code will force you to spend a lot of time updating your tests: that’s why you should organize your tests with the same care as your production code.
Good tests have also a nice side effect: they make your code more flexible. Why? Well, if you have a good test coverage, and all your tests are meaningful, you will be more confident in applying changes and adding new functionalities. Otherwise, when you change your code, you will not be sure not only that the new code works as expected, but that you have not introduced any regression.
So, having a clean, thorough test suite is crucial for the life of your application.
How to keep tests clean
We’ve seen why we should write clean tests. But how should you write them?
Let’s write a bad test:
[Test]publicvoid CreateTableTest()
{
//Arrangestring tableContent = @"<table>
<thead>
<tr>
<th>ColA</th>
<th>ColB</th>
</tr>
</thead>
<tbody>
<tr>
<td>Text1A</td>
<td>Text1B</td>
</tr>
<tr>
<td>Text2A</td>
<td>Text2B</td>
</tr>
</tbody>
</table>";
var tableInfo = new TableInfo(2);
HtmlDocument doc = new HtmlDocument();
doc.LoadHtml(tableContent);
var node = doc.DocumentNode.ChildNodes[0];
var part = new TableInfoCreator(node);
var result = part.CreateTableInfo();
tableInfo.SetHeaders(newstring[] { "ColA", "ColB" });
tableInfo.AddRow(newstring[] { "Text1A", "Text1B" });
tableInfo.AddRow(newstring[] { "Text2A", "Text2B" });
result.Should().BeEquivalentTo(tableInfo);
}
This test proves that the CreateTableInfo method of the TableInfoCreator class parses correctly the HTML passed in input and returns a TableInfo object that contains info about rows and headers.
This is kind of a mess, isn’t it? Let’s improve it.
Use appropriate test names
What does CreateTableTest do? How does it help the reader understand what’s going on?
We need to explicitly say what the tests want to achieve. There are many ways to do it; one of the most used is the Given-When-Then pattern: every method name should express those concepts, possibly in a consistent way.
I like to use always the same format when naming tests: {Something}_Should_{DoSomething}_When_{Condition}. This format explicitly shows what and why the test exists.
So, let’s change the name:
[Test]publicvoid CreateTableInfo_Should_CreateTableInfoWithCorrectHeadersAndRows_When_TableIsWellFormed()
{
//Arrangestring tableContent = @"<table>
<thead>
<tr>
<th>ColA</th>
<th>ColB</th>
</tr>
</thead>
<tbody>
<tr>
<td>Text1A</td>
<td>Text1B</td>
</tr>
<tr>
<td>Text2A</td>
<td>Text2B</td>
</tr>
</tbody>
</table>";
var tableInfo = new TableInfo(2);
HtmlDocument doc = new HtmlDocument();
doc.LoadHtml(tableContent);
HtmlNode node = doc.DocumentNode.ChildNodes[0];
var part = new TableInfoCreator(node);
var result = part.CreateTableInfo();
tableInfo.SetHeaders(newstring[] { "ColA", "ColB" });
tableInfo.AddRow(newstring[] { "Text1A", "Text1B" });
tableInfo.AddRow(newstring[] { "Text2A", "Text2B" });
result.Should().BeEquivalentTo(tableInfo);
}
Now, just by reading the name of the test, we know what to expect.
Initialization
The next step is to refactor the tests to initialize all the stuff in a better way.
The first step is to remove the creation of the HtmlNode seen in the previous example, and move it to an external function: this will reduce code duplication and help the reader understand the test without worrying about the HtmlNode creation details:
[Test]publicvoid CreateTableInfo_Should_CreateTableWithHeadersAndRows_When_TableIsWellFormed()
{
//Arrangestring tableContent = @"<table>
<thead>
<tr>
<th>ColA</th>
<th>ColB</th>
</tr>
</thead>
<tbody>
<tr>
<td>Text1A</td>
<td>Text1B</td>
</tr>
<tr>
<td>Text2A</td>
<td>Text2B</td>
</tr>
</tbody>
</table>";
var tableInfo = new TableInfo(2);
// HERE! HtmlNode node = CreateNodeElement(tableContent);
var part = new TableInfoCreator(node);
var result = part.CreateTableInfo();
tableInfo.SetHeaders(newstring[] { "ColA", "ColB" });
tableInfo.AddRow(newstring[] { "Text1A", "Text1B" });
tableInfo.AddRow(newstring[] { "Text2A", "Text2B" });
result.Should().BeEquivalentTo(tableInfo);
}
privatestatic HtmlNode CreateNodeElement(string content)
{
HtmlDocument doc = new HtmlDocument();
doc.LoadHtml(content);
return doc.DocumentNode.ChildNodes[0];
}
Then, depending on what you are testing, you could even extract input and output creation into different methods.
If you extract them, you may end up with something like this:
[Test]publicvoid CreateTableInfo_Should_CreateTableWithHeadersAndRows_When_TableIsWellFormed()
{
var node = CreateWellFormedHtmlTable();
var part = new TableInfoCreator(node);
var result = part.CreateTableInfo();
TableInfo tableInfo = CreateWellFormedTableInfo();
result.Should().BeEquivalentTo(tableInfo);
}
privatestatic TableInfo CreateWellFormedTableInfo()
{
var tableInfo = new TableInfo(2);
tableInfo.SetHeaders(newstring[] { "ColA", "ColB" });
tableInfo.AddRow(newstring[] { "Text1A", "Text1B" });
tableInfo.AddRow(newstring[] { "Text2A", "Text2B" });
return tableInfo;
}
private HtmlNode CreateWellFormedHtmlTable()
{
var table = CreateWellFormedTable();
return CreateNodeElement(table);
}
privatestaticstring CreateWellFormedTable()
=> @"<table>
<thead>
<tr>
<th>ColA</th>
<th>ColA</th>
</tr>
</thead>
<tbody>
<tr>
<td>Text1A</td>
<td>Text1B</td>
</tr>
<tr>
<td>Text2A</td>
<td>Text2B</td>
</tr>
</tbody>
</table>";
So, now, the general structure of the test is definitely better. But, to understand what’s going on, readers have to jump to the details of both CreateWellFormedHtmlTable and CreateWellFormedTableInfo.
Even worse, you have to duplicate those methods for every test case. You could do a further step by joining the input and the output into a single object:
publicclassTableTestInfo{
public HtmlNode Html { get; set; }
public TableInfo ExpectedTableInfo { get; set; }
}
private TableTestInfo CreateTestInfoForWellFormedTable() =>
new TableTestInfo
{
Html = CreateWellFormedHtmlTable(),
ExpectedTableInfo = CreateWellFormedTableInfo()
};
and then, in the test, you simplify everything in this way:
[Test]publicvoid CreateTableInfo_Should_CreateTableWithHeadersAndRows_When_TableIsWellFormed()
{
var testTableInfo = CreateTestInfoForWellFormedTable();
var part = new TableInfoCreator(testTableInfo.Html);
var result = part.CreateTableInfo();
TableInfo tableInfo = testTableInfo.ExpectedTableInfo;
result.Should().BeEquivalentTo(tableInfo);
}
In this way, you have all the info in a centralized place.
But, sometimes, this is not the best way. Or, at least, in my opinion.
In the previous example, the most important part is the elaboration of a specific input. So, to help readers, I usually prefer to keep inputs and outputs listed directly in the test method.
On the contrary, if I had to test for some properties of a class or method (for instance, test that the sorting of an array with repeated values works as expected), I’d extract the initializations outside the test methods.
AAA: Arrange, Act, Assert
A good way to write tests is to write them with a structured and consistent template. The most used way is the Arrange-Act-Assert pattern:
That means that in the first part of the test you set up the objects and variables that will be used; then, you’ll perform the operation under test; finally, you check if the test passes by using assertion (like a simple Assert.IsTrue(condition)).
I prefer to explicitly write comments to separate the 3 parts of each test, like this:
[Test]publicvoid CreateTableInfo_Should_CreateTableWithHeadersAndRows_When_TableIsWellFormed()
{
// Arrangevar testTableInfo = CreateTestInfoForWellFormedTable();
TableInfo expectedTableInfo = testTableInfo.ExpectedTableInfo;
var part = new TableInfoCreator(testTableInfo.Html);
// Actvar actualResult = part.CreateTableInfo();
// Assert actualResult.Should().BeEquivalentTo(expectedTableInfo);
}
Only one assertion per test (with some exceptions)
Ideally, you may want to write tests with only a single assertion.
Let’s take as an example a method that builds a User object using the parameters in input:
publicclassUser{
publicstring FirstName { get; set; }
publicstring LastName { get; set; }
public DateTime BirthDate { get; set; }
public Address AddressInfo { get; set; }
}
publicclassAddress{
publicstring Country { get; set; }
publicstring City { get; set; }
}
public User BuildUser(string name, string lastName, DateTime birthdate, string country, string city)
{
returnnew User
{
FirstName = name,
LastName = lastName,
BirthDate = birthdate,
AddressInfo = new Address
{
Country = country,
City = city
}
};
}
Nothing fancy, right?
So, ideally, we should write tests with a single assert (ignore in the next examples the test names – I removed the when part!):
… and so on. Imagine writing a test for each property: your test class will be full of small methods that only clutter the code.
If you can group assertions in a logical way, you could write more asserts in a single test:
[Test]publicvoid BuildUser_Should_CreateUserWithCorrectPlainInfo()
{
// Arrangevar name = "Davide";
var lastName = "Bellone";
var birthDay = new DateTime(1991, 1, 1);
// Actvar user = BuildUser(name, lastName, birthDay, null, null);
// Assert user.FirstName.Should().Be(name);
user.LastName.Should().Be(lastName);
user.BirthDate.Should().Be(birthDay);
}
This is fine because the three properties (FirstName, LastName, and BirthDate) are logically on the same level and with the same meaning.
One concept per test
As we stated before, it’s not important to test only one property per test: each and every test must be focused on a single concept.
By looking at the previous examples, you can notice that the AddressInfo property is built using the values passed as parameters on the BuildUser method. That makes it a good candidate for its own test.
Another way of seeing this tip is thinking of the properties of an object (I mean, the mathematical properties). If you’re creating your custom sorting, think of which properties can be applied to your method. For instance:
an empty list, when sorted, is still an empty list
an item with 1 item, when sorted, still has one item
applying the sorting to an already sorted list does not change the order
and so on.
So you don’t want to test every possible input but focus on the properties of your method.
In a similar way, think of a method that gives you the number of days between today and a certain date. In this case, just a single test is not enough.
You have to test – at least – what happens if the other date:
is exactly today
it is in the future
it is in the past
it is next year
it is February, the 29th of a valid year (to check an odd case)
it is February, the 30th (to check an invalid date)
Each of these tests is against a single value, so you might be tempted to put everything in a single test method. But here you are running tests against different concepts, so place every one of them in a separate test method.
Of course, in this example, you must not rely on the native way to get the current date (in C#, DateTime.Now or DateTime.UtcNow). Rather, you have to mock the current date.
FIRST tests: Fast, Independent, Repeatable, Self-validating, and Timed
You’ll often read the word FIRST when talking about the properties of good tests. What does FIRST mean?
It is simply an acronym. A test must be Fast, Independent, Repeatable, Self-validating, and Timed.
Fast
Tests should be fast. How much? Enough to don’t discourage the developers to run them. This property applies only to Unit Tests: in fact, while each test should run in less than 1 second, you may have some Integration and E2E tests that take more than 10 seconds – it depends on what you’re testing.
Now, imagine if you have to update one class (or one method), and you have to re-run all your tests. If the whole tests suite takes just a few seconds, you can run them whenever you want – some devs run all the tests every time they hit Save; if every single test takes 1 second to run, and you have 200 tests, just a simple update to one class makes you lose at least 200 seconds: more than 3 minutes. Yes, I know that you can run them in parallel, but that’s not the point!
So, keep your tests short and fast.
Independent
Every test method must be independent of the other tests.
This means that the result and the execution of one method must not impact the execution of another one. Conversely, one method must not rely on the execution of another method.
Those tests are perfectly valid if run in sequence. But Test1 affects the execution of Test2 by setting a global variable
used by the second method. But what happens if you run only Test2? It will fail. Same result if the tests are run in a different order.
So, you can transform the previous method in this way:
In this way, we have a default value, Boe, that gets overridden by the single methods – only when needed.
Repeatable
Every Unit test must be repeatable: this means that you must be able to run them at any moment and on every machine (and get always the same result).
So, avoid all the strong dependencies on your machine (like file names, absolute paths, and so on), and everything that is not directly under your control: the current date and time, random-generated numbers, and GUIDs.
To work with them there’s only a solution: abstract them and use a mocking mechanism.
If you want to learn 3 ways to do this, check out my 3 ways to inject DateTime and test it. There I explained how to inject DateTime, but the same approaches work even for GUIDs and random numbers.
Self-validating
You must be able to see the result of a test without performing more actions by yourself.
So, don’t write your test results on an external file or source, and don’t put breakpoints on your tests to see if they’ve passed.
Just put meaningful assertions and let your framework (and IDE) tell you the result.
Timely
You must write your tests when required. Usually, when using TDD, you write your tests right before your production code.
So, this particular property applies only to devs who use TDD.
Wrapping up
In this article, we’ve seen that even if many developers consider tests redundant and not worthy of attention, they are first-class citizens of our applications.
Paying enough attention to tests brings us a lot of advantages:
tests document our code, thus helping onboarding new developers
they help us deploy with confidence a new version of our product, without worrying about regressions
they prove that our code has no bugs (well, actually you’ll always have a few bugs, it’s just that you haven’t discovered them yet )
code becomes more flexible and can be extended without too many worries
So, write meaningful tests, and always well written.
Code coverage is a good indicator of the health of your projects. We’ll see how to show Cobertura reports associated to your builds on Azure DevOps and how to display the progress on Dashboard.
Table of Contents
Just a second! 🫷 If you are here, it means that you are a software developer.
So, you know that storage, networking, and domain management have a cost .
If you want to support this blog, please ensure that you have disabled the adblocker for this site. I configured Google AdSense to show as few ADS as possible – I don’t want to bother you with lots of ads, but I still need to add some to pay for the resources for my site.
Thank you for your understanding. – Davide
Code coverage is a good indicator of the health of your project: the more your project is covered by tests, the lesser are the probabilities that you have easy-to-find bugs in it.
Even though 100% of code coverage is a good result, it is not enough: you have to check if your tests are meaningful and bring value to the project; it really doesn’t make any sense to cover each line of your production code with tests valid only for the happy path; you also have to cover the edge cases!
But, even if it’s not enough, having an idea of the code coverage on your project is a good practice: it helps you understanding where you should write more tests and, eventually, help you removing some bugs.
In a previous article, we’ve seen how to use Coverlet and Cobertura to view the code coverage report on Visual Studio (of course, for .NET projects).
In this article, we’re gonna see how to show that report on Azure DevOps: by using a specific command (or, even better, a set of flags) on your YAML pipeline definition, we are going to display that report for every build we run on Azure DevOps. This simple addition will help you see the status of a specific build and, if it’s the case, update the code to add more tests.
Then, in the second part of this article, we’re gonna see how to view the coverage history on your Azure DevOps dashboard, by using a plugin called Code Coverage Protector.
But first, let’s start with the YAML pipelines!
Coverlet – the NuGet package for code coverage
As already explained in my previous article, the very first thing to do to add code coverage calculation is to install a NuGet package called Coverlet. This package must be installed in every test project in your Solution.
So, running a simple dotnet add package coverlet.msbuild on your test projects is enough!
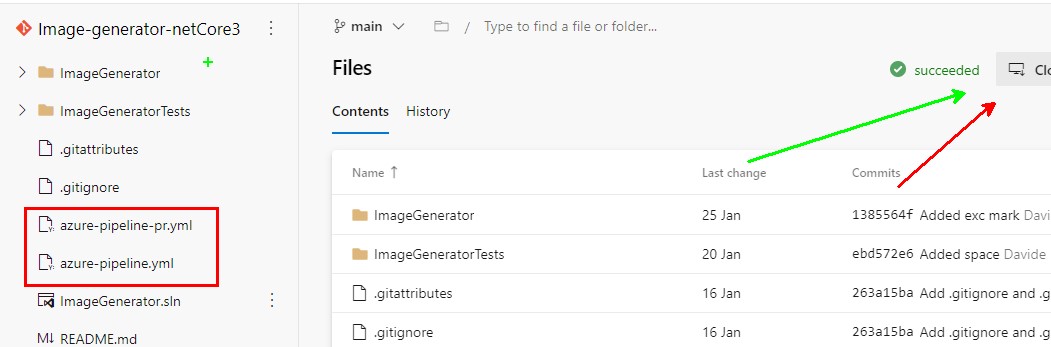
Create YAML tasks to add code coverage
Once we have Coverlet installed, it’s time to add the code coverage evaluation to the CI pipeline.
We need to add two steps to our YAML file: one for collecting the code coverage on test projects, and one for actually publishing it.
Run tests and collect code coverage results
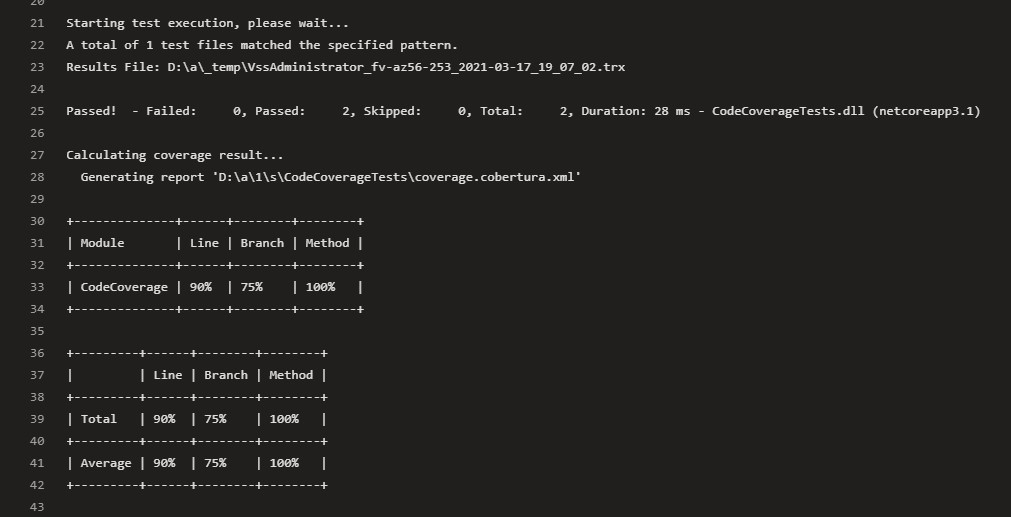
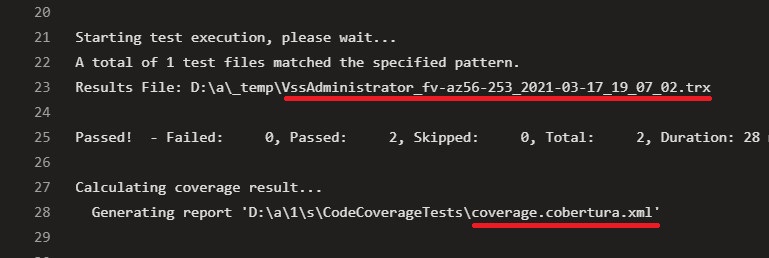
Since we are working with .NET Core applications, we need to use a DotNetCoreCLI@2 task to run dotnet test. But we need to specify some attributes: in the arguments field, add /p:CollectCoverage=true to tell the task to collect code coverage results, and /p:CoverletOutputFormat=cobertura to specify which kind of code coverage format we want to receive as output.
You can see the code coverage preview directly in the log panel of the executing build. The ASCII table tells you the code coverage percentage for each module, specifying the lines, branches, and methods covered by tests for every module.
Another interesting thing to notice is that this task generates two files: a trx file, that contains the test results info (which tests passed, which ones failed, and other info), and a coverage.cobertura.xml, that is the file we will use in the next step to publish the coverage results.
Publish code coverage results
Now that we have the coverage.cobertura.xml file, the last thing to do is to publish it.
Create a task of type PublishCodeCoverageResults@1, specify that the result format is Cobertura, and then specify the location of the file to be published.
So, here, we simply build the solution, run the tests and publish both test and code coverage results.
Where can we see the results?
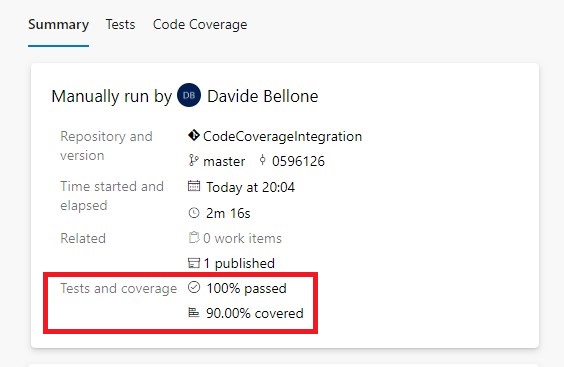
If we go to the build execution details, we can see the tests and coverage results under the Tests and coverage section.
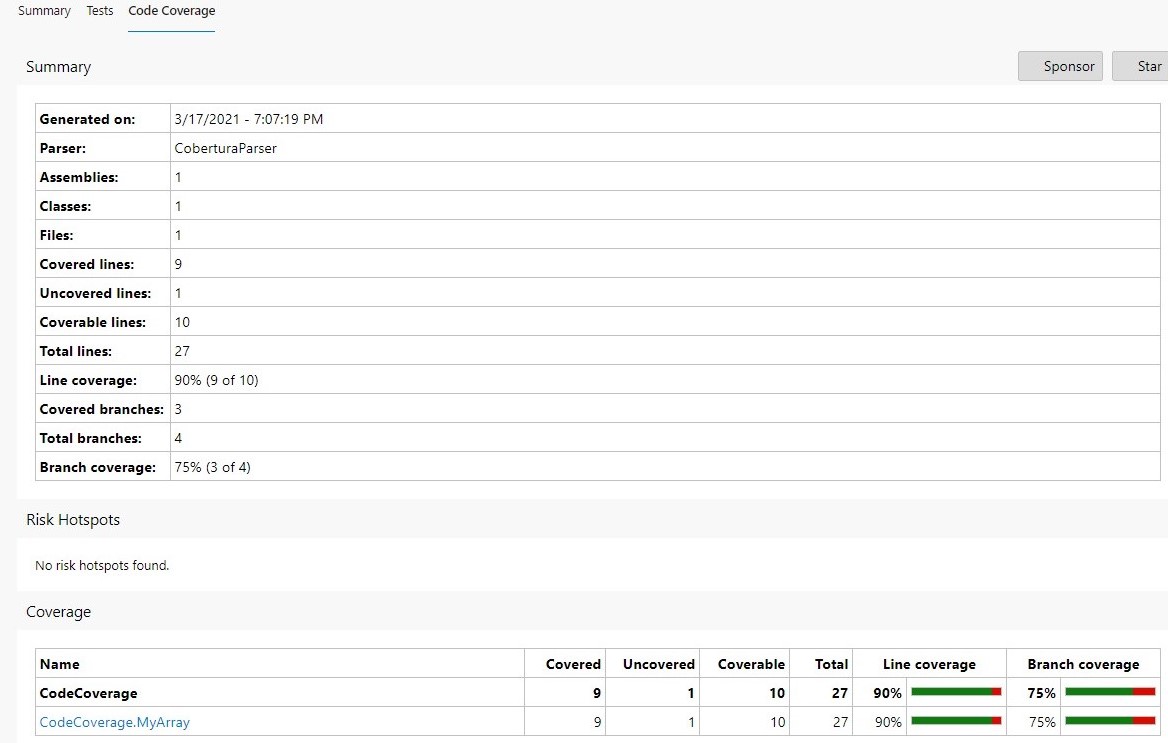
By clicking on the Code Coverage tab, we can jump to the full report, where we can see how many lines and branches we have covered.
And then, when we click on a class (in this case, CodeCoverage.MyArray), you can navigate to the class details to see which lines have been covered by tests.
Code Coverage Protector: an Azure DevOps plugin
Now what? We should keep track of the code coverage percentage over time. But open every Build execution to see the progress is not a good idea, isn’t it? We should find another way to see the progress.
A really useful plugin to manage this use case is Code Coverage Protector, developed by Dave Smits: among other things, it allows you to display the status of code coverage directly on your Azure DevOps Dashboards.
Once you have installed it, you can add one or more of its widgets to your project’s Dashboard, define which Build pipeline it must refer to, select which metric must be taken into consideration (line, branch, class, and so on), and set up a few other options (like the size of the widget).
So, now, with just one look you can see the progress of your project.
Wrapping up
In this article, we’ve seen how to publish code coverage reports for .NET applications on Azure DevOps. We’ve used Cobertura and Coverlet to generate the reports, some YAML configurations to show them in the related build panel, and Code Coverage Protector to show the progress in your Azure DevOps dashboard.
If you want to do one further step, you could use Code Coverage Protector as a build step to make your builds fail if the current Code Coverage percentage is less than the one from the previous builds.
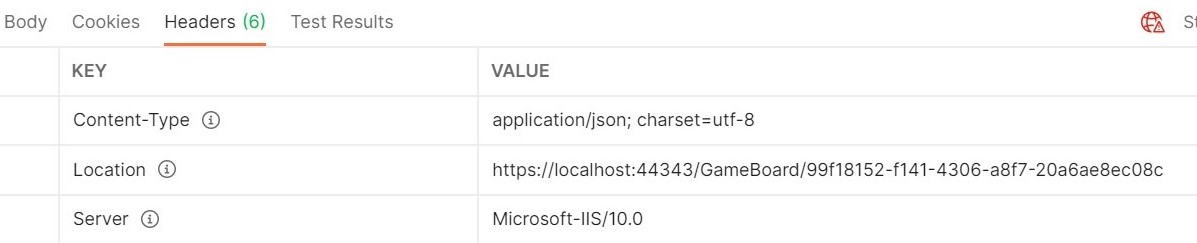
It’s not a good practice to return the ID of a newly created item in the HTTP Response Body. What to do? You can return it in the HTTP Response Headers, with CreatedAtAction and CreatedAtRoute.
Table of Contents
Just a second! 🫷 If you are here, it means that you are a software developer.
So, you know that storage, networking, and domain management have a cost .
If you want to support this blog, please ensure that you have disabled the adblocker for this site. I configured Google AdSense to show as few ADS as possible – I don’t want to bother you with lots of ads, but I still need to add some to pay for the resources for my site.
Thank you for your understanding. – Davide
Even though many devs (including me!) often forget about it, REST is not a synonym of HTTP API: it is an architectural style based on the central idea of resource.
So, when you are seeing an HTTP request like GET http://api.example.com/games/123 you may correctly think that you are getting the details of the game with ID 123. You are asking for the resource with ID 123.
But what happens when you create a new resource? You perform a POST, insert a new item… and then? How can you know the ID of the newly created resource – if the ID is created automatically – and use it to access the details of the new item?
Get item detail
For .NET APIs, all the endpoints are exposed inside a Controller, which is a class that derives from ControllerBase:
[ApiController][Route("[controller]")]
publicclassGameBoardController : ControllerBase
{
// all the actions here!}
So, to define a GET endpoint, we have to create an Action and specify the HTTP verb associated by using [HttpGet].
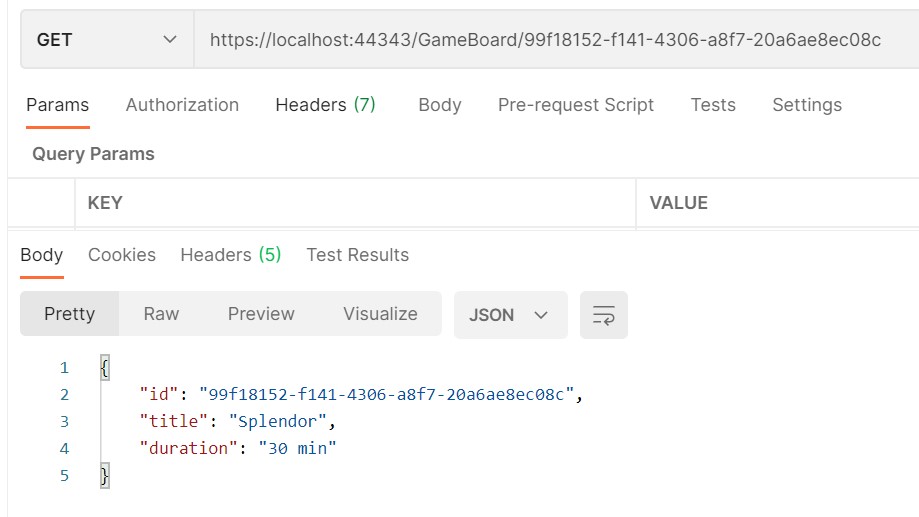
[HttpGet][Route("{id}")]public IActionResult GetDetail(Guid id)
{
var game = Games.FirstOrDefault(_ => _.Id.Equals(id));
if (game is not null)
{
return Ok(game);
}
else {
return NotFound();
}
}
This endpoint is pretty straightforward: if the game with the specified ID exists, the method returns it; otherwise, the method returns a NotFoundResult object that corresponds to a 404 HTTP Status Code.
Notice the [Route("{id}")] attribute: it means that the ASP.NET engine when parsing the incoming HTTP requests, searches for an Action with the required HTTP method and a route that matches the required path. Then, when it finds the Action, it maps the route parameters ({id}) to the parameters of the C# method (Guid id).
Hey! in this section I inserted not-so-correct info: I mean, it is generally right, but not precise. Can you spot it? Drop a comment😉
What to do when POST-ing a resource?
Of course, you also need to create new resources: that’s where the HTTP POST verb comes in handy.
Suppose a simple data flow: you create a new object, you insert it in the database, and it is the database itself that assigns to the object an ID.
Then, you need to use the newly created object. How to proceed?
You could return the ID in the HTTP Response Body. But we are using a POST verb, so you should not return data – POST is meant to insert data, not return values.
Otherwise, you can perform a query to find an item with the exact fields you’ve just inserted. For example
POST /item {title:"foo", description: "bar"}
GET /items?title=foo&description=bar
Not a good idea to use those ways, uh?
We have a third possibility: return the resource location in the HTTP Response Header.
How to return it? We have 2 ways: returning a CreatedAtActionResult or a CreatedAtRouteResult.
Using CreatedAtAction
With CreatedAtAction you can specify the name of the Action (or, better, the name of the method that implements that action) as a parameter.
ps: for the sake of simplicity, the new ID is generated directly into the method – no DBs in sight!
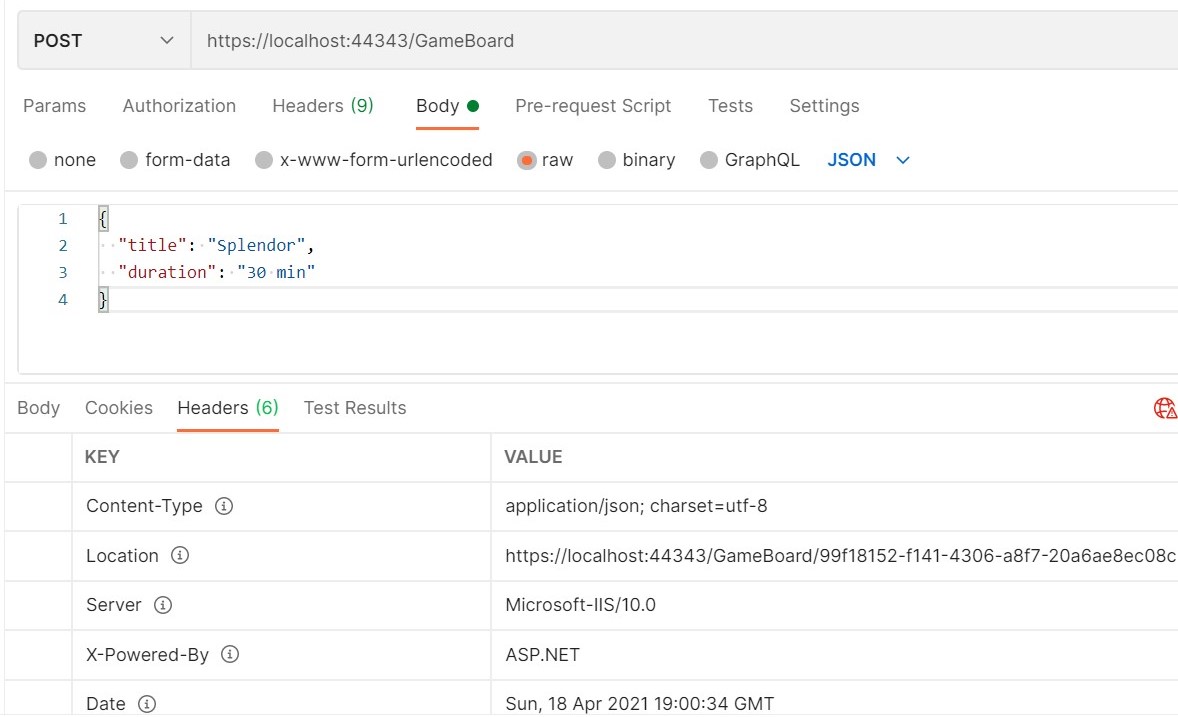
[HttpPost]public IActionResult Create(GameBoard game)
{
var newGameId = Guid.NewGuid();
var gameBoard = new GameBoardEntity
{
Title = game.Title,
Duration = game.Duration,
Id = newGameId
};
Games.Add(gameBoard);
return CreatedAtAction(nameof(GetDetail), new { id = newGameId }, game);
}
What are the second and third parameters?
We can see a new { id = newGameId } that indicates the route parameters defined in the GET endpoint (remember the [Route("{id}")] attribute? ) and assigns to each parameter a value.
The last parameter is the newly created item – or any object you want to return in that field.
Using CreatedAtRoute
Similar to the previous method we have CreatedAtRoute. As you may guess by the name, it does not refer to a specific Action by using the name, but it refers to the Route.
[HttpPost]public IActionResult Create(GameBoard game)
{
var newGameId = Guid.NewGuid();
var gameBoard = new GameBoardEntity
{
Title = game.Title,
Duration = game.Duration,
Id = newGameId
};
Games.Add(gameBoard);
return CreatedAtRoute("EndpointName", new { id = newGameId }, game);
}
To give a Route a name, we need to add a Name attribute to it:
[HttpGet]
- [Route("{id}")]
+ [Route("{id}", Name = "EndpointName")]
public IActionResult GetDetail(Guid id)
That’s it! Easy Peasy!
Needless to say, when we perform a GET at the URL specified in the Location attribute, we get the details of the item we’ve just created.
What about Routes and Query Strings?
We can use the same technique to get the details of an item by retrieving it using a query string parameter instead of a route parameter:
[HttpGet]
- [Route("{id}")]
- public IActionResult GetDetail(Guid id)
+ [Route("details")]
+ public IActionResult GetDetail([FromQuery] Guid id)
{
This means that the corresponding path is /GameBoard/details?id=123.
And, without modifying the Create methods we’ve seen before, we can let ASP.NET resolve the routing and create for us the URL:
And, surprise surprise, there’s more!
We can mix route parameters with query string parameters, and the Location attribute will hold the right value for the path.
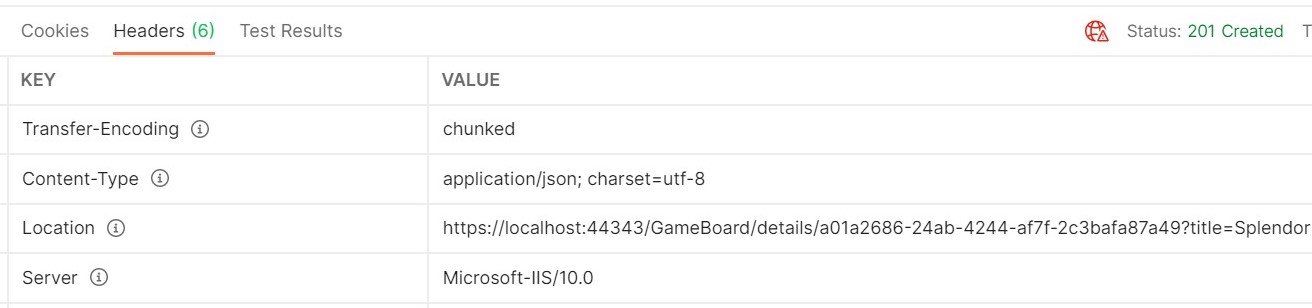
Let’s update the GetDetail method: now the resource ID is included in the route, and a new parameter – title – is passed in query string to filter for the name of the game:
[HttpGet][Route("details/{id}")]public IActionResult GetDetail([FromRoute] Guid id, [FromQuery] string title)
{
var game = Games.FirstOrDefault(_ =>
_.Id.Equals(id) && _.Title.Equals(title, StringComparison.OrdinalIgnoreCase)
);
This means that we need to pass a new field in the object passed to the CreatedAtRoute and CreatedAtAction methods:
- return CreatedAtRoute("EndpointName", new { id = newGameId }, game);
+ return CreatedAtRoute("EndpointName", new { id = newGameId, title = game.Title }, game);
see, the title field?
When creating a new item, we can see the correct path in the Response Header:
Wrapping up
We’ve seen how to manage the creation of an item when developing a REST API: depending on the way you define routes, you can use CreatedAtRoute or CreatedAtAction.
Remember that REST APIs are based on the idea of manipulation of resources: you should remember that every HTTP Verb has its meaning, and you should always consider it when developing an endpoint. Is it a GET? We should not change the status of a resource. Is it a POST? We should not return the resource itself – but we can return a reference to it.
Doing a tech talk is easy. Doing a good talk is harder. We’re going to see some tips to improve the delivery of your conferences.
Table of Contents
Just a second! 🫷 If you are here, it means that you are a software developer.
So, you know that storage, networking, and domain management have a cost .
If you want to support this blog, please ensure that you have disabled the adblocker for this site. I configured Google AdSense to show as few ADS as possible – I don’t want to bother you with lots of ads, but I still need to add some to pay for the resources for my site.
Thank you for your understanding. – Davide
I love to deliver tech talks: they help me improve both my technical and communication skills.
Hey! If you’re starting doing tech talks, don’t miss my article Thoughts after my very first public speech where I explained what I did right and what I did wrong at my very first tech talk. Learn from my errors, and avoid them!💪
On one hand, teaching stuff requires technical preparations: you need to know what you’re talking about, and you need to know it pretty well. Even more, you need to know some advanced stuff to give the audience something they will remember – if everything is obvious, what will they remember from your talk?
On the other hand, tech talks require good communication skills: your job is to deliver a message to your audience, and you can do it only if your intent is clear and you avoid talking of useless (or misleading) stuff.
But, in the end, only having good content is not enough: you need to shape the talk in a way that stimulates the attention of the public and does not bore them.
note: I still have a lot of room for improvement, so I still have to work on myself to improve my talks!
1- Tell what are the topics covered by your talk
Why should someone attend your talk?
This is a simple question, but it must be clear to you way before submitting your talk to CFPs. Usually, the best reason to attend is because of the content of the conference (unless you attend a conference only for the free pizza and swags!).
You should always express what is the topic of your talk.
Where, and when?
In the title: the title should express what you’re going to say. «Azure DevOps: an intro to build and release pipelines» is better than «Let’s work with Azure DevOps!». Yes, it’s less fancy, but you are making the scope clear (build and release pipelines), the tool (Azure DevOps), and the difficulty of your talk (it’s an intro, not a talk that targets experts)
In the description of your talk: when submitting CFP, when sharing it on social media, and everywhere else you can add some text to describe your talk, you should add some more details. For instance, «In this session, we’re gonna see how to build and release .NET Core projects with Azure DevOps pipelines, how to use PR builds, how to manage variable substitution with Variable Groups…». This will help the reader decide whether or not attending to your session.
At the beginning of your talk: this is for people who forgot to read the session description. Repeat the points you’re gonna cover at the beginning of your talk, like right after the title and the slide about who are you. In this way, attendees can leave if they find out that the topic is not what they were expecting from the title. They don’t lose time on anything not interesting for them, and you don’t lose your focus watching at their bored faces.
2- Divide the talks into smaller blocks
Think of your own experience: are you able to keep the focus on a 1-hour long talk? Or do you get distracted after 10 minutes, start wandering with the mind, and so on?
Well, that’s normal. Generally, people have a short attention span. This means that you cannot talk for 60 minutes about the same topic: your audience will get bored soon.
So, you should split your talk into several smaller blocks. A good idea is to separate the sub-topics into 5 or 10 minutes slots, to help people understanding the precise topic of a block and, in case, pay less attention to that specific block (maybe because that’s a topic they already know, so not focusing 100% is fine).
3- Wake up the audience with simple questions
Sometimes the easiest way to regain the attention of the attendees is to ask them some simple questions: «Can you see my screen?», «Does any of you already used this tool?».
It’s easy to reply to these questions, even without thinking too much about the answer.
This kind of questions will wake up the audience and let them focus on what you’re saying for a bit more.
Needless to say, avoid asking those questions too many times, and don’t repeat always the same question.
4- Choose the right slide layout
Many monitors and screens are now in 16:9. So remember to adapt the slide layout to that format.
In the image below, we can see how the slide layout impacts the overall look: slides with a 4:3 layout are too small for current devices, and they just look… ugly!
Slides in 16:9 feel more natural for many screen layouts.
It’s a simple trick to remember, but it may have a great impact on your delivery.
5- Don’t move hands and body if it’s not necessary
Moving too much your body drives the attention away from the content of your talk. Avoid fidgeting, moving too much your hands and head.
Remember that every movement of your body should have a meaning. Use your movements to drive attention to a specific topic, or to imitate and explain some details.
For instance, use your hands to simulate how some modules communicate with each other.
When preparing your presentation, you are used to thinking of how you see the screen: you have your monitor size and resolution, and you can adjust your content based on that info.
But you don’t know how the audience will see your screen.
If you are doing an in-person talk, pay attention to the screens the audience sees: is the resolution fine? Do you have to increase the font size? Is it fine both for folks on the front and the last seats?
On the contrary, when doing an online talk, you don’t know the device your audience will use: PC, tablet, smart tv, smartphone?
This means that you can’t rely on the mouse cursor to point at a specific part of your monitor (eg: some text, a button, a menu item) as your audience may not see it.
A good idea is to use some kind of tools like ZoomIt: it allows you to zoom in a part of your screen and to draw lines in a virtual layer.
So, instead of saying «now click this button – hey, can you see my cursor?», use Zoomit to zoom on that button or, even better, to draw a rectangle or an arrow to highlight it.
7- Pin presentation folder on Resource Explorer
As we’ve already discussed in my article 10 underestimated tasks to do before your next virtual presentation, you should hide all the desktop icons – they tend to distract the audience. This also implies that even your folder you use to store the presentation assets has to be hidden.
But now… Damn, you’ve just closed the folder with all the conference assets! Now you have to find it again and navigate through your personal folders.
If you use Windows, luckily you can simply right-click on your folder, click Pin to Quick access
and have it displayed on the right bar of any folder you open.
In this way, you can easily reach any folder with just one click.
So your “main” folder will not be visible on your desktop, but you can still open it via the Quick Access panel.
8- Stress when a topic is important
You have created the presentation. You know why you built it, and what are the important stuff. Does your audience know what is important to remember?
If you are talking for one hour, you are giving the public a lot of information. Some are trivia, some are niche details, some are the key point of a topic.
So, make it clear what is important to remember and what is just a “good-to-know”.
For instance, when talking about clean code, stress why it is important to follow a certain rule if it can be a game-changer. «Use consistent names when classes have similar meaning» and «Choose whether using tabs or spaces, and use them for all your files» are both valid tips, but the first one has a different weight compared to the latter one.
Again, spend more time on the important stuff, and tell explicitly the audience that that part is important (and why).
9- Use the slide space in the best way possible
Let’s talk about the size of the slides’ font: keep it consistent or adapt it to the text and space in the slide?
I thought that keeping it consistent was a good idea – somehow it hurts my brain seeing different sizes in different slides.
But then I realized that there are some exceptions: for example, when a slide contains only a few words or a few points in a bullet list. In that case, you should occupy the space in a better way, to avoid all the emptiness around your text.
Here we have 2 slides with the same font:
The first one is fine, the second one is too empty.
Let’s adjust the font of the second slide:
It’s a bit better. Not excellent, but at least the audience can read it. The text is a bit bigger, but you’ll hardly notice it.
10- Turn off all the notifications
It’s simple: if you are sharing your screen, you don’t want your audience to see those weird messages you receive on Discord or the spam emails on Outlook.
So, turn off all the notifications. Of course, unless you are demonstrating how to integrate your stuff with platforms like Slack, Teams et cetera.
11- Use the slides as a reference, not as a teleprompter
Avoid full sentences in your slides. Nobody’s gonna read them – even more, if the audience is not paying attention!
So, prefer putting just a few words instead of full, long sentences: you should not read your slides as if they were a teleprompter, and you should help your audience getting back on track if they lost their focus.
Two bullet points like “Keep track of your progress” and “Fix weakness” are better than a single phrase like “Remember to use some tool to keep track of the progress of your project, so that you can find the weak points and fix them”.
– of course, unless it is a quote: you should write the full text if it is important.
12- “End” is the word
We’re nearly at the end of this session.
A simple yet powerful statement that can wake up your audience.
When you’ve lost your focus, you get triggered by some words, like end. You unconsciously remember that you are at that conference for some reason, and you have to focus to get the most from the last minutes of the conference.
So, try triggering the subconscious of your audience with some words like ending.
13- Recap what you’ve explained
Finally, you’re at the end of your talk.
What should the audience remember from it?
Spend some time to recap what you’ve seen, what are the key points of your conference, and what you’d like the others to remember.
It is a good way to help the audience focus again and thinking of questions to bring to your attention.
Wrapping up
In this article, I’ve summarized some of the things I’ve worked on to improve my tech talks.
There is still a lot to do, and a lot to learn. But I hope that those simple tricks will help other newbies like me to improve their talks.
Knowing the Assembly Version of the API you’ve deployed on an environment may be helpful for many reasons. We’re gonna see why, how to retrieve it, and how to expose it with Endpoint Routing (bye-bye Controllers and Actions!)
Table of Contents
Just a second! 🫷 If you are here, it means that you are a software developer.
So, you know that storage, networking, and domain management have a cost .
If you want to support this blog, please ensure that you have disabled the adblocker for this site. I configured Google AdSense to show as few ADS as possible – I don’t want to bother you with lots of ads, but I still need to add some to pay for the resources for my site.
Thank you for your understanding. – Davide
Sometimes it can be useful to show the version of the running Assembly in one .NET Core API endpoint: for example, when you want to know which version of your code is running in an environment, or to expose a simple endpoint that acts as a “minimal” health check.
In this article, we’re going to see how to retrieve the assembly version at runtime using C#, then we will expose it under the root endpoint of a .NET Core API without creating an API Controller, and lastly we’ll see how to set the Assembly version with Visual Studio.
How to get Assembly version
To get the Assembly version, everything we need is this snippet:
The first step is to get the info about the running assembly:
Assembly assembly = Assembly.GetEntryAssembly();
The Assembly class is part of the System.Reflection namespace, so you have to declare the corresponding using statement.
The AssemblyInformationalVersionAttribute attribute comes from the same namespace, and contains some info for the assembly manifest. You can get that info with the second line of the snippet:
Next, we need to expose that value using .NET Core API.
Since we’re exposing only that value, we might not want to create a new Controller with a single Action: in this case, endpoint routing is the best choice!
In the Startup.cs file, under the Configure method, we can define how the HTTP request pipeline is configured.
By default, for ASP.NET Core APIs, you’ll see a section that allows the engine to map the Controllers to the endpoints:
In this section, we can configure some other endpoints.
The easiest way is to map a single path to an endpoint and specify the returned content. We can do it by using the MapGet method, which accepts a string for the path pattern and an async Delegate for the execution:
In this way, we will receive the message Hi there every time we call the root of our API (because of the first parameter, /), and it happens only when we use the GET HTTP Verb, because of the MapGet method.
Putting all together
Now that we have all in place, we can join the two parts and return the Assembly version on the root of our API.
You could just return the string as it is returned from the versionAttribute.InformationalVersion property we’ve seen before. Or you could wrap it into an object.
If you don’t want to specify a class for it, you can use an ExpandoObject instance and create new properties on the fly. Then, you have to serialize it into a string, and return it in the HTTP Response:
endpoints.MapGet("/", async context =>
{
// get assembly version Assembly assembly = Assembly.GetEntryAssembly();
AssemblyInformationalVersionAttribute versionAttribute = assembly.GetCustomAttribute<AssemblyInformationalVersionAttribute>();
string assemblyVersion = versionAttribute.InformationalVersion;
// create the dynamic objectdynamic result = new ExpandoObject();
result.version = assemblyVersion;
// serialize the objectstring versionAsText = JsonSerializer.Serialize(result);
// return it as a stringawait context.Response.WriteAsync(versionAsText);
});
That’s it!
Of course, if you want only the version as a string without the dynamic object, you can simplify the MapGet method in this way:
endpoints.MapGet("/", async context =>
{
    var version = Assembly.GetEntryAssembly().GetCustomAttribute<AssemblyInformationalVersionAttribute>().InformationalVersion;
    await context.Response.WriteAsync(version);
});
But, for this example, let’s stay with the full object.
Let’s try it: update Assembly version and retrieve it from API
After tidying up the code, the UseEndpoints section will have this form:
WithAssemblyVersionOnRoot is an extension method I created to wrap that logic and make the UseEndpoints method cleaner. If you want to learn how to create extension methods with C#, and what are some gotchas, head to this article!
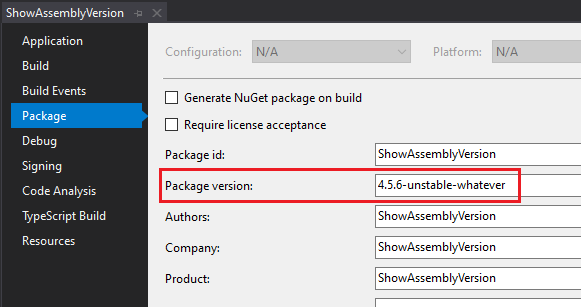
To see the result, open Visual Studio, select the API project and click alt + Enter to navigate to the Project properties. Here, under the Package tag, define the version in the Package version section.
In this screen, you can set the value of the package that will be built.
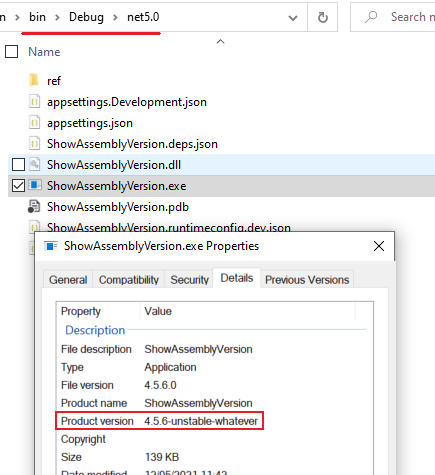
To double-check that the version is correct, head to the bin folder and locate the exe related to your project: right-click on it, go to properties and to the details tab. Here you can see the details of that exe:
Noticed the Product version? That’s exactly what we’ve set up on Visual Studio.
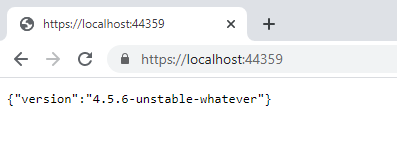
So, now it’s time to run the application.
Get back to Visual Studio, run the application, and navigate to the root of the API.
Finally, we can enjoy the result!
Quite simple, isn’t it?
Wrapping up
In this article, we’ve seen how to expose on a specific route the version of the assembly running at a specified URL.
This is useful to help you understand which version is currently running in an environment without accessing the CD pipelines to see which version has been deployed.
Also, you can use this information as a kind of health check, since the data exposed are static and do not depend on any input or database status: the simplest match for getting info about the readiness of your application.
What other info would you add to the exposed object? Let me know in the comment section 👇
Just a second! 🫷 If you are here, it means that you are a software developer.
So, you know that storage, networking, and domain management have a cost .
If you want to support this blog, please ensure that you have disabled the adblocker for this site. I configured Google AdSense to show as few ADS as possible – I don’t want to bother you with lots of ads, but I still need to add some to pay for the resources for my site.
Thank you for your understanding. – Davide
One of the fundamentals of clean code is: use meaningful names.
But choosing meaningful names takes time!
Time spent finding good names is time saved trying to figure out what you meant.
How to approach it? Good names do not come on the first try!
My suggestion is: at first, write down the code as it comes.
publicstaticstring Get(string input)
{
char[] arr = newchar[input.Length];
int i = input.Length - 1;
foreach (var e in input)
{
arr[i] = e;
i--;
}
returnnew String(arr);
}
And then, when you have almost everything clear, choose better names for
Probably, you’ll never reach perfection. Sad, but true.
You might want to add some tests to your code, right? RIGHT??
A good moment to choose better names is while writing test: at that moment your tests act as Clients to your production code, so if you find that the name of the method does not fully represent its meaning, or the parameter names are misleading, this is a good moment to improve them.
And don’t forget about private variables and methods!
So, what is “a good name”?
A good name should express:
its meaning (what a method does?)
its scope (for items in loops, even var i = 0 is acceptable, if the scope is small)
what it represents (originalString is, of course, the original string)
👉 Let’s discuss it on Twitter or on the comment section below!
Do you need the index of the current item in a foreach loop with C#? Here you’ll see two approaches.
Table of Contents
Just a second! 🫷 If you are here, it means that you are a software developer.
So, you know that storage, networking, and domain management have a cost .
If you want to support this blog, please ensure that you have disabled the adblocker for this site. I configured Google AdSense to show as few ADS as possible – I don’t want to bother you with lots of ads, but I still need to add some to pay for the resources for my site.
Thank you for your understanding. – Davide
Sometimes, when looping over a collection of elements in C#, you need not only the items itself, but also its position in the collection.
How to get the index of the current element in a foreach loop?
The easiest way is to store and update the index in a separate variable
List<string> myFriends = new List<string> {
"Emma", "Rupert", "Daniel", "Maggie", "Alan"};
int index = 0;
foreach (var friend in myFriends)
{
Console.WriteLine($"Friend {index}: {friend}");
index++;
}
This works fine, nothing to add.
But, if you want something a little more elegant and compact, you can use the Select method from LINQ:
there is a tight bond between the current item in the loop and the index
I find it cleaner and easier to read
Or… You can just replace it with a simple for loop!
What about performance?
I’ve done a simple benchmark (see here), and it resulted that for lists with less than 1000 items, the first solution is faster, and for lists with 10000 items, using LINQ is way faster than using an external index.
Size (#items)
With simple index (ms)
With LINQ (ms)
100
96
128
1000
1225
1017
10000
5523
786
This happens with .NET 5.
Update 2021-06-09: the previous benchmark was wrong!!😐
The times listed in the previous table were misleading: I calculated those durations using a StopWatch and calling it in different methods.
But, when performing a more precise benchmark using Benchmark.NET, the results are totally different.
With .NET Core 3.1.14 I get the following results:
Method
array
Mean
Error
WithIndex
Int32[10000]
269,386.4 ns
6,168.76 ns
WithLinq
Int32[10000]
396,421.3 ns
7,778.64 ns
WithIndex
Int32[1000]
25,438.3 ns
504.03 ns
WithLinq
Int32[1000]
39,981.3 ns
1,578.48 ns
WithIndex
Int32[100]
2,440.8 ns
48.34 ns
WithLinq
Int32[100]
3,687.7 ns
73.60 ns
WithIndex
Int32[10]
185.6 ns
3.52 ns
WithLinq
Int32[10]
369.5 ns
9.51 ns
While with .NET 5 I get these results:
Method
array
Mean
Error
WithIndex
Int32[10000]
134,431.02 ns
2,181.244 ns
WithLinq
Int32[10000]
273,691.68 ns
5,334.833 ns
WithIndex
Int32[1000]
12,961.69 ns
233.351 ns
WithLinq
Int32[1000]
26,023.63 ns
495.341 ns
WithIndex
Int32[100]
1,088.25 ns
21.485 ns
WithLinq
Int32[100]
2,299.12 ns
21.901 ns
WithIndex
Int32[10]
48.01 ns
0.748 ns
WithLinq
Int32[10]
228.66 ns
4.531 ns
As you can see, actually using LINQ is slower than using a simple index. While in .NET Core 3 the results were quite similar, with .NET 5 there was a huge improvement both cases, but now using a simple index is two times faster than using LINQ.
SORRY FOR THAT MISLEADING INFO! Thank you, Ben, for pointing it out in the comments section! 🙏
Below you can see the code I used for this benchmark. I you want to get started with Benchmark.NET, look at the documentation or to my article Enum.HasFlag performance with BenchmarkDotNet
We’ve discovered that there are many ways to use indexes tightly bound with items. If you look at performance, go for the simplest ways (for loop or foreach with simple index). If you want a more concise code, go for LINQ.
Anything else to add?
👉 Let’s discuss it on Twitter or on the comment section below!