برچسب: vert

  • DRY or not DRY? | Code4IT

    DRY or not DRY? | Code4IT


    DRY is a fundamental principle in software development. Should you apply it blindly?

    Table of Contents

    Just a second! 🫷
    If you are here, it means that you are a software developer.
    So, you know that storage, networking, and domain management have a cost .

    If you want to support this blog, please ensure that you have disabled the adblocker for this site.
    I configured Google AdSense to show as few ADS as possible – I don’t want to bother you with lots of ads, but I still need to add some to pay for the resources for my site.

    Thank you for your understanding.
    Davide

    You’ve probably heard about the DRY principle: Don’t Repeat Yourself.

    Does it really make sense? Not always.

    When to DRY

    Yes, you should not repeat yourself if there is some logic that you can reuse. Take this simple example:

    public class PageExistingService
    {
        public async Task<string> GetHomepage()
        {
            string url = "https://www.code4it.dev/";
    
            var httpClient = new HttpClient();
            var result = await httpClient.GetAsync(url);
    
            if (result.IsSuccessStatusCode)
            {
                return await result.Content.ReadAsStringAsync();
            }
            return "";
        }
    
        public async Task<string> GetAboutMePage()
        {
            string url = "https://www.code4it.dev/about-me";
    
            var httpClient = new HttpClient();
            var result = await httpClient.GetAsync(url);
    
            if (result.IsSuccessStatusCode)
            {
                return await result.Content.ReadAsStringAsync();
            }
            return "";
        }
    }
    

    As you can see, the two methods are almost identical: the only difference is with the page that will be downloaded.

    pss: that’s not the best way to use an HttpClient! Have a look at this article

    Now, what happens if an exception is thrown? You’d better add a try-catch to handle those errors. But, since the logic is repeated, you have to add the same logic to both methods.

    That’s one of the reasons you should not repeat yourself: if you had to update a common functionality, you have to do that in every place it is used.

    You can then refactor these methods in this way:

    public class PageExistingService
    {
        public Task<string> GetHomepage() => GetPage("https://www.code4it.dev/");
    
        public Task<string> GetAboutMePage() => GetPage("https://www.code4it.dev/about-me");
    
    
        private async Task<string> GetPage(string url)
        {
    
            var httpClient = new HttpClient();
            var result = await httpClient.GetAsync(url);
    
            if (result.IsSuccessStatusCode)
            {
                return await result.Content.ReadAsStringAsync();
            }
            return "";
        }
    
    }
    

    Now both GetHomepage and GetAboutMePage use the same logic defined in the GetPage method: you can then add the error handling only in one place.

    When NOT to DRY

    This doesn’t mean that you have to refactor everything without thinking of the meanings.

    You should not follow the DRY principle when

    • the components are not referring to the same context
    • the components are expected to evolve in different ways

    The two points are strictly related.
    A simple example is separating the ViewModels and the Database Models.

    Say that you have a CRUD application that handles Users.

    Both the View and the DB are handling Users, but in different ways and with different purposes.

    We might have a ViewModelUser class used by the view (or returned from the APIs, if you prefer)

    class ViewModelUser
    {
        public string Name { get; set; }
        public string LastName { get; set; }
        public DateTime RegistrationDate {get; set; }
    }
    

    and a DbUser class, similar to ViewModelUser, but which also handles the user Id.

    class DbUser
    {
    
        public int Id { get; set; }
        public string Name { get; set; }
        public string LastName { get; set; }
        public DateTime RegistrationDate {get; set; }
    }
    

    If you blinldy follow the DRY principle, you might be tempted to only use the DbUser class, maybe rename it as User, and just use the necessary fields on the View.

    Another step could be to create a base class and have both models inherit from that class:

    public abstract class User
    {
        public string Name { get; set; }
        public string LastName { get; set; }
        public DateTime RegistrationDate {get; set; }
    }
    
    class ViewModelUser : User
    {
    }
    
    class DbUser : User
    {
        public int Id { get; set; }
    }
    

    Sounds familiar?

    Well, in this case, ViewModelUser and DbUser are used in different contexts and with different purposes: showing the user data on screen and saving the user on DB.

    What if, for some reason, you must update the RegistrationDate type from DateTime to string? That change will impact both the ViewModel and the DB.

    There are many other reasons this way of handling models can bring more troubles than benefits. Can you find some? Drop a comment below 📧

    The solution is quite simple: duplicate your code.

    In that way, you have the freedom to add and remove fields, add validation, expose behavior… everything that would’ve been a problem to do with the previous approach.

    Of course, you will need to map the two data types, if necessary: luckily it’s a trivial task, and there are many libraries that can do that for you. By the way, I prefer having 100% control of those mappings, also to have the flexibility of changes and custom behavior.

    Further readings

    DRY implies the idea of Duplication. But duplication is not just “having the same lines of code over and over”. There’s more:

    🔗 Clean Code Tip: Avoid subtle duplication of code and logic | Code4IT

    As I anticipated, the way I used the HttpClient is not optimal. There’s a better way:

    🔗 C# Tip: use IHttpClientFactory to generate HttpClient instances | Code4IT

    This article first appeared on Code4IT

    Wrapping up

    DRY is a principle, not a law written in stone. Don’t blindly apply it.

    Well, you should never apply anything blindly: always consider the current and the future context.

    Happy coding!
    🐧


    Source link

  • 3 (and more) ways to set configuration values in .NET &vert; Code4IT

    3 (and more) ways to set configuration values in .NET | Code4IT


    Every application relies on some configurations. Many devs set them up using only the appsettings file. But there’s more!

    Table of Contents

    Just a second! 🫷
    If you are here, it means that you are a software developer.
    So, you know that storage, networking, and domain management have a cost .

    If you want to support this blog, please ensure that you have disabled the adblocker for this site.
    I configured Google AdSense to show as few ADS as possible – I don’t want to bother you with lots of ads, but I still need to add some to pay for the resources for my site.

    Thank you for your understanding.
    Davide

    Needless to say, almost every application needs to deal with some configurations. There are tons of use cases, and you already have some of them in mind, don’t you?

    If you’re working with .NET, you’ve probably already used the appsettings.json file. It’s a good starting point, but it may be not enough in the case of complex applications (and complex deployments).

    In this article, we will learn some ways to set configurations in a .NET API application. We will use the appsettings file, of course, and some other ways such as the dotnet CLI. Let’s go! 🚀

    Project setup

    First things first: let’s set up the demo project.

    I have created a simple .NET 6 API application using Minimal APIs. This is my whole application (yes, less than 50 lines!)

    using Microsoft.Extensions.Options;
    
    namespace HowToSetConfigurations
    {
        public class Program
        {
            public static void Main(string[] args)
            {
                WebApplicationBuilder builder = WebApplication.CreateBuilder(args);
    
                builder.Services.Configure<MyRootConfig>(
                    builder.Configuration.GetSection("RootConfig")
                );
    
                builder.Services.Configure<JsonOptions>(o =>
                {
                    o.SerializerOptions.WriteIndented = true;
                });
    
                WebApplication app = builder.Build();
    
                app.MapGet("/config", (IOptionsSnapshot<MyRootConfig> options) =>
                {
                    MyRootConfig config = options.Value;
                    return config;
                });
    
                app.Run();
            }
        }
    
        public class MyRootConfig
        {
            public MyNestedConfig Nested { get; set; }
            public string MyName { get; set; }
        }
    
        public class MyNestedConfig
        {
            public int Skip { get; set; }
            public int Limit { get; set; }
        }
    }
    

    Nothing else! 🤩

    In short, I scaffold the WebApplicationBuilder, configure that I want to map the settings section with root named RootConfig to my class of type MyRootConfig, and then run the application.

    I then expose a single endpoint, /config, which returns the current configurations, wrapped within an IOptionsSnapshot<MyRootConfig> object.

    Where is the source of the application’s configurations?

    As stated on the Microsoft docs website, here 🔗, the WebApplicationBuilder

    Loads app configuration in the following order from:
    appsettings.json.
    appsettings.{Environment}.json.
    User secrets when the app runs in the Development environment using the entry assembly.
    Environment variables.
    Command-line arguments.

    So, yeah, we have several possible sources, and the order does matter.

    Let’s see a bunch of them.

    Define settings within the appsetting.json file

    The most common way is by using the appsettings.json file. Here, in a structured and hierarchical way, you can define all the logs used as a baseline for your application.

    A typical example is this one:

    {
      "Logging": {
        "LogLevel": {
          "Default": "Information",
          "Microsoft.AspNetCore": "Warning"
        }
      },
      "AllowedHosts": "*",
      "RootConfig": {
        "MyName": "Davide",
        "Nested": {
          "Skip": 2,
          "Limit": 3
        }
      }
    }
    

    With this file, all the fields within the RootConfig element will be mapped to the MyRootConfig class at startup. That object can then be returned using the /config endpoint.

    Running the application (using Visual Studio or the dotnet CLI) you will be able to call that endpoint and see the expected result.

    Configuration results from plain Appsettings file

    Use environment-specific appsettings.json

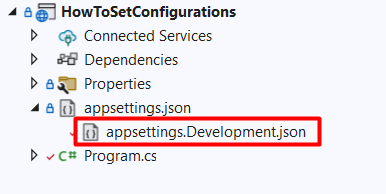
    Now, you probably know that you can use other appsettings files with a name such as appsettings.Development.json.

    appsettings.Development file

    With that file, you can override specific configurations using the same structure, but ignoring all the configs that don’t need to be changed.

    Let’s update the Limit field defined in the “base” appsettings. You don’t need to recreate the whole structure just for one key; you can use this JSON instead:

    {
      "RootConfig": {
        "Nested": {
          "Limit": 9
        }
      }
    }
    

    Now, if we run the application using VS we will see this result:

    The key defined in the appsettings.Development.json file is replaced in the final result

    Ok, but what made .NET understand that I wanted to use that file?? It’s a matter of Environment variables and Launch profiles.

    How to define profiles within the launchSettings.json file

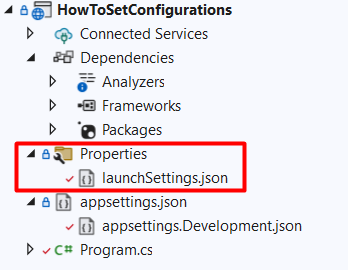
    Within the Properties folder in your project, you can see a launchSettings.json file. As you might expect, that file describes how you can launch the application.

    launchSettings file location in the solution

    Here we have some Launch profiles, and each of them specifies an ASPNETCORE_ENVIRONMENT variable. By default, its value is set to Development.

    "profiles": {
        "HowToSetConfigurations": {
          "commandName": "Project",
          "dotnetRunMessages": true,
          "launchBrowser": true,
          "launchUrl": "config",
          "applicationUrl": "https://localhost:7280;http://localhost:5280",
          "environmentVariables": {
            "ASPNETCORE_ENVIRONMENT": "Development"
          }
        },
    }
    

    Now, recall that the environment-specific appsettings file name is defined as appsettings.{Environment}.json. Therefore, by running your application with Visual Studio using the HowToSetConfigurations launch profile, you’re gonna replace that {Environment} with Development, thus using the appsettings.Development.json.

    Ça va sans dire that you can use every value you prefer – such as Staging, MyCustomEnvironmentName, and so on.

    How to define the current Environment with the CLI

    If you are using the dotnet CLI you can set that environment variable as

    dotnet run --ASPNETCORE_ENVIRONMENT=Development
    

    or, in a simpler way, you can use

    dotnet run --environment Development
    

    and get the same result.

    How do nested configurations get resolved?

    As we’ve seen in a previous article, even if we are using configurations defined in a hierarchical structure, in the end, they are transformed into key-value pairs.

    The Limit key as defined here:

    {
      "RootConfig": {
        "Nested": {
          "Limit": 9
        }
      }
    }
    

    is transformed into

    {
        "Key": "RootConfig:Nested:Limit",
        "Value": "9"
    },
    

    with the : separator. We will use this info shortly.

    Define configurations in the launchSettings file

    As we’ve seen before, each profile defined in the launchSettings file describes a list of environment variables:

    "environmentVariables": {
      "ASPNETCORE_ENVIRONMENT": "Development"
    }
    

    This means that we can also define our configurations here, and have them loaded when using this specific profile.

    From these configurations

    "RootConfig": {
        "MyName": "Davide",
        "Nested": {
          "Skip": 2,
          "Limit": 3
        }
      }
    

    I want to update the MyName field.

    I can then update the current profile as such:

    "environmentVariables": {
      "ASPNETCORE_ENVIRONMENT": "Development",
      "RootConfig:MyName": "Mr Bellone"
    }
    

    so that, when I run the application using that profile, I will get this result:

    The RootConfig:MyName is replaced, its value is taken from the launchSettings file

    Have you noticed the key RootConfig:MyName? 😉

    🔎 Notice that now we have both MyName = Mr Bellone, as defined in the lauchSettings file, and Limit = 9, since we’re still using the appsettings.Development.json file (because of that “ASPNETCORE_ENVIRONMENT”: “Development” ).

    How to define the current profile with the CLI

    Clearly, we can use the dotnet CLI to load the whole environment profile. We just need to specify it using the --launch-profile flag:

    dotnet run --launch-profile=HowToSetConfigurations
    

    Define application settings using the dotnet CLI

    Lastly, we can specify config values directly using the CLI.

    It’s just a matter of specifying the key-value pairs as such:

    dotnet run --RootConfig:Nested:Skip=55
    

    And – TAH-DAH! – you will see this result:

    JSON result with the key specified on the CLI

    ❓ A question for you! Notice that, even though I specified only the Skip value, both Limit and MyName have the value defined before. Do you know why it happens? Drop a message below if you know the answer! 📩

    Further readings

    As always, there’s more!

    If you want to know more about how dotNET APIs load and start, you should have a look at this page:

    🔗 ASP.NET Core Web Host | Microsoft Docs

    Ok, now you know different approaches for setting configurations.
    How do you know the exact values that are set in your application?

    🔗 The 2 secret endpoints I create in my .NET APIs | Code4IT

    This article first appeared on Code4IT

    Wrapping up

    Ok then, in this article we’ve seen different approaches you can use to define configurations in your .NET API projects.

    Knowing what you can do with the CLI can be helpful especially when using CI/CD, in case you need to run the application using specific keys.

    Do you know any other ways to define configs?

    Happy coding!

    🐧


    Source link

  • use the @ prefix when a name is reserved &vert; Code4IT

    use the @ prefix when a name is reserved | Code4IT


    Just a second! 🫷
    If you are here, it means that you are a software developer.
    So, you know that storage, networking, and domain management have a cost .

    If you want to support this blog, please ensure that you have disabled the adblocker for this site.
    I configured Google AdSense to show as few ADS as possible – I don’t want to bother you with lots of ads, but I still need to add some to pay for the resources for my site.

    Thank you for your understanding.
    Davide

    You already know it: using meaningful names for variables, methods, and classes allows you to write more readable and maintainable code.

    It may happen that a good name for your business entity matches one of the reserved keywords in C#.

    What to do, now?

    There are tons of reserved keywords in C#. Some of these are

    • int
    • interface
    • else
    • null
    • short
    • event
    • params

    Some of these names may be a good fit for describing your domain objects or your variables.

    Talking about variables, have a look at this example:

    var eventList = GetFootballEvents();
    
    foreach(var event in eventList)
    {
        // do something
    }
    

    That snippet will not work, since event is a reserved keyword.

    You can solve this issue in 3 ways.

    You can use a synonym, such as action:

    var eventList = GetFootballEvents();
    
    foreach(var action in eventList)
    {
        // do something
    }
    

    But, you know, it doesn’t fully match the original meaning.

    You can use the my prefix, like this:

    var eventList = GetFootballEvents();
    
    foreach(var myEvent in eventList)
    {
        // do something
    }
    

    But… does it make sense? Is it really your event?

    The third way is by using the @ prefix:

    var eventList = GetFootballEvents();
    
    foreach(var @event in eventList)
    {
        // do something
    }
    

    That way, the code is still readable (even though, I admit, that @ is a bit weird to see around the code).

    Of course, the same works for every keyword, like @int, @class, @public, and so on

    Further readings

    If you are interested in a list of reserved keywords in C#, have a look at this article:

    🔗 C# Keywords (Reserved, Contextual) | Tutlane

    This article first appeared on Code4IT

    Wrapping up

    It’s a tiny tip, but it can help you write better code.

    Happy coding!

    🐧


    Source link

  • How to deploy .NET APIs on Azure using GitHub actions &vert; Code4IT

    How to deploy .NET APIs on Azure using GitHub actions | Code4IT


    Building APIs with .NET is easy. Deploying them on Azure is easy too, with GitHub Actions!

    Table of Contents

    Just a second! 🫷
    If you are here, it means that you are a software developer.
    So, you know that storage, networking, and domain management have a cost .

    If you want to support this blog, please ensure that you have disabled the adblocker for this site.
    I configured Google AdSense to show as few ADS as possible – I don’t want to bother you with lots of ads, but I still need to add some to pay for the resources for my site.

    Thank you for your understanding.
    Davide

    With Continuous Delivery (CD), you can deploy your code in a fast-paced and stable way.

    To deploy applications, you’ll need workflows that run and automate the process. In that way, you don’t have to perform repetitive tasks and the whole process becomes less error-prone.

    In this article, we will learn how to implement CD pipelines using GitHub Actions. In particular, we will focus on the case of a .NET API application that will be deployed on Azure.

    Create a .NET API project

    Since the focus of this article is on the deployment part, we won’t create complex APIs. Just a simple Hello Word is enough.

    To do that, we’re gonna use dotnet Minimal API – a way to create APIs without scaffolding lots of files and configurations.

    Our API, the BooksAPI, has a single endpoint: /, the root, simply returns “Hello World!”.

    All our code is stored in the Program file:

    var builder = WebApplication.CreateBuilder(args);
    
    var app = builder.Build();
    
    app.UseHttpsRedirection();
    
    app.MapGet("/", () => "Hello World!");
    
    app.Run();
    

    Nothing fancy: run the application locally, and navigate to the root. You will see the Hello World message.

    Lastly, put your code on GitHub: initialize a repository and publish it on GitHub – it can either be a public or a private repository.

    Create an App Service on Azure

    Now, to deploy an application, we need to define its destination. We’re going to deploy it on Azure, so you need an Azure account before moving on.

    Open the Azure Portal, navigate to the App Service section, and create a new one.

    Configure it as you wish, and then proceed until you have it up and running.

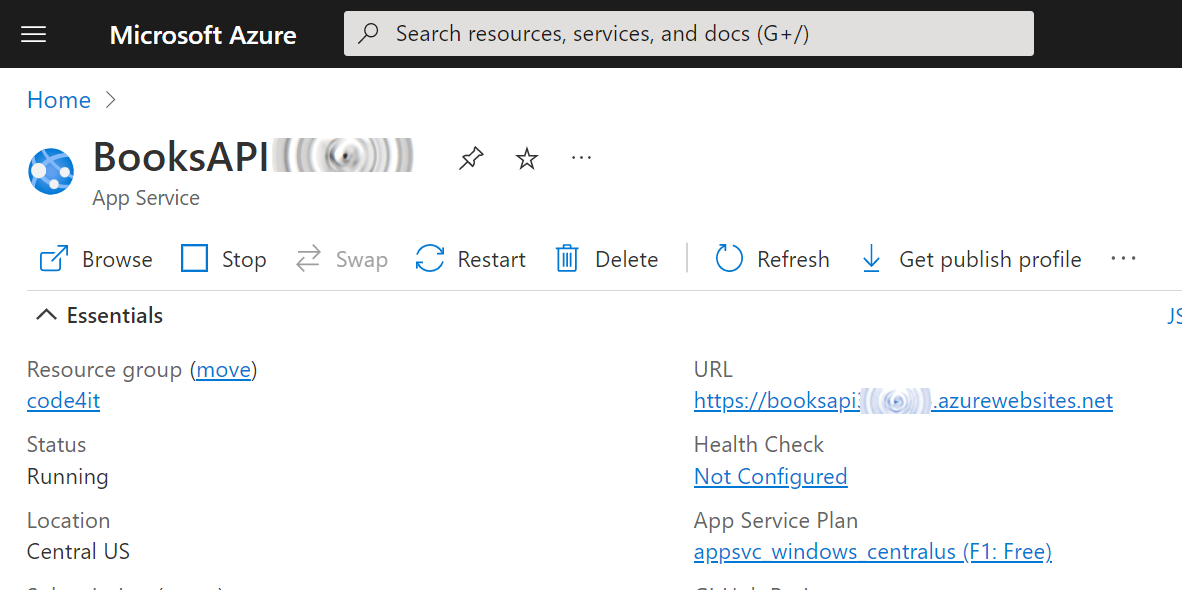
    Once everything is done, you should have something like this:

    Azure App Service overview

    Now the application is ready to be used: we now need to deploy our code here.

    Generate the GitHub Action YAML file for deploying .NET APIs on Azure

    It’s time to create our Continuous Delivery pipeline.

    Luckily, GitHub already provides lots of templates for GitHub Actions. We will need one specific for our .NET APIs.

    On GitHub, navigate to your repository, head to the Actions menu, and select New workflow.

    New Workflow button on GitHub

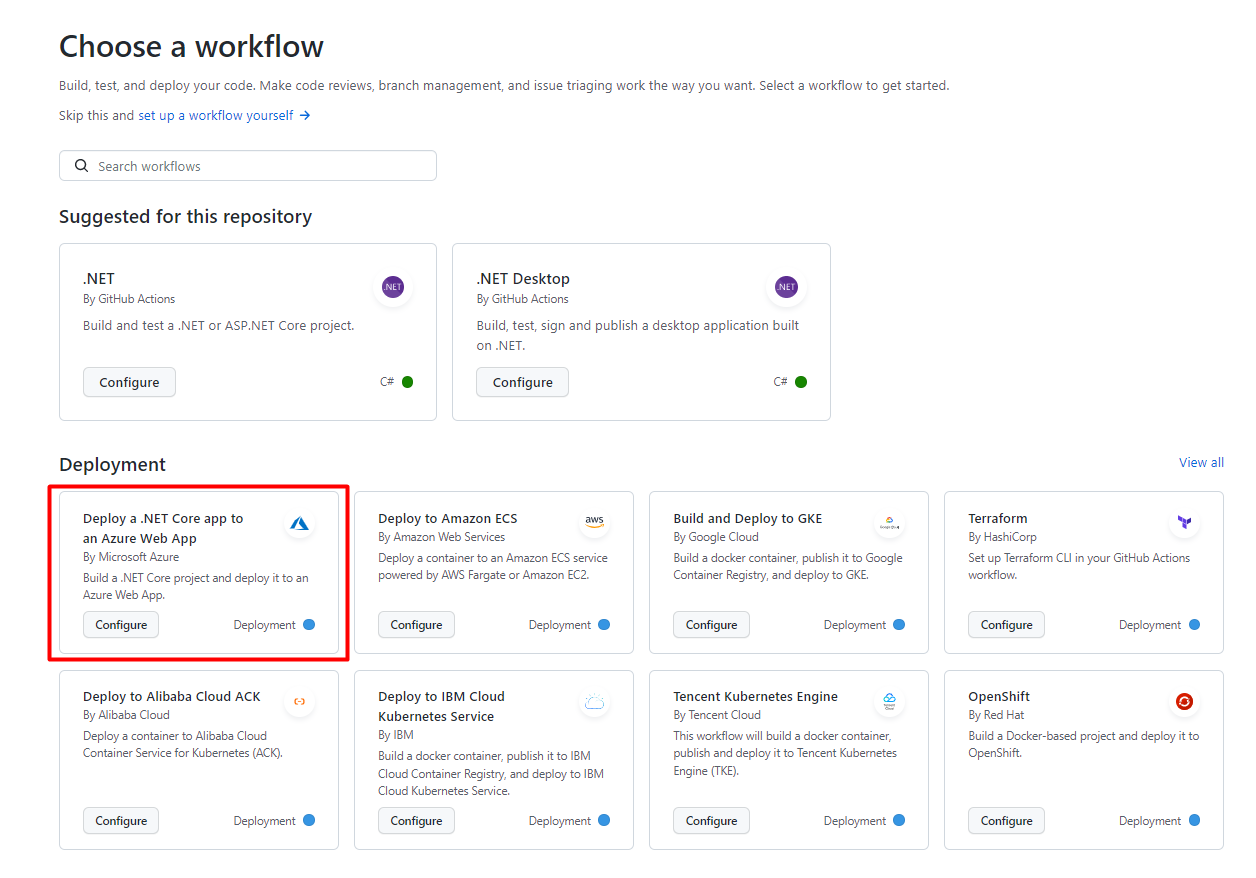
    You will see several predefined actions that allow you to do stuff with your repository. We are now interested in the one called “Deploy a .NET Core app to an Azure Web App”:

    Template for deploying the .NET Application on Azure

    Clicking on “Configure” you will see a template. Read carefully the instructions, as they will guide you to the correct configuration of the GitHub action.

    In particular, you will have to update the environment variables specified in this section:

    env:
      AZURE_WEBAPP_NAME: your-app-name # set this to the name of your Azure Web App
      AZURE_WEBAPP_PACKAGE_PATH: "." # set this to the path to your web app project, defaults to the repository root
      DOTNET_VERSION: "5" # set this to the .NET Core version to use
    

    Clearly, AZURE_WEBAPP_NAME must match the name you’ve defined on Azure, while DOTNET_VERSION must match the version you’re using to create your dotnet APIs.

    For my specific project, I’ve replaced that section with

    env:
      AZURE_WEBAPP_NAME: BooksAPI<myName> # set this to the name of your Azure Web App
      AZURE_WEBAPP_PACKAGE_PATH: "." # set this to the path to your web app project, defaults to the repository root
      DOTNET_VERSION: "6.0" # set this to the .NET Core version to use
    

    🟧 DOTNET_VERSION requires also the minor version of dotnet. Setting 6 will now work: you need to specify 6.0. 🟧

    Now you can save your YAML file in your repository: it will be saved under ./.github/workflows.

    So, as a reference, here’s the full YAML file I’m using to deploy my APIs:

    name: Build and deploy ASP.Net Core app to an Azure Web App
    
    env:
      AZURE_WEBAPP_NAME: BooksAPI<myName>
      AZURE_WEBAPP_PACKAGE_PATH: "."
      DOTNET_VERSION: "6.0"
    
    on:
      push:
        branches: ["master"]
      workflow_dispatch:
    
    permissions:
      contents: read
    
    jobs:
      build:
        runs-on: ubuntu-latest
    
        steps:
          - uses: actions/checkout@v3
    
          - name: Set up .NET Core
            uses: actions/setup-dotnet@v2
            with:
              dotnet-version: ${{ env.DOTNET_VERSION }}
    
          - name: Set up dependency caching for faster builds
            uses: actions/cache@v3
            with:
              path: ~/.nuget/packages
              key: ${{ runner.os }}-nuget-${{ hashFiles('**/packages.lock.json') }}
              restore-keys: |
                            ${{ runner.os }}-nuget-
    
          - name: Build with dotnet
            run: dotnet build --configuration Release
    
          - name: dotnet publish
            run: dotnet publish -c Release -o ${{env.DOTNET_ROOT}}/myapp
    
          - name: Upload artifact for deployment job
            uses: actions/upload-artifact@v3
            with:
              name: .net-app
              path: ${{env.DOTNET_ROOT}}/myapp
    
      deploy:
        permissions:
          contents: none
        runs-on: ubuntu-latest
        needs: build
        environment:
          name: "Development"
          url: ${{ steps.deploy-to-webapp.outputs.webapp-url }}
    
        steps:
          - name: Download artifact from build job
            uses: actions/download-artifact@v3
            with:
              name: .net-app
    
          - name: Deploy to Azure Web App
            id: deploy-to-webapp
            uses: azure/webapps-deploy@v2
            with:
              app-name: ${{ env.AZURE_WEBAPP_NAME }}
              publish-profile: ${{ secrets.AZURE_WEBAPP_PUBLISH_PROFILE }}
              package: ${{ env.AZURE_WEBAPP_PACKAGE_PATH }}
    

    As you can see, we have 2 distinct steps: build and deploy.

    In the build phase, we check out our code, restore the NuGet dependencies, build the project, pack it and store the final result as an artifact.

    In the deploy step, we retrieve the newly created artifact and publish it on Azure.

    Store the Publish profile as GitHub Secret

    As you can see in the instructions of the workflow file, you have to

    Create a secret in your repository named AZURE_WEBAPP_PUBLISH_PROFILE, paste the publish profile contents as the value of the secret.

    That Create a secret in your repository named AZURE_WEBAPP_PUBLISH_PROFILE statement was not clear to me: I thought you had to create that key within your .NET project. Turns out you can create secrets related to repositories on GitHub (so, it’s language-agnostic).

    A Publish profile is a file that contains information and settings used to deploy applications to Azure. It’s nothing but an XML file that lists the possible ways to deploy your application, such as FTP, Web Deploy, Zip Deploy, and so on.

    We have to get our publish profile and save it into GitHub secrets.

    To retrieve the Publish profile, head to the Azure App Service page and click Get publish profile to download the file.

    Get Publish Profile button on Azure Portal

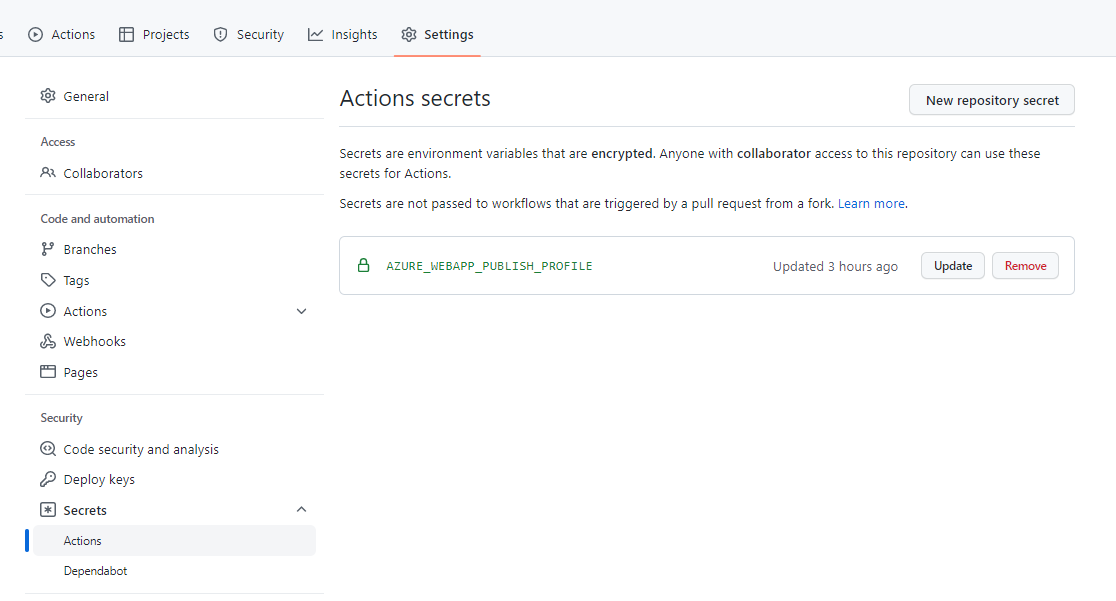
    Now, get back on GitHub, Head to Settings > Security > Secrets > Actions.

    Here you can create a new secret related to your repository.

    Create a new one, name it AZURE_WEBAPP_PUBLISH_PROFILE, and paste the content of the Publish profile file you’ve just downloaded.

    You will then see something like this:

    GitHub secret for Publish profile

    Notice that the secret name must be AZURE_WEBAPP_PUBLISH_PROFILE. That constraint is set because we are accessing the Publish profile by key:

    - name: Deploy to Azure Web App
        id: deploy-to-webapp
        uses: azure/webapps-deploy@v2
        with:
            app-name: ${{ env.AZURE_WEBAPP_NAME }}
            publish-profile: ${{ secrets.AZURE_WEBAPP_PUBLISH_PROFILE }}
            package: ${{ env.AZURE_WEBAPP_PACKAGE_PATH }}
    

    In particular, notice the publish-profile: ${{ secrets.AZURE_WEBAPP_PUBLISH_PROFILE }} part.

    Clearly, the two names must match: nothing stops you from changing the name of the secret in both the YAML file and the GitHub Secret page.

    Final result

    It’s time to see the final result.

    Update the application code (I’ve slightly modified the Hello world message), and push your changes to GitHub.

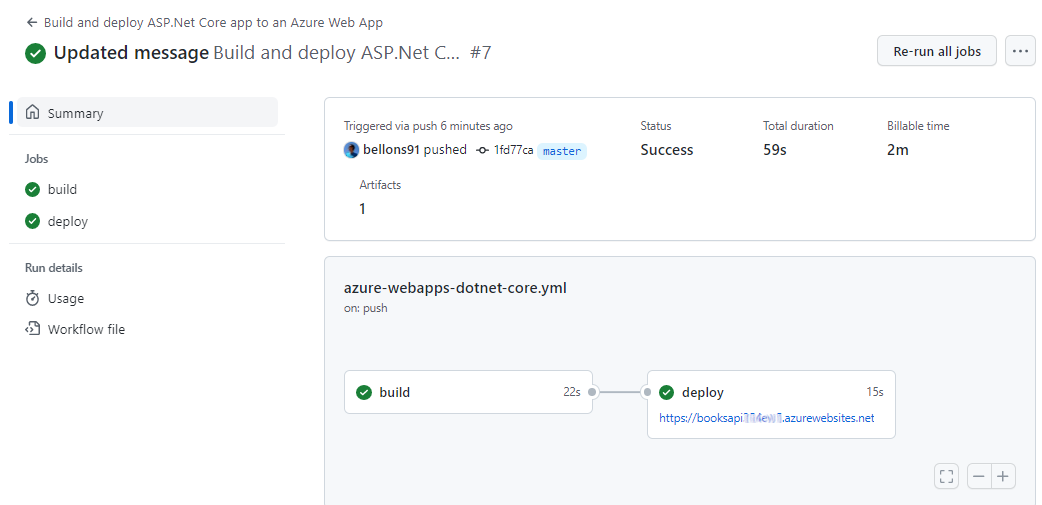
    Under the Actions tab, you will see your CD pipeline run.

    CD workflow run

    Once it’s completed, you can head to your application root and see the final result.

    Final result of the API

    Further readings

    Automating repetitive tasks allows you to perform more actions with fewer errors. Generally speaking, the more stuff you can automate, the better.

    My own blog heavily relies on automation: scaffolding content, tracking ideas, and publishing online…

    If you want to peek at what I do, here are my little secrets:

    🔗 From idea to publishing, and beyond: how I automated my blogging workflow with GitHub, PowerShell, and Azure | Code4IT

    In this article, we’ve only built and deployed our application. We can do more: run tests and keep track of code coverage. If you want to learn how you can do it using Azure DevOps, here we go:

    🔗 Cobertura, YAML, and Code Coverage Protector: how to view Code Coverage report on Azure DevOps | Code4IT

    This article first appeared on Code4IT 🐧

    Wrapping up

    I have to admit that I struggled a lot in setting up the CD pipeline. I was using the one proposed by default on Visual Studio – but it didn’t work.

    Using the template found on GitHub worked almost instantly – I just had to figure out what did they mean by repository secrets.

    Now we have everything in place. Since the workflow is stored in a text file within my repository, if I have to create and deploy a new API project I can simply do that by copying that file and fixing the references.

    Nice and easy, right? 😉

    Happy coding!

    🐧


    Source link

  • Methods should have a coherent level of abstraction &vert; Code4IT

    Methods should have a coherent level of abstraction | Code4IT


    Just a second! 🫷
    If you are here, it means that you are a software developer.
    So, you know that storage, networking, and domain management have a cost .

    If you want to support this blog, please ensure that you have disabled the adblocker for this site.
    I configured Google AdSense to show as few ADS as possible – I don’t want to bother you with lots of ads, but I still need to add some to pay for the resources for my site.

    Thank you for your understanding.
    Davide

    Mixed levels of abstraction make the code harder to understand.

    At the first sight, the reader should be able to understand what the code does without worrying about the details of the operations.

    Take this code snippet as an example:

    public void PrintPriceWithDiscountForProduct(string productId)
    {
        var product = sqlRepository.FindProduct(productId);
        var withDiscount = product.Price * 0.9;
        Console.WriteLine("The final price is " + withDiscount);
    }
    

    We are mixing multiple levels of operations. In the same method, we are

    • integrating with an external service
    • performing algebraic operations
    • concatenating strings
    • printing using .NET Console class

    Some operations have a high level of abstraction (call an external service, I don’t care how) while others are very low-level (calculate the price discount using the formula ProductPrice*0.9).

    Here the readers lose focus on the overall meaning of the method because they’re distracted by the actual implementation.

    When I’m talking about abstraction, I mean how high-level an operation is: the more we stay away from bit-to-bit and mathematical operations, the more our code is abstract.

    Cleaner code should let the reader understand what’s going on without the need of understanding the details: if they’re interested in the details, they can just read the internals of the methods.

    We can improve the previous method by splitting it into smaller methods:

    public void PrintPriceWithDiscountForProduct(string productId)
    {
        var product = GetProduct(productId);
        var withDiscount = CalculateDiscountedPrice(product);
        PrintPrice(withDiscount);
    }
    
    private Product GetProduct(string productId)
    {
        return sqlRepository.FindProduct(productId);
    }
    
    private double CalculateDiscountedPrice(Product product)
    {
        return product.Price * 0.9;
    }
    
    private void PrintPrice(double price)
    {
        Console.WriteLine("The final price is " + price);
    }
    

    Here you can see the different levels of abstraction: the operations within PrintPriceWithDiscountForProduct have a coherent level of abstraction: they just tell you what the steps performed in this method are; all the methods describe an operation at a high level, without expressing the internal operations.

    Yes, now the code is much longer. But we have gained some interesting advantages:

    • readers can focus on the “what” before getting to the “how”;
    • we have more reusable code (we can reuse GetProduct, CalculateDiscountedPrice, and PrintPrice in other methods);
    • if an exception is thrown, we can easily understand where it happened, because we have more information on the stack trace.

    You can read more about the latest point here:

    🔗 Clean code tip: small functions bring smarter exceptions | Code4IT

    This article first appeared on Code4IT 🐧

    Happy coding!

    🐧


    Source link

  • How to create an API Gateway using Azure API Management &vert; Code4IT

    How to create an API Gateway using Azure API Management | Code4IT


    In a microservices architecture, an API Gateway hides your real endpoints. We will create one using Azure API Management

    Table of Contents

    Just a second! 🫷
    If you are here, it means that you are a software developer.
    So, you know that storage, networking, and domain management have a cost .

    If you want to support this blog, please ensure that you have disabled the adblocker for this site.
    I configured Google AdSense to show as few ADS as possible – I don’t want to bother you with lots of ads, but I still need to add some to pay for the resources for my site.

    Thank you for your understanding.
    Davide

    If you’re building an application that exposes several services you might not want to expose them on different hosts. Consumers will have a hard time configuring their application with all the different hostnames, and you will be forced to maintain the same URLs even if you need to move to other platforms or, for instance, you want to transform a REST endpoint into an Azure Function.

    In this case, you should mask the real endpoints beneath a facade: maybe… an API Gateway? 🙂

    In this article, we will learn how to configure Azure API Management (from now on: APIM) service to create an API Gateway and “hide” our real services.

    Demo: publish .NET API services and locate the OpenAPI definition

    For the sake of this article, we will work with 2 API services: BooksService and VideosService.

    They are both .NET 6 APIs, deployed on Azure using GitHub Actions (using the steps I described in a previous article).

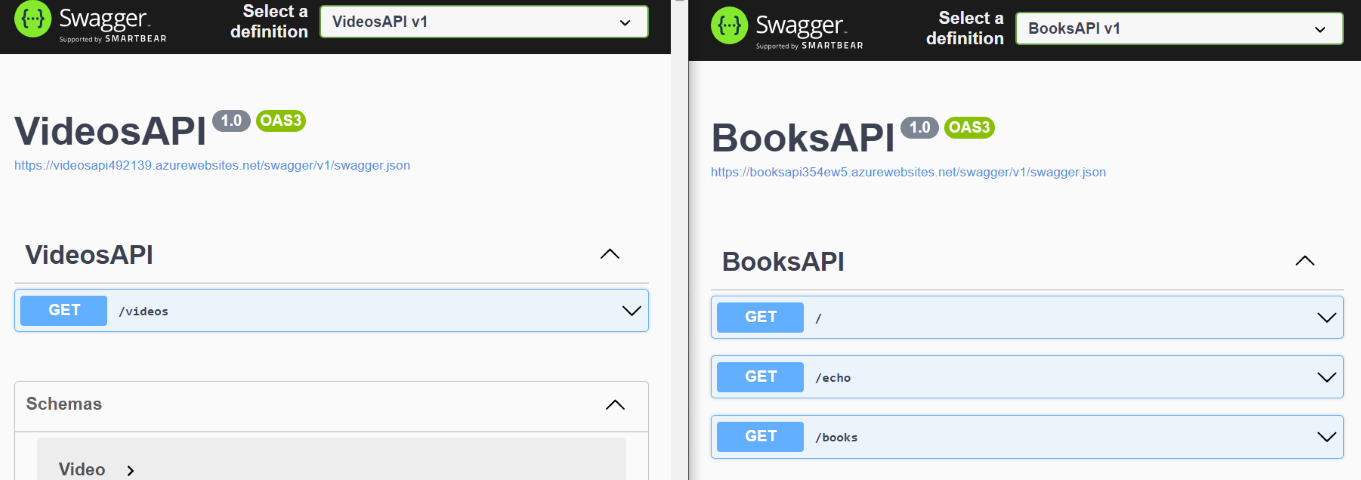
    Both services expose their Swagger pages and a bunch of endpoints that we will gonna hide behind Azure APIM.

    Swagger pages

    How to create Azure API Management (APIM) Service from Azure Portal

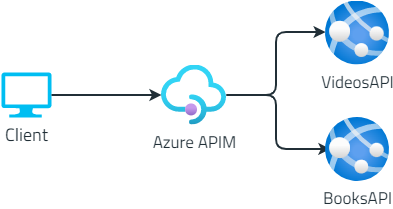
    Now, we want to hide their real endpoints. The clients will then only know about the existence of the API Gateway, and not of the two separate API services:

    An API Gateway hides origin endpoints to clients

    It’s time to create our APIM resource.👷‍♂️

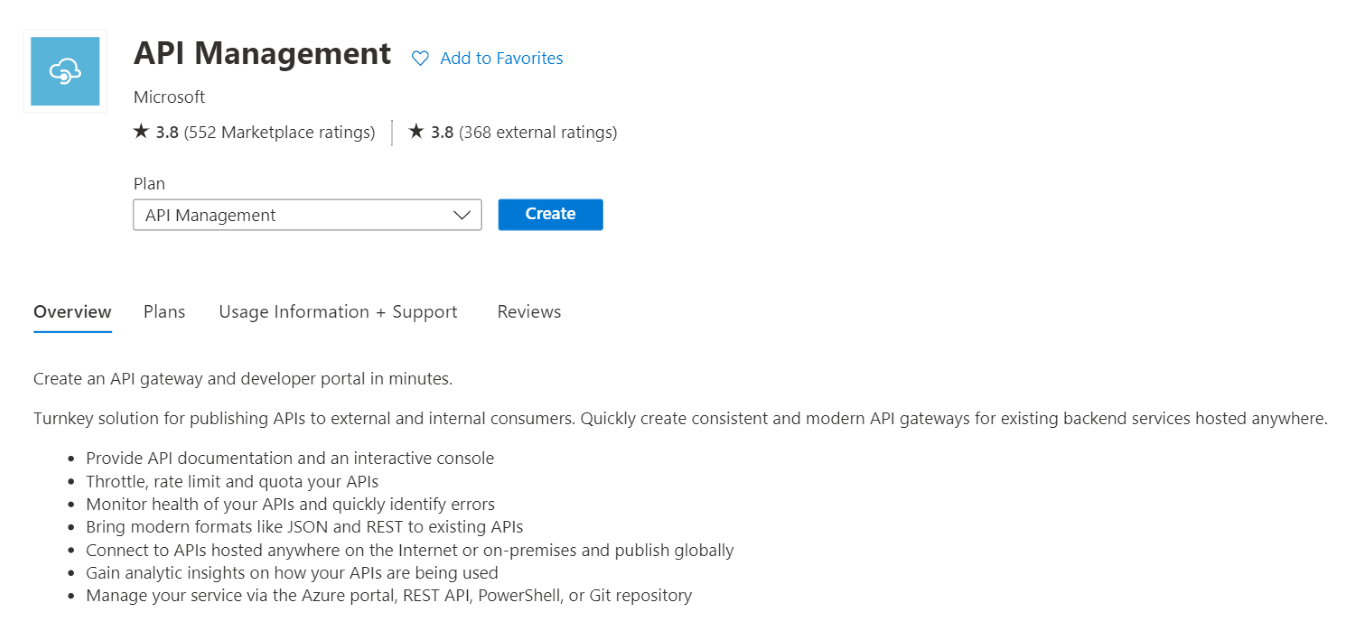
    Head to the Azure Portal, and create a new API Management instance. I suggest reading the short overview of the functionalities provided by Azure API Management services as listed in the screenshot below.

    API Management description on Azure Portal

    The wizard will ask you for some info, such as the resource name, the region, and an email used to send communications (honestly speaking, I still haven’t figured out why they’re asking for your email).

    Fill in all the fields, pick your preferred pricing tier (mine is Developer: it doesn’t have an SLA and is quite cheap), and then proceed with the service creation.

    After several minutes (it took 50 minutes – fifty!💢 – to scaffold my instance), you will have your instance ready to be used.

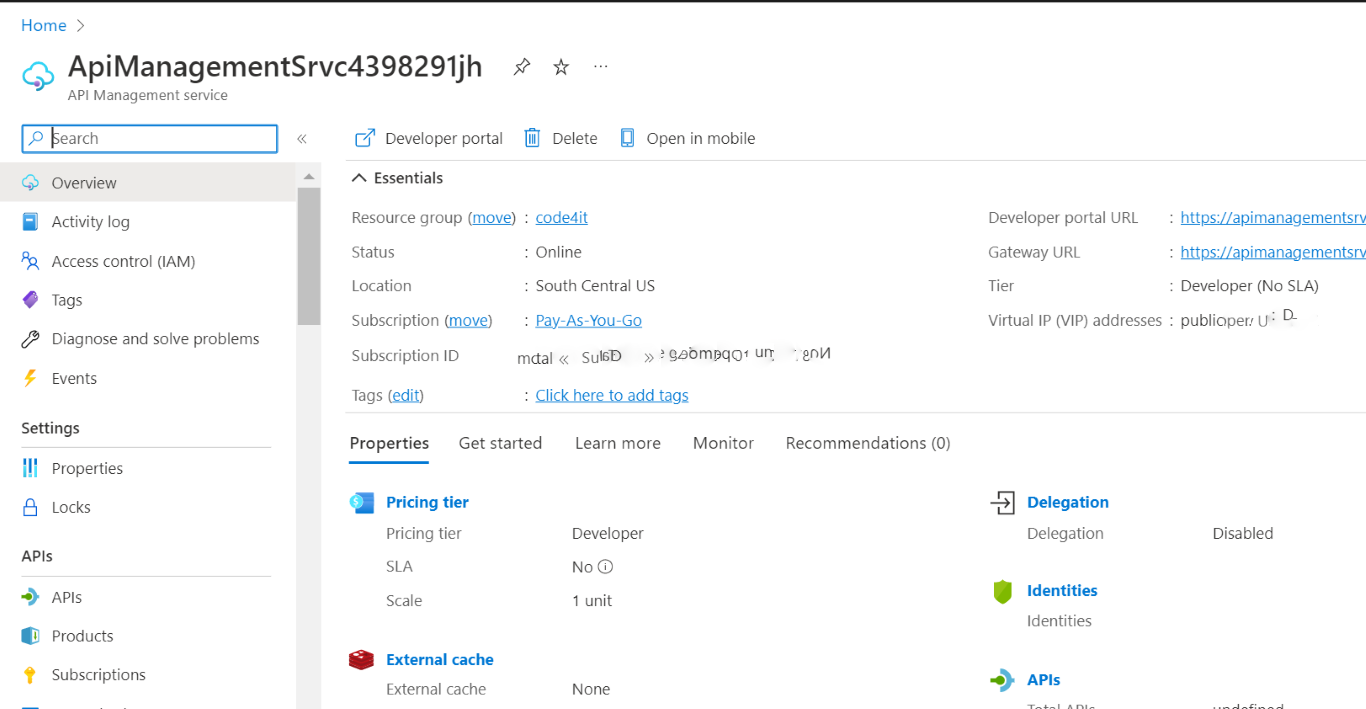
    API management dashboard

    We are now ready to add our APIs and expose them to our clients.

    How to add APIs to Azure API Management using Swagger definition (OpenAPI)

    As we’ve seen in a previous article, Swagger creates a JSON file that describes the operations available in your APIs, as well as the object structures accepted as input and returned as output.

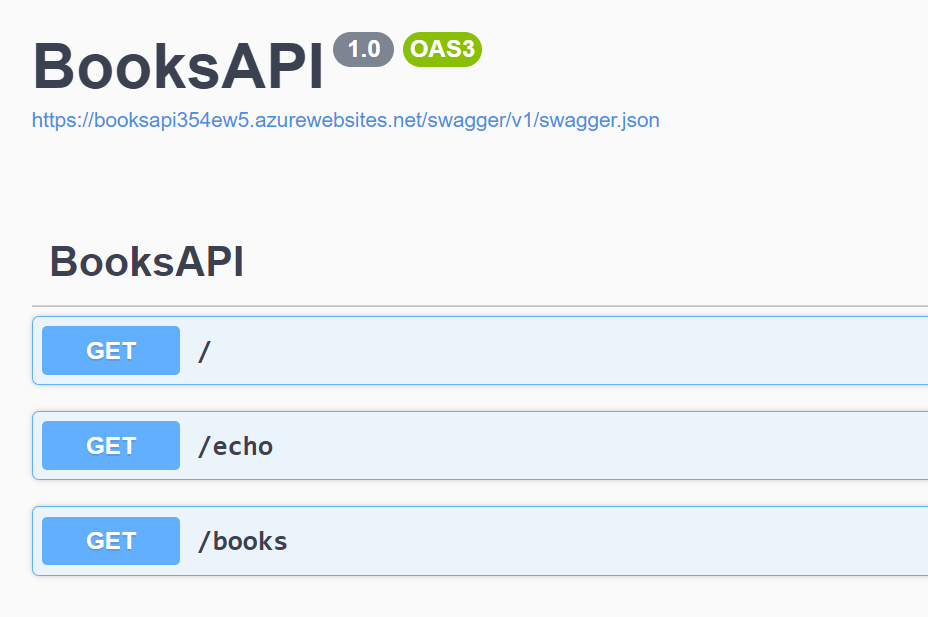
    Let me use as an example the Books API: once that API project is deployed on the cloud (it’s not mandatory to use Azure: it will work the same using other cloud vendors), you will see the Swagger UI and the related JSON definition.

    Swagger UI for BooksAPI

    We have 3 endpoints, /, /echo, and /books; those endpoints are described in the swagger.json file linked in the Swagger page; put that link aside: we will use it soon.

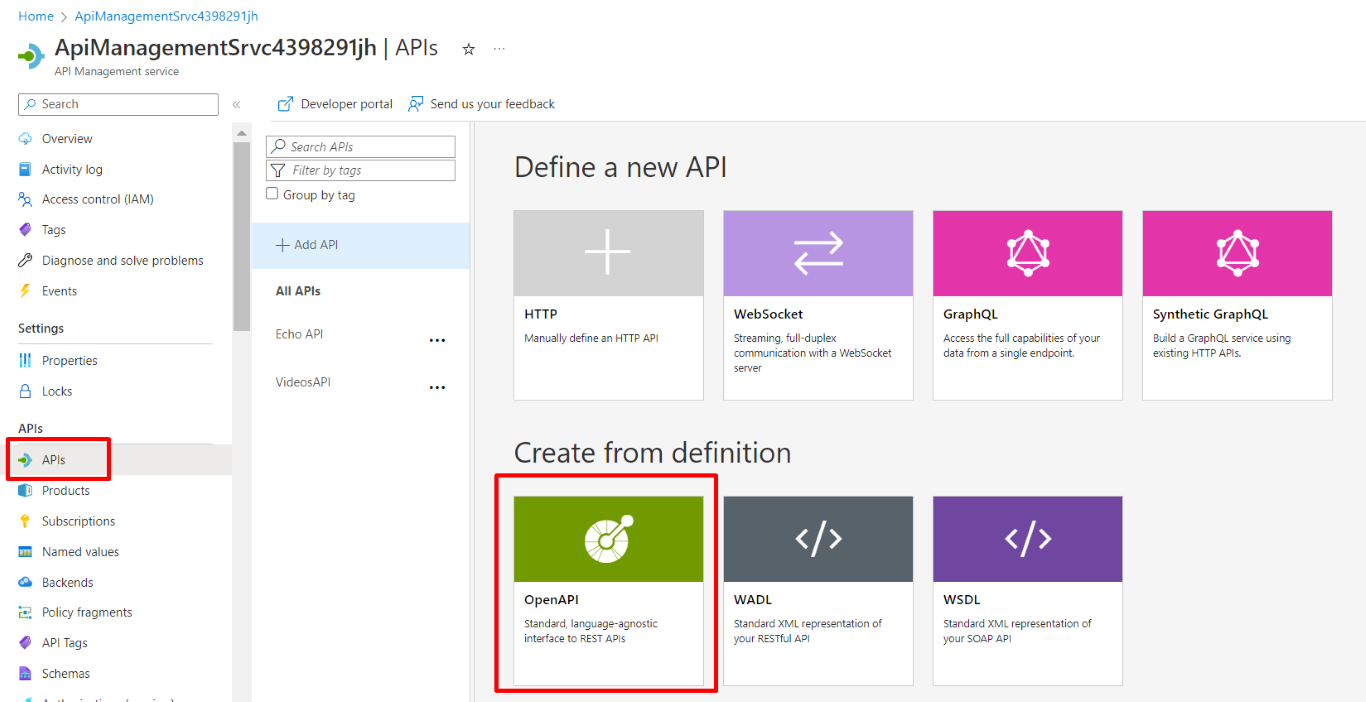
    Finally, we can add our Books APIs to our Azure Management API Service! Head to the resource on Azure, locate the APIs menu item on the left panel, and create a new API definition using OpenAPI (which is the standard used by Swagger to create its UI).

    Import API from OpenAPI specification

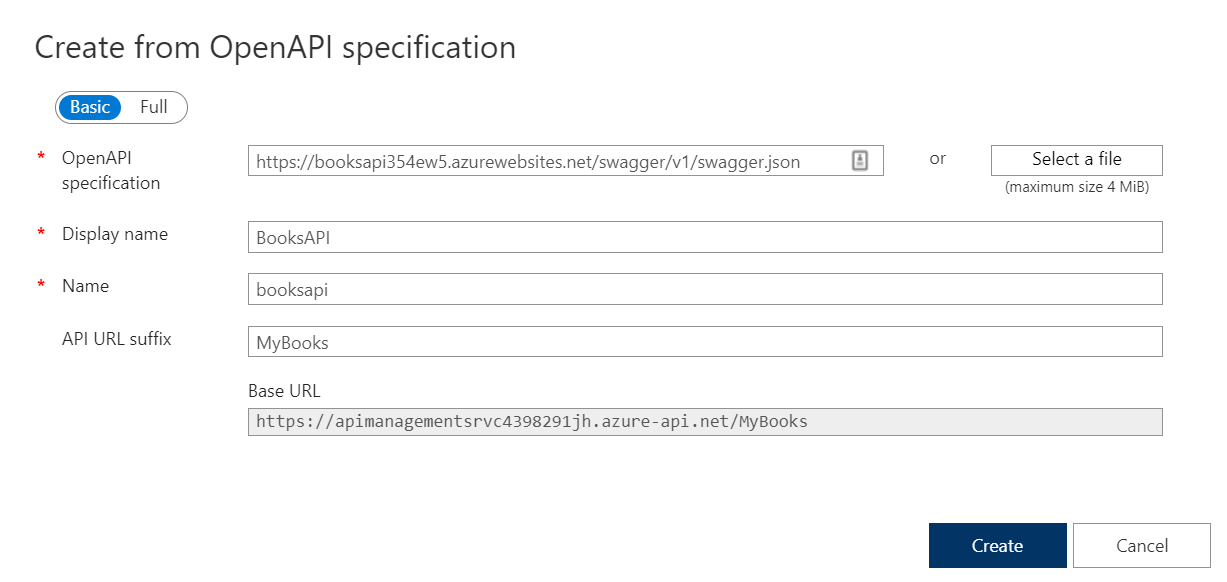
    You will see a form that allows you to create new resources from OpenAPI specifications.

    Paste here the link to the swagger.json file you located before, populate the required fields and, if you want, add a prefix to identify these endpoints: I choose MyBooks.

    Wizard to import APIs from OpenAPI

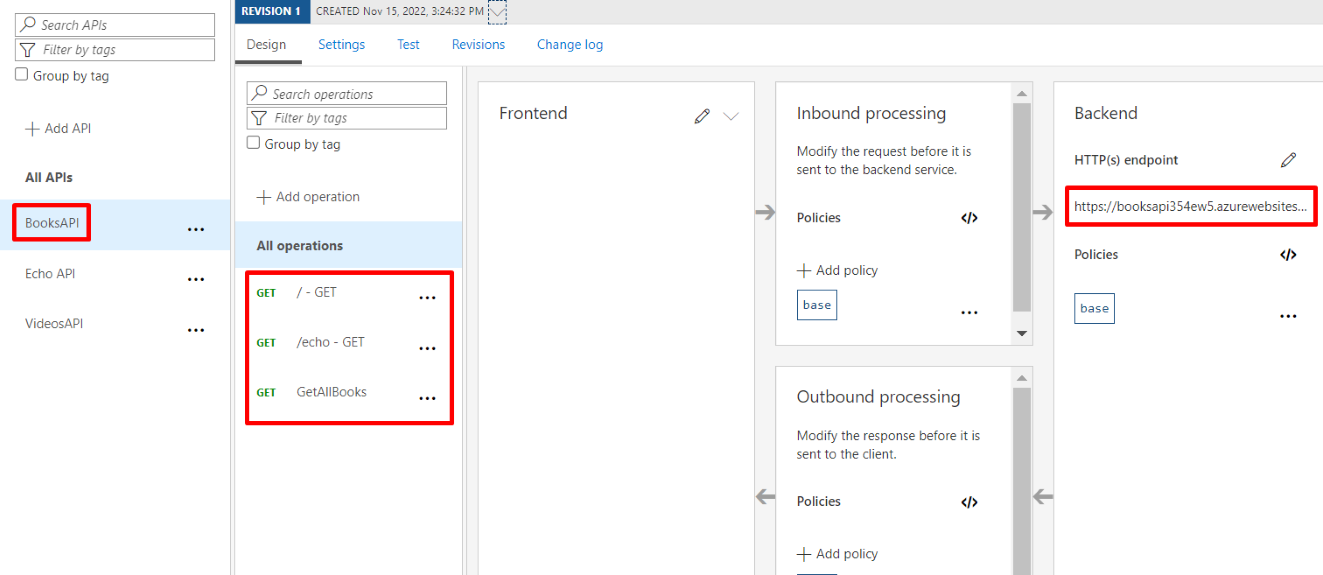
    You will then see your APIs appear in the panel shown below. It is composed of different parts:

    • The list of services exposed. In the screenshot below, BooksAPI, Echo API, and VideosAPI;
    • The list of endpoints exposed for each service: here, BooksAPI exposes endpoints at /, /echo, and /books;
    • A list of policies that are applied to the inbound requests before hitting the real endpoint;
    • The real endpoint used when calling the facade exposed by APIM;
    • A list of policies applied to the outbound requests after the origin has processed the requests.

    API detail panel

    For now, we will ignore both Inbound and Outbound processing, as they will be the topic of a future article.

    Consuming APIs exposed on the API Gateway

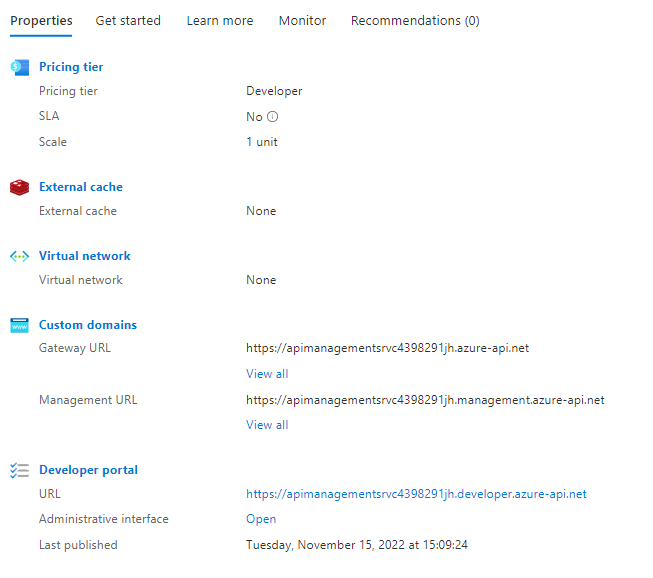
    We’re ready to go! Head back to the Azure API Management service dashboard and locate the URL of the API Gateway under Custom domains > Gateway URL.

    Where to find the Gateway URL

    This will be the root URL that our clients will use.

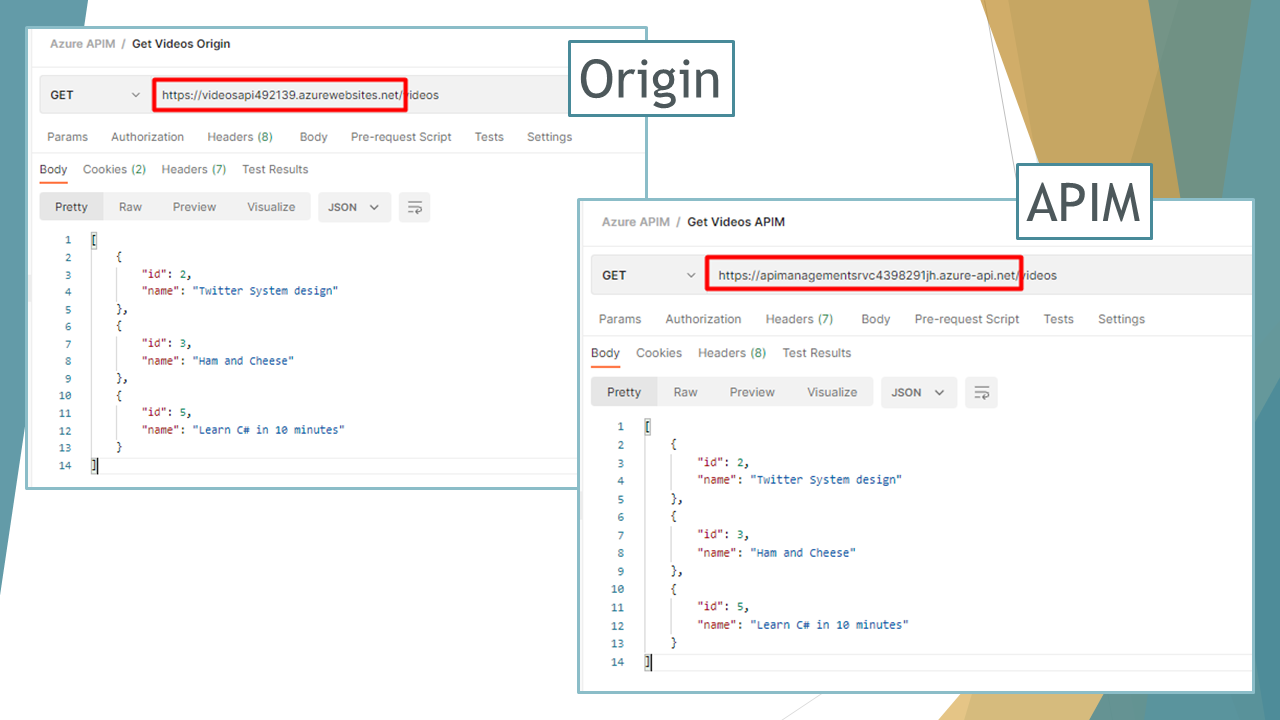
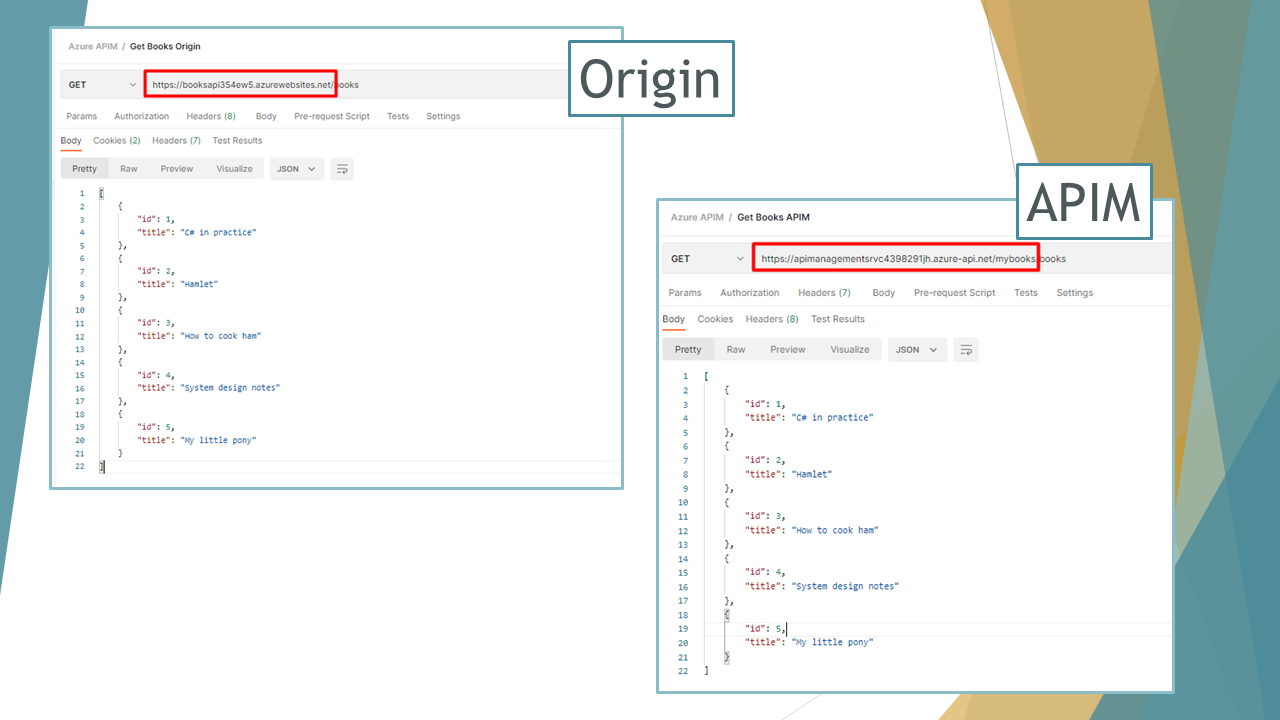
    We can then access Books API and Videos API both on the Origin and the Gateway (we’re doing it just for demonstrating that things are working; clients will only use the APIs exposed by the API Gateway).

    The Videos API maintains the exact same structure, mapping the endpoints as they are defined in Origin.

    Videos API on Origin and on API Gateway

    On the contrary, to access the Books APIs we have to access the /mybooks path (because we defined it a few steps ago when we imported the BooksAPI from OpenAPI definition: it’s the API Url Suffix field), as shown below:

    Books API on Origin and on API Gateway

    Further readings

    As usual, a bunch of interesting readings 📚

    In this article, we’ve only scratched the surface of Azure API Management. There’s way lot – and you can read about it on the Microsoft Docs website:

    🔗 What is Azure API Management? | Microsoft docs

    To integrate Azure APIM, we used two simple dotNET 6 Web APIs deployed on Azure. If you wanna know how to set up GitHub Actions to build and deploy dotNET APIs, I recently published an article on that topic.

    🔗 How to deploy .NET APIs on Azure using GitHub actions | Code4IT

    Lastly, since we’ve talked about Swagger, here’s an article where I dissected how you can integrate Swagger in dotNET Core applications:

    🔗 Understanding Swagger integration in .NET Core | Code4IT

    This article first appeared on Code4IT 🐧

    Wrapping up

    This can be just the beginning of a long journey; APIM allows you to highly customize your API Gateway by defining API access by user role, creating API documentation using custom templates and themes, and a lot of different stuff.

    We will come back to this topic soon.

    Happy coding!

    🐧


    Source link

  • Raise synchronous events using Timer (and not a While loop) &vert; Code4IT

    Raise synchronous events using Timer (and not a While loop) | Code4IT


    Just a second! 🫷
    If you are here, it means that you are a software developer.
    So, you know that storage, networking, and domain management have a cost .

    If you want to support this blog, please ensure that you have disabled the adblocker for this site.
    I configured Google AdSense to show as few ADS as possible – I don’t want to bother you with lots of ads, but I still need to add some to pay for the resources for my site.

    Thank you for your understanding.
    Davide

    There may be times when you need to process a specific task on a timely basis, such as polling an endpoint to look for updates or refreshing a Refresh Token.

    If you need infinite processing, you can pick two roads: the obvious one or the better one.

    For instance, you can use an infinite loop and put a Sleep command to delay the execution of the next task:

    while(true)
    {
        Thread.Sleep(2000);
        Console.WriteLine("Hello, Davide!");
    }
    

    There’s nothing wrong with it – but we can do better.

    Introducing System.Timers.Timer

    The System.Timers namespace exposes a cool object that you can use to achieve that result: Timer.

    You then define the timer, choose which event(s) must be processed, and then run it:

    void Main()
    {
        System.Timers.Timer timer = new System.Timers.Timer(2000);
        timer.Elapsed += AlertMe;
        timer.Elapsed += AlertMe2;
    
        timer.Start();
    }
    
    void AlertMe(object sender, ElapsedEventArgs e)
    {
        Console.WriteLine("Ciao Davide!");
    }
    
    void AlertMe2(object sender, ElapsedEventArgs e)
    {
        Console.WriteLine("Hello Davide!");
    }
    

    The constructor accepts in input an interval (a double value that represents the milliseconds for the interval), whose default value is 100.

    This class implements IDisposable: if you’re using it as a dependency of another component that must be Disposed, don’t forget to call Dispose on that Timer.

    Note: use this only for synchronous tasks: there are other kinds of Timers that you can use for asynchronous operations, such as PeriodicTimer, which also can be stopped by canceling a CancellationToken.

    This article first appeared on Code4IT 🐧

    Happy coding!

    🐧


    Source link

  • PriorityQueues on .NET 7 and C# 11 &vert; Code4IT

    PriorityQueues on .NET 7 and C# 11 | Code4IT


    A PriorityQueue represents a collection of items that have a value and a priority. Now this data structure is built-in in dotNET!

    Table of Contents

    Just a second! 🫷
    If you are here, it means that you are a software developer.
    So, you know that storage, networking, and domain management have a cost .

    If you want to support this blog, please ensure that you have disabled the adblocker for this site.
    I configured Google AdSense to show as few ADS as possible – I don’t want to bother you with lots of ads, but I still need to add some to pay for the resources for my site.

    Thank you for your understanding.
    Davide

    Starting from .NET 6 and C# 10, we finally have built-in support for PriorityQueues 🥳

    A PriorityQueue is a collection of items that have a value and a priority; as you can imagine, they act as a queue: the main operations are “add an item to the queue”, called Enqueue, and “remove an item from the queue”, named Dequeue. The main difference from a simple Queue is that on dequeue, the item with lowest priority is removed.

    In this article, we’re gonna use a PriorityQueue and wrap it into a custom class to solve one of its design issues (that I hope they’ll be addressed in a future release of dotNET).

    Welcoming Priority Queues in .NET

    Defining a priority queue is straightforward: you just have to declare it specifying the type of items and the type of priority.

    So, if you need a collection of Child items, and you want to use int as a priority type, you can define it as

    PriorityQueue<Child, int> pq = new PriorityQueue<Child, int>();
    

    Now you can add items using the Enqueue method:

    Child child = //something;
    int priority = 3;
    queue.Enqueue(child, priority);
    

    And you can retrieve the one on the top of the queue by calling Peek(), if you want to just look at the first item without removing it from the queue:

    Child child3 = BuildChild3();
    Child child2 = BuildChild2();
    Child child1 = BuildChild1();
    
    queue.Enqueue(child3, 3);
    queue.Enqueue(child1, 1);
    queue.Enqueue(child2, 2);
    
    //queue.Count = 3
    
    Child first = queue.Peek();
    //first will be child1, because its priority is 1
    //queue.Count = 3, because we did not remove the item on top
    

    or Dequeue if you want to retrieve it while removing it from the queue:

    Child child3 = BuildChild3();
    Child child2 = BuildChild2();
    Child child1 = BuildChild1();
    
    queue.Enqueue(child3, 3);
    queue.Enqueue(child1, 1);
    queue.Enqueue(child2, 2);
    
    //queue.Count = 3
    
    Child first = queue.Dequeue();
    //first will be child1, because its priority is 1
    //queue.Count = 2, because we removed the item with the lower priority
    

    This is the essence of a Priority Queue: insert items, give them a priority, then remove them starting from the one with lower priority.

    Creating a Wrapper to automatically handle priority in Priority Queues

    There’s a problem with this definition: you have to manually specify the priority of each item.

    I don’t like it that much: I’d like to automatically assign each item a priority. So we have to wrap it in another class.

    Since we’re near Christmas, and this article is part of the C# Advent 2022, let’s use an XMAS-themed example: a Christmas list used by Santa to handle gifts for children.

    Let’s assume that the Child class has this shape:

    public class Child
    {
        public bool HasSiblings { get; set; }
        public int Age { get; set; }
        public List<Deed> Deeds { get; set; }
    }
    
    public abstract class Deed
    {
        public string What { get; set; }
    }
    
    public class GoodDeed : Deed
    { }
    
    public class BadDeed : Deed
    { }
    

    Now we can create a Priority Queue of type <Child, int>:

    PriorityQueue<Child, int> pq = new PriorityQueue<Child, int>();
    

    And wrap it all within a ChristmasList class:

    public class ChristmasList
    {
        private readonly PriorityQueue<Child, int> queue;
    
        public ChristmasList()
        {
            queue = new PriorityQueue<Child, int>();
        }
    
        public void Add(Child child)
        {
            int priority =// ??;
            queue.Enqueue(child, priority);
        }
    
         public Child Get()
        {
            return queue.Dequeue();
        }
    }
    

    A question for you: what happens when we call the Get method on an empty queue? What should we do instead? Drop a message below! 📩

    We need to define a way to assign each child a priority.

    Define priority as private behavior

    The easiest way is to calculate the priority within the Add method: define a function that accepts a Child and returns an int, and then pass that int value to the Enqueue method.

    public void Add(Child child)
    {
        int priority = GetPriority(child);
        queue.Enqueue(child, priority);
    }
    

    This approach is useful because you’re encapsulating the behavior in the ChristmasList class, but has the downside that it’s not extensible, and you cannot use different priority algorithms in different places of your application. On the other side, GetPriority is a private operation within the ChristmasList class, so it can be fine for our example.

    Pass priority calculation from outside

    We can then pass a Func<Child, int> in the ChristmasList constructor, centralizing the priority definition and giving the caller the responsibility to define it:

    public class ChristmasList
    {
        private readonly PriorityQueue<Child, int> queue;
        private readonly Func<Child, int> _priorityCalculation;
    
        public ChristmasList(Func<Child, int> priorityCalculation)
        {
            queue = new PriorityQueue<Child, int>();
            _priorityCalculation = priorityCalculation;
        }
    
    
        public void Add(Child child)
        {
            int priority = _priorityCalculation(child);
            queue.Enqueue(child, priority);
        }
    
         public Child Get()
        {
            return queue.Dequeue();
        }
    }
    

    This implementation presents the opposite problems and solutions we saw in the previous example.

    What I’d like to see in the future

    This is a personal thought: it’d be great if we had a slightly different definition of PriorityQueue to automate the priority definition.

    One idea could be to add in the constructor a parameter that we can use to calculate the priority, just to avoid specifying it explicitly. So, I’d expect that the current definition of the constructor and of the Enqueue method change from this:

    PriorityQueue<Child, int> pq = new PriorityQueue<Child, int>();
    
    int priority = _priorityCalculation(child);
    queue.Enqueue(child, priority);
    

    to this:

    PriorityQueue<Child, int> pq = new PriorityQueue<Child, int>(_priorityCalculation);
    
    queue.Enqueue(child);
    

    It’s not perfect, and it raises some new problems.

    Another way could be to force the item type to implement an interface that exposes a way to retrieve its priority, such as

    public interface IHavePriority<T>{
        public T GetPriority();
    }
    
    public class Child : IHavePriority<int>{}
    

    Again, this approach is not perfect but can be helpful.

    Talking about its design, which approach would you suggest, and why?

    Further readings

    As usual, the best way to learn about something is by reading its official documentation:

    🔗 PriorityQueue documentation | Microsoft Learn

    This article is part of the 2022 C# Advent (that’s why I chose a Christmas-ish topic for this article),

    🔗 C# Advent Calendar 2022

    This article first appeared on Code4IT 🐧

    Conclusion

    PriorityQueue is a good-to-know functionality that is now out-of-the-box in dotNET. Do you like its design? Have you used another library to achieve the same result? In what do they differ?

    Let me know in the comments section! 📩

    For now, happy coding!

    🐧


    Source link

  • How to customize Swagger UI with custom CSS in .NET 7 &vert; Code4IT

    How to customize Swagger UI with custom CSS in .NET 7 | Code4IT


    Exposing Swagger UI is a good way to help developers consume your APIs. But don’t be boring: customize your UI with some fancy CSS

    Table of Contents

    Just a second! 🫷
    If you are here, it means that you are a software developer.
    So, you know that storage, networking, and domain management have a cost .

    If you want to support this blog, please ensure that you have disabled the adblocker for this site.
    I configured Google AdSense to show as few ADS as possible – I don’t want to bother you with lots of ads, but I still need to add some to pay for the resources for my site.

    Thank you for your understanding.
    Davide

    Brace yourself, Christmas is coming! 🎅

    If you want to add a more festive look to your Swagger UI, it’s just a matter of creating a CSS file and injecting it.

    You should create a custom CSS for your Swagger endpoints, especially if you are exposing them outside your company: if your company has a recognizable color palette, using it in your Swagger pages can make your brand stand out.

    In this article, we will learn how to inject a CSS file in the Swagger UI generated using .NET Minimal APIs.

    How to add Swagger in your .NET Minimal APIs

    There are plenty of tutorials about how to add Swagger to your APIs. I wrote some too, where I explained how every configuration impacts what you see in the UI.

    That article was targeting older dotNET versions without Minimal APIs. Now everything’s easier.

    When you create your API project, Visual Studio asks you if you want to add OpenAPI support (aka Swagger). By adding it, you will have everything in place to get started with Swagger.

    You Minimal APIs will look like this:

    public static void Main(string[] args)
    {
        var builder = WebApplication.CreateBuilder(args);
    
        builder.Services.AddEndpointsApiExplorer();
        builder.Services.AddSwaggerGen();
    
        var app = builder.Build();
    
        app.UseSwagger();
        app.UseSwaggerUI();
    
    
        app.MapGet("/weatherforecast", (HttpContext httpContext) =>
        {
            // return something
        })
        .WithName("GetWeatherForecast")
        .WithOpenApi();
    
        app.Run();
    }
    

    The key parts are builder.Services.AddEndpointsApiExplorer(), builder.Services.AddSwaggerGen(), app.UseSwagger(), app.UseSwaggerUI() and WithOpenApi(). Do you know that those methods do? If so, drop a comment below! 📩

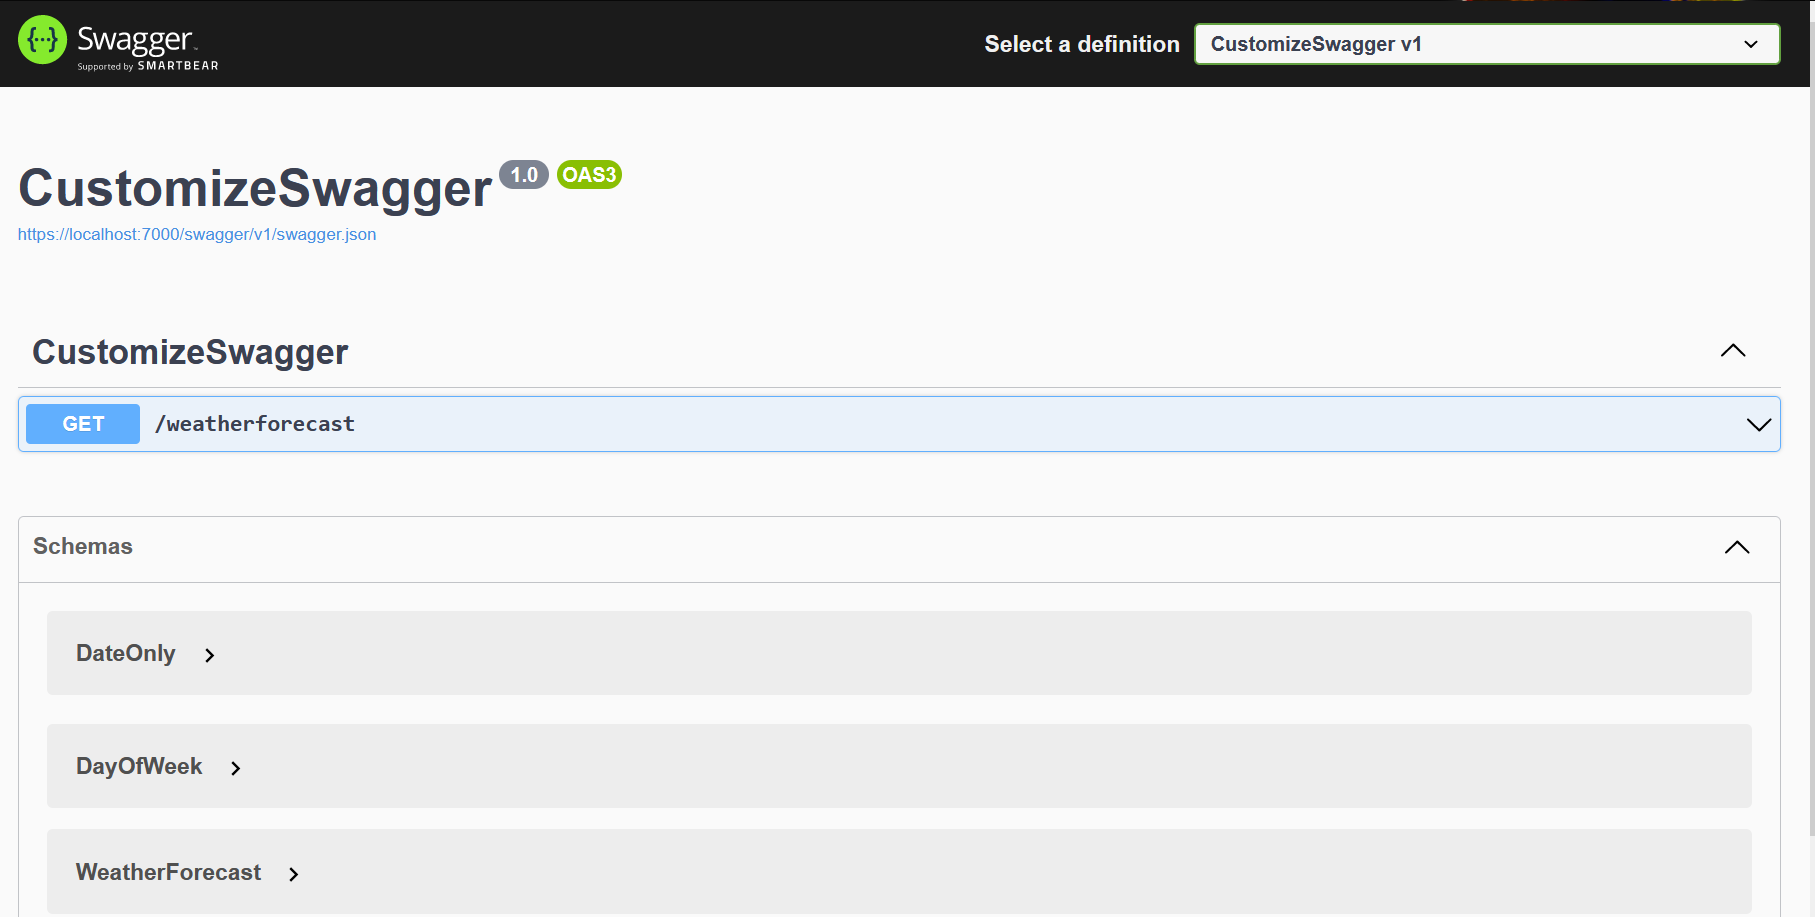
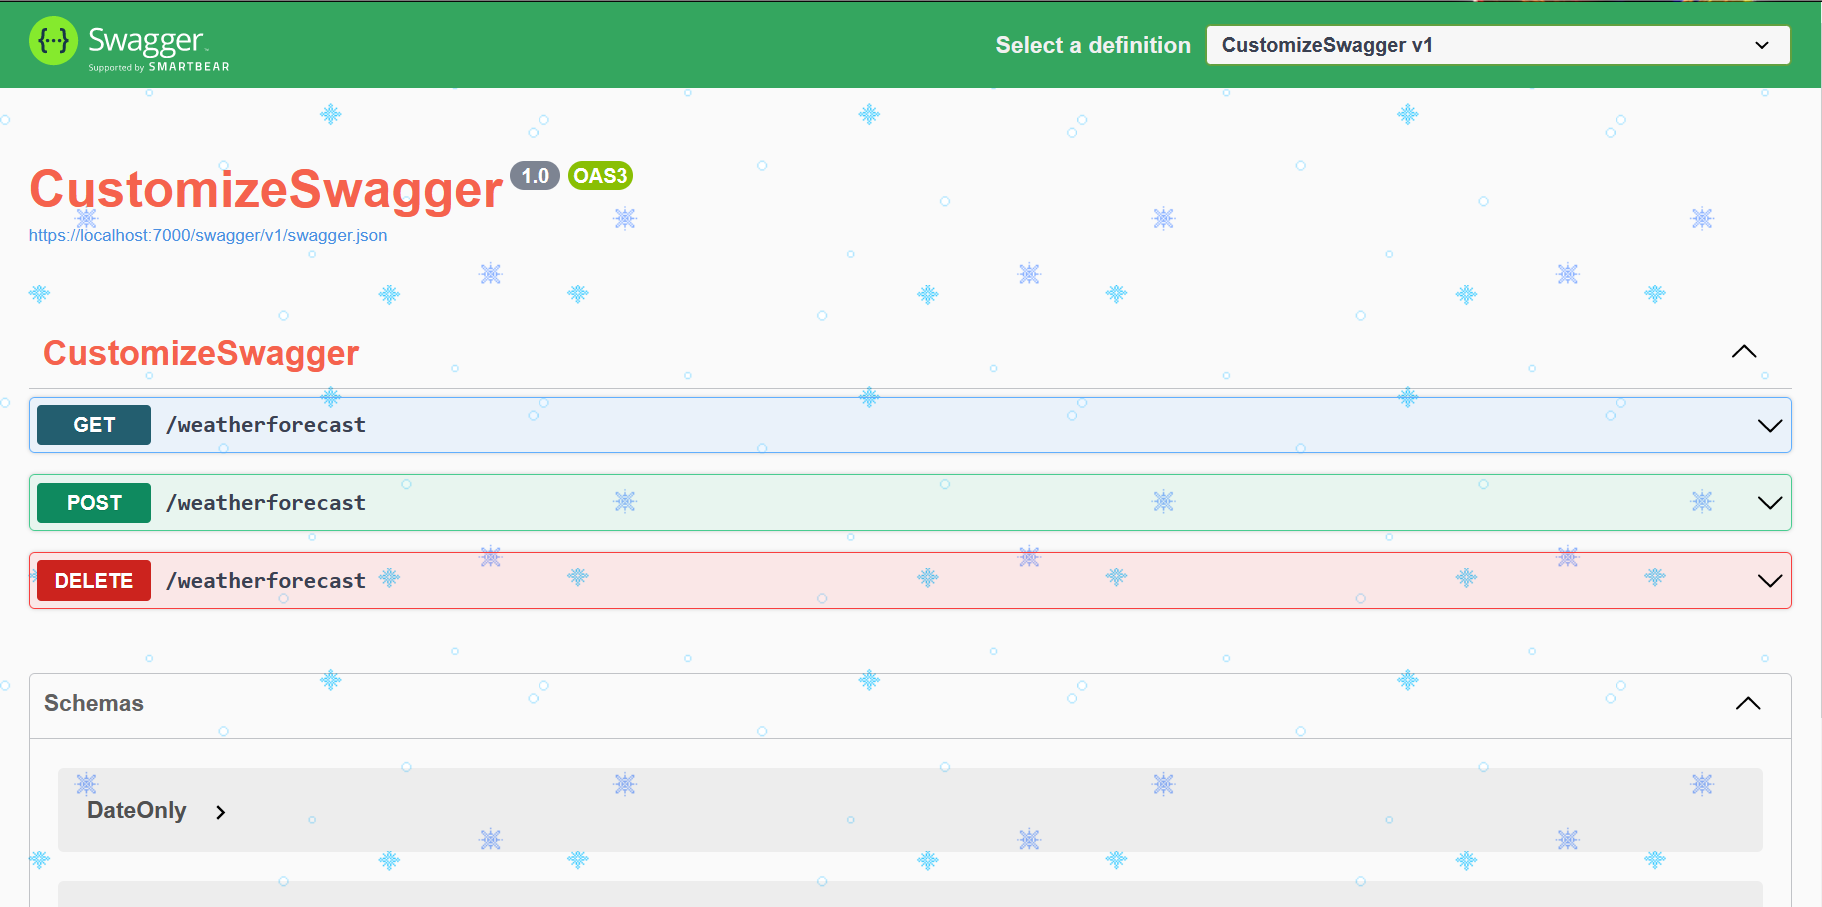
    Now, if we run our application, we will see a UI similar to the one below.

    Basic Swagger UI

    That’s a basic UI. Quite boring, uh? Let’s add some style

    Create the CSS file for Swagger theming

    All the static assets must be stored within the wwwroot folder. It does not exist by default, so you have to create it manually. Click on the API project, add a new folder, and name it “wwwroot”. Since it’s a special folder, by default Visual Studio will show it with a special icon (it’s a sort of blue world, similar to 🌐).

    Now you can add all the folders and static resources needed.

    I’ve created a single CSS file under /wwwroot/assets/css/xmas-style.css. Of course, name it as you wish – as long as it is within the wwwroot folder, it’s fine.

    My CSS file is quite minimal:

    body {
      background-image: url("../images/snowflakes.webp");
    }
    
    div.topbar {
      background-color: #34a65f !important;
    }
    
    h2,
    h3 {
      color: #f5624d !important;
    }
    
    .opblock-summary-get > button > span.opblock-summary-method {
      background-color: #235e6f !important;
    }
    
    .opblock-summary-post > button > span.opblock-summary-method {
      background-color: #0f8a5f !important;
    }
    
    .opblock-summary-delete > button > span.opblock-summary-method {
      background-color: #cc231e !important;
    }
    

    There are 3 main things to notice:

    1. the element selectors are taken directly from the Swagger UI – you’ll need a bit of reverse-engineering skills: just open the Browser Console and find the elements you want to update;
    2. unless the element does not already have the rule you want to apply, you have to add the !important CSS operator. Otherwise, your code won’t affect the UI;
    3. you can add assets from other folders: I’ve added background-image: url("../images/snowflakes.webp"); to the body style. That image is, as you can imagine, under the wwwroot folder we created before.

    Just as a recap, here’s my project structure:

    Static assets files

    Of course, it’s not enough: we have to tell Swagger to take into consideration that file

    How to inject a CSS file in Swagger UI

    This part is quite simple: you have to update the UseSwaggerUI command within the Main method:

    app.UseSwaggerUI(c =>
    +   c.InjectStylesheet("/assets/css/xmas-style.css")
    );
    

    Notice how that path begins: no wwwroot, no ~, no .. It starts with /assets.

    One last step: we have to tell dotNET to consider static files when building and running the application.

    You just have to add UseStaticFiles()

    After builder.Build():

    var app = builder.Build();
    + app.UseStaticFiles();
    
    app.UseSwagger();
    app.UseSwaggerUI(c =>
        c.InjectStylesheet("/assets/css/xmas-style.css")
    );
    

    Now we can run our APIs as admire our wonderful Xmas-style UI 🎅

    XMAS-style Swagger UI

    Further readings

    This article is part of 2022 .NET Advent, created by Dustin Moris 🐤:

    🔗 dotNET Advent Calendar 2022

    CSS is not the only part you can customize, there’s way more. Here’s an article I wrote about Swagger integration in .NET Core 3 APIs, but it’s still relevant (I hope! 😁)

    🔗 Understanding Swagger integration in .NET Core | Code4IT

    This article first appeared on Code4IT

    Wrapping up

    Theming is often not considered an important part of API development. That’s generally correct: why should I bother adding some fancy colors to APIs that are not expected to have a UI?

    This makes sense if you’re working on private APIs. In fact, theming is often useful to improve brand recognition for public-facing APIs.

    You should also consider using theming when deploying APIs to different environments: maybe Blue for Development, Yellow for Staging, and Green for Production. That way your developers can understand which environment they’re exploring right easily.

    Happy coding!
    🐧


    Source link

  • pick the right methods! &vert; Code4IT

    pick the right methods! | Code4IT


    LINQ is a set of methods that help developers perform operations on sets of items. There are tons of methods – do you know which is the one for you?

    Table of Contents

    Just a second! 🫷
    If you are here, it means that you are a software developer.
    So, you know that storage, networking, and domain management have a cost .

    If you want to support this blog, please ensure that you have disabled the adblocker for this site.
    I configured Google AdSense to show as few ADS as possible – I don’t want to bother you with lots of ads, but I still need to add some to pay for the resources for my site.

    Thank you for your understanding.
    Davide

    LINQ is one of the most loved functionalities by C# developers. It allows you to perform calculations and projections over a collection of items, making your code easy to build and, even more, easy to understand.

    As of C# 11, there are tens of methods and overloads you can choose from. Some of them seem similar, but there are some differences that might not be obvious to C# beginners.

    In this article, we’re gonna learn the differences between couples of methods, so that you can choose the best one that fits your needs.

    First vs FirstOrDefault

    Both First and FirstOrDefault allow you to get the first item of a collection that matches some requisites passed as a parameter, usually with a Lambda expression:

    int[] numbers = new int[] { -2, 1, 6, 12 };
    
    var mod3OrDefault = numbers.FirstOrDefault(n => n % 3 == 0);
    var mod3 = numbers.First(n => n % 3 == 0);
    

    Using FirstOrDefault you get the first item that matches the condition. If no items are found you’ll get the default value for that type. The default value depends on the data type:

    Data type Default value
    int 0
    string null
    bool false
    object null

    To know the default value for a specific type, just run default(string).

    So, coming back to FirstOrDefault, we have these two possible outcomes:

    int[] numbers = new int[] { -2,  1, 6, 12 };
    numbers.FirstOrDefault(n => n % 3 == 0); // 6
    numbers.FirstOrDefault(n => n % 7 == 0); // 0
    

    On the other hand, First throws an InvalidOperationException with the message “Sequence contains no matching element” if no items in the collection match the filter criterion:

    int[] numbers = new int[] { -2,  1, 6, 12 };
    numbers.First(n => n % 3 == 0); // 6
    numbers.First(n => n % 7 == 0); // throws InvalidOperationException
    

    First vs Single

    While First returns the first item that satisfies the condition, even if there are more than two or more, Single ensures that no more than one item matches that condition.

    If there are two or more items that passing the filter, an InvalidOperationException is thrown with the message “Sequence contains more than one matching element”.

    int[] numbers = new int[] { -2, 1, 6, 12 };
    numbers.First(n => n % 3 == 0); // 6
    numbers.Single(n => n % 3 == 0); // throws exception because both 6 and 12 are accepted values
    

    Both methods have their corresponding -OrDefault counterpart: SingleOrDefault returns the default value if no items are valid.

    int[] numbers = new int[] { -2, 1, 6, 12 };
    
    numbers.SingleOrDefault(n => n % 4 == 0); // 12
    numbers.SingleOrDefault(n => n % 7 == 0); // 0, because no items are %7
    numbers.SingleOrDefault(n => n % 3 == 0); // throws exception
    

    Any vs Count

    Both Any and Count give you indications about the presence or absence of items for which the specified predicate returns True.

    int[] numbers = new int[] { -2, 1, 6, 12 };
    
    numbers.Any(n => n % 3 == 0); // true
    numbers.Count(n => n % 3 == 0); // 2
    

    the difference is that Any returns a boolean, while Count returns an integer.

    Where vs First

    As you remember, First returns only one item.

    If you need all the items that meet the specified criteria, you can use Where:

    int[] numbers = new int[] { -2, 1, 6, 12 };
    numbers.Where(n => n % 3 == 0); // [6, 12]
    

    Sort vs Order

    Both Sort and Order deal with the sorting of collections.

    The main difference is that Sort sorts the items in place, modifying the original collection.

    On the contrary, Order and OrderBy create a new collection of items with the same items of the original sequence but sorted.

    List<int> originalNumbers = new List<int> { -7, 1, 5, -6};
    originalNumbers.Sort(); // originalNumbers now is [-7, -6, 1, 5]
    

    Also, notice that Sort is valid only on List<T>, and not Arrays or generic Enumerables.

    OrderBy and Order create a brand-new collection of items.

    List<int> originalNumbers = new List<int> { -7, 1, 5, -6};
    var sortedNumbers = originalNumbers.OrderBy(n => n);
    // sortedNumbers is [-7, -6, 1, 5];
    // originalNumbers is [-7, 1, 5, -6];
    

    💡 Starting from C# 11 we can simplify OrderBy(n => n) and use Order()!

    Further readings

    C# collections do not natively expose such methods. They are ALL Extension methods (well, except for Sort, which is a native of List<T> ).

    If you want to learn what are Extension Methods and how you can write your own methods, have a look at this article:

    🔗 How you can create extension methods in C# | Code4IT

    Then, in the C# TIPS section of my blog, there are several articles that you might find interesting.

    One of these is about a LINQ method that you might want to know: SelectMany.

    🔗 C# Tip: SelectMany in LINQ

    This article first appeared on Code4IT 🐧

    If you want to learn more about Sort, the best place is the documentation:

    🔗 List.Sort Method | Microsoft Docs

    Wrapping up

    In this article, we learned the differences between couples of LINQ methods.

    Each of them has a purpose, and you should use the right one for each case.

    ❓ A question for you: talking about performance, which is more efficient: First or Single? And what about Count() == 0 vs Any()? Drop a message below if you know the answer! 📩

    I hope you enjoyed this article! Let’s keep in touch on Twitter or on LinkedIn, if you want! 🤜🤛

    Happy coding!

    🐧


    Source link