Just a second! 🫷 If you are here, it means that you are a software developer.
So, you know that storage, networking, and domain management have a cost .
If you want to support this blog, please ensure that you have disabled the adblocker for this site. I configured Google AdSense to show as few ADS as possible – I don’t want to bother you with lots of ads, but I still need to add some to pay for the resources for my site.
Thank you for your understanding. – Davide
In C#, ExpandoObjects are dynamically-populated objects without a predefined shape.
dynamic myObj = new ExpandoObject();
myObj.Name ="Davide";
myObj.Age = 30;
Name and Age are not part of the definition of ExpandoObject: they are two fields I added without declaring their type.
This is a dynamic object, so I can add new fields as I want. Say that I need to add my City: I can simply use
without creating any field on the ExpandoObject class.
Now: how can I retrieve all the values? Probably the best way is by converting the ExpandoObject into a Dictionary.
Create a new Dictionary
Using an IDictionary makes it easy to access the keys of the object.
If you have an ExpandoObject that will not change, you can use it to create a new IDictionary:
Notice that we use the ExpandoObject to create a newIDictionary. This means that after the Dictionary creation if we add a new field to the ExpandoObject, that new field will not be present in the Dictionary.
Cast to IDictionary
If you want to use an IDictionary to get the ExpandoObject keys, and you need to stay in sync with the ExpandoObject status, you just have to cast that object to an IDictionary
In today’s regulatory climate, compliance is no longer a box-ticking exercise. It is a strategic necessity. Organizations across industries are under pressure to secure sensitive data, meet privacy obligations, and avoid hefty penalties. Yet, despite all the talk about “data visibility” and “compliance readiness,” one fundamental gap remains: unseen data—the information your business holds but doesn’t know about.
Unseen data isn’t just a blind spot—it’s a compliance time bomb waiting to trigger regulatory and reputational damage.
The Myth: Sensitive Data Lives Only in Databases
Many businesses operate under the dangerous assumption that sensitive information exists only in structured repositories like databases, ERP platforms, or CRM systems. While it’s true these systems hold vast amounts of personal and financial information, they’re far from the whole picture.
Reality check: Sensitive data is often scattered across endpoints, collaboration platforms, and forgotten storage locations. Think of HR documents on a laptop, customer details in a shared folder, or financial reports in someone’s email archive. These are prime targets for breaches—and they often escape compliance audits because they live outside the “official” data sources.
Myth vs Reality: Why Structured Data is Not the Whole Story
Yes, structured sources like SQL databases allow centralized access control and auditing. But compliance risks aren’t limited to structured data. Unstructured and endpoint data can be far more dangerous because:
They are harder to track.
They often bypass IT policies.
They get replicated in multiple places without oversight.
When organizations focus solely on structured data, they risk overlooking up to 50–70% of their sensitive information footprint.
The Challenge Without Complete Discovery
Without full-spectrum data discovery—covering structured, unstructured, and endpoint environments—organizations face several challenges:
Compliance Gaps – Regulations like GDPR, DPDPA, HIPAA, and CCPA require knowing all locations of personal data. If data is missed, compliance reports will be incomplete.
Increased Breach Risk – Cybercriminals exploit the easiest entry points, often targeting endpoints and poorly secured file shares.
Inefficient Remediation – Without knowing where data lives, security teams can’t effectively remove, encrypt, or mask it.
Costly Investigations – Post-breach forensics becomes slower and more expensive when data locations are unknown.
The Importance of Discovering Data Everywhere
A truly compliant organization knows where every piece of sensitive data resides, no matter the format or location. That means extending discovery capabilities to:
Structured Data
Where it lives: Databases, ERP, CRM, and transactional systems.
Why it matters: It holds core business-critical records, such as customer PII, payment data, and medical records.
Risks if ignored: Non-compliance with data subject rights requests; inaccurate reporting.
Unstructured Data
Where it lives: File servers, SharePoint, Teams, Slack, email archives, cloud storage.
Why it matters: Contains contracts, scanned IDs, reports, and sensitive documents in freeform formats.
Risks if ignored: Harder to monitor, control, and protect due to scattered storage.
Endpoint Data
Where it lives: Laptops, desktops, mobile devices (Windows, Mac, Linux).
Why it matters: Employees often store working copies of sensitive files locally.
Risks if ignored: Theft, loss, or compromise of devices can expose critical information.
Real-World Examples of Compliance Risks from Unseen Data
Healthcare Sector: A hospital’s breach investigation revealed patient records stored on a doctor’s laptop, which was never logged into official systems. GDPR fines followed.
Banking & Finance: An audit found loan application forms with customer PII on a shared drive, accessible to interns.
Retail: During a PCI DSS assessment, old CSV exports containing cardholder data were discovered in an unused cloud folder.
Government: Sensitive citizen records are emailed between departments, bypassing secure document transfer systems, and are later exposed to a phishing attack.
Closing the Gap: A Proactive Approach to Data Discovery
The only way to eliminate unseen data risks is to deploy comprehensive data discovery and classification tools that scan across servers, cloud platforms, and endpoints—automatically detecting sensitive content wherever it resides.
This proactive approach supports regulatory compliance, improves breach resilience, reduces audit stress, and ensures that data governance policies are meaningful in practice, not just on paper.
Bottom Line
Compliance isn’t just about protecting data you know exists—it’s about uncovering the data you don’t. From servers to endpoints, organizations need end-to-end visibility to safeguard against unseen risks and meet today’s stringent data protection laws.
In unit tests, sometimes you need to perform deep checks on the object passed to the mocked service. We will learn 3 ways to do that with Moq and C#
Table of Contents
Just a second! 🫷 If you are here, it means that you are a software developer.
So, you know that storage, networking, and domain management have a cost .
If you want to support this blog, please ensure that you have disabled the adblocker for this site. I configured Google AdSense to show as few ADS as possible – I don’t want to bother you with lots of ads, but I still need to add some to pay for the resources for my site.
Thank you for your understanding. – Davide
When writing unit tests, you can use Mocks to simulate the usage of class dependencies.
Even though some developers are harshly against the usage of mocks, they can be useful, especially when the mocked operation does not return any value, but still, you want to check that you’ve called a specific method with the correct values.
In this article, we will learn 3 ways to check the values passed to the mocks when using Moq in our C# Unit Tests.
To better explain those 3 ways, I created this method:
publicvoid UpdateUser(User user, Preference preference)
{
var userDto = new UserDto
{
Id = user.id,
UserName = user.username,
LikesBeer = preference.likesBeer,
LikesCoke = preference.likesCoke,
LikesPizza = preference.likesPizza,
};
_userRepository.Update(userDto);
}
UpdateUser simply accepts two objects, user and preference, combines them into a single UserDto object, and then calls the Update method of _userRepository, which is an interface injected in the class constructor.
As you can see, we are not interested in the return value from _userRepository.Update. Rather, we are interested in checking that we are calling it with the right values.
We can do it in 3 ways.
Verify each property with It.Is
The simplest, most common way is by using It.Is<T> within the Verify method.
This approach works well when you have to perform checks on only a few fields. But the more fields you add, the longer and messier that code becomes.
Also, a problem with this approach is that if it fails, it becomes hard to understand which is the cause of the failure, because there is no indication of the specific field that did not match the expectations.
Here’s an example of an error message:
Expected invocation on the mock at least once, but was never performed: _ => _.Update(It.Is<UserDto>(u => (((u.Id == 1 && u.UserName == "Davidde") && u.LikesPizza == True) && u.LikesBeer == True) && u.LikesCoke == False))

Performed invocations:

Mock<IUserRepository:1> (_):
    IUserRepository.Update(UserDto { UserName = Davide, Id = 1, LikesPizza = True, LikesCoke = False, LikesBeer = True })
Can you spot the error? And what if you were checking 15 fields instead of 5?
Verify with external function
Another approach is by externalizing the function.
[Test]publicvoid WithExternalFunction()
{
//Arrangevar user = new User(1, "Davide");
var preferences = new Preference(true, true, false);
UserDto expected = new UserDto
{
Id = 1,
UserName = "Davide",
LikesBeer = true,
LikesCoke = false,
LikesPizza = true,
};
//Act userUpdater.UpdateUser(user, preferences);
//Assert userRepo.Verify(_ => _.Update(It.Is<UserDto>(u => AreEqual(u, expected))));
}
privatebool AreEqual(UserDto u, UserDto expected)
{
Assert.AreEqual(expected.UserName, u.UserName);
Assert.AreEqual(expected.Id, u.Id);
Assert.AreEqual(expected.LikesBeer, u.LikesBeer);
Assert.AreEqual(expected.LikesCoke, u.LikesCoke);
Assert.AreEqual(expected.LikesPizza, u.LikesPizza);
returntrue;
}
Here, we are passing an external function to the It.Is<T> method.
This approach allows us to define more explicit and comprehensive checks.
The good parts of it are that you will gain more control over the assertions, and you will also have better error messages in case a test fails:
Expected string length 6 but was 7. Strings differ at index 5.
Expected: "Davide"
But was:  "Davidde"
The bad part is that you will stuff your test class with lots of different methods, and the class can easily become hard to maintain. Unluckily, we cannot use local functions.
On the other hand, having external functions allows us to combine them when we need to do some tests that can be reused across test cases.
Intercepting the function parameters with Callback
Lastly, we can use a hidden gem of Moq: Callbacks.
With Callbacks, you can store in a local variable the reference to the item that was called by the method.
[Test]publicvoid CompareWithCallback()
{
// Arrangevar user = new User(1, "Davide");
var preferences = new Preference(true, true, false);
UserDto actual = null;
userRepo.Setup(_ => _.Update(It.IsAny<UserDto>()))
.Callback(new InvocationAction(i => actual = (UserDto)i.Arguments[0]));
UserDto expected = new UserDto
{
Id = 1,
UserName = "Davide",
LikesBeer = true,
LikesCoke = false,
LikesPizza = true,
};
//Act userUpdater.UpdateUser(user, preferences);
//Assert Assert.IsTrue(AreEqual(expected, actual));
}
In this way, you can use it locally and run assertions directly to that object without relying on the Verify method.
Or, if you use records, you can use the auto-equality checks to simplify the Verify method as I did in the previous example.
Wrapping up
In this article, we’ve explored 3 ways to perform checks on the objects passed to dependencies mocked with Moq.
Each way has its pros and cons, and it’s up to you to choose the approach that fits you the best.
I personally prefer the second and third approaches, as they allow me to perform better checks on the passed values.
Just a second! 🫷 If you are here, it means that you are a software developer.
So, you know that storage, networking, and domain management have a cost .
If you want to support this blog, please ensure that you have disabled the adblocker for this site. I configured Google AdSense to show as few ADS as possible – I don’t want to bother you with lots of ads, but I still need to add some to pay for the resources for my site.
Thank you for your understanding. – Davide
You surely take care of your code to make it easy to read and understand, right? RIGHT??
Well done! 👏
But most of the developers tend to write good production code (the one actually executed by your system), but very poor test code.
Production code is meant to be run, while tests are also meant to document your code; therefore there must not be doubts about the meaning and the reason behind a test.
This also means that all the names must be explicit enough to help readers understand how and why a test should pass.
This is a valid C# test:
[Test]publicvoid TestHtmlParser()
{
HtmlDocument doc = new HtmlDocument();
doc.LoadHtml("<p>Hello</p>");
var node = doc.DocumentNode.ChildNodes[0];
var parser = new HtmlParser();
Assert.AreEqual("Hello", parser.ParseContent(node));
}
What is the meaning of this test? We should be able to understand it just by reading the method name.
Also, notice that here we are creating the HtmlNode object; imagine if this node creation is present in every test method: you will see the same lines of code over and over again.
you can understand its meaning by reading the test name
the code is concise, and some creation parts are refactored out
we’ve well separated the 3 parts of the tests: Arrange, Act, Assert (we’ve already talked about it here)
Wrapping up
Tests are still part of your project, even though they are not used directly by your customers.
Never skip tests, and never write them in a rush. After all, when you encounter a bug, the first thing you should do is write a test to reproduce the bug, and then validate the fix using that same test.
C# recently introduced Records, a new way of defining types. In this article, we will see 8 things you probably didn’t know about C# Records
Table of Contents
Just a second! 🫷 If you are here, it means that you are a software developer.
So, you know that storage, networking, and domain management have a cost .
If you want to support this blog, please ensure that you have disabled the adblocker for this site. I configured Google AdSense to show as few ADS as possible – I don’t want to bother you with lots of ads, but I still need to add some to pay for the resources for my site.
Thank you for your understanding. – Davide
Records are the new data type introduced in 2021 with C# 9 and .NET Core 5.
publicrecordPerson(string Name, int Id);
Records are the third way of defining data types in C#; the other two are class and struct.
Since they’re a quite new idea in .NET, we should spend some time experimenting with it and trying to understand its possibilities and functionalities.
In this article, we will see 8 properties of Records that you should know before using it, to get the best out of this new data type.
1- Records are immutable
By default, Records are immutable. This means that, once you’ve created one instance, you cannot modify any of its fields:
var me = new Person("Davide", 1);
me.Name = "AnotherMe"; // won't compile!
This operation is not legit.
Even the compiler complains:
Init-only property or indexer ‘Person.Name’ can only be assigned in an object initializer, or on ’this’ or ‘base’ in an instance constructor or an ‘init’ accessor.
2- Records implement equality
The other main property of Records is that they implement equality out-of-the-box.
[Test]publicvoid EquivalentInstances_AreEqual()
{
var me = new Person("Davide", 1);
var anotherMe = new Person("Davide", 1);
Assert.That(anotherMe, Is.EqualTo(me));
Assert.That(me, Is.Not.SameAs(anotherMe));
}
As you can see, I’ve created two instances of Person with the same fields. They are considered equal, but they are not the same instance.
3- Records can be cloned or updated using ‘with’
Ok, so if we need to update the field of a Record, what can we do?
We can use the with keyword:
[Test]publicvoid WithProperty_CreatesNewInstance()
{
var me = new Person("Davide", 1);
var anotherMe = me with { Id = 2 };
Assert.That(anotherMe, Is.Not.EqualTo(me));
Assert.That(me, Is.Not.SameAs(anotherMe));
}
Take a look at me with { Id = 2 }: that operation creates a clone of me and updates the Id field.
Of course, you can use with to create a new instance identical to the original one.
[Test]publicvoid With_CreatesNewInstance()
{
var me = new Person("Davide", 1);
var anotherMe = me with { };
Assert.That(anotherMe, Is.EqualTo(me));
Assert.That(me, Is.Not.SameAs(anotherMe));
}
4- Records can be structs and classes
Basically, Records act as Classes.
publicrecordPerson(string Name, int Id);
Sometimes that’s not what you want. Since C# 10 you can declare Records as Structs:
publicrecordstruct Point(int X, int Y);
Clearly, everything we’ve seen before is still valid.
[Test]publicvoid EquivalentStructsInstances_AreEqual()
{
var a = new Point(2, 1);
var b = new Point(2, 1);
Assert.That(b, Is.EqualTo(a));
//Assert.That(a, Is.Not.SameAs(b));// does not compile!}
Well, almost everything: you cannot use Is.SameAs() because, since structs are value types, two values will always be distinct values. You’ll get notified about it by the compiler, with an error that says:
The SameAs constraint always fails on value types as the actual and the expected value cannot be the same reference
5- Records are actually not immutable
We’ve seen that you cannot update existing Records. Well, that’s not totally correct.
That assertion is true in the case of “simple” Records like Person:
publicrecordPerson(string Name, int Id);
But things change when we use another way of defining Records:
We can explicitly declare the properties of the Record to make it look more like plain classes.
Using this approach, we still can use the auto-equality functionality of Records
[Test]publicvoid ComplexRecordsAreEquatable()
{
var a = new Pair("Capital", "Roma");
var b = new Pair("Capital", "Roma");
Assert.That(b, Is.EqualTo(a));
}
But we can update a single field without creating a brand new instance:
[Test]publicvoid ComplexRecordsAreNotImmutable()
{
var b = new Pair("Capital", "Roma");
b.Value = "Torino";
Assert.That(b.Value, Is.EqualTo("Torino"));
}
Also, only simple types are immutable, even with the basic Record definition.
The ComplexPair type is a Record that accepts in the definition a list of strings.
That list of strings is not immutable: you can add and remove items as you wish:
[Test]publicvoid ComplexRecordsAreNotImmutable2()
{
var b = new ComplexPair("Capital", "Roma", new List<string> { "City" });
b.Metadata.Add("Another Value");
Assert.That(b.Metadata.Count, Is.EqualTo(2));
}
In the example below, you can see that I added a new item to the Metadata list without creating a new object.
6- Records can have subtypes
A neat feature is that we can create a hierarchy of Records in a very simple manner.
Do you remember the Person definition?
publicrecordPerson(string Name, int Id);
Well, you can define a subtype just as you would do with plain classes:
publicrecordEmployee(string Name, int Id, string Role) : Person(Name, Id);
Of course, all the rules of Boxing and Unboxing are still valid.
[Test]publicvoid Records_CanHaveSubtypes()
{
Person meEmp = new Employee("Davide", 1, "Chief");
Assert.That(meEmp, Is.AssignableTo<Employee>());
Assert.That(meEmp, Is.AssignableTo<Person>());
}
Finally, if you’re interested in trivia about C# stuff we use but we rarely explore, here’s an article I wrote a while ago about GUIDs in C# – you’ll find some neat stuff in there!
Just a second! 🫷 If you are here, it means that you are a software developer.
So, you know that storage, networking, and domain management have a cost .
If you want to support this blog, please ensure that you have disabled the adblocker for this site. I configured Google AdSense to show as few ADS as possible – I don’t want to bother you with lots of ads, but I still need to add some to pay for the resources for my site.
Thank you for your understanding. – Davide
The problem with HttpClient
When you create lots of HttpClient instances, you may incur Socket Exhaustion.
This happens because sockets are a finite resource, and they are not released exactly when you ‘Dispose’ them, but a bit later. So, when you create lots of clients, you may terminate the available sockets.
Even with using statements you may end up with Socket Exhaustion.
classResourceChecker{
publicasync Task<bool> ResourceExists(string url)
{
using (HttpClient client = new HttpClient())
{
var response = await client.GetAsync(url);
return response.IsSuccessStatusCode;
}
}
}
Actually, the real issue lies in the disposal of HttpMessageHandler instances. With simple HttpClient objects, you have no control over them.
Introducing HttpClientFactory
The HttpClientFactory class creates HttpClient instances for you.
The purpose of IHttpClientFactory is to solve that issue with HttpMessageHandler.
An interesting feature of IHttpClientFactory is that you can customize it with some general configurations that will be applied to all the HttpClient instances generated in a certain way. For instance, you can define HTTP Headers, Base URL, and other properties in a single point, and have those properties applied everywhere.
How to add it to .NET Core APIs or Websites
How can you use HttpClientFactory in your .NET projects?
If you have the Startup class, you can simply add an instruction to the ConfigureServices method:
Logs are important. Properly structured logs can be the key to resolving some critical issues. With Serilog’s Scopes, you can enrich your logs with info about the context where they happened.
Table of Contents
Just a second! 🫷 If you are here, it means that you are a software developer.
So, you know that storage, networking, and domain management have a cost .
If you want to support this blog, please ensure that you have disabled the adblocker for this site. I configured Google AdSense to show as few ADS as possible – I don’t want to bother you with lots of ads, but I still need to add some to pay for the resources for my site.
Thank you for your understanding. – Davide
Even though it’s not one of the first things we usually set up when creating a new application, logging is a real game-changer in the long run.
When an error occurred, if we have proper logging we can get more info about the context where it happened so that we can easily identify the root cause.
In this article, we will use Scopes, one of the functionalities of Serilog, to create better logs for our .NET 6 application. In particular, we’re going to create a .NET 6 API application in the form of Minimal APIs.
We will also use Seq, just to show you the final result.
To summarize, Serilog is an open source .NET library for logging. One of the best features of Serilog is that messages are in the form of a template (called Structured Logs), and you can enrich the logs with some value automatically calculated, such as the method name or exception details.
To add Serilog to your application, you simply have to run dotnet add package Serilog.AspNetCore.
Since we’re using Minimal APIs, we don’t have the StartUp file anymore; instead, we will need to add it to the Program.cs file:
As you can see, we’re injecting an ILogger<ItemsRepository>: specifying the related class automatically adds some more context to the logs that we will generate.
Installing Seq and adding it as a Sink
Seq is a logging platform that is a perfect fit for Serilog logs. If you don’t have it already installed, head to their download page and install it locally (you can even install it as a Docker container 🤩).
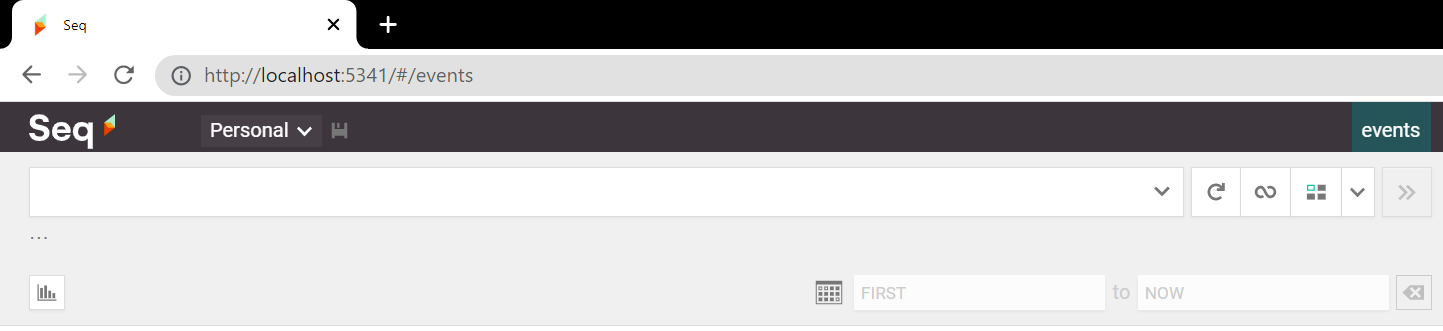
In the installation wizard, you can select the HTTP port that will expose its UI. Once everything is in place, you can open that page on your localhost and see a page like this:
On this page, we will see all the logs we write.
But wait! ⚠ We still have to add Seq as a sink for Serilog.
A sink is nothing but a destination for the logs. When using .NET APIs we can define our sinks both on the appsettings.json file and on the Program.cs file. We will use the second approach.
First of all, you will need to install a NuGet package to add Seq as a sink: dotnet add package Serilog.Sinks.Seq.
Then, you have to update the Serilog definition we’ve seen before by adding a .WriteTo.Seq instruction:
Notice that we’ve specified also the port that exposes our Seq instance.
Now, every time we log something, we will see our logs both on the Console and on Seq.
How to add scopes
The time has come: we can finally learn how to add Scopes using Serilog!
Setting up the example
For this example, I’ve created a simple controller, ItemsController, which exposes two endpoints: Get and Add. With these two endpoints, we are able to add and retrieve items stored in an in-memory collection.
This class has 2 main dependencies: IItemsRepository and IUsersItemsRepository. Each of these interfaces has its own concrete class, each with a private logger injected in the constructor:
public ItemsRepository(ILogger<ItemsRepository> logger)
{
    _logger = logger;
}
and, similarly
public UsersItemRepository(ILogger<UsersItemRepository> logger)
{
    _logger = logger;
}
How do those classes use their own _logger instances?
For example, the UsersItemRepository class exposes an AddItem method that adds a specific item to the list of items already possessed by a specific user.
publicvoid AddItem(string username, Item item)
{
if (!_usersItems.ContainsKey(username))
{
_usersItems.Add(username, new List<Item>());
_logger.LogInformation("User was missing from the list. Just added");
}
_usersItems[username].Add(item);
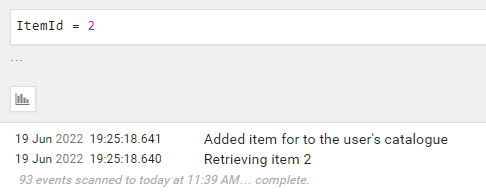
_logger.LogInformation("Added item for to the user's catalogue");
}
We are logging some messages, such as “User was missing from the list. Just added”.
Something similar happens in the ItemsRepository class, where we have a GetItem method that returns the required item if it exists, and null otherwise.
[HttpPost(Name = "AddItems")]public IActionResult Add(string userName, int itemId)
{
var item = _itemsRepository.GetItem(itemId);
if (item == null)
{
_logger.LogWarning("Item does not exist");
return NotFound();
}
_usersItemsRepository.AddItem(userName, item);
return Ok(item);
}
Ok then, we’re ready to run the application and see the result.
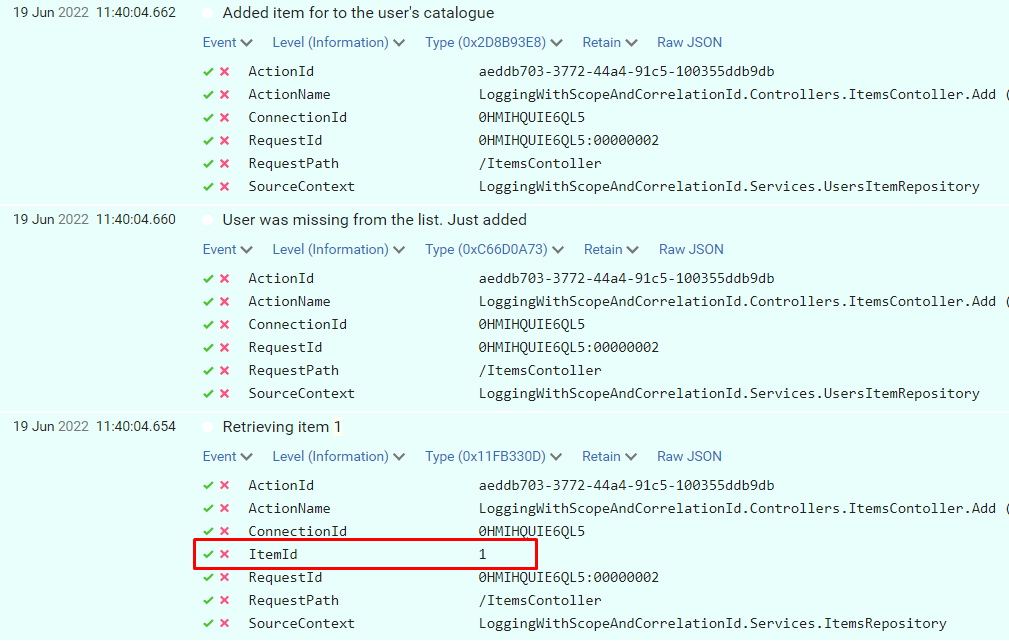
When I call that endpoint by passing “davide” as userName and “1” as itemId, we can see these logs:
We can see the 3 log messages but they are unrelated one each other. In fact, if we expand the logs to see the actual values we’ve logged, we can see that only the “Retrieving item 1” log has some information about the item ID we want to associate with the user.
Using BeginScope with Serilog
Finally, it’s time to define the Scope.
It’s as easy as adding a simple using statement; see how I added the scope to the Add method in the Controller:
[HttpPost(Name = "AddItems")]public IActionResult Add(string userName, int itemId)
{
using (_logger.BeginScope("Adding item {ItemId} for user {UserName}", itemId, userName))
{
var item = _itemsRepository.GetItem(itemId);
if (item == null)
{
_logger.LogWarning("Item does not exist");
return NotFound();
}
_usersItemsRepository.AddItem(userName, item);
return Ok(item);
}
}
Here’s the key!
using (_logger.BeginScope("Adding item {ItemId} for user {UserName}", itemId, userName))
With this single instruction, we are actually performing 2 operations:
we are adding a Scope to each message – “Adding item 1 for user davide”
we are adding ItemId and UserName to each log entry that falls in this block, in every method in the method chain.
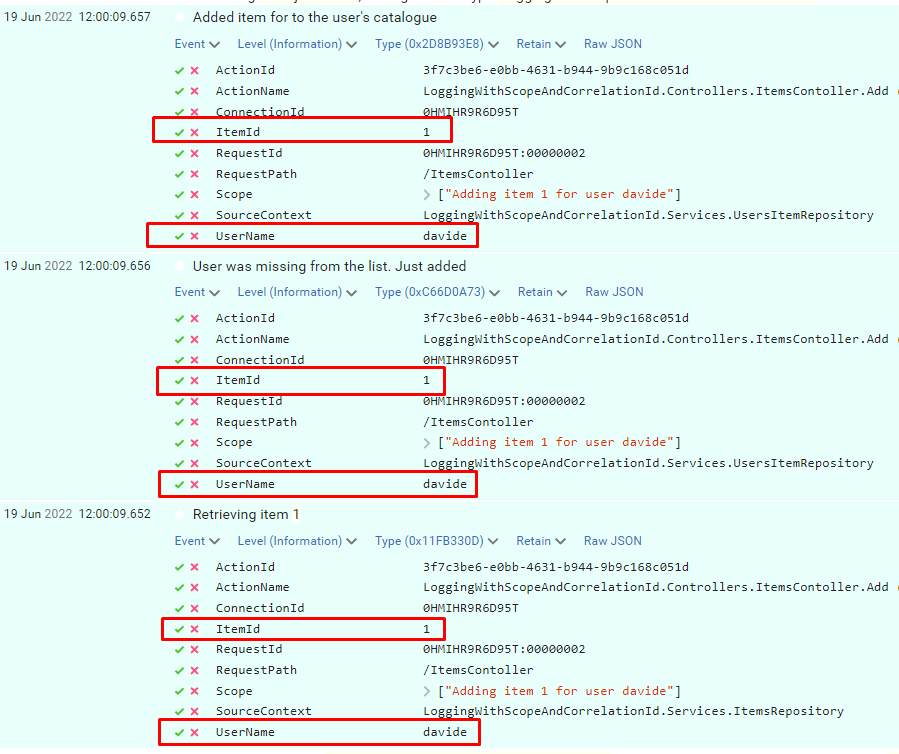
Let’s run the application again, and we will see this result:
So, now you can use these new properties to get some info about the context of when this log happened, and you can use the ItemId and UserName fields to search for other related logs.
You can also nest scopes, of course.
Why scopes instead of Correlation ID?
You might be thinking
Why can’t I just use correlation IDs?
Well, the answer is pretty simple: correlation IDs are meant to correlate different logs in a specific request, and, often, across services. You generally use Correlation IDs that represent a specific call to your API and act as a Request ID.
For sure, that can be useful. But, sometimes, not enough.
Using scopes you can also “correlate” distinct HTTP requests that have something in common.
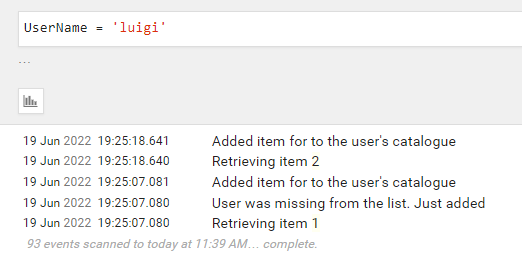
If I call 2 times the AddItem endpoint, I can filter both for UserName and for ItemId and see all the related logs across distinct HTTP calls.
Let’s see a real example: I have called the endpoint with different values
id=1, username=“davide”
id=1, username=“luigi”
id=2, username=“luigi”
Since the scope reference both properties, we can filter for UserName and discover that Luigi has added both Item1 and Item 2.
At the same time, we can filter by ItemId and discover that the item with id = 2 has been added only once.
Ok, then, in the end, Scopes or Correlation IDs? The answer is simple:
Then, you might want to deep dive into Serilog’s BeginScope. Here’s a neat article by Nicholas Blumhardt. Also, have a look at the comments, you’ll find interesting points to consider
Hi! My name is Clarisse and I’m a freelance web designer at Okey Studio, currently based in Toulouse, France. Together with Adrien Quéchon, a web developer, we co-founded Okey Studio in 2021 — an independent digital studio specializing in the creation of unique, fully custom websites. We particularly love creating creative and original sites where we can play with ideas, interactions, and visuals, while still meeting our clients’ goals. We put a lot of heart into crafting personalized user experiences, always aligned with the needs and vision of those we work with.
What I especially enjoy is the diversity of sectors we collaborate with: it pushes us to stay curious, constantly test new visual languages, explore unexpected ideas, and challenge our habits.
This is the promotional website for Cyclops Club, a New York-based studio offering video production and editing services to optimize your multimedia content. Created within Okey Studio, the site immerses visitors in a quirky, dynamic, and fun universe.
Challenges: We wanted to incorporate nods to the video world (timelines, icons, progress bars, time indicators, REC mode…), as well as GIFs and Easter eggs. The challenge was to maintain a professional tone while keeping it fun — so we had to find the right balance between all these elements.
Personal note: This was one of those projects where you really feel creative freedom, and above all, where we genuinely had fun. Marvin trusted us 200%, which allowed us to push the graphic boundaries quite far while staying consistent with the brand image and goals. We enjoyed hiding little easter eggs and GIFs throughout the site. The nicest was embracing this funny tone while maintaining a professional and controlled foundation.
Virtual Gallery is a personal project we created internally at Okey Studio. The site honors photographers who generously share their photos online. It celebrates their talent through a small virtual photo gallery — like an exhibition space, but in a digital form. We wanted to create a smooth and enjoyable browsing experience through a selection of stunning photos, featuring carefully crafted scrolling and an immersive feel.
Challenges: The biggest challenge was probably selecting the photos. I sorted the images by colors and moods to maintain a consistent aesthetic throughout the site.
Personal notes: Since this is a personal project, it was naturally harder to set boundaries. No client, no deadline… so you want to keep going, keep testing, keep redoing. You have to learn to set limits for yourself and accept that it’s “finished” at some point. But it was also a true creative bubble, a playground and experimental space — the kind of project that reconnects you to the simple joy of designing without constraints.
This is the showcase website for Inertia Studios, a London-based creative studio pushing the boundaries of CGI, design, and futuristic aesthetics. Their ambition: create visual experiences that grab you, stop you, and make you feel something real.
Created within Okey Studio, the site adopts a rather sober aesthetic: micro-interactions, smooth transitions, subtle hover effects, large capitals, and solid and well-paced typographic blocks, for a sharp and impactful look — without feeling cold. A true balance between rigor, minimalism, and boldness. I really love the work of Inertia Studios — collaborating on their website redesign was a pure pleasure.
Challenges: Inertia has a strong brand image and an international client portfolio, so it was essential to remain highly professional and perfectly legible. The main challenge was to maintain a “classic” structure in terms of usability (clear information, intuitive navigation) while avoiding boredom by injecting modernity and visual tension.
Karo is an art and clothing brand based in New York, founded by Anya Karolyn. The studio defines itself as: non-traditional, a unification of artwork, fashion, music and video. Anya reached out to Okey Studio to redesign her e-commerce website. I imagined a more artistic, unconventional, and bold version, fully rooted in her aesthetic. The design adopts a brutalist approach, featuring chrome elements — a color and material that Anya particularly loves — as well as touches of electric blue; both emblematic of her visual identity. We loved transcribing the world of Studio Karo through interactive web animations where users become part of the experience.
Challenges: The challenge was definitely to find the right balance between an artistic, highly personal design — with a strong visual aesthetic — and a smooth, intuitive e-commerce experience. The site needed to both reflect Karo’s unique world while allowing users to navigate easily and shop without any friction.
Personal note: I loved working on this project — Anya and I were truly on the same wavelength from the start. She gave me complete trust, and we immediately understood each other about her desires, her objectives, and the creative direction to take. It was a super creative project where I could bring some different, sometimes bolder ideas — and she absolutely loved it. A smooth, inspiring, and freeing collaboration!
Henri Heymans
Henri is a web developer who contacted me to work on the web design for his first portfolio. His goal was clear: to stand out from other developers and try to win a Site of the Day (SOTD) on Awwwards. The site, now updated (2025), is unfortunately no longer online — but I kept a video and visual captures of it.
It featured a brutalist style on a black background. The design played with very large typographic compositions, scale variations, and a horizontal scroll that paced the navigation. The central element of the site was a 3D liquid metal sphere in negative, located on the homepage. It responded to cursor movements, creating a hypnotic effect that anchored the experience in a living material.
Personal note: This was a project where I could explore a bold design with a strong graphic stance. Henri wanted a site that grabs attention — and we had fun creating a showcase unlike any other.
This is my personal website, designed as a creative showcase that reflects both my style and personality. I wanted it to be minimalist in structure, yet fun and human, giving a more intimate glimpse of who I am.
In the loader, Adrien had fun animating the logo with a pixel effect we love — we especially enjoy these kinds of little details. When you arrive on the page, the central feature is a distortion effect applied to the main text, creating a lively and interactive texture.
Since I get bored quickly and like almost every color, I added a “Change the mood” button that lets you modify both the page’s color palette and the welcome GIF in the Hero section. This gives the site an evolving vibe and highlights visual diversity, while adding a playful touch.
It’s not a classic portfolio: no detailed project pages, but rather a personal space where I can present my work in a way that suits me, test ideas, and evolve the site as I please.
Challenges: The real challenge was setting boundaries for myself. When you create for yourself, anything is possible, and I tend to like and try many things. I had to decide: “Okay, this is the direction I choose,” and stick to it until the end.
Thanks to Cédric, videographer, for his awesome work on the video for my showreel.
Background
I studied graphic design in Toulouse, with a final year specializing in web design. I quickly developed a taste for web design and interactive experiences. Right after graduating, I had the opportunity to work directly on web projects as a freelancer — and I decided to fully embark on this adventure.
In 2021, together with Adrien Quéchon, we founded Okey Studio to offer a complete service: custom design and development, hand in hand.
One of the highlights was our very first Site of the Day on Awwwards: after spending my student years admiring other designers’ work on that site, seeing our own work featured there was a true achievement.
Design Philosophy
For me, creating a website means telling a visual story that reflects a brand’s personality. I believe in custom-made solutions, the importance of details, and the idea that a site must be beautiful, functional, high-performing, and designed to stand out, regardless of its complexity.
Tools and Techniques
I use Figma for design and conception, and I love working closely with Adrien on the development side to enhance interactions and brainstorm animation ideas together. I do a lot of creative research and exploration before each project. It’s also essential for me to fully immerse myself in the world of the client or brand I’m working with.
Inspiration
Online, I like to browse sites like Awwwards, CSS Design Awards, FWA, Dribbble, Pinterest, etc. (nothing very original). But I also draw a lot of inspiration from real life: through travel, as well as music, books, and films.
Future Goals
I’d like to keep creating websites that are both creative and tailor-made, with more projects where I have true artistic freedom, or at least plenty of space to propose original ideas. I really enjoy having fun in what I do! And I want to continue refining my work and improving.
Together with Adrien, we would also like to start working on the Okey Studio website — a site that truly reflects who we are and showcases our work and projects. It’s an exciting challenge, but we’ll need to find the time, as projects like this can quickly become a real playground!
Final Thoughts
It’s always a bit tricky to give advice or share a personal message, but I’d simply say: enjoy what you do, have fun, and put your heart into it — it usually comes across in the project 🫶
Thank you so much for reading, and a big thanks to Codrops and Manoela for inviting me to share a glimpse of my world and work.
You can find my contact info on my website clarissemichard.com I also share all my latest projects on social media:
Just a second! 🫷 If you are here, it means that you are a software developer.
So, you know that storage, networking, and domain management have a cost .
If you want to support this blog, please ensure that you have disabled the adblocker for this site. I configured Google AdSense to show as few ADS as possible – I don’t want to bother you with lots of ads, but I still need to add some to pay for the resources for my site.
Thank you for your understanding. – Davide
Duplication is not only about lines of code, but also about data usage and meaning.
Reducing it will help us minimize the impact of every change.
Take this class as an example:
classBookShelf{
private Book[] myBooks = new Book[]
{
new Book(1, "C# in depth"),
new Book(2, "I promessi paperi")
};
publicint Count() => myBooks.Length;
publicbool IsEmpty() => myBooks.Length == 0;
publicbool HasElements() => myBooks.Length > 0;
}
Here, both Count and IsEmpty use the same logical way to check the length of the collection: by calling myBooks.Length.
What happens if you have to change the myBooks collection and replace the array of Books with a collection that does not expose the Length property? You will have to replace the logic everywhere!
So, a better approach is to “centralize” the way to count the items in the collection in this way:
classBookShelf{
private Book[] myBooks = new Book[]
{
new Book(1, "C# in depth"),
new Book(2, "I promessi paperi")
};
publicint Count() => myBooks.Length;
publicbool IsEmpty() => Count() == 0;
publicbool HasElements() => Count() > 0;
}
If you will need to replace the myBooks data type, you will simply have to update the Count method – everything else will be the same.
Also, HasElements and IsEmpty are a logical duplication. If they’re not necessary, you should remove one. Remove the one most used in its negative form: if you find lots of if(!HasElements()), you should consider replacing it with if(IsEmpty()): always prefer the positive form!
Yes, I know, this is an extreme example: it’s too simple. But think of a more complex class or data flow in which you reuse the same logical flow, even if you’re not really using the exact same lines of code.
By duplicating the logic, you will need to write more tests that do the same thing. Also, it may happen that if you found a flaw in your logic, and you fix it in some places and forget to fix it in other methods.
Centralizing it will allow you to build safer code that is easier to test and update.
A simple way to avoid “logical” duplication? Abstract classes!
Well, there are many others… that I expect you to tell me in the comments section!
When two creatives collaborate, the design process becomes a shared stage — each bringing their own strengths, perspectives, and instincts. This project united designer/art director Artem Shcherban and 3D/motion designer Andrew Moskvin to help New York–based scenographer and costume designer Christian Fleming completely reimagine how his work is presented.
What began as a portfolio refresh evolved into a cohesive visual system: a rigorously minimal print catalog, a single-page website concept, and a cinematic 3D visualization. Together, Artem and Andrew shaped an experience that distilled Christian’s theatrical sensibility into clear, atmospheric design across both physical and digital formats.
From here, Artem picks up the story, walking us through how he approached the portfolio’s structure, the visual rules it would live by, and the thinking that shaped both its print and on-screen presence.
Starting the Design Conversation
Christian Fleming is a prominent designer and director based in New York City who works with theaters around the world creating visual spaces for performances. He approached me with a challenge: to update and rethink his portfolio, to make it easy to send out to theater directors and curators. Specifically the print format.
Christian had a pretty clear understanding of what he wanted to show and how it should look: rigid Scandinavian minimalism, extreme clarity of composition, a minimum of elements and a presentation that would be understandable to absolutely anyone – regardless of age, profession or context.
It was important to create a system that would:
be updated regularly (approximately every 3 weeks),
adapt to new projects,
and at the same time remain visually and semantically stable.
There also needed to be an “About Christian” section in the structure, but this too had to fit within a strict framework of visual language.
Designing a Flexible Visual System
I started by carefully analyzing how Christian works. His primary language is visual. He thinks in images, light, texture and composition. So it was important to retain a sense of air and rhythm, but build a clear modular structure that he could confidently work with on his own.
We came up with a simple adaptive system:
it easily adapts to images of different formats,
scalable for everything from PDFs to presentations,
and can be used both digitally and offline.
In the first stages, we tried several structures. However, Christian still felt that there was something missing in the layout – the visuals and logic were in conflict. We discussed which designs he wanted to show openly and which he didn’t. Some works had global reviews and important weight, but could not be shown in all details.
The solution was to divide them into two meaningful blocks:
“Selected Projects”, with full submission, and “Archival Projects”, with a focus on awards, reviews, and context. This approach preserved both structure and tone. The layout became balanced – and Christian immediately responded to this.
After gathering the structure and understanding how it would work, we began creating the design itself and populating it with content. It was important from the start to train Kristan to add content on his own, as there was a lot of project and they change quite often.
One of the key pluses of our work is versatility. Not only could the final file be emailed, but it could also be used as a print publication. This gave Christian the opportunity to give physical copies at meetings, premieres and professional events where tactility and attention to detail are important.
Christian liked the first result, both in the way the system was laid out and the way I approached the task. Then I suggested: let’s update the website as well.
Translating the Portfolio to a Single-Page Site
This phase proved to be the most interesting, and the most challenging.
Although the website looks simple, it took almost 3 months to build. From the very beginning, Christian and I tried to understand why he needed to update the site and how it should work together with the already established portfolio system.
The main challenge was to show the visual side of his projects. Not just text or logos, but the atmosphere, the light, the costumes, the feeling of the scene.
One of the restrictions that Christian set was the requirement to make the site as concise as possible, without a large number of pages, or better to limit it to one, and without unnecessary transitions. It had to be simple, clear and intuitive, but still user-friendly and quite informative. This was a real challenge, given the amount of content that needed to be posted.
Designing with Stage Logic
One of the key constraints that started the work on the site was Christian’s wish: no multiple pages. Everything had to be compact, coherent, clear and yet rich. This posed a special challenge. It was necessary to accommodate a fairly large amount of information without overloading the perception.
I proposed a solution built on a theatrical metaphor: as in a stage blackout, the screen darkens and a new space appears. Each project becomes its own scene, with the user as a spectator — never leaving their seat, never clicking through menus. Navigation flows in smooth, seamless transitions, keeping attention focused and the emotional rhythm intact.
Christian liked the idea, but immediately faced a new challenge: how to fit everything important on one screen:
a short text about him,
social media links and a resume,
the job title and description,
and, if necessary, reviews.
At the same time, the main visual content – photos and videos – had to remain in the center of attention and not overlap with the interface.
Solving the Composition Puzzle
We explored several layouts — from centered titles and multi-level disclosures to diagonal structures and thumbnail navigation. Some looked promising, but they lacked the sense of theatrical rhythm we wanted. The layouts felt crowded, with too much design and not enough air.
The breakthrough came when we shifted focus from pure visuals to structural logic. We reduced each project view to four key elements: minimal information about Christian, the production title with the director’s name, a review (when available), and a button to select the project. Giving each element its own space created a layout that was both clear and flexible, without overloading the screen.
Refining Through Iteration
As with the book, the site went through several iterations:
In the first prototype, the central layout quickly proved unworkable – long play titles and director names didn’t fit on the screen, especially in the mobile version. We were losing scalability and not using all the available space.
In the second version, we moved the information blocks upwards – this gave us a logical hierarchy and allowed us not to burden the center of the screen. The visual focus remained on the photos, and the text did not interfere with the perception of the scenography.
In the third round, the idea of “titles” appeared – a clear typographic structure, where titles are highlighted only by boldness, without changing the lettering. This was in keeping with the overall minimalist aesthetic, and Christian specifically mentioned that he didn’t want to use more than one font or style unless necessary.
We also decided to stylistically separate the reviews from the main description. We italicized them and put them just below. This made it clear what belonged to the author and what was a response to the author’s work.
Bringing Theatrical Flow to Navigation
The last open issue was navigation between projects. I proposed two scenarios:
Navigating with arrows, as if the viewer were leafing through the play scene by scene.
A clickable menu with a list of works for those who want to go directly.
Christian was concerned about the question: wouldn’t the user lose their bearings if they didn’t see the list all the time? We discussed this and came to the conclusion that most visitors don’t come to the site to “look for the right job”. They come to feel the atmosphere and “experience” its theater. So the basic scenario is a consistent browsing experience, like moving through a play. The menu is available, but not in the way – it should not break the effect of involvement.
What We Learned About Theatrical Design
We didn’t build just a website. We built an experience. It is not a digital storefront, but a space that reflects the way Christian works. He is an artist who thinks in the rhythm of the stage, and it was essential not to break that rhythm.
The result is a place where the viewer isn’t distracted; they inhabit it. Navigation, structure, and interface quietly support this experience. Much of that comes from Christian’s clear and thoughtful feedback, which shaped the process at every step. This project is a reminder that even work which appears simple is defined by countless small decisions, each influencing not only how it functions but also the mood it creates from the very beginning.
Extending the Design from Screen to Print
Once the site was complete, a new question emerged: how should this work be presented in the most meaningful way?
The digital format was only part of the answer. We also envisioned a printed edition — something that could be mailed or handed over in person as a physical object. In the theater world, where visual presence and tactility carry as much weight as the idea itself, this felt essential.
We developed a set of layouts, but bringing the catalog to life as intended proved slow. Christian’s schedule with his theater work left little time to finalize the print production. We needed an alternative that could convey not only the design but also the atmosphere and weight of the finished book.
Turning the Book into a Cinematic Object
At this stage, 3D and motion designer Andrew Moskvin joined the project. We shared the brief with him — not just to present the catalog, but to embed it within the theatrical aesthetic, preserving the play of light, texture, air, and mood that defined the website.
Andrew was immediately enthusiastic. After a quick call, he dove into the process. I assembled all the pages of the print version we had, and together we discussed storyboards, perspectives, atmosphere, possible scenes, and materials that could deepen the experience. The goal was more than simply showing the layout — we wanted cinematic shots where every fold of fabric and every spot of light served a single dramaturgy.
The result exceeded expectations. Andrew didn’t just recreate the printed version; he brought it to life. His work was subtle and precise, with a deep respect for context. He captured not only the mood but also the intent behind each spread, giving the book weight, materiality, and presence — the kind we imagined holding in our hands and leafing through in person.
Andrew will share his development process below.
Breaking Down the 3D Process
The Concept
At the very start, I wanted my work to blend fluently in the ideas that were already made. Christian Fleming is a scenographer and costume designer, so the visual system needed to reflect his world. Since the project was deeply rooted in the theatrical aesthetic, my 3D work had to naturally blend into that atmosphere. Artem’s direction played a key role in shaping the unique look envisioned by Christian Fleming — rich with stage-like presence, bold compositions, and intentional use of space. My task was to ensure that the 3D elements not only supported this world, but also felt like an organic extension of it — capturing the same mood, lighting nuances, and visual rhythm that define a theatrical setting.
The Tools
For the entire 3D pipeline, I worked in:
Cinema 4D for modeling and scene setup
Redshift for rendering
After Effects for compositing
Photoshop for color correcting static images
Modeling the Book
The book was modeled entirely from scratch. Me and Artem discussed the form and proportions, and after several iterations, we finalized the design direction. I focused on the small details that bring realism: the curvature of the hardcover spine, beveled edges, the separation between the cover and pages, and the layered structure of the paper block. I also modeled the cloth texture wrapping the spine, giving the book a tactile, fabric-like look. The geometry was built to hold up in close-up shots and fit the theatrical lighting.
Lighting with a Theatrical Eye
Lighting was one of the most important parts of this process. I wanted the scenes to feel theatrical — as if the objects were placed on a stage under carefully controlled spotlights. Using a combination of area lights and spotlights in Redshift, I shaped the lighting to create soft gradients and shadows on the surfaces. The setup was designed to emphasize the geometry without flattening it, always preserving depth and direction. A subtle backlight highlight played a key role in defining the edges and enhancing the overall form.
I think I spent more time on lighting than on modeling, since lighting has always been more experimental for me — even in product scenes.
One small but impactful trick I always use is setting up a separate HDRI map just for reflections. I disable its contribution to diffuse lighting by setting the diffuse value to 0, while keeping reflections at 1. This allows the reflections to pop more without affecting the overall lighting of the scene. It’s a simple setup, but it gives you way more control over how materials respond — especially in stylized or highly art-directed environments.
Building the Materials
When I was creating the materials, I noticed that Artem had used a checkerboard texture for the cover. So I thought — why not take that idea further and implement it directly into the material? I added a subtle bump using a checker texture on the sides and front part of the book.
I also experimented quite a bit with displacement. Initially, I had the idea to make the title metallic, but it felt too predictable. So instead, I went with a white title featuring embossed details, while keeping the checker bump texture underneath.
This actually ties back to the modeling process — for the displacement to work properly, the geometry had to be evenly dense and ready for subdivision.
I created a mask in Photoshop and applied a procedural Gaussian blur using a Smart Object. Without the blur, the displacement looked harsh and unrefined — even a slight blur made a noticeable difference.
The main challenge with using white, as always, was avoiding blown-out highlights. I had to carefully balance the lighting and tweak the material settings to make the title clean and visible without overexposing it.
One of the more unusual challenges in this project was animating the page slide and making the pages differ. I didn’t want the pages to feel too repetitive, but I also didn’t want to create dozens of individual materials for each page. To find a balance, I created two different materials for two pages and made them random inside of the cloner. It was a bit of a workaround — mostly due to limitations inside the Shader switch node — but it worked well enough to create the illusion of variety without significantly increasing the complexity of the setup.
There’s a really useful node in Redshift called Color User Data — especially when working with the MoGraph system to trigger object index values. One of the strangest (and probably least intuitive) things I did in this setup was using a Change Range node to remap those index values properly according to the number of textures I had. With that in place, I built a system that used an index to mix between all the textures inside a Shader Switch node. This allowed me to get true variation across the pages without manually assigning materials to each one.
You might’ve noticed that the pages look a bit too bright for a real-world scenario — and that was actually a deliberate choice. I often use a trick that helps me art-direct material brightness independently of the scene’s lighting. The key node here is Color Correct Node.
Inside it, there’s a parameter called Level. If you set it higher than 1, it increases the overall brightness of the texture output — without affecting shadows or highlights too aggressively. This also works in reverse: if your texture has areas that are too bright (like pure white), lowering the Level value below 1 will tone it down without needing to modify the source texture.
It’s a simple trick, but incredibly useful when you want fine control over how materials react in stylized or theatrical lighting setups.
The red cloth material I used throughout the scene is another interesting part of the project. I wanted it to have a strong tactile feel — something that looks thick, textured, and physically present. To achieve that, I relied heavily on geometry. I used a Redshift Object Tag with Subdivision (under the Geometry tab) enabled to add more detail where it was needed. This helped the cloth catch light properly and hold up in close-up shots.
For the translucent look, I originally experimented with Subsurface Scattering, but it didn’t give me the control I wanted. So instead, I used an Opacity setup driven by a Ramp and Change Range nodes. That gave me just enough falloff and variation to fake the look of light passing through thinner areas of the fabric — and in the end, it worked surprisingly well.
Animating the Pages
This was by far the most experimental part of the project for me. The amount of improvisation — and the complete lack of confidence in what the next frame would be — made the process both fun and flexible.
What you’re about to see might look a bit chaotic, so let me quickly walk you through how it all started.
The simulation started with a subject — in our case, a page. It had to have the proper form, and by that I mean the right typology. Specifically, it needed to consist only of horizontal segments; otherwise, it would bend unevenly under the forces present in the scene. (And yes, I did try versions with even polygons — it got messy.)
I set up all the pages in a Cloner so I could easily adjust any parameters I needed, and added a bit of randomness using a Random Effector.
In the video, you can see a plane on the side that connects to the pages — that was actually the first idea I had when thinking about how to run the simulation. The plane has a Connect tag that links all the pages to it, so when it rotates, they all follow along.
I won’t go into all the force settings — most of them were experimental, and animations like this always require a bit of creative adjustment.
The main force was wind. The pages did want to slide just from the plane with the Connect tag, but I needed to give them an extra push from underneath — that’s where wind came in handy.
I also used a Field Force to move the pages mid-air, from the center outward to the other side.
Probably the most important part was how I triggered the “Mix Animation.” I used a Vertex Map tag on the Cloner to paint a map using a Field, which then drove the Mix Animation parameter in the Cloth tag. This setup made the pages activate one by one, creating a natural, finger-like sliding motion as seen in Video.
Postprocessing
I didn’t go too heavy on post-processing, but there’s one plugin I have to mention — Deep Glow. It gives amazing results. By tweaking the threshold, you can make it react only to the brightest areas, which creates a super clean, glowing effect.
The Final Theatrical Ecosystem
In the end, Christian was delighted with the outcome. Together we had built more than a portfolio — we had created a cohesive theatrical ecosystem. It moved fluidly from digital performance to printed object, from live stage to interface, and from emotion to technology.
The experience is pared back to its essence: no superfluous effects, no unnecessary clicks, nothing to pull focus. What remains is what matters most — the work itself, framed in a way that stays quietly behind the scenes yet comes fully alive in the viewer’s hands and on their screen.