APIs often call other APIs to perform operations. If an error occurs in one of them, how can you understand the context that caused that error? You can use Correlation IDs in your logs!
Table of Contents
Just a second! 🫷 If you are here, it means that you are a software developer.
So, you know that storage, networking, and domain management have a cost .
If you want to support this blog, please ensure that you have disabled the adblocker for this site. I configured Google AdSense to show as few ADS as possible – I don’t want to bother you with lots of ads, but I still need to add some to pay for the resources for my site.
Thank you for your understanding. – Davide
Correlation IDs are values that are passed across different systems to correlate the operations performed during a “macro” operation.
Most of the time they are passed as HTTP Headers – of course in systems that communicate via HTTP.
In this article, we will learn how to log those Correlation IDs using Serilog, a popular library that helps handle logs in .NET applications.
Setting up the demo dotNET project
This article is heavily code-oriented. So, let me first describe the demo project.
Overview of the project
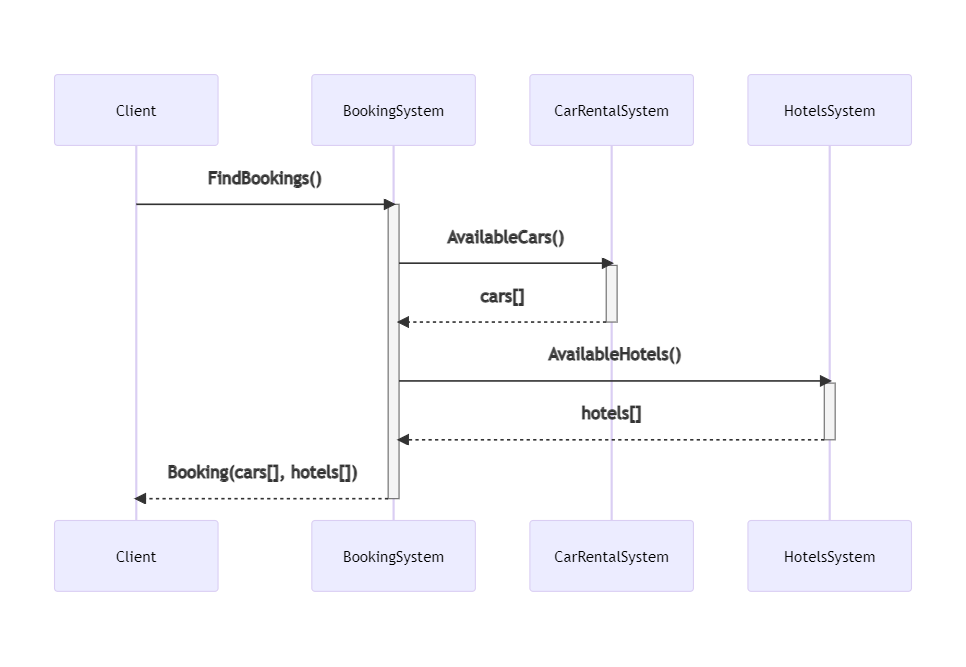
To demonstrate how to log Correlation IDs and how to correlate logs generated by different systems, I’ve created a simple solution that handles bookings for a trip.
The “main” project, BookingSystem, fetches data from external systems by calling some HTTP endpoints; it then manipulates the data and returns an aggregate object to the caller.
BookingSystem depends on two projects, placed within the same solution: CarRentalSystem, which returns data about the available cars in a specified date range, and HotelsSystem, which does the same for hotels.
So, this is the data flow:
If an error occurs in any of those systems, can we understand the full story of the failed request? No. Unless we use Correlation IDs!
Let’s see how to add them and how to log them.
We need to propagate HTTP Headers. You could implement it from scratch, as we’ve seen in a previous article. Or we could use a native library that does it all for us.
Of course, let’s go with the second approach.
For every project that will propagate HTTP headers, we have to follow these steps.
First, we need to install Microsoft.AspNetCore.HeaderPropagation: this NuGet package allows us to add the .NET classes needed to propagate HTTP headers.
Next, we have to update the part of the project that we use to configure our application. For .NET projects with Minimal APIs, it’s the Program class.
Here we need to add the capability to read the HTTP Context, by using
builder.Services.AddHttpContextAccessor();
As you can imagine, this is needed because, to propagate HTTP Headers, we need to know which are the incoming HTTP Headers. And they can be read from the HttpContext object.
Next, we need to specify, as a generic behavior, which headers must be propagated. For instance, to propagate the “my-custom-correlation-id” header, you must add
Since you probably know what’s going on, let me go straight to the point.
Install Serilog Enricher for Correlation IDs
We’re gonna use a specific library to log HTTP Headers treating them as Correlation IDs. To use it, you have to install the Serilog.Enrichers.CorrelationId package available on NuGet.
Therefore, you can simply run
dotnet add Serilog.Enrichers.CorrelationId
to every .NET project that will use this functionality.
Once we have that NuGet package ready, we can add its functionality to our logger by adding this line:
This simple line tells dotnet that, when we see an HTTP Header named “my-custom-correlation-id”, we should log it as a Correlation ID.
Run it all together
Now we have everything in place – it’s time to run it!
We have to run all the 3 services at the same time (you can do it with VisualStudio or you can run them separately using a CMD), and we need to have Seq installed on our local machine.
You will see 3 instances of Swagger, and each instance is running under a different port.
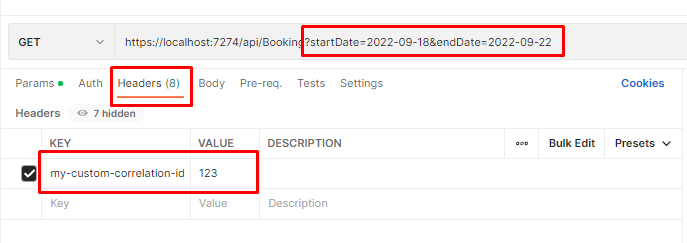
Once we have all the 3 applications up and running, we can call the /Bookings endpoint passing it a date range and an HTTP Header with key “my-custom-correlation-id” and value = “123” (or whatever we want).
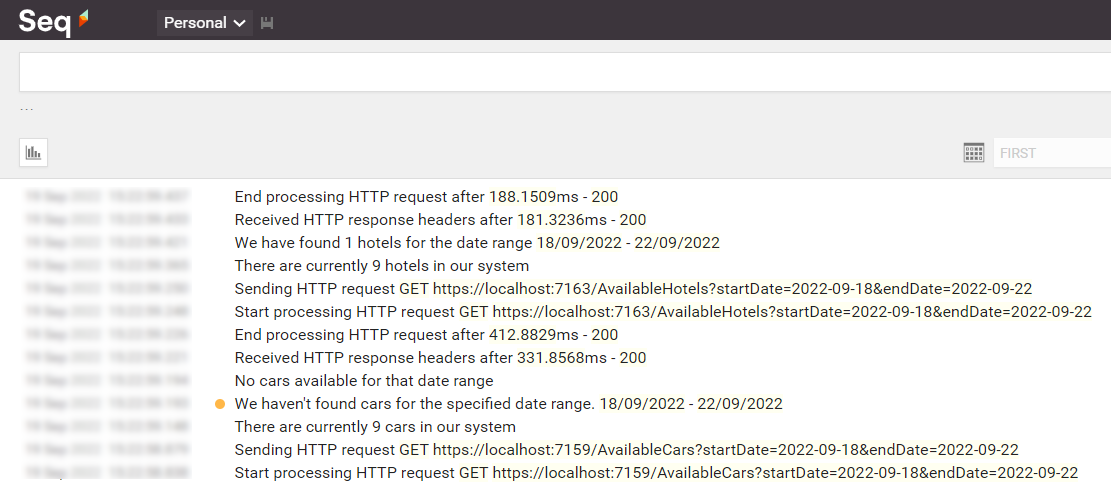
If everything worked as expected, we can open Seq and see all the logs we’ve written in our applications:
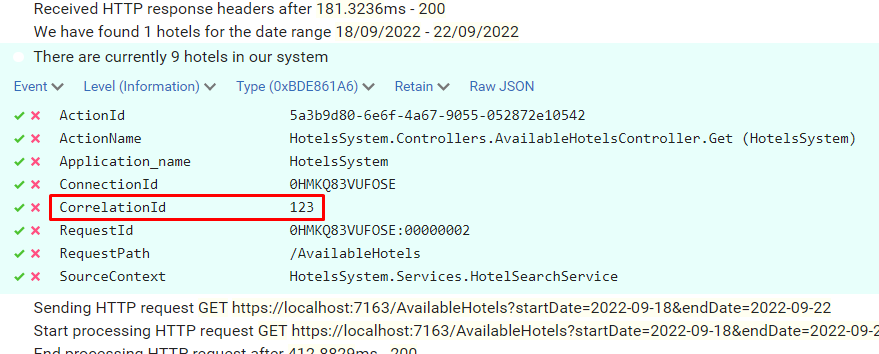
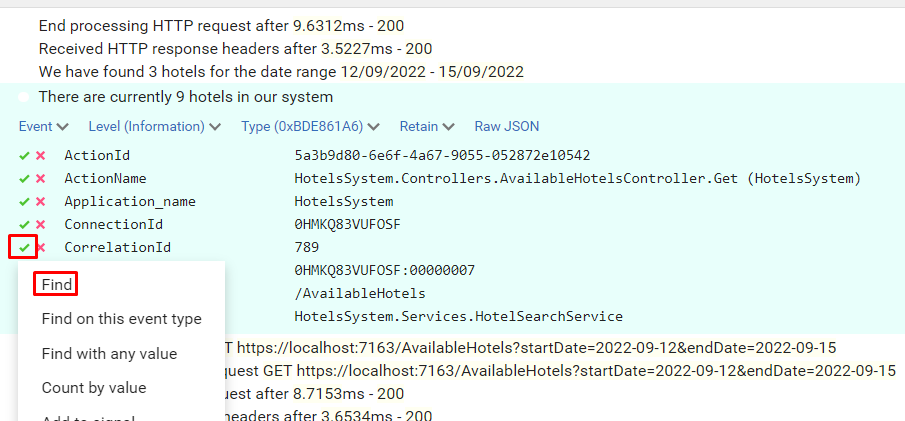
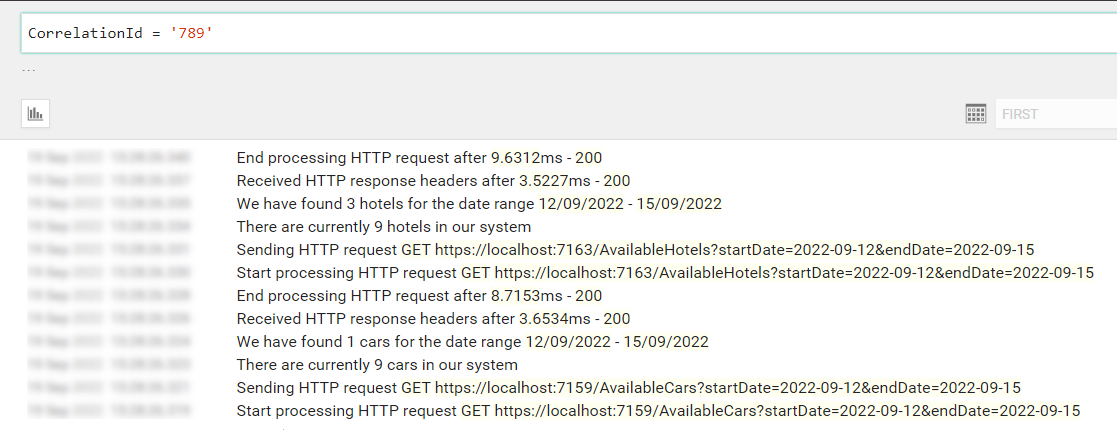
Open one of them and have a look at the attributes of the logs: you will see a CorrelationId field with the value set to “123”.
Now, to better demonstrate how it works, call the endpoint again, but this time set “789” as my-custom-correlation-id, and specify a different date range. You should be able to see another set of logs generated by this second call.
You can now apply filters to see which logs are related to a specific Correlation ID: open one log, click on the tick button and select “Find”.
You will then see all and only logs that were generated during the call with header my-custom-correlation-id set to “789”.
Further readings
That’s it. With just a few lines of code, you can dramatically improve your logging strategy.
For this article, we’ve used the Microsoft.AspNetCore.HeaderPropagation package, which is ready to use. Are you interested in building your own solution – or, at least, learning how you can do that?
This article concludes a sort of imaginary path that taught us how to use Serilog, how to correlate different logs within the same application using Scopes, and how to correlate logs from different services using Correlation IDs.
Using these capabilities, you will be able to write logs that can help you understand the context in which a specific log occurred, thus helping you fix errors more efficiently.
In case of unmanageable error, should you return null or throw exceptions?
Table of Contents
Just a second! 🫷 If you are here, it means that you are a software developer.
So, you know that storage, networking, and domain management have a cost .
If you want to support this blog, please ensure that you have disabled the adblocker for this site. I configured Google AdSense to show as few ADS as possible – I don’t want to bother you with lots of ads, but I still need to add some to pay for the resources for my site.
Thank you for your understanding. – Davide
When you don’t have any fallback operation to manage null values (eg: retry pattern), you should throw an exception instead of returning null.
You will clean up your code and make sure that, if something cannot be fixed, it gets caught as soon as possible.
Don’t return null or false
Returning nulls impacts the readability of your code. The same happens for boolean results for operations. And you still have to catch other exceptions.
Take this example:
bool SaveOnFileSystem(ApiItem item)
{
// save on file systemreturnfalse;
}
ApiItem GetItemFromAPI(string apiId)
{
var httpResponse = GetItem(apiId);
if (httpResponse.StatusCode == 200)
{
return httpResponse.Content;
}
else {
returnnull;
}
}
DbItem GetItemFromDB()
{
// returns the item or nullreturnnull;
}
If all those methods complete successfully, they return an object (DbItem, ApiItem, or true); if they fail, they return null or false.
How can you consume those methods?
void Main()
{
    var itemFromDB = GetItemFromDB();
    if (itemFromDB != null)
    {
        var itemFromAPI = GetItemFromAPI(itemFromDB.ApiId);

        if (itemFromAPI != null)
        {
            bool successfullySaved = SaveOnFileSystem(itemFromAPI);.

            if (successfullySaved)
                Console.WriteLine("Saved");
        }
    }
    Console.WriteLine("Cannot save the item");
}
Note that there is nothing we can do in case something fails. So, do we really need all that nesting? We can do better!
Throw Exceptions instead
Let’s throw exceptions instead:
void SaveOnFileSystem(ApiItem item)
{
// save on file systemthrownew FileSystemException("Cannot save item on file system");
}
ApiItem GetItemFromAPI(string apiId)
{
var httpResponse = GetItem(apiId);
if (httpResponse.StatusCode == 200)
{
return httpResponse.Content;
}
else {
thrownew ApiException("Cannot download item");
}
}
DbItem GetItemFromDB()
{
// returns the item or throws an exceptionthrownew DbException("item not found");
}
Here, each method can complete in two statuses: it either completes successfully or it throws an exception of a type that tells us about the operation that failed.
We can then consume the methods in this way:
void Main()
{
    try
    {
        var itemFromDB = GetItemFromDB();
        var itemFromAPI = GetItemFromAPI(itemFromDB.ApiId);
        SaveOnFileSystem(itemFromAPI);
        Console.WriteLine("Saved");
    }
    catch(Exception ex)
    {
        Console.WriteLine("Cannot save the item");
    }

}
Now the reader does not have to spend time reading the nested operations, it’s all more linear and immediate.
Conclusion
Remember, this way of writing code should be used only when you cannot do anything if an operation failed. You should use exceptions carefully!
Now, a question for you: if you need more statuses as a return type of those methods (so, not only “success” and “fail”, but also some other status like “partially succeeded”), how would you transform that code?
In this article, I will show you two simple tricks that help me understand the deployment status of my .NET APIs
Table of Contents
Just a second! 🫷 If you are here, it means that you are a software developer.
So, you know that storage, networking, and domain management have a cost .
If you want to support this blog, please ensure that you have disabled the adblocker for this site. I configured Google AdSense to show as few ADS as possible – I don’t want to bother you with lots of ads, but I still need to add some to pay for the resources for my site.
Thank you for your understanding. – Davide
When I create Web APIs with .NET I usually add two “secret” endpoints that I can use to double-check the status of the deployment.
I generally expose two endpoints: one that shows me some info about the current environment, and another one that lists all the application settings defined after the deployment.
In this article, we will see how to create those two endpoints, how to update the values when building the application, and how to hide those endpoints.
Project setup
For this article, I will use a simple .NET 6 API project. We will use Minimal APIs, and we will use the appsettings.json file to load the application’s configuration values.
Since we are using Minimal APIs, you will have the endpoints defined in the Main method within the Program class.
To expose an endpoint that accepts the GET HTTP method, you can write
That’s all you need to know about .NET Minimal APIs for the sake of this article. Let’s move to the main topics ⏩
How to show environment info in .NET APIs
Let’s say that your code execution depends on the current Environment definition. Typical examples are that, if you’re running on production you may want to hide some endpoints otherwise visible in the other environments, or that you will use a different error page when an unhandled exception is thrown.
Once the application has been deployed, how can you retrieve the info about the running environment?
Here we go:
app.MapGet("/env", async context =>
{
    IWebHostEnvironment? hostEnvironment = context.RequestServices.GetRequiredService<IWebHostEnvironment>();
    var thisEnv = new
    {
        ApplicationName = hostEnvironment.ApplicationName,
        Environment = hostEnvironment.EnvironmentName,
    };

    var jsonSerializerOptions = new JsonSerializerOptions { WriteIndented = true };
    await context.Response.WriteAsJsonAsync(thisEnv, jsonSerializerOptions);
});
This endpoint is quite simple.
The context variable, which is of type HttpContext, exposes some properties. Among them, the RequestServices property allows us to retrieve the services that have been injected when starting up the application. We can then use GetRequiredService to get a service by its type and store it into a variable.
💡 GetRequiredService throws an exception if the service cannot be found. On the contrary, GetService returns null. I usually prefer GetRequiredService, but, as always, it depends on what you’re using it.
Then, we create an anonymous object with the information of our interest and finally return them as an indented JSON.
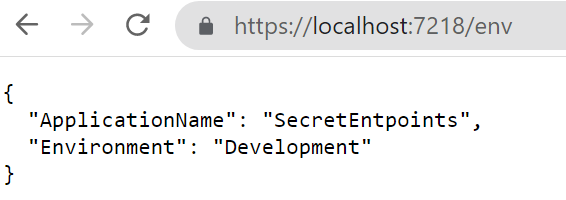
It’s time to run it! Open a terminal, navigate to the API project folder (in my case, SecretEndpoint), and run dotnet run. The application will compile and start; you can then navigate to /env and see the default result:
How to change the Environment value
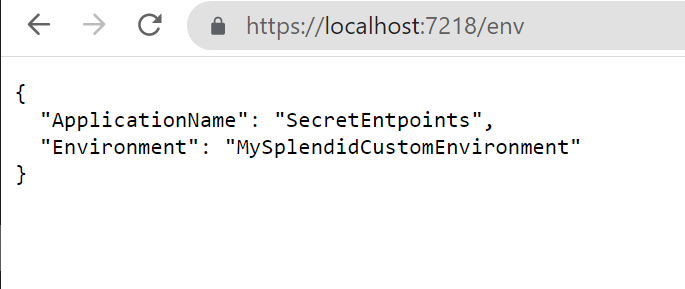
While the applicationName does not change – it is the name of the running assembly, so any other value will make stop your application from running – you can (and, maybe, want to) change the Environment value.
When running the application using the command line, you can use the --environment flag to specify the Environment value.
So, running
dotnet run --environment MySplendidCustomEnvironment
will produce this result:
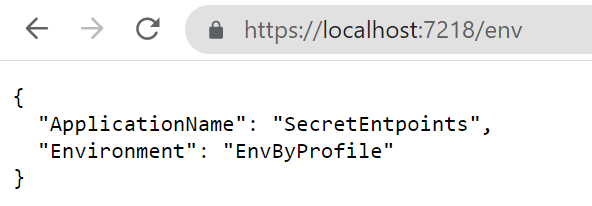
There’s another way to set the environment: update the launchSettings.json and run the application using Visual Studio.
To do that, open the launchSettings.json file and update the profile you are using by specifying the Environment name. In my case, the current profile section will be something like this:
As you can see, the ASPNETCORE_ENVIRONMENT variable is set to EnvByProfile.
If you run the application using Visual Studio using that profile you will see the following result:
How to list all the configurations in .NET APIs
In my current company, we deploy applications using CI/CD pipelines.
This means that final variables definition comes from the sum of 3 sources:
the project’s appsettings file
the release pipeline
the deployment environment
You can easily understand how difficult it is to debug those applications without knowing the exact values for the configurations. That’s why I came up with these endpoints.
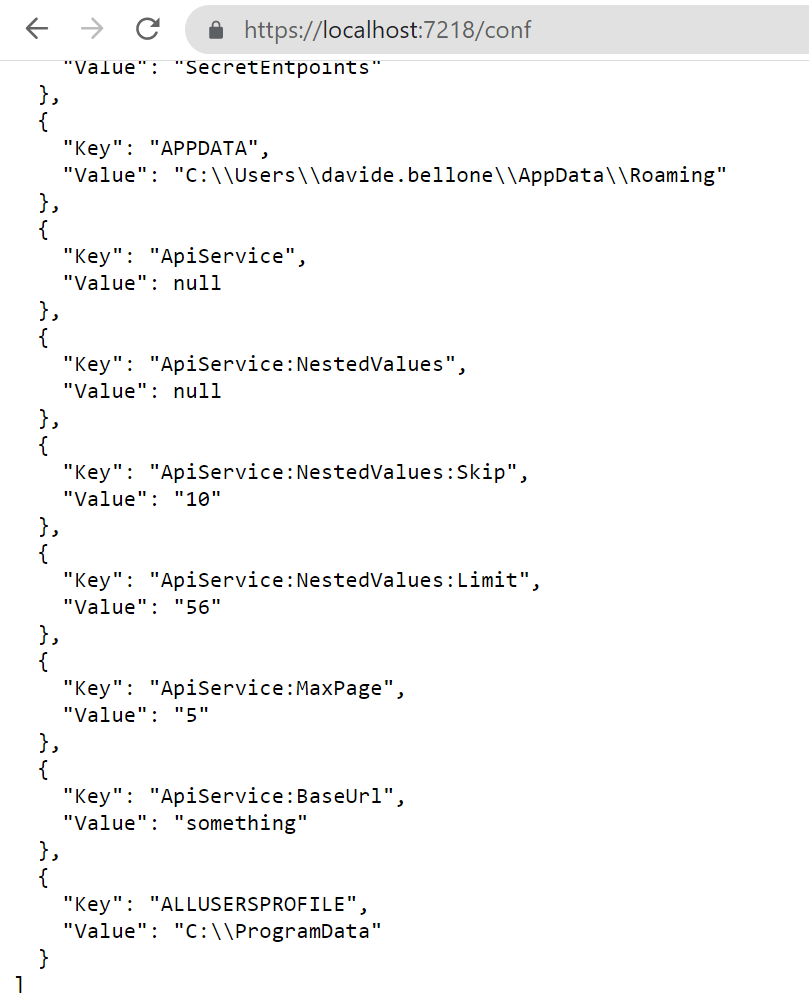
To print all the configurations, we’re gonna use an approach similar to the one we’ve used in the previous example.
What’s going on? We are retrieving the IConfiguration object, which contains all the configurations loaded at startup; then, we’re listing all the configurations as key-value pairs, and finally, we’re returning the list to the client.
As an example, here’s my current appsettings.json file:
That endpoint shows a lot more than you can imagine: take some time to have a look at those configurations – you’ll thank me later!
How to change the value of a variable
There are many ways to set the value of your variables.
The most common one is by creating an environment-specific appsettings file that overrides some values.
So, if your environment is called “EnvByProfile”, as we’ve defined in the previous example, the file will be named appsettings.EnvByProfile.json.
There are actually some other ways to override application variables: we will learn them in the next article, so stay tuned! 😎
3 ways to hide your endpoints from malicious eyes
Ok then, we have our endpoints up and running, but they are visible to anyone who correctly guesses their addresses. And you don’t want to expose such sensitive info to malicious eyes, right?
There are, at least, 3 simple values to hide those endpoints:
Use a non-guessable endpoint: you can use an existing word, such as “housekeeper”, use random letters, such as “lkfrmlvkpeo”, or use a Guid, such as “E8E9F141-6458-416E-8412-BCC1B43CCB24”;
Specify a key on query string: if that key is not found or it has an invalid value, return a 404-not found result
Use an HTTP header, and, again, return 404 if it is not valid.
Both query strings and HTTP headers are available in the HttpContext object injected in the route definition.
Now it’s your turn to find an appropriate way to hide these endpoints. How would you do that? Drop a comment below 📩
✒ Edit 2022-10-10: I thought it was quite obvious, but apparently it is not: these endpoints expose critical information about your applications and your infrastructure, so you should not expose them unless it is strictly necessary! If you have strong authentication in place, use it to secure those endpoints. If you don’t, hide those endpoints the best you can, and show only necessary data, and not everything. Strip out sensitive content. And, as soon as you don’t need that info anymore, remove those endpoints (comment them out or generate them only if a particular flag is set at compilation time). Another possible way is by using feature flags. In the end, take that example with a grain of salt: learn that you can expose them, but keep in mind that you should not expose them.
Further readings
We’ve used a quite new way to build and develop APIs with .NET, called “Minimal APIs”. You can read more here:
If you are not using Minimal APIs, you still might want to create such endpoints. We’ve talked about accessing the HttpContext to get info about the HTTP headers and query string. When using Controllers, accessing the HttpContext requires some more steps. Here’s an article that you may find interesting:
Hey there. My name is Julie Marting, and I’m a Paris-based designer. Focusing on concept, interactivity, and 3D, I’ve been working on these subjects at Hervé Studio for a few years now, with occasional freelance projects when something cool comes my way.
The types of projects I work on revolve around interactive and immersive experiences. From a landing page with interactive elements to a virtual immersive exhibition, or interactive user journeys within applications, my goal is to enhance the user experience by evoking emotions that encourage them to explore or use a service.
Featured work
Madbox
Madbox is a mobile game publisher creating fun, small games with simple gameplay that anyone can enjoy. Our mission was to create a website that reflected their image: playful, innovative, full of references and surprises that delight users, and also one that would make people want to join their team. (And obviously, with a mobile first approach.)
If you are curious, you will be intrigued by the hot-air balloon traveling through the hero section: it takes you on a test to see if you would be a good fit to join the Madbox team.
Personal Notes
This was the first project I worked on when I joined Hervé in 2021, and it’s still one of my favorites. We had so much fun coming up with concepts, interactions, animations, and easter eggs to add to this joyful design. It was a pleasure working with the clients, and a great collaboration with the developers, who were very proactive in making the experience as good as possible.
Fruitz is a French dating app that uses fruits to categorize what you’re looking for: one-night stands, casual matches, serious relationships… While the service is only available through the app, the clients still wanted a playful and interactive landing page for curious visitors. That’s where our adventure began!
To echo the tags and labels used on dating apps, we chose to explore an artistic direction centered around stickers. This also allowed us to highlight the puns that Fruitz loves to use in its communication campaigns.
Personal Notes
This project was a great opportunity to develop a new style for Fruitz’s communication, based on their brand guidelines but with some freedom to explore playful new visuals. It’s also always interesting to come up with a concept for a simple landing page with limited content. It has to catch the eye and delight users, without being “too much”.
For the Vivatech event, the LVMH group needed to create a virtual showcase of its brands’ latest innovations. On this occasion, I teamed up with Cosmic Shelter to create “The Showroom”, an immersive experience where you can discover the stories and the technological advances of the best Maisons, through an imaginary world.
Personal Notes
Aside from the art direction, which I really enjoyed, I found it very interesting to work as a freelancer for another digital agency. Although we share similar processes and methods, everyone works differently, so it’s always instructive to exchange ideas. Working as a freelancer on a specific part of a project (in this case, 3D art direction) and working as a designer within a studio with multiple roles on the same project are two very different experiences, both of which are incredibly enriching to explore.
365, A Year Of Cartier
Every year, Cartier publishes a magazine showcasing their key actions over the past 12 months. For two years in a row, they asked us at Hervé Studio to create a digital version of the magazine.
The goal was to bring together 29 articles across 6 chapters around a central navigation system, ensuring that users wouldn’t miss anything, and especially the 6 immersive articles we developed further.
Personal Notes
The challenge on this project was the tight deadline in relation to the complexity of the experiments and the creative intentions we wanted to bring to them. We were a small team, so we had to stay organized and work quickly, but in the end it was a real pleasure to see all these experiments come to life.
For the end-of-year celebrations, Lacoste wanted to promote the customization feature of their polo shirts. We were asked at Hervé Studio to design a short video highlighting this feature and its various possibilities.
Personal notes
This really cool project, despite its short deadline, was a great opportunity to explore the physics effects in Cinema 4D, which I wasn’t very familiar with. It was important to develop a storytelling approach around the creation of a unique polo, and I’m proud of the result we managed to achieve for this two-week project.
Background & Career highlights
As interactive design is a recent and niche field, I began my studies in graphic design without knowing it even existed. It was at Gobelins that I discovered and fell in love with this specialty, and I went on to enroll in a master’s degree in interactive design. The main strength of this school was the sandwich course, which allowed me to start my first job at a very young age. After working for a bespoke industrial design studio, a ready-to-wear brand, and a digital agency, I finally joined Hervé Studio over four years ago.
We were a small team with a human spirit, which gave me the opportunity to quickly take on responsibilities for projects of various sizes.
We’ve grown and evolved, winning over new clients and new types of projects. We were eventually invited to give a talk at the Paris Design Meetup organized by Algolia and Jitter, and later at the OFFF Vienna festival. There, we shared our experience on the following topic: “WebGL for Interactivity: From Concept to Production”. The idea was to demystify the use of this technology, highlight the possibilities it opens up for designers, and explain our workflow and collaboration with developers to move forward together on a shared project.
Talk at the OFFF Vienna Festival with the co-founders of Hervé Studio: Romain Briaux and Vincent Jouty
Design Philosophy
I am convinced that in this overwhelming world, design can bring us meaning and calm. In my approach, I see it as a way to transport people into a world beyond the ordinary. Immersing users, capturing their attention, and offering them a moment of escape while conveying a message is what I aspire to.
Injecting meaning into projects is a leitmotif. It’s obviously not enough to create something beautiful; it’s about creating something tailor-made that holds meaning for users, clients, and ourselves.
Interactive design enables us to place the user at the center of the experience, making them an active participant rather than just a reader of information or a potential consumer. Moreover, interactive design can sometimes evoke emotions and create lasting memories. For these reasons, this specialty feels like a powerful medium for expression and exchange, because that’s what it’s all about.
Tools & Technics
A pencil and some paper: inherent to creation
Figma: to gather and create
Cinema 4D + Octane render: to let the magic happen
But I would say the best tool is communication, within the team and with developers, to understand how we can work better together, which techniques to use, and how to achieve a smoother workflow and a stunning result.
Inspiration
We’re lucky to have many platforms to find inspiration today, but I would say my main source of inspiration comes from life itself, everything that crosses our path at any given moment. Staying open to what surrounds us, observing, and focusing our attention on things that catch our eye or raise questions. It can be visual (static or moving), a sensation, a feeling, a moment, an action, a concept, a sentence, an idea, anything we’re sensitive to.
And if we get inspired by something and need to take some notes or sketch it, no matter how accurate the result is, the important thing is to catch the inspiration and explore all around. This is why I like to do some photography in my spare time, or other accessible crafts like painting on objects, nude drawing sessions, or creating little jewels out of nowhere. These activities are very invigorating and allow us to take a break from our hectic lives.
Future goals
My main goal is to finally start working on my portfolio. Like many designers, I’ve always postponed this moment, relying on platforms like Behance to showcase my projects. But there comes a time when it’s important to have an online presence, a professional storefront that evolves with us over time.
Final Thoughts
Don’t pay too much attention to negative minds. Believe in yourself, stick to what you like, explore and try without worrying about rules or expectations. Make mistakes and don’t blame yourself for them. On the contrary, failures can sometimes lead to good surprises, or at least valuable lessons. Above all, listen to yourself and find the right balance between creating and taking time to breathe. Enjoying yourself is essential.
Contact
Thank you very much for your reading, and feel free to reach out if interested in anything, I would be happy to discuss!
DRY is a fundamental principle in software development. Should you apply it blindly?
Table of Contents
Just a second! 🫷 If you are here, it means that you are a software developer.
So, you know that storage, networking, and domain management have a cost .
If you want to support this blog, please ensure that you have disabled the adblocker for this site. I configured Google AdSense to show as few ADS as possible – I don’t want to bother you with lots of ads, but I still need to add some to pay for the resources for my site.
Thank you for your understanding. – Davide
You’ve probably heard about the DRY principle: Don’t Repeat Yourself.
Does it really make sense? Not always.
When to DRY
Yes, you should not repeat yourself if there is some logic that you can reuse. Take this simple example:
publicclassPageExistingService{
publicasync Task<string> GetHomepage()
{
string url = "https://www.code4it.dev/";
var httpClient = new HttpClient();
var result = await httpClient.GetAsync(url);
if (result.IsSuccessStatusCode)
{
returnawait result.Content.ReadAsStringAsync();
}
return"";
}
publicasync Task<string> GetAboutMePage()
{
string url = "https://www.code4it.dev/about-me";
var httpClient = new HttpClient();
var result = await httpClient.GetAsync(url);
if (result.IsSuccessStatusCode)
{
returnawait result.Content.ReadAsStringAsync();
}
return"";
}
}
As you can see, the two methods are almost identical: the only difference is with the page that will be downloaded.
pss: that’s not the best way to use an HttpClient! Have a look at this article
Now, what happens if an exception is thrown? You’d better add a try-catch to handle those errors. But, since the logic is repeated, you have to add the same logic to both methods.
That’s one of the reasons you should not repeat yourself: if you had to update a common functionality, you have to do that in every place it is used.
You can then refactor these methods in this way:
publicclassPageExistingService{
public Task<string> GetHomepage() => GetPage("https://www.code4it.dev/");
public Task<string> GetAboutMePage() => GetPage("https://www.code4it.dev/about-me");
privateasync Task<string> GetPage(string url)
{
var httpClient = new HttpClient();
var result = await httpClient.GetAsync(url);
if (result.IsSuccessStatusCode)
{
returnawait result.Content.ReadAsStringAsync();
}
return"";
}
}
Now both GetHomepage and GetAboutMePage use the same logic defined in the GetPage method: you can then add the error handling only in one place.
When NOT to DRY
This doesn’t mean that you have to refactor everything without thinking of the meanings.
You should not follow the DRY principle when
the components are not referring to the same context
the components are expected to evolve in different ways
The two points are strictly related.
A simple example is separating the ViewModels and the Database Models.
Say that you have a CRUD application that handles Users.
Both the View and the DB are handling Users, but in different ways and with different purposes.
We might have a ViewModelUser class used by the view (or returned from the APIs, if you prefer)
classViewModelUser{
publicstring Name { get; set; }
publicstring LastName { get; set; }
public DateTime RegistrationDate {get; set; }
}
and a DbUser class, similar to ViewModelUser, but which also handles the user Id.
classDbUser{
publicint Id { get; set; }
publicstring Name { get; set; }
publicstring LastName { get; set; }
public DateTime RegistrationDate {get; set; }
}
If you blinldy follow the DRY principle, you might be tempted to only use the DbUser class, maybe rename it as User, and just use the necessary fields on the View.
Another step could be to create a base class and have both models inherit from that class:
publicabstractclassUser{
publicstring Name { get; set; }
publicstring LastName { get; set; }
public DateTime RegistrationDate {get; set; }
}
classViewModelUser : User
{
}
classDbUser : User
{
publicint Id { get; set; }
}
Sounds familiar?
Well, in this case, ViewModelUser and DbUser are used in different contexts and with different purposes: showing the user data on screen and saving the user on DB.
What if, for some reason, you must update the RegistrationDate type from DateTime to string? That change will impact both the ViewModel and the DB.
There are many other reasons this way of handling models can bring more troubles than benefits. Can you find some? Drop a comment below 📧
The solution is quite simple: duplicate your code.
In that way, you have the freedom to add and remove fields, add validation, expose behavior… everything that would’ve been a problem to do with the previous approach.
Of course, you will need to map the two data types, if necessary: luckily it’s a trivial task, and there are many libraries that can do that for you. By the way, I prefer having 100% control of those mappings, also to have the flexibility of changes and custom behavior.
Further readings
DRY implies the idea of Duplication. But duplication is not just “having the same lines of code over and over”. There’s more:
In the ever-evolving cybersecurity landscape, attackers constantly seek new ways to bypass traditional defences. One of the latest and most insidious methods involves using Scalable Vector Graphics (SVG)—a file format typically associated with clean, scalable images for websites and applications. But beneath their seemingly harmless appearance, SVGs can harbour threatening scripts capable of executing sophisticated phishing attacks.
This blog explores how SVGs are weaponized, why they often evade detection, and what organizations can do to protect themselves.
SVGs: More Than Just Images
SVG files differ fundamentally from standard image formats like JPEG or PNG. Instead of storing pixel data, SVGs use XML-based code to define vector paths, shapes, and text. This makes them ideal for responsive design, as they scale without losing quality. However, this same structure allows SVGs to contain embedded JavaScript, which can execute when the file is opened in a browser—something that happens by default on many Windows systems.
Delivery
Email Attachments: Sent via spear-phishing emails with convincing subject lines and sender impersonation.
Cloud Storage Links: Shared through Dropbox, Google Drive, OneDrive, etc., often bypassing email filters.
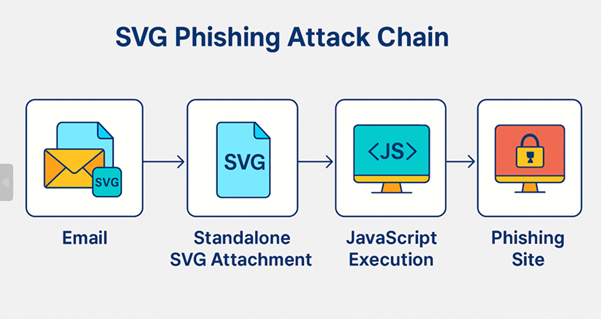
Fig:1 Attack chain of SVG campaign
The image illustrates the SVG phishing attack chain in four distinct stages: it begins with an email containing a seemingly harmless SVG attachment, which, when opened, triggers JavaScript execution in the browser, ultimately redirecting the user to a phishing site designed to steal credentials.
How the attack works:
When a target receives an SVG attachment and opens an email, the file typically launches in their default web browser—unless they have a specific application set to handle SVG files—allowing any embedded scripts to execute immediately.
Fig2: Phishing Email of SVG campaign
Attackers commonly send phishing emails with deceptive subject lines like “Reminder for your Scheduled Event 7212025.msg” or “Meeting-Reminder-7152025.msg”, paired with innocuous-looking attachments named “Upcoming Meeting.svg” or “Your-to-do-List.svg” to avoid raising suspicion. Once opened, the embedded JavaScript within the SVG file silently redirects the victim to a phishing site that closely mimics trusted services like Microsoft 365 or Google Workspace. As shown in fig.
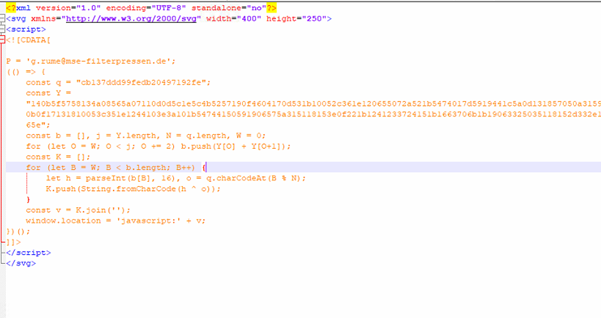
Fig3: Malicious SVG code.
In the analyzed SVG sample, the attacker embeds a <script> tag within the SVG, using a CDATA section to hide malicious logic. The code includes a long hex-encoded string (Y) and a short XOR key (q), which decodes into a JavaScript payload when processed. This decoded payload is then executed using window.location = ‘javascript:’ + v;, effectively redirecting the victim to a phishing site upon opening the file. An unused email address variable (g.rume@mse-filterpressen.de) is likely a decoy or part of targeted delivery.
Upon decryption, we found the c2c phishing link as
hxxps://hju[.]yxfbynit[.]es/koRfAEHVFeQZ!bM9
Fig4: Cloudflare CAPTCHA gate
The link directs to a phishing site protected by a Cloudflare CAPTCHA gate. After you check the box to verify, you’re human then you’re redirected to a malicious page controlled by the attackers.
Fig5: Office 365 login form
This page embeds a genuine-looking Office 365 login form, allowing the phishing group to capture and validate your email and password credentials simultaneously.
Conclusion: Staying Ahead of SVG-Based Threats
As attackers continue to innovate, organizations must recognize the hidden risks in seemingly benign file formats like SVG. Security teams should:
Implement deep content inspection for SVG files.
Disable automatic browser rendering of SVGs from untrusted sources.
Educate employees about the risks of opening unfamiliar attachments.
Monitor for unusual redirects and script activity in email and web traffic.
SVGs may be powerful tools for developers, but in the wrong hands, they can become potent weapons for cybercriminals. Awareness and proactive defense are key to staying ahead of this emerging threat.
Every application relies on some configurations. Many devs set them up using only the appsettings file. But there’s more!
Table of Contents
Just a second! 🫷 If you are here, it means that you are a software developer.
So, you know that storage, networking, and domain management have a cost .
If you want to support this blog, please ensure that you have disabled the adblocker for this site. I configured Google AdSense to show as few ADS as possible – I don’t want to bother you with lots of ads, but I still need to add some to pay for the resources for my site.
Thank you for your understanding. – Davide
Needless to say, almost every application needs to deal with some configurations. There are tons of use cases, and you already have some of them in mind, don’t you?
If you’re working with .NET, you’ve probably already used the appsettings.json file. It’s a good starting point, but it may be not enough in the case of complex applications (and complex deployments).
In this article, we will learn some ways to set configurations in a .NET API application. We will use the appsettings file, of course, and some other ways such as the dotnet CLI. Let’s go! 🚀
Project setup
First things first: let’s set up the demo project.
I have created a simple .NET 6 API application using Minimal APIs. This is my whole application (yes, less than 50 lines!)
In short, I scaffold the WebApplicationBuilder, configure that I want to map the settings section with root named RootConfig to my class of type MyRootConfig, and then run the application.
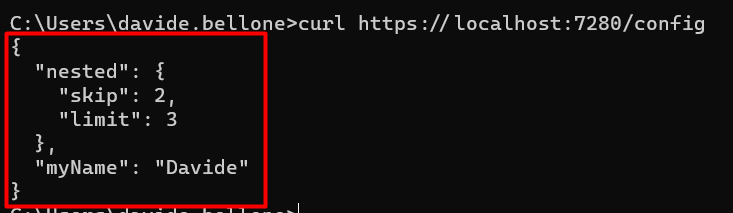
I then expose a single endpoint, /config, which returns the current configurations, wrapped within an IOptionsSnapshot<MyRootConfig> object.
Where is the source of the application’s configurations?
As stated on the Microsoft docs website, here 🔗, the WebApplicationBuilder…
Loads app configuration in the following order from:
appsettings.json.
appsettings.{Environment}.json.
User secrets when the app runs in the Development environment using the entry assembly.
Environment variables.
Command-line arguments.
So, yeah, we have several possible sources, and the order does matter.
Let’s see a bunch of them.
Define settings within the appsetting.json file
The most common way is by using the appsettings.json file. Here, in a structured and hierarchical way, you can define all the logs used as a baseline for your application.
With this file, all the fields within the RootConfig element will be mapped to the MyRootConfig class at startup. That object can then be returned using the /config endpoint.
Running the application (using Visual Studio or the dotnet CLI) you will be able to call that endpoint and see the expected result.
Use environment-specific appsettings.json
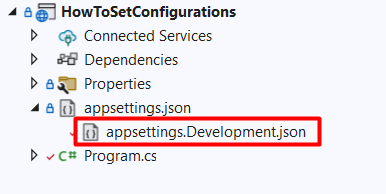
Now, you probably know that you can use other appsettings files with a name such as appsettings.Development.json.
With that file, you can override specific configurations using the same structure, but ignoring all the configs that don’t need to be changed.
Let’s update the Limit field defined in the “base” appsettings. You don’t need to recreate the whole structure just for one key; you can use this JSON instead:
{
  "RootConfig": {
    "Nested": {
      "Limit": 9
    }
  }
}
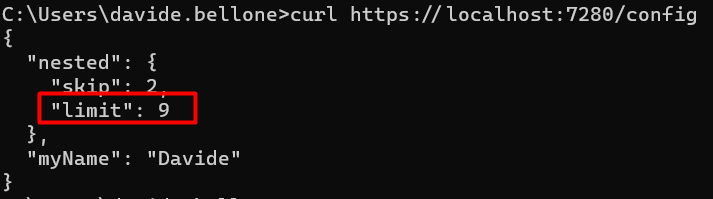
Now, if we run the application using VS we will see this result:
Ok, but what made .NET understand that I wanted to use that file?? It’s a matter of Environment variables and Launch profiles.
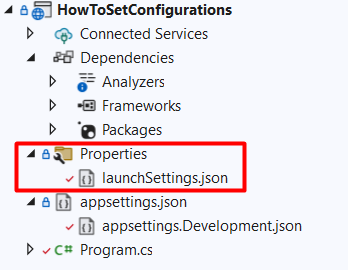
How to define profiles within the launchSettings.json file
Within the Properties folder in your project, you can see a launchSettings.json file. As you might expect, that file describes how you can launch the application.
Here we have some Launch profiles, and each of them specifies an ASPNETCORE_ENVIRONMENT variable. By default, its value is set to Development.
Now, recall that the environment-specific appsettings file name is defined as appsettings.{Environment}.json. Therefore, by running your application with Visual Studio using the HowToSetConfigurations launch profile, you’re gonna replace that {Environment} with Development, thus using the appsettings.Development.json.
Ça va sans dire that you can use every value you prefer – such as Staging, MyCustomEnvironmentName, and so on.
How to define the current Environment with the CLI
If you are using the dotnet CLI you can set that environment variable as
dotnet run --ASPNETCORE_ENVIRONMENT=Development
or, in a simpler way, you can use
dotnet run --environment Development
and get the same result.
How do nested configurations get resolved?
As we’ve seen in a previous article, even if we are using configurations defined in a hierarchical structure, in the end, they are transformed into key-value pairs.
so that, when I run the application using that profile, I will get this result:
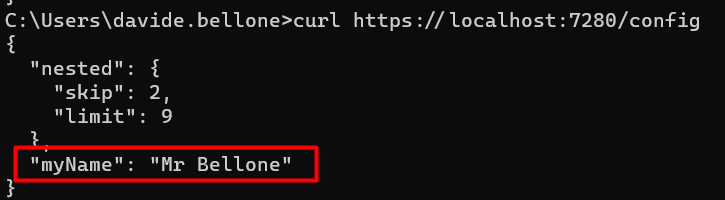
Have you noticed the key RootConfig:MyName? 😉
🔎 Notice that now we have both MyName = Mr Bellone, as defined in the lauchSettings file, and Limit = 9, since we’re still using the appsettings.Development.json file (because of that “ASPNETCORE_ENVIRONMENT”: “Development” ).
How to define the current profile with the CLI
Clearly, we can use the dotnet CLI to load the whole environment profile. We just need to specify it using the --launch-profile flag:
dotnet run --launch-profile=HowToSetConfigurations
Define application settings using the dotnet CLI
Lastly, we can specify config values directly using the CLI.
It’s just a matter of specifying the key-value pairs as such:
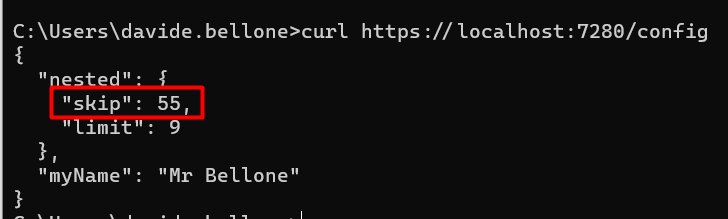
dotnet run --RootConfig:Nested:Skip=55
And – TAH-DAH! – you will see this result:
❓ A question for you! Notice that, even though I specified only the Skip value, both Limit and MyName have the value defined before. Do you know why it happens? Drop a message below if you know the answer! 📩
Further readings
As always, there’s more!
If you want to know more about how dotNET APIs load and start, you should have a look at this page:
Aether 1 began as an internal experiment at OFF+BRAND: Could we craft a product‑launch site so immersive that visitors would feel the sound?
The earbuds themselves are fictional, but every pixel of the experience is real – an end‑to‑end sandbox where our brand, 3D, and engineering teams pushed WebGL, AI‑assisted tooling, and narrative design far beyond a typical product page.
This technical case study is the living playbook of that exploration. Inside you’ll find:
3D creation workflow – how we sculpted, animated, and optimised the earphones and their charging case.
Interactive WebGL architecture – the particle flow‑fields, infinite scroll, audio‑reactive shaders, and custom controllers that make the site feel alive.
Performance tricks – GPU‑friendly materials, faux depth‑of‑field, selective bloom, and other tactics that kept the project running at 60 FPS on mobile hardware.
Tool stack & takeaways – what worked, what didn’t, and why every lesson here can translate to your own projects.
Whether you’re a developer, designer, or producer, the next sections unpack the decisions, experiments, and hard‑won optimizations that helped us prove that “sound without boundaries” can exist on the web.
1. 3D Creation Workflow
By Celia Lopez
3D creation of the headphone and case
For the headphone shape, we needed to create one from scratch. To help ourselves quickly sketch out the ideas we had in mind, we used Midjourney. Thanks to references from the internet and the help of AI, we agreed on an artistic direction.
Size reference and headphone creation
To ensure the size matched a real-life reference, we used Apple headphones and iterated until we found something interesting. We used Figma to present all the iterations to the team, exporting three images – front, side, and back – each time to help them better visualize the object.
Same for the case.
Storyboard
For the storyboard, we first sketched our ideas and tried to match each specific scene with a 3D visualization.
We iterated for a while before finalizing the still frames for each part. Some parts were too tricky to represent in 3D, so we adjusted the workflow accordingly.
Motion
So that everyone agrees on the flow, look, and feel, we created a full-motion version of it.
Unwrapping and renaming
To prepare the scene for a developer, we needed to spend some time unwrapping the UVs, cleaning the file, and renaming the elements. We used C4D exclusively for unwrapping since the shapes weren’t too complex. It’s also very important to rename all parts and organize the file so the developer can easily recognize which object is which. (In the example below, we show the technique – not the full workflow or a perfect unwrap.)
Fluid flow baked
Almost all the animations were baked from C4D to Blender and exported as .glb files.
Timing
We decided to start with an infinite scroll and a looped experience. When the user releases the scroll, seven anchors subtly and automatically guide the progression. To make it easier for the developer to divide the baked animation, we used specific timing for each step — 200 keyframes between each anchor.
AO baking
Because the headphones were rotating, we couldn’t bake the lighting. We only baked the Ambient Occlusion shadows to enhance realism. For that, after unwrapping the objects, we combined all the different parts of the headphones into a single object, applied a single texture with the Ambient Occlusion, and baked it in Redshift. Same for the case.
Normal map baked
For the Play‑Stade touchpad only, we needed a normal map, so we exported it. However, since the AO was already baked, the UVs had to remain the same.
Camera path and target
In order to ensure a smooth flow during the web experience, it was crucial to use a single camera. However, since we have different focal points, we needed two separate circular paths with different centers and sizes, along with a null object to serve as a target reference throughout the flow.
2. WebGL Features and Interactive Architecture
By Adrian Gubrica
GPGPU particles
Particles are a great way to add an extra layer of detail to 3D scenes, as was the case with Aether 1. To complement the calming motion of the audio waves, a flow‑field simulation was used — a technique known for producing believable and natural movement in particle systems. With the right settings, the resulting motion can also be incredibly relaxing to watch.
To calculate the flow fields, noise algorithms — specifically Simplex4D — were used. Since these can be highly performance-intensive on the CPU, a GPGPU technique (essentially the WebGL equivalent of a compute shader) was implemented to run the simulation efficiently on the GPU. The results were stored and updated across two textures, enabling smooth and high-performance motion.
Smooth scene transitions
To create a seamless transition between scenes, I developed a custom controller to manage when each scene should or shouldn’t render. I also implemented a manual way of controlling their scroll state, allowing me, for example, to display the last position of a scene without physically scrolling there. By combining this with a custom transition function that primarily uses GSAP to animate values, I was able to create both forward and backward animations to the target scene.
It is important to note that all scenes and transitions are displayed within a “post‑processing scene,” which consists of an orthographic camera and a full‑screen plane. In the fragment shader, I merge all the renders together.
This transition technique became especially tricky when transitioning at the end of each scroll in the main scene to create an infinite loop. To achieve this, I created two instances of the main scene (A and B) and swapped between them whenever a transition occurred.
Custom scroll controller for infinite scrolling
As mentioned earlier, the main scene features an infinite loop at both the start and end of the scroll, which triggers a transition back to the beginning or end of the scene. This behavior is enhanced with some resistance during the backward movement and other subtle effects. Achieving this required careful manual tweaking of the Lenis library.
My initial idea was to use Lenis’ infinite: true property, which at first seemed like a quick solution – especially for returning to the starting scroll position. However, this approach required manually listening to the scroll velocity and predicting whether the scroll would pass a certain threshold to stop it at the right moment and trigger the transition. While possible, it quickly proved unreliable, often leading to unpredictable behavior like broken scroll states, unintended transitions, or a confused browser scroll history.
Because of these issues, I decided to remove the infinite: true property and handle the scroll transitions manually. By combining Lenis.scrollTo(), Lenis.stop(), and Lenis.start(), I was able to recreate the same looping effect at the end of each scroll with greater control and reliability. An added benefit was being able to retain Lenis’s default easing at the beginning and end of the scroll, which contributed a smooth and polished feel.
Cursor with fluid simulation pass
Fluid simulation triggered by mouse or touch movement has become a major trend on immersive websites in recent years. But beyond just being trendy, it consistently enhances the visual appeal and adds a satisfying layer of interactivity to the user experience.
In my implementation, I used the fluid simulation as a blue overlay that follows the pointer movement. It also served as a mask for the Fresnel pass (explained in more detail below) and was used to create a dynamic displacement and RGB shift effect in the final render.
Because fluid simulations can be performance‑intensive – requiring multiple passes to calculate realistic behavior – I downscaled it to just 7.5 percent of the screen resolution. This optimization still produced a visually compelling effect while maintaining smooth overall performance.
Fresnel pass on the earphones
In the first half of the main scene’s scroll progression, users can see the inner parts of the earphones when hovering over them, adding a nice interactive touch to the scene. I achieved this effect by using the fluid simulation pass as a mask on the earphones’ material.
However, implementing this wasn’t straightforward at first, since the earphones and the fluid simulation use different coordinate systems. My initial idea was to create a separate render pass for the earphones and apply the fluid mask in that specific pass. But this approach would have been costly and introduced unnecessary complexity to the post‑processing pipeline.
After some experimentation, I realized I could use the camera’s view position as a kind of screen‑space UV projection onto the material. This allowed me to accurately sample the fluid texture directly in the earphones’ material – exactly what I needed to make the effect work without additional rendering overhead.
Audio reactivity
Since the project is a presentation of earphones, some scene parameters needed to become audio‑reactive. I used one of the background audio’s frequency channels – the one that produced the most noticeable “jumps,” as the rest of the track had a very stable tone – which served as the input to drive various effects. This included modifying the pace and shape of the wave animations, influencing the strength of the particles’ flow field, and shaping the touchpad’s visualizer.
The background audio itself was also processed using the Web Audio API, specifically a low‑pass filter. This filter was triggered when the user hovered over the earphones in the first section of the main scene, as well as during the scene transitions at the start and end. The low‑pass effect helped amplify the impact of the animations, creating a subtle sensation of time slowing down.
Animation and empties
Most of the animations were baked directly into the .glb file and controlled via the scroll progress using THREE.js’s AnimationMixer. This included the camera movement as well as the earphone animations.
This workflow proved to be highly effective when collaborating with another 3D artist, as it gave them control over multiple aspects of the experience – such as timing, motion, and transitions – while allowing me to focus solely on the real‑time interactions and logic.
Speaking of real‑time actions, I extended the scene by adding multiple empties, animating their position and scale values to act as drivers for various interactive events – such as triggering interactive points or adjusting input strength during scroll. This approach made it easy to fine‑tune these events directly in Blender’s timeline and align them precisely with other baked animations.
3. Optimization Techniques
Visual expectations were set very high for this project, making it clear from the start that performance optimization would be a major challenge. Because of this, I closely monitored performance metrics throughout development, constantly looking for opportunities to save resources wherever possible. This often led to unexpected yet effective solutions to problems that initially seemed too demanding or impractical for our goals. Some of these optimizations have already been mentioned – such as using GPGPU techniques for particle simulation and significantly reducing the resolution of the cursor’s fluid simulation. However, there were several other key optimizations that played a crucial role in maintaining solid performance:
Artificial depth of field
One of that was using depth of field during the close‑up view on the headphones. Depth of field is usually used as a post‑processing layer using some kind of convolution to simulate progressive blurring of the rendered scene. I considered this as a good‑to‑have from the beginning in case we will be left with some additional fps, but not as a realistic option.
However, after implementing the particles simulation, which used smoothstep function in the particle’s fragment shader to draw the blue circle, I was wondering if it might not be enough to simply modify its values to make it look like it’s blurred. After few little tweaks, the particles became blurry.
The only problem left was that the blur was not progressive like in a real camera, meaning it was not getting blurry according to the focus point of the camera. So I decided to try the camera’s view position to get some kind of depth value, which surprisingly did the job well.
I applied the same smoothstep technique to the rotating tube in the background, but now without the progressive effect since it was almost at a constant distance most of the time.
Voilà. Depth of field for almost free (not perfect, but does the job well).
Artificial bloom
Bloom was also part of the post‑processing stack – typically a costly effect due to the additional render pass it requires. This becomes even more demanding when using selective bloom, which I needed to make the core of the earphones glow. In that case, the render pass is effectively doubled to isolate and blend only specific elements.
To work around this performance hit, I replaced the bloom effect with a simple plane using a pre‑generated bloom texture that matched the shape of the earphone core. The plane was set to always face the camera (a billboard technique), creating the illusion of bloom without the computational overhead.
Surprisingly, this approach worked very well. With a bit of fine‑tuning – especially adjusting the depth write settings – I was even able to avoid visible overlaps with nearby geometry, maintaining a clean and convincing look.
Custom performant glass material
A major part of the earphones’ visual appeal came from the glossy surface on the back. However, achieving realistic reflections in WebGL is always challenging – and often expensive – especially when using double‑sided materials.
To tackle this, I used a strategy I often rely on: combining a MeshStandardMaterial for the base physical lighting model with a glass matcap texture, injected via the onBeforeCompile callback. This setup provided a good balance between realism and performance.
To enhance the effect further, I added Fresnel lighting on the edges and introduced a slight opacity, which together helped create a convincing glass‑like surface. The final result closely matched the visual concept provided for the project – without the heavy cost of real‑time reflections or more complex materials.
Simplified raycasting
Raycasting on high‑polygon meshes can be slow and inefficient. To optimise this, I used invisible low‑poly proxy meshes for the points of interest – such as the earphone shapes and their interactive areas.
This approach significantly reduced the performance cost of raycasting while giving me much more flexibility. I could freely adjust the size and position of the raycastable zones without affecting the visual mesh, allowing me to fine‑tune the interactions for the best possible user experience.
Mobile performance
Thanks to the optimisation techniques mentioned above, the experience maintains a solid 60 FPS – even on older devices like the iPhone SE (2020).
Three.js: For a project of this scale, Three.js was the clear choice. Its built‑in materials, loaders, and utilities made it ideal for building highly interactive WebGL scenes. It was especially useful when setting up the GPGPU particle simulation, which is supported via a dedicated addon provided by the Three.js ecosystem.
lil‑gui: Commonly used alongside Three.js, was instrumental in creating a debug environment during development. It also allowed designers to interactively tweak and fine‑tune various parameters of the experience without needing to dive into the code.
GSAP: Most linear animations were handled with GSAP and its timeline system. It proved particularly useful when manually syncing animations to the scroll progress provided by Lenis, offering precise control over timing and transitions.
Lenis: As mentioned earlier, Lenis provided a smooth and reliable foundation for scroll behavior. Its syncTouch parameter helped manage DOM shifting on mobile devices, which can be a common challenge in scroll‑based experiences.
5. Results and Takeaways
Aether 1 successfully demonstrated how brand narrative, advanced WebGL interactions, and rigorous 3D workflows can blend into a single, performant, and emotionally engaging web experience.
By baking key animations, using empties for event triggers, and leaning on tools like Three.js, GSAP, and Lenis, the team was able to iterate quickly without sacrificing polish. Meanwhile, the 3D pipeline- from Midjourney concept sketches through C4D unwrapping and Blender export ensured the visual fidelity stayed aligned with the brand vision.
Most importantly, every technique outlined here is transferable. Whether you are considering audio‑reactive visuals, infinite scroll adventures, or simply trying to squeeze extra frames per second out of a heavy scene, the solutions documented above show that thoughtful planning and a willingness to experiment can push WebGL far beyond typical product‑page expectations.
6. Author Contributions
General – Ross Anderson 3D – Celia Lopez WebGL – Adrian Gubrica
7. Site credits
Art Direction – Ross Anderson Design – Gilles Tossoukpe 3D – Celia Lopez WebGL – Adrian Gubrica AI Integration – Federico Valla Motion – Jason Kearley Front End / Webflow – Youness Benammou
Just a second! 🫷 If you are here, it means that you are a software developer.
So, you know that storage, networking, and domain management have a cost .
If you want to support this blog, please ensure that you have disabled the adblocker for this site. I configured Google AdSense to show as few ADS as possible – I don’t want to bother you with lots of ads, but I still need to add some to pay for the resources for my site.
Thank you for your understanding. – Davide
You already know it: using meaningful names for variables, methods, and classes allows you to write more readable and maintainable code.
It may happen that a good name for your business entity matches one of the reserved keywords in C#.
What to do, now?
There are tons of reserved keywords in C#. Some of these are
int
interface
else
null
short
event
params
Some of these names may be a good fit for describing your domain objects or your variables.
Talking about variables, have a look at this example:
var eventList = GetFootballEvents();
foreach(vareventin eventList)
{
// do something}
That snippet will not work, since event is a reserved keyword.
You can solve this issue in 3 ways.
You can use a synonym, such as action:
var eventList = GetFootballEvents();
foreach(var action in eventList)
{
// do something}
But, you know, it doesn’t fully match the original meaning.
You can use the my prefix, like this:
var eventList = GetFootballEvents();
foreach(var myEvent in eventList)
{
// do something}
But… does it make sense? Is it really your event?
The third way is by using the @ prefix:
var eventList = GetFootballEvents();
foreach(var @event in eventList)
{
// do something}
That way, the code is still readable (even though, I admit, that @ is a bit weird to see around the code).
Of course, the same works for every keyword, like @int, @class, @public, and so on
Further readings
If you are interested in a list of reserved keywords in C#, have a look at this article:
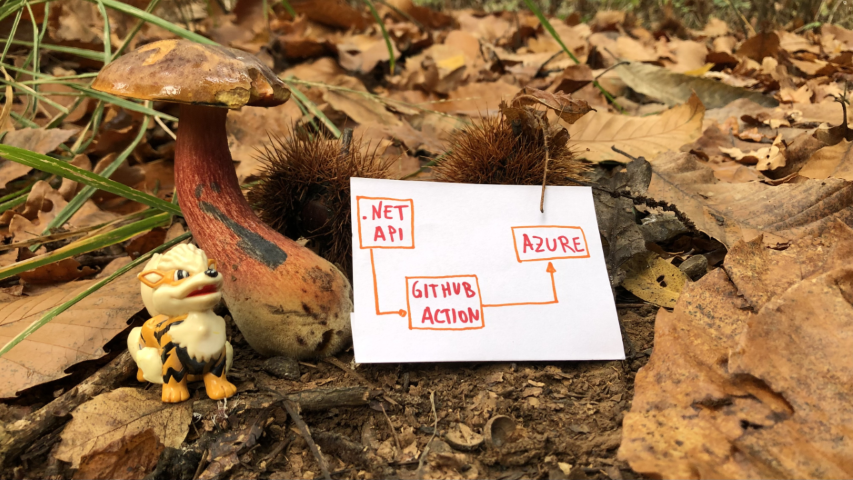
Building APIs with .NET is easy. Deploying them on Azure is easy too, with GitHub Actions!
Table of Contents
Just a second! 🫷 If you are here, it means that you are a software developer.
So, you know that storage, networking, and domain management have a cost .
If you want to support this blog, please ensure that you have disabled the adblocker for this site. I configured Google AdSense to show as few ADS as possible – I don’t want to bother you with lots of ads, but I still need to add some to pay for the resources for my site.
Thank you for your understanding. – Davide
With Continuous Delivery (CD), you can deploy your code in a fast-paced and stable way.
To deploy applications, you’ll need workflows that run and automate the process. In that way, you don’t have to perform repetitive tasks and the whole process becomes less error-prone.
In this article, we will learn how to implement CD pipelines using GitHub Actions. In particular, we will focus on the case of a .NET API application that will be deployed on Azure.
Create a .NET API project
Since the focus of this article is on the deployment part, we won’t create complex APIs. Just a simple Hello Word is enough.
To do that, we’re gonna use dotnet Minimal API – a way to create APIs without scaffolding lots of files and configurations.
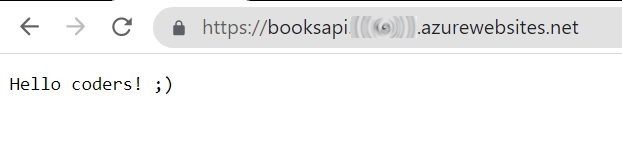
Our API, the BooksAPI, has a single endpoint: /, the root, simply returns “Hello World!”.
All our code is stored in the Program file:
var builder = WebApplication.CreateBuilder(args);

var app = builder.Build();

app.UseHttpsRedirection();

app.MapGet("/", () => "Hello World!");

app.Run();
Nothing fancy: run the application locally, and navigate to the root. You will see the Hello World message.
Lastly, put your code on GitHub: initialize a repository and publish it on GitHub – it can either be a public or a private repository.
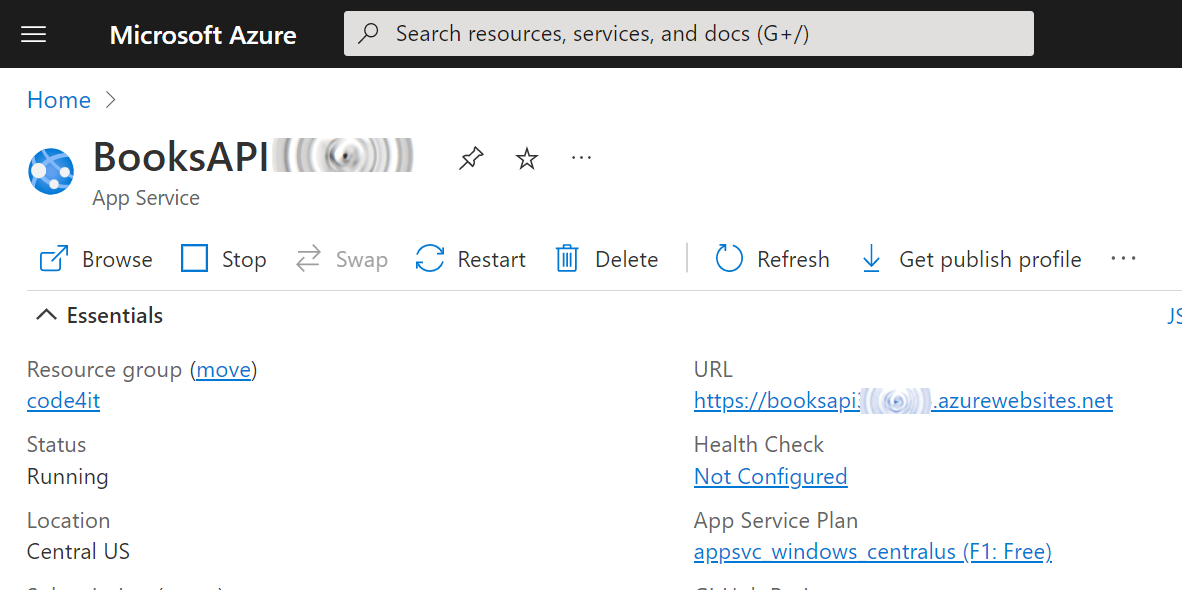
Create an App Service on Azure
Now, to deploy an application, we need to define its destination. We’re going to deploy it on Azure, so you need an Azure account before moving on.
Open the Azure Portal, navigate to the App Service section, and create a new one.
Configure it as you wish, and then proceed until you have it up and running.
Once everything is done, you should have something like this:
Now the application is ready to be used: we now need to deploy our code here.
Generate the GitHub Action YAML file for deploying .NET APIs on Azure
It’s time to create our Continuous Delivery pipeline.
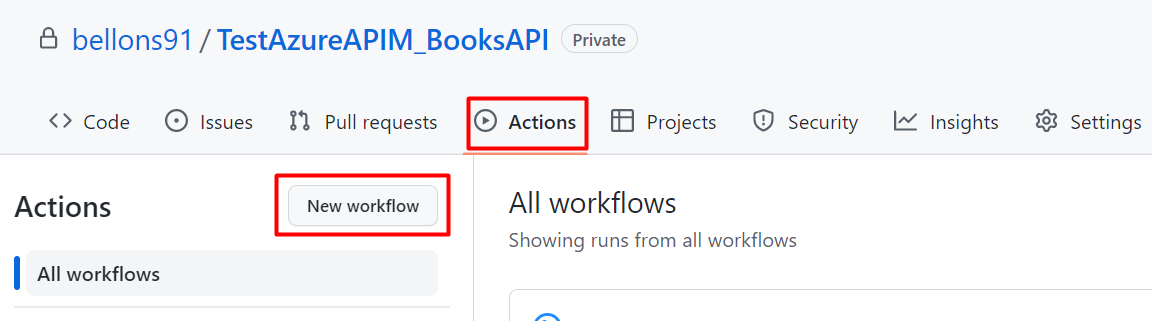
Luckily, GitHub already provides lots of templates for GitHub Actions. We will need one specific for our .NET APIs.
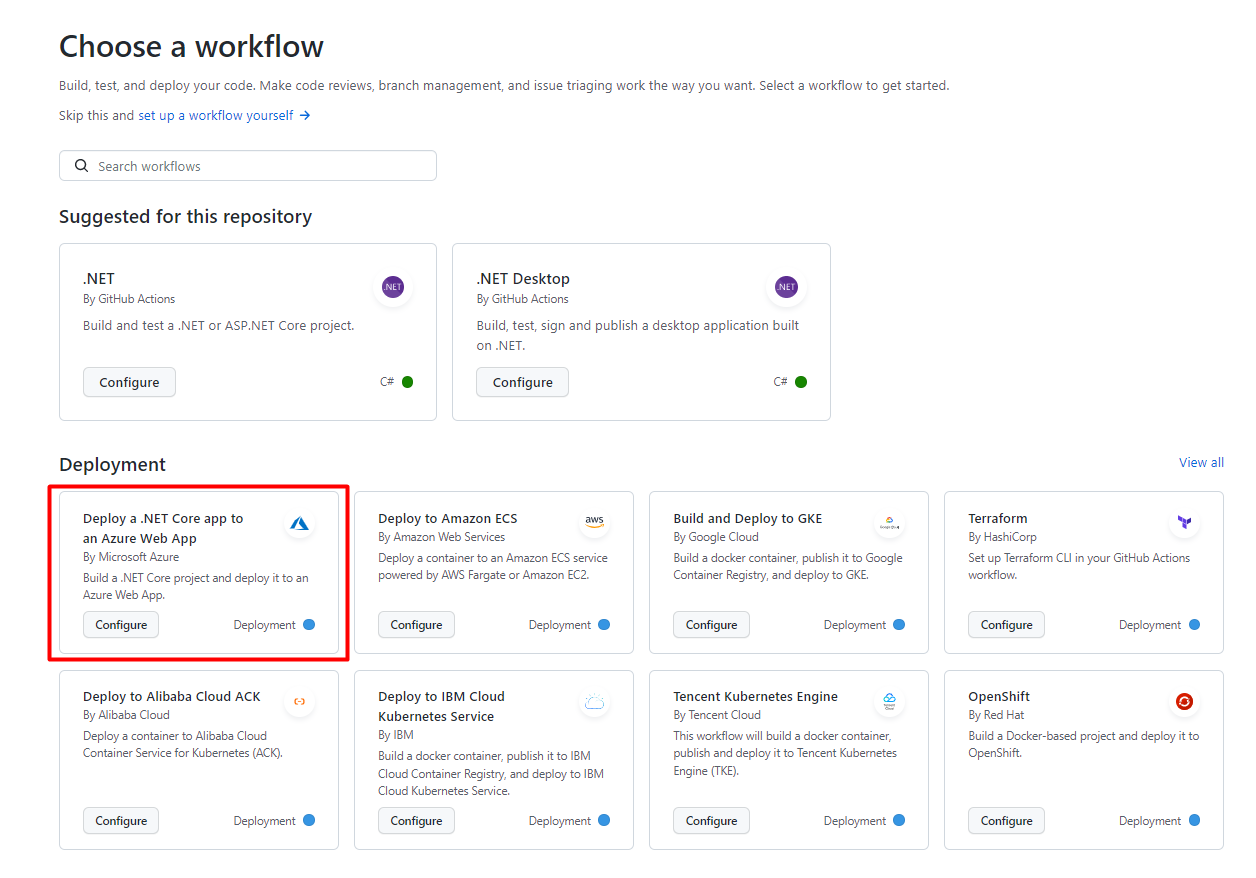
On GitHub, navigate to your repository, head to the Actions menu, and select New workflow.
You will see several predefined actions that allow you to do stuff with your repository. We are now interested in the one called “Deploy a .NET Core app to an Azure Web App”:
Clicking on “Configure” you will see a template. Read carefully the instructions, as they will guide you to the correct configuration of the GitHub action.
In particular, you will have to update the environment variables specified in this section:
env:
AZURE_WEBAPP_NAME: your-app-name# set this to the name of your Azure Web AppAZURE_WEBAPP_PACKAGE_PATH: "."# set this to the path to your web app project, defaults to the repository rootDOTNET_VERSION: "5"# set this to the .NET Core version to use
Clearly, AZURE_WEBAPP_NAME must match the name you’ve defined on Azure, while DOTNET_VERSION must match the version you’re using to create your dotnet APIs.
For my specific project, I’ve replaced that section with
env:
AZURE_WEBAPP_NAME: BooksAPI<myName># set this to the name of your Azure Web AppAZURE_WEBAPP_PACKAGE_PATH: "."# set this to the path to your web app project, defaults to the repository rootDOTNET_VERSION: "6.0"# set this to the .NET Core version to use
🟧 DOTNET_VERSION requires also the minor version of dotnet. Setting 6 will now work: you need to specify 6.0. 🟧
Now you can save your YAML file in your repository: it will be saved under ./.github/workflows.
So, as a reference, here’s the full YAML file I’m using to deploy my APIs:
name: Build and deploy ASP.Net Core app to an Azure Web Appenv:
AZURE_WEBAPP_NAME: BooksAPI<myName>AZURE_WEBAPP_PACKAGE_PATH: "."DOTNET_VERSION: "6.0"on:
push:
branches: ["master"]
workflow_dispatch:
permissions:
contents: readjobs:
build:
runs-on: ubuntu-lateststeps:
- uses: actions/checkout@v3 - name: Set up .NET Coreuses: actions/setup-dotnet@v2with:
dotnet-version: ${{ env.DOTNET_VERSION }} - name: Set up dependency caching for faster buildsuses: actions/cache@v3with:
path: ~/.nuget/packageskey: ${{ runner.os }}-nuget-${{ hashFiles('**/packages.lock.json') }}restore-keys: |${{ runner.os }}-nuget- - name: Build with dotnetrun: dotnet build --configuration Release - name: dotnet publishrun: dotnet publish -c Release -o ${{env.DOTNET_ROOT}}/myapp - name: Upload artifact for deployment jobuses: actions/upload-artifact@v3with:
name: .net-apppath: ${{env.DOTNET_ROOT}}/myappdeploy:
permissions:
contents: noneruns-on: ubuntu-latestneeds: buildenvironment:
name: "Development"url: ${{ steps.deploy-to-webapp.outputs.webapp-url }}steps:
- name: Download artifact from build jobuses: actions/download-artifact@v3with:
name: .net-app - name: Deploy to Azure Web Appid: deploy-to-webappuses: azure/webapps-deploy@v2with:
app-name: ${{ env.AZURE_WEBAPP_NAME }}publish-profile: ${{ secrets.AZURE_WEBAPP_PUBLISH_PROFILE }}package: ${{ env.AZURE_WEBAPP_PACKAGE_PATH }}
As you can see, we have 2 distinct steps: build and deploy.
In the build phase, we check out our code, restore the NuGet dependencies, build the project, pack it and store the final result as an artifact.
In the deploy step, we retrieve the newly created artifact and publish it on Azure.
Store the Publish profile as GitHub Secret
As you can see in the instructions of the workflow file, you have to
Create a secret in your repository named AZURE_WEBAPP_PUBLISH_PROFILE, paste the publish profile contents as the value of the secret.
That Create a secret in your repository named AZURE_WEBAPP_PUBLISH_PROFILE statement was not clear to me: I thought you had to create that key within your .NET project. Turns out you can create secrets related to repositories on GitHub (so, it’s language-agnostic).
A Publish profile is a file that contains information and settings used to deploy applications to Azure. It’s nothing but an XML file that lists the possible ways to deploy your application, such as FTP, Web Deploy, Zip Deploy, and so on.
We have to get our publish profile and save it into GitHub secrets.
To retrieve the Publish profile, head to the Azure App Service page and click Get publish profile to download the file.
Now, get back on GitHub, Head to Settings > Security > Secrets > Actions.
Here you can create a new secret related to your repository.
Create a new one, name it AZURE_WEBAPP_PUBLISH_PROFILE, and paste the content of the Publish profile file you’ve just downloaded.
You will then see something like this:
Notice that the secret name must be AZURE_WEBAPP_PUBLISH_PROFILE. That constraint is set because we are accessing the Publish profile by key:
- name: Deploy to Azure Web Appid: deploy-to-webappuses: azure/webapps-deploy@v2with:
app-name: ${{ env.AZURE_WEBAPP_NAME }}publish-profile: ${{ secrets.AZURE_WEBAPP_PUBLISH_PROFILE }}package: ${{ env.AZURE_WEBAPP_PACKAGE_PATH }}
In particular, notice the publish-profile: ${{ secrets.AZURE_WEBAPP_PUBLISH_PROFILE }} part.
Clearly, the two names must match: nothing stops you from changing the name of the secret in both the YAML file and the GitHub Secret page.
Final result
It’s time to see the final result.
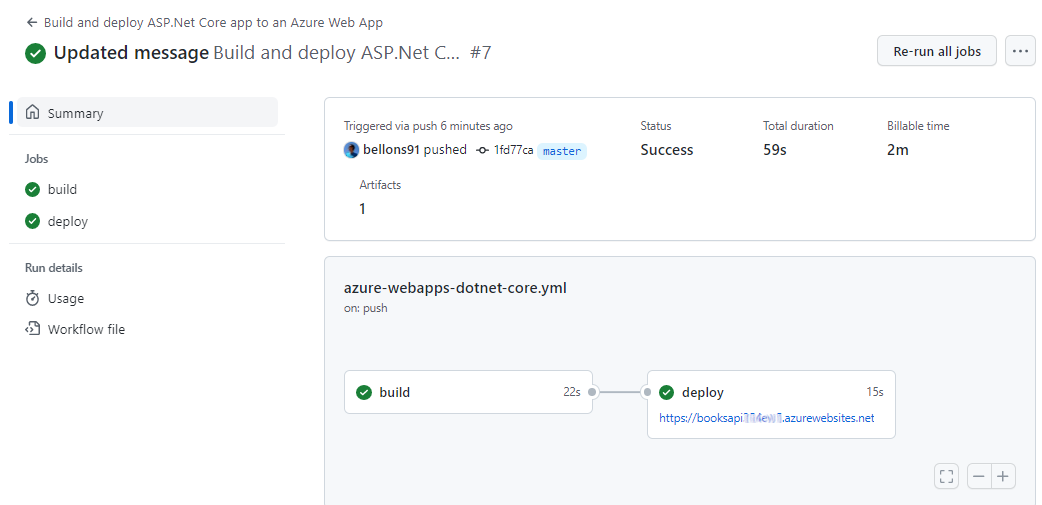
Update the application code (I’ve slightly modified the Hello world message), and push your changes to GitHub.
Under the Actions tab, you will see your CD pipeline run.
Once it’s completed, you can head to your application root and see the final result.
Further readings
Automating repetitive tasks allows you to perform more actions with fewer errors. Generally speaking, the more stuff you can automate, the better.
My own blog heavily relies on automation: scaffolding content, tracking ideas, and publishing online…
If you want to peek at what I do, here are my little secrets:
In this article, we’ve only built and deployed our application. We can do more: run tests and keep track of code coverage. If you want to learn how you can do it using Azure DevOps, here we go:
I have to admit that I struggled a lot in setting up the CD pipeline. I was using the one proposed by default on Visual Studio – but it didn’t work.
Using the template found on GitHub worked almost instantly – I just had to figure out what did they mean by repository secrets.
Now we have everything in place. Since the workflow is stored in a text file within my repository, if I have to create and deploy a new API project I can simply do that by copying that file and fixing the references.