Happening from October 8–10, 2025, Penpot Fest is where designers, developers, and open-source enthusiasts gather to explore one big idea: Better, together.
Over three days, you’ll dive into:
8 thought-provoking keynotes
1 lively panel discussion
3 hands-on workshops
Full meals, drinks, swag, and a welcome party
A breathtaking venue and space to connect, collaborate, and be inspired
With confirmed speakers like Glòria Langreo (GitHub), Francesco Siddi (Blender), and Laura Kalbag (Penpot), you’ll be learning from some of the brightest minds in the design-dev world.
And this year, we’re kicking it off with something extra special…
The Contest: “Wish You Were Here”
We’re giving away a free ticket to Penpot Fest 2025, and entering is as easy as sharing a thought.
Here’s the idea: We want to hear your “I wish…” — your vision, your frustration, your funny or heartfelt take on the future of design tools, team workflows, or dev collaboration.
It can be:
“I wish design tools spoke dev.”
“I wish handoff wasn’t a hand grenade.”
“I wish design files didn’t feel like final bosses.”
Serious or silly — it’s all valid.
How to Enter
Post your “I wish…” message on one of the following networks: X (Twitter), LinkedIn, Instagram, Bluesky, Mastodon, or Facebook
Include the hashtag#WishYouWereHerePenpot
Tag @PenpotApp so we can find your entry!
Get creative: write it, design it, animate it, sing it — whatever helps your wish stand out.
Key Dates
Contest opens: August 4, 2025
Last day to enter: September 4, 2025
Why This Matters
This campaign isn’t just about scoring a free ticket (though that’s awesome). It’s about surfacing what our community really needs — and giving space for those wishes to be heard.
Penpot is built by people who listen. Who believe collaboration between design and code should be open, joyful, and seamless. This is your chance to share what you want from that future — and maybe even help shape it.
A look back at Penpot Fest 2023: hands-on workshops, design & code talks, open source energy, delicious local food, and great company under the sunny Barcelona skies.
Ready to Join Us in Madrid?
We want to hear your voice. Your “I wish…” could make someone laugh, inspire a toolmaker, or land you in Madrid this fall with the Penpot crew.
So what are you waiting for?
Post your “I wish…” with #WishYouWereHerePenpot and tag @PenpotApp by September 4th for a chance to win a free ticket to Penpot Fest 2025!
Just a second! 🫷 If you are here, it means that you are a software developer.
So, you know that storage, networking, and domain management have a cost .
If you want to support this blog, please ensure that you have disabled the adblocker for this site. I configured Google AdSense to show as few ADS as possible – I don’t want to bother you with lots of ads, but I still need to add some to pay for the resources for my site.
Thank you for your understanding. – Davide
Mixed levels of abstraction make the code harder to understand.
At the first sight, the reader should be able to understand what the code does without worrying about the details of the operations.
Take this code snippet as an example:
publicvoid PrintPriceWithDiscountForProduct(string productId)
{
var product = sqlRepository.FindProduct(productId);
var withDiscount = product.Price * 0.9;
Console.WriteLine("The final price is " + withDiscount);
}
We are mixing multiple levels of operations. In the same method, we are
integrating with an external service
performing algebraic operations
concatenating strings
printing using .NET Console class
Some operations have a high level of abstraction (call an external service, I don’t care how) while others are very low-level (calculate the price discount using the formula ProductPrice*0.9).
Here the readers lose focus on the overall meaning of the method because they’re distracted by the actual implementation.
When I’m talking about abstraction, I mean how high-level an operation is: the more we stay away from bit-to-bit and mathematical operations, the more our code is abstract.
Cleaner code should let the reader understand what’s going on without the need of understanding the details: if they’re interested in the details, they can just read the internals of the methods.
We can improve the previous method by splitting it into smaller methods:
Here you can see the different levels of abstraction: the operations within PrintPriceWithDiscountForProduct have a coherent level of abstraction: they just tell you what the steps performed in this method are; all the methods describe an operation at a high level, without expressing the internal operations.
Yes, now the code is much longer. But we have gained some interesting advantages:
readers can focus on the “what” before getting to the “how”;
we have more reusable code (we can reuse GetProduct, CalculateDiscountedPrice, and PrintPrice in other methods);
if an exception is thrown, we can easily understand where it happened, because we have more information on the stack trace.
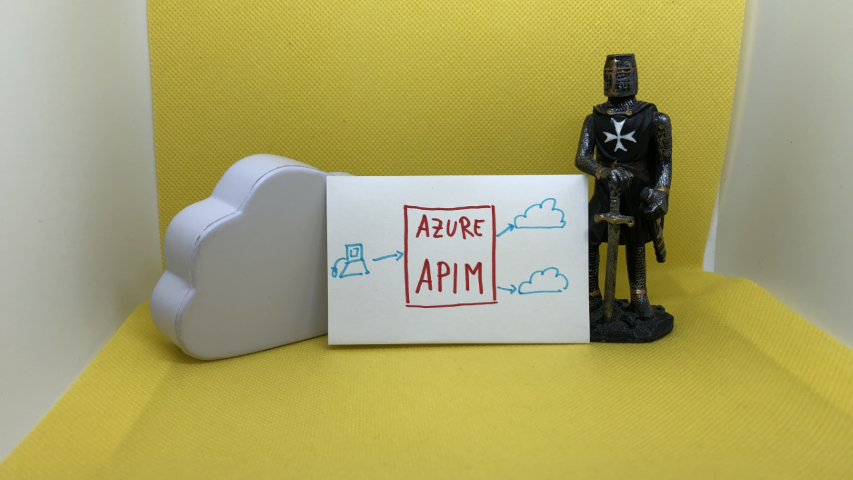
In a microservices architecture, an API Gateway hides your real endpoints. We will create one using Azure API Management
Table of Contents
Just a second! 🫷 If you are here, it means that you are a software developer.
So, you know that storage, networking, and domain management have a cost .
If you want to support this blog, please ensure that you have disabled the adblocker for this site. I configured Google AdSense to show as few ADS as possible – I don’t want to bother you with lots of ads, but I still need to add some to pay for the resources for my site.
Thank you for your understanding. – Davide
If you’re building an application that exposes several services you might not want to expose them on different hosts. Consumers will have a hard time configuring their application with all the different hostnames, and you will be forced to maintain the same URLs even if you need to move to other platforms or, for instance, you want to transform a REST endpoint into an Azure Function.
In this case, you should mask the real endpoints beneath a facade: maybe… an API Gateway? 🙂
In this article, we will learn how to configure Azure API Management (from now on: APIM) service to create an API Gateway and “hide” our real services.
Demo: publish .NET API services and locate the OpenAPI definition
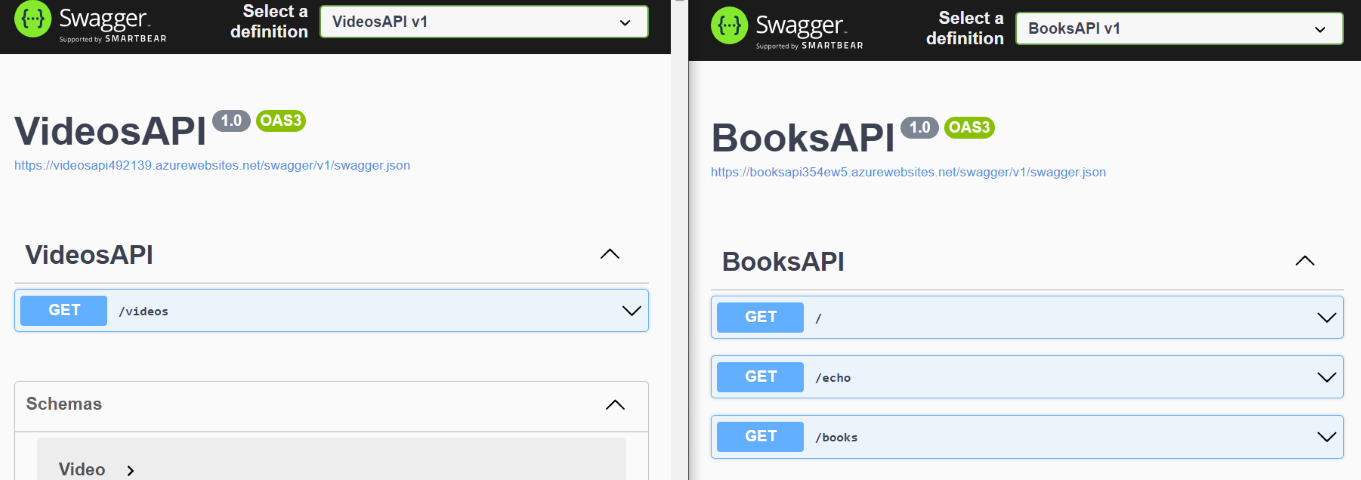
For the sake of this article, we will work with 2 API services: BooksService and VideosService.
They are both .NET 6 APIs, deployed on Azure using GitHub Actions (using the steps I described in a previous article).
Both services expose their Swagger pages and a bunch of endpoints that we will gonna hide behind Azure APIM.
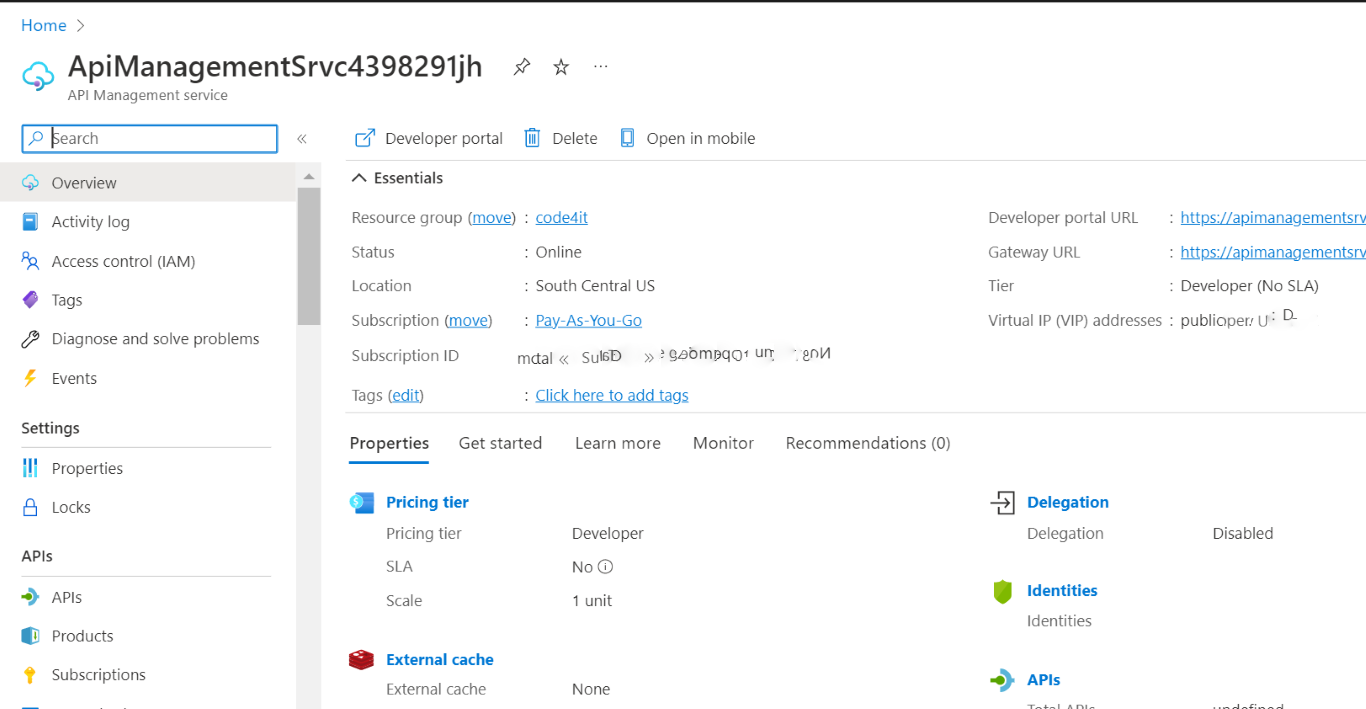
How to create Azure API Management (APIM) Service from Azure Portal
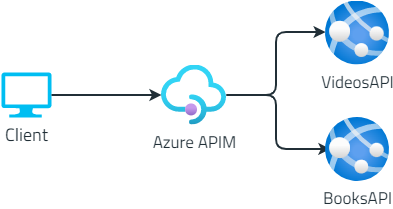
Now, we want to hide their real endpoints. The clients will then only know about the existence of the API Gateway, and not of the two separate API services:
It’s time to create our APIM resource.👷♂️
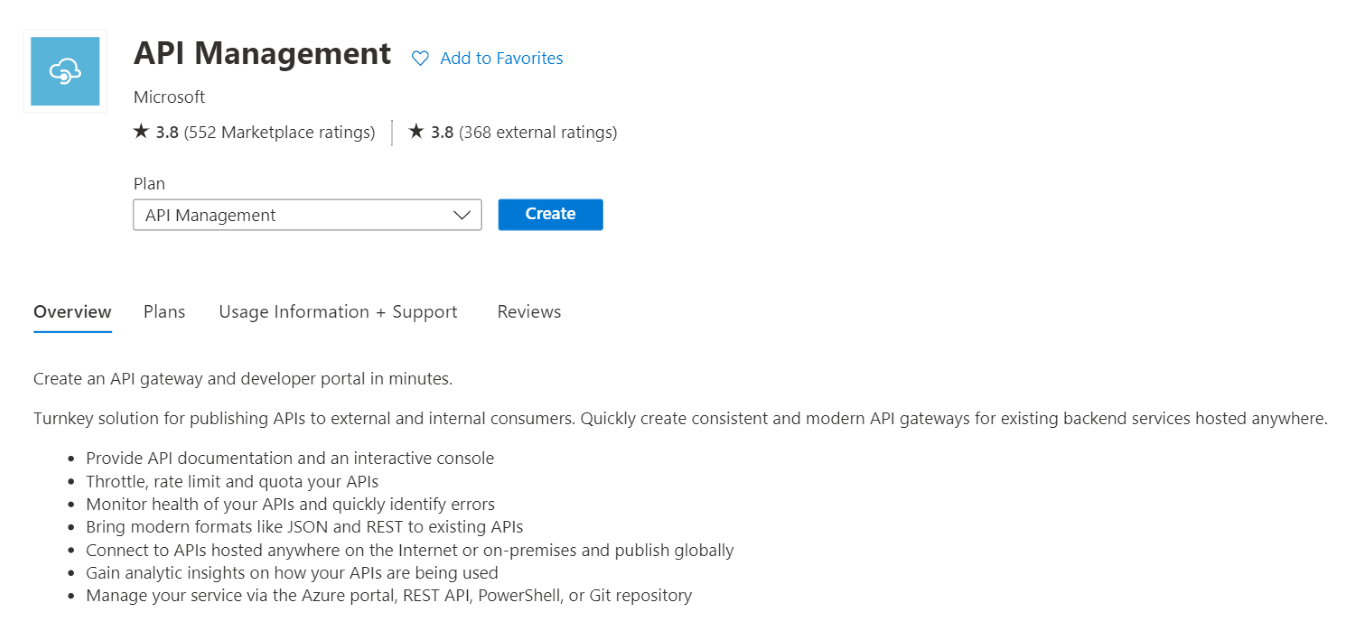
Head to the Azure Portal, and create a new API Management instance. I suggest reading the short overview of the functionalities provided by Azure API Management services as listed in the screenshot below.
The wizard will ask you for some info, such as the resource name, the region, and an email used to send communications (honestly speaking, I still haven’t figured out why they’re asking for your email).
Fill in all the fields, pick your preferred pricing tier (mine is Developer: it doesn’t have an SLA and is quite cheap), and then proceed with the service creation.
After several minutes (it took 50 minutes – fifty!💢 – to scaffold my instance), you will have your instance ready to be used.
We are now ready to add our APIs and expose them to our clients.
How to add APIs to Azure API Management using Swagger definition (OpenAPI)
As we’ve seen in a previous article, Swagger creates a JSON file that describes the operations available in your APIs, as well as the object structures accepted as input and returned as output.
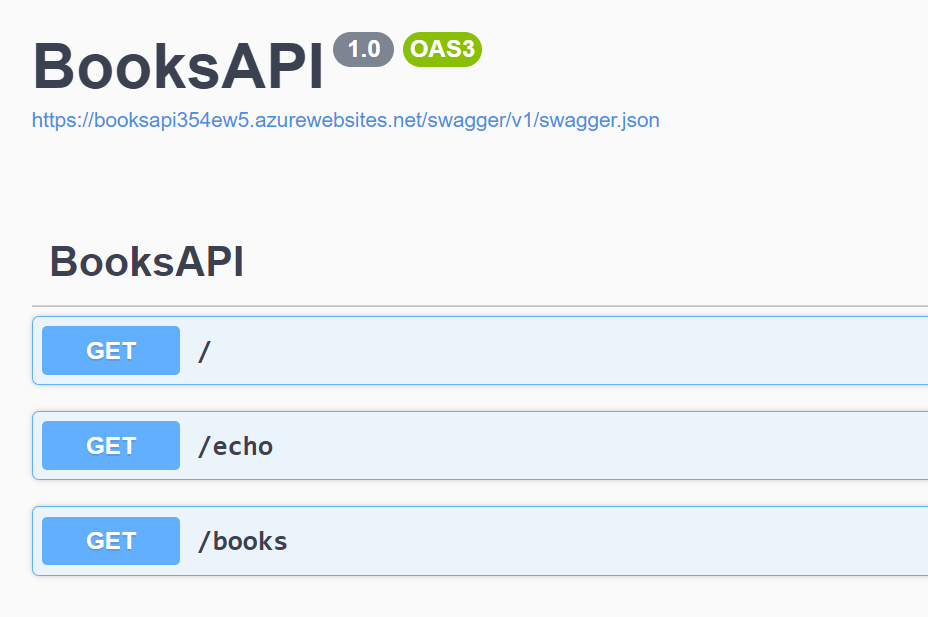
Let me use as an example the Books API: once that API project is deployed on the cloud (it’s not mandatory to use Azure: it will work the same using other cloud vendors), you will see the Swagger UI and the related JSON definition.
We have 3 endpoints, /, /echo, and /books; those endpoints are described in the swagger.json file linked in the Swagger page; put that link aside: we will use it soon.
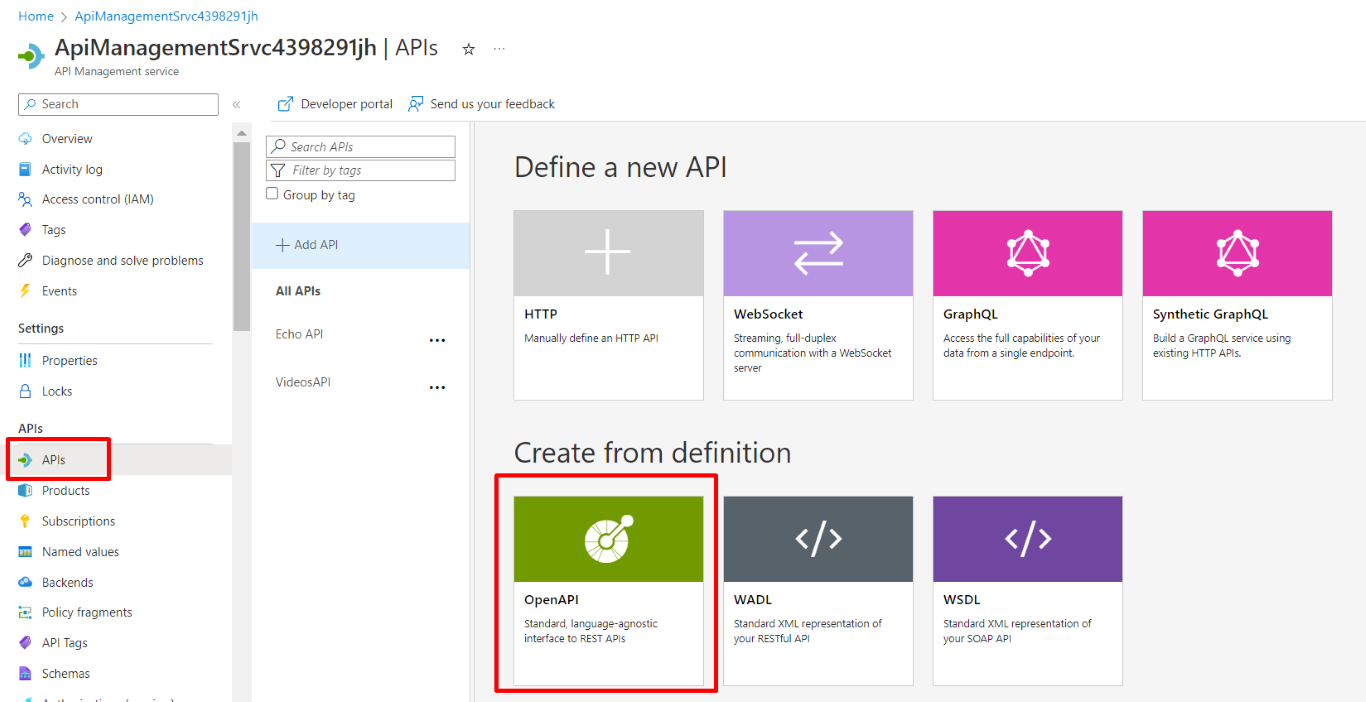
Finally, we can add our Books APIs to our Azure Management API Service! Head to the resource on Azure, locate the APIs menu item on the left panel, and create a new API definition using OpenAPI (which is the standard used by Swagger to create its UI).
You will see a form that allows you to create new resources from OpenAPI specifications.
Paste here the link to the swagger.json file you located before, populate the required fields and, if you want, add a prefix to identify these endpoints: I choose MyBooks.
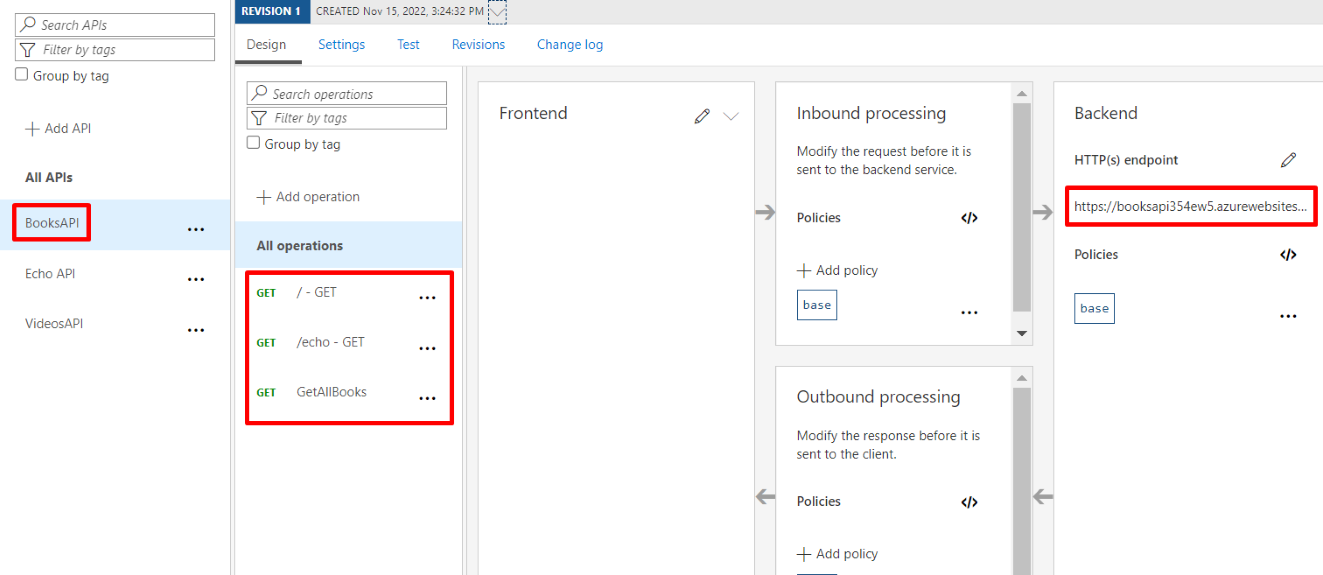
You will then see your APIs appear in the panel shown below. It is composed of different parts:
The list of services exposed. In the screenshot below, BooksAPI, Echo API, and VideosAPI;
The list of endpoints exposed for each service: here, BooksAPI exposes endpoints at /, /echo, and /books;
A list of policies that are applied to the inbound requests before hitting the real endpoint;
The real endpoint used when calling the facade exposed by APIM;
A list of policies applied to the outbound requests after the origin has processed the requests.
For now, we will ignore both Inbound and Outbound processing, as they will be the topic of a future article.
Consuming APIs exposed on the API Gateway
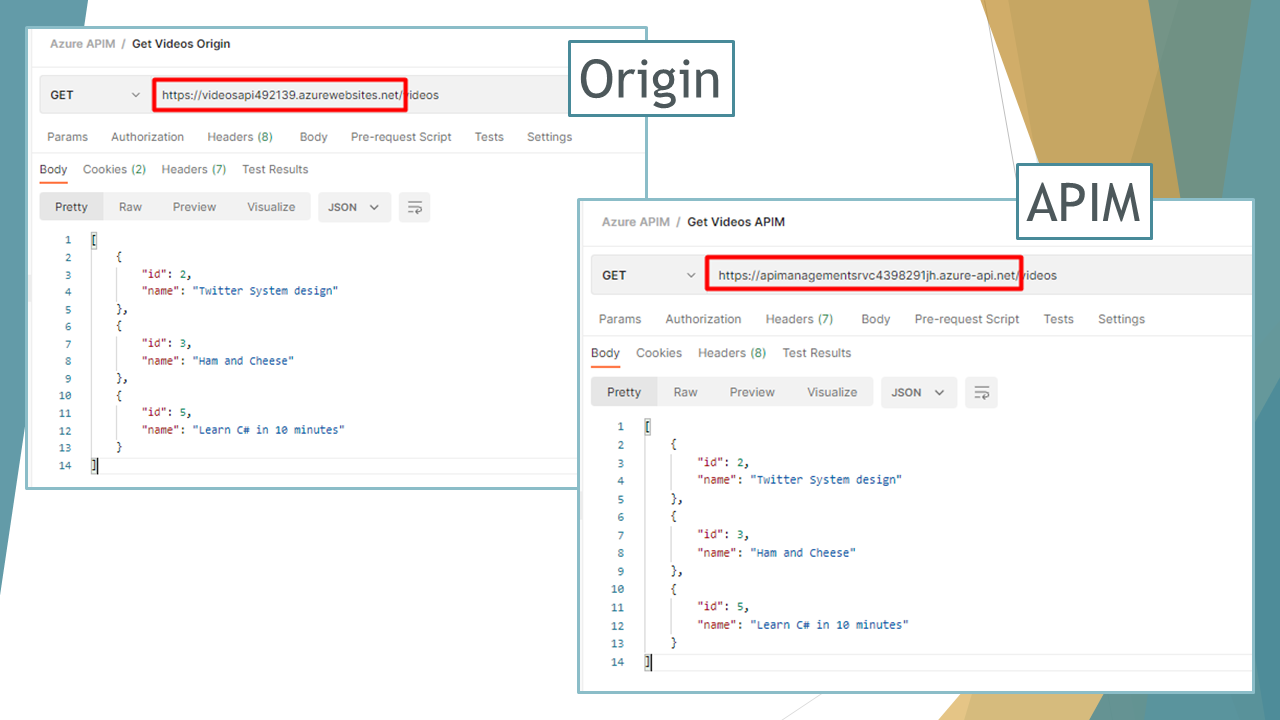
We’re ready to go! Head back to the Azure API Management service dashboard and locate the URL of the API Gateway under Custom domains > Gateway URL.
This will be the root URL that our clients will use.
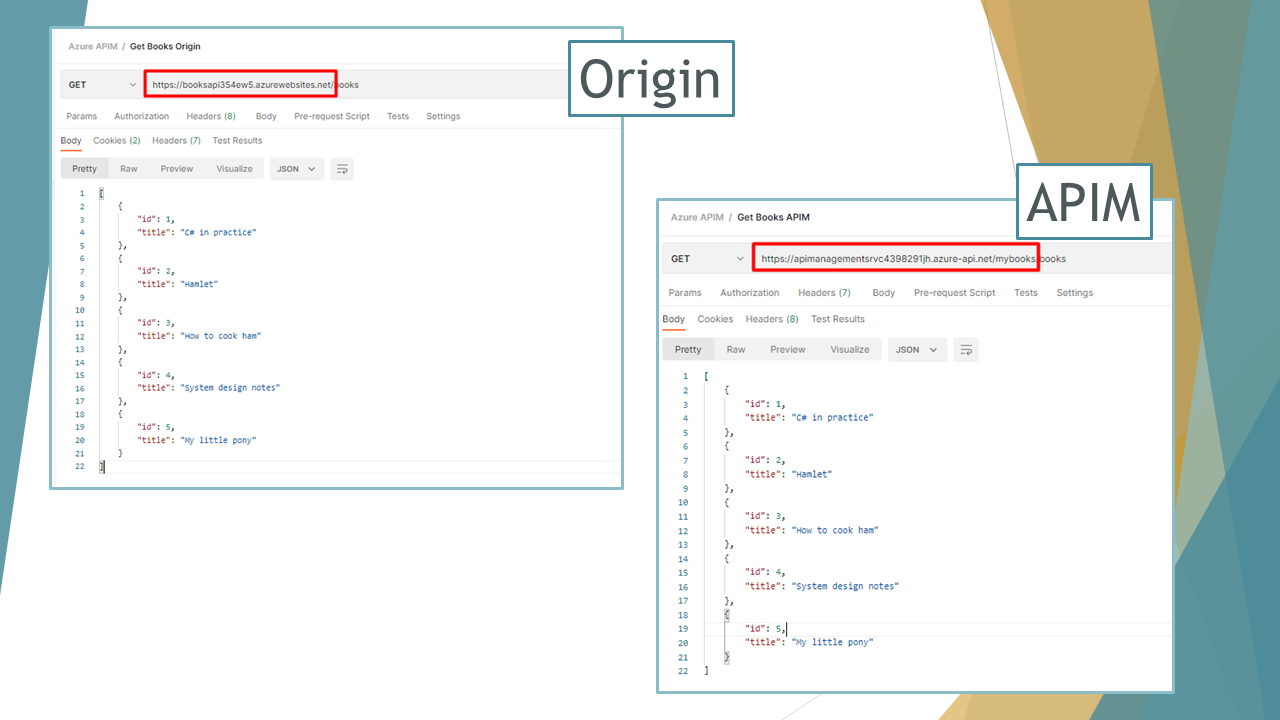
We can then access Books API and Videos API both on the Origin and the Gateway (we’re doing it just for demonstrating that things are working; clients will only use the APIs exposed by the API Gateway).
The Videos API maintains the exact same structure, mapping the endpoints as they are defined in Origin.
On the contrary, to access the Books APIs we have to access the /mybooks path (because we defined it a few steps ago when we imported the BooksAPI from OpenAPI definition: it’s the API Url Suffix field), as shown below:
Further readings
As usual, a bunch of interesting readings 📚
In this article, we’ve only scratched the surface of Azure API Management. There’s way lot – and you can read about it on the Microsoft Docs website:
To integrate Azure APIM, we used two simple dotNET 6 Web APIs deployed on Azure. If you wanna know how to set up GitHub Actions to build and deploy dotNET APIs, I recently published an article on that topic.
This can be just the beginning of a long journey; APIM allows you to highly customize your API Gateway by defining API access by user role, creating API documentation using custom templates and themes, and a lot of different stuff.
Just a second! 🫷 If you are here, it means that you are a software developer.
So, you know that storage, networking, and domain management have a cost .
If you want to support this blog, please ensure that you have disabled the adblocker for this site. I configured Google AdSense to show as few ADS as possible – I don’t want to bother you with lots of ads, but I still need to add some to pay for the resources for my site.
Thank you for your understanding. – Davide
There may be times when you need to process a specific task on a timely basis, such as polling an endpoint to look for updates or refreshing a Refresh Token.
If you need infinite processing, you can pick two roads: the obvious one or the better one.
For instance, you can use an infinite loop and put a Sleep command to delay the execution of the next task:
The constructor accepts in input an interval (a double value that represents the milliseconds for the interval), whose default value is 100.
This class implements IDisposable: if you’re using it as a dependency of another component that must be Disposed, don’t forget to call Dispose on that Timer.
Note: use this only for synchronous tasks: there are other kinds of Timers that you can use for asynchronous operations, such as PeriodicTimer, which also can be stopped by canceling a CancellationToken.
“C# 11 and .NET 7 – Modern Cross-Platform Development Fundamentals” is a HUGE book – ~750 pages – that guides readers from the very basics of C# and dotnet to advanced topics and approaches.
This book starts from the very beginning, explaining the history of C# and .NET, then moving to C# syntax and exploring OOP topics.
If you already have some experience with C#, you might be tempted to skip those chapters. Don’t skip them! Yes, they’re oriented to newbies, but you’ll find some gems that you might find interesting or that you might have ignored before.
Then, things get really interesting: some of my favourite topics were:
how to build and distribute packages;
how to publish Console Apps;
Entity Framework (which I used in the past, before ASP.NET Core, so it was an excellent way to see how things evolved);
Blazor
What I liked
the content is well explained;
you have access to the code example to follow along (also, the author explains how to install and configure stuff necessary to follow along, such as SQL Lite when talking about Entity Framework)
it also teaches you how to use Visual Studio
What I did not like
in the printed version, some images are not that readable
experienced developers might find some chapters boring (well, they’re not the target audience of the book, so it makes sense 🤷♂️ )
A PriorityQueue represents a collection of items that have a value and a priority. Now this data structure is built-in in dotNET!
Table of Contents
Just a second! 🫷 If you are here, it means that you are a software developer.
So, you know that storage, networking, and domain management have a cost .
If you want to support this blog, please ensure that you have disabled the adblocker for this site. I configured Google AdSense to show as few ADS as possible – I don’t want to bother you with lots of ads, but I still need to add some to pay for the resources for my site.
Thank you for your understanding. – Davide
Starting from .NET 6 and C# 10, we finally have built-in support for PriorityQueues 🥳
A PriorityQueue is a collection of items that have a value and a priority; as you can imagine, they act as a queue: the main operations are “add an item to the queue”, called Enqueue, and “remove an item from the queue”, named Dequeue. The main difference from a simple Queue is that on dequeue, the item with lowest priority is removed.
In this article, we’re gonna use a PriorityQueue and wrap it into a custom class to solve one of its design issues (that I hope they’ll be addressed in a future release of dotNET).
Welcoming Priority Queues in .NET
Defining a priority queue is straightforward: you just have to declare it specifying the type of items and the type of priority.
So, if you need a collection of Child items, and you want to use int as a priority type, you can define it as
PriorityQueue<Child, int> pq = new PriorityQueue<Child, int>();
And you can retrieve the one on the top of the queue by calling Peek(), if you want to just look at the first item without removing it from the queue:
Child child3 = BuildChild3();
Child child2 = BuildChild2();
Child child1 = BuildChild1();
queue.Enqueue(child3, 3);
queue.Enqueue(child1, 1);
queue.Enqueue(child2, 2);
//queue.Count = 3Child first = queue.Peek();
//first will be child1, because its priority is 1//queue.Count = 3, because we did not remove the item on top
or Dequeue if you want to retrieve it while removing it from the queue:
Child child3 = BuildChild3();
Child child2 = BuildChild2();
Child child1 = BuildChild1();
queue.Enqueue(child3, 3);
queue.Enqueue(child1, 1);
queue.Enqueue(child2, 2);
//queue.Count = 3Child first = queue.Dequeue();
//first will be child1, because its priority is 1//queue.Count = 2, because we removed the item with the lower priority
This is the essence of a Priority Queue: insert items, give them a priority, then remove them starting from the one with lower priority.
Creating a Wrapper to automatically handle priority in Priority Queues
There’s a problem with this definition: you have to manually specify the priority of each item.
I don’t like it that much: I’d like to automatically assign each item a priority. So we have to wrap it in another class.
Since we’re near Christmas, and this article is part of the C# Advent 2022, let’s use an XMAS-themed example: a Christmas list used by Santa to handle gifts for children.
Now we can create a Priority Queue of type <Child, int>:
PriorityQueue<Child, int> pq = new PriorityQueue<Child, int>();
And wrap it all within a ChristmasList class:
publicclassChristmasList{
privatereadonly PriorityQueue<Child, int> queue;
public ChristmasList()
{
queue = new PriorityQueue<Child, int>();
}
publicvoid Add(Child child)
{
int priority =// ??; queue.Enqueue(child, priority);
}
public Child Get()
{
return queue.Dequeue();
}
}
A question for you: what happens when we call the Get method on an empty queue? What should we do instead? Drop a message below! 📩
We need to define a way to assign each child a priority.
Define priority as private behavior
The easiest way is to calculate the priority within the Add method: define a function that accepts a Child and returns an int, and then pass that int value to the Enqueue method.
This approach is useful because you’re encapsulating the behavior in the ChristmasList class, but has the downside that it’s not extensible, and you cannot use different priority algorithms in different places of your application. On the other side, GetPriority is a private operation within the ChristmasList class, so it can be fine for our example.
Pass priority calculation from outside
We can then pass a Func<Child, int> in the ChristmasList constructor, centralizing the priority definition and giving the caller the responsibility to define it:
This implementation presents the opposite problems and solutions we saw in the previous example.
What I’d like to see in the future
This is a personal thought: it’d be great if we had a slightly different definition of PriorityQueue to automate the priority definition.
One idea could be to add in the constructor a parameter that we can use to calculate the priority, just to avoid specifying it explicitly. So, I’d expect that the current definition of the constructor and of the Enqueue method change from this:
PriorityQueue<Child, int> pq = new PriorityQueue<Child, int>();

int priority = _priorityCalculation(child);
queue.Enqueue(child, priority);
to this:
PriorityQueue<Child, int> pq = new PriorityQueue<Child, int>(_priorityCalculation);

queue.Enqueue(child);
It’s not perfect, and it raises some new problems.
Another way could be to force the item type to implement an interface that exposes a way to retrieve its priority, such as
publicinterfaceIHavePriority<T>{
public T GetPriority();
}
publicclassChild : IHavePriority<int>{}
Again, this approach is not perfect but can be helpful.
Talking about its design, which approach would you suggest, and why?
Further readings
As usual, the best way to learn about something is by reading its official documentation:
PriorityQueue is a good-to-know functionality that is now out-of-the-box in dotNET. Do you like its design? Have you used another library to achieve the same result? In what do they differ?
“Move fast and break things” has graduated from a startup mantra to an industry-wide gospel. We’re told to ship now and ask questions later, to launch minimum viable products and iterate indefinitely. But in the race to be first, we risk forgetting what it means to be good. What if the relentless pursuit of ‘now’ comes with higher reputational consequences than we realise?
I have worked for a lot of other businesses before. Contract, Industry, Agency, you name it… over the last 17 years I’ve seen the decisions that get made, many of them mistakes, from junior level through to senior leadership. Often I would find myself wondering, ‘is this how it has to be?’.
Businesses I worked for would cut corners everywhere, and I don’t mean slightly under-deliver to preserve margin, I mean a perpetual ethos of poor performance was not just accepted, but cultivated through indifference and a lack of accountability.
Motivated by this behaviour, I wanted to start something with integrity, something a bit more human, something where value is determined by quality-delivered, not just cash-extracted.
Although I am introverted by nature, and generally more interested in craft than networking – I’ve been fortunate enough to build partnerships with some of the largest companies and brands in the world.
The projects we work on are usually for brands with a substantial audience, which require a holistic approach to design and development. We are particularly proud of our work in the entertainment sector, which we recently decided was a logical niche for us.
Our Ethos
Our guiding philosophy is simple:
Designed with purpose, built to perform.
In the entertainment space, a digital touchpoint is more than just a website or an app, it’s a gateway to an experience. It has to handle crushing traffic spikes for ticket or merchandise drops, convey the energy of an event (usually using highly visual, large content formats like video/audio), be just as performant on mobile as it is on desktop, and function flawlessly under pressure.
In this context, creativity without a clear purpose is just noise. A beautiful design that collapses under load isn’t just a failure; it’s a broken promise to thousands of fans. This is why we are laser-focused on creativity and performance being complimentary forces, rather than adversaries.
To design with purpose is to understand that every choice must be anchored in strategy. It means we don’t just ask “what does it look like?” but “what is it for?”. A critical part of our ethos involves avoiding common industry pitfalls.
I don’t know how loud this needs to be for people to hear me, but you should never build platform first.
If you’re advising clients that they need a WordPress website because that’s the only tool you know, you’re doing something wrong. The same is true of any solution that you deliver.
There is a right way and 17 wrong ways to do everything.
This is why we build for performance by treating speed, stability, and scalability as core features, not afterthoughts. It’s about architecting systems that are as resilient as they are beautiful. Working with the correct tech stack on every project is important. The user experience is only as good as the infrastructure that supports it.
That said, experiential design is an incredibly important craft, and at the front edge of this are libraries like GSAP, Lenis, and of course WebGL/Three.js. Over the last few years, we’ve been increasing the amount of these features across our work, thankfully to much delight.
liquidGL
Recently we launched a library you might like to try called liquidGL, an attempt to bring Apple’s new Liquid Glass aesthetic to the web. It’s a lot trickier in the browser, and there are still some things to work out in BETA, but it’s available now on GitHub and of course, it’s open source.
particlesGL
In addition to liquidGL, we recently launched particlesGL, a library for creating truly unique particle effects in the browser, complete with 6 core demos and support for all media formats including 3D models, video, audio, images and text. Available on GitHub and free for personal use.
glitchGL
Following on from particlesGL is glitchGL, a library for creating pixelation, CRT and glitch effects in the browser. With more than 30 custom properties and a configurable global interaction system, which can be applied to multiple elements. Also available on GitHub and free for personal use.
We post mainly on LinkedIn, so if you’re interested in libraries like these, give us a follow so you don’t miss new releases and updates.
The result is a suite of market-specific solutions that consistently deliver: web, game development, mobile app, and e-commerce; all made possible because we know the culture and the owners, not just the brief. This is why I would encourage other creatives to niche down into an industry they understand, and to see their clients as partners rather than targets – you might think this cynicism is rare but I can assure you it is not.
Quality relationships take time, but they’re the foundation of quality work.
OFFLIMITS
Sometimes the best choices you make on a project are the ones that no one sees.
For OFFLIMITS Festival, the UAE’s first open format music festival featuring Ed Sheeran, Kaiser Chiefs, OneRepublic, and more, one of the most critical aspects was the ability to serve large content formats performantly, at scale.
Whilst Webflow was the right platform for the core requirements, we decided to forgo several of Webflow’s own features, including their forms setup and asset handling. We opted to use Cloudflare R2 to serve videos and audio, giving us granular control over caching policies and delivery. One of many hidden changes which were invisible to users, but critical to performance. Taking time for proper decisions, even boring ones, is what separates experiences that deliver from those that merely look nice.
PRIMAL™
PRIMAL™ started as a sample pack library focused on raw high quality sounds. When they wanted to expand into audio plugins, we spent eighteen months developing custom audio plugins and architecting a comprehensive ecosystem from scratch, because comprehensive solutions create lasting value.
The result is something we’re particularly proud of, with automatic account creation, login, subscription creation, and license generation happening from a single click. This may sound simple on the surface, but it required months of careful planning and development across JUCE/C++, Stripe, Clerk, React, Cloudflare, and Mailchimp.
More information on this repositioning will be available late 2025.
The Integrated Pipeline
Our philosophy of Quality Over Speed only works if your team is structured to support it. Common approaches separate concerns like design and development. In large teams this is seen as somewhat essential, a project moves along a conveyor belt, handed off from one silo to the next.
Having a holistic approach allows you to create deeply connected digital ecosystems.
When the same team that designs the brand identity also builds the mobile app and architects the backend, you get a level of coherence that simply isn’t possible otherwise. This leads to better outcomes: lower operational costs for our clients, less patchwork for us, higher conversion rates, and a superior customer experience that feels seamless and intentional.
Final Thoughts
Choosing craft over haste is not an indulgence, it’s a strategic decision we make every day.
It’s not that we are perfect, we’re not. It’s that we’d rather aim for perfection and miss, than fail to even try and settle for ‘good enough’. In a digital landscape saturated with forgettable experiences, perfectionism is what cuts through the noise.
It’s what turns a user into a fan and a brand into a legacy.
Our work has been fortunate enough to win awards, but the real validation comes from seeing our clients thrive on the back of the extra care and attention to detail that goes into a Quality Over Speed mindset. By building platforms that are purposeful, performant, and deeply integrated, we deliver lasting value.
The goal isn’t just to launch something, it’s to launch something right.
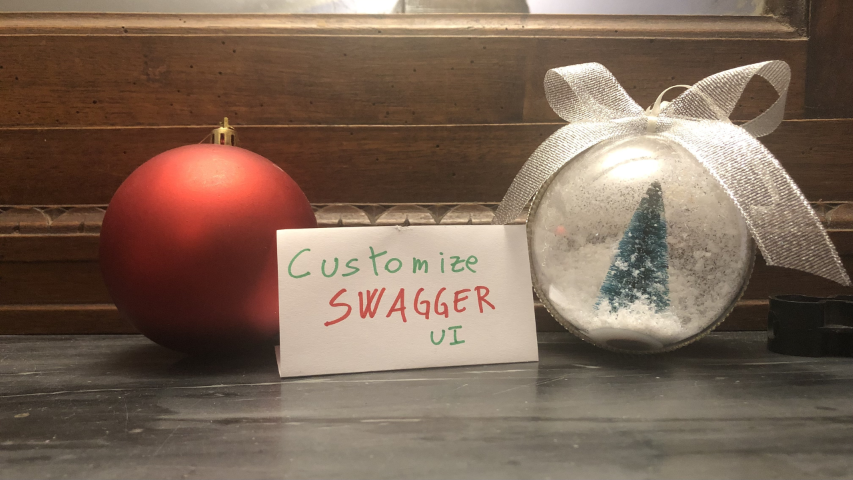
Exposing Swagger UI is a good way to help developers consume your APIs. But don’t be boring: customize your UI with some fancy CSS
Table of Contents
Just a second! 🫷 If you are here, it means that you are a software developer.
So, you know that storage, networking, and domain management have a cost .
If you want to support this blog, please ensure that you have disabled the adblocker for this site. I configured Google AdSense to show as few ADS as possible – I don’t want to bother you with lots of ads, but I still need to add some to pay for the resources for my site.
Thank you for your understanding. – Davide
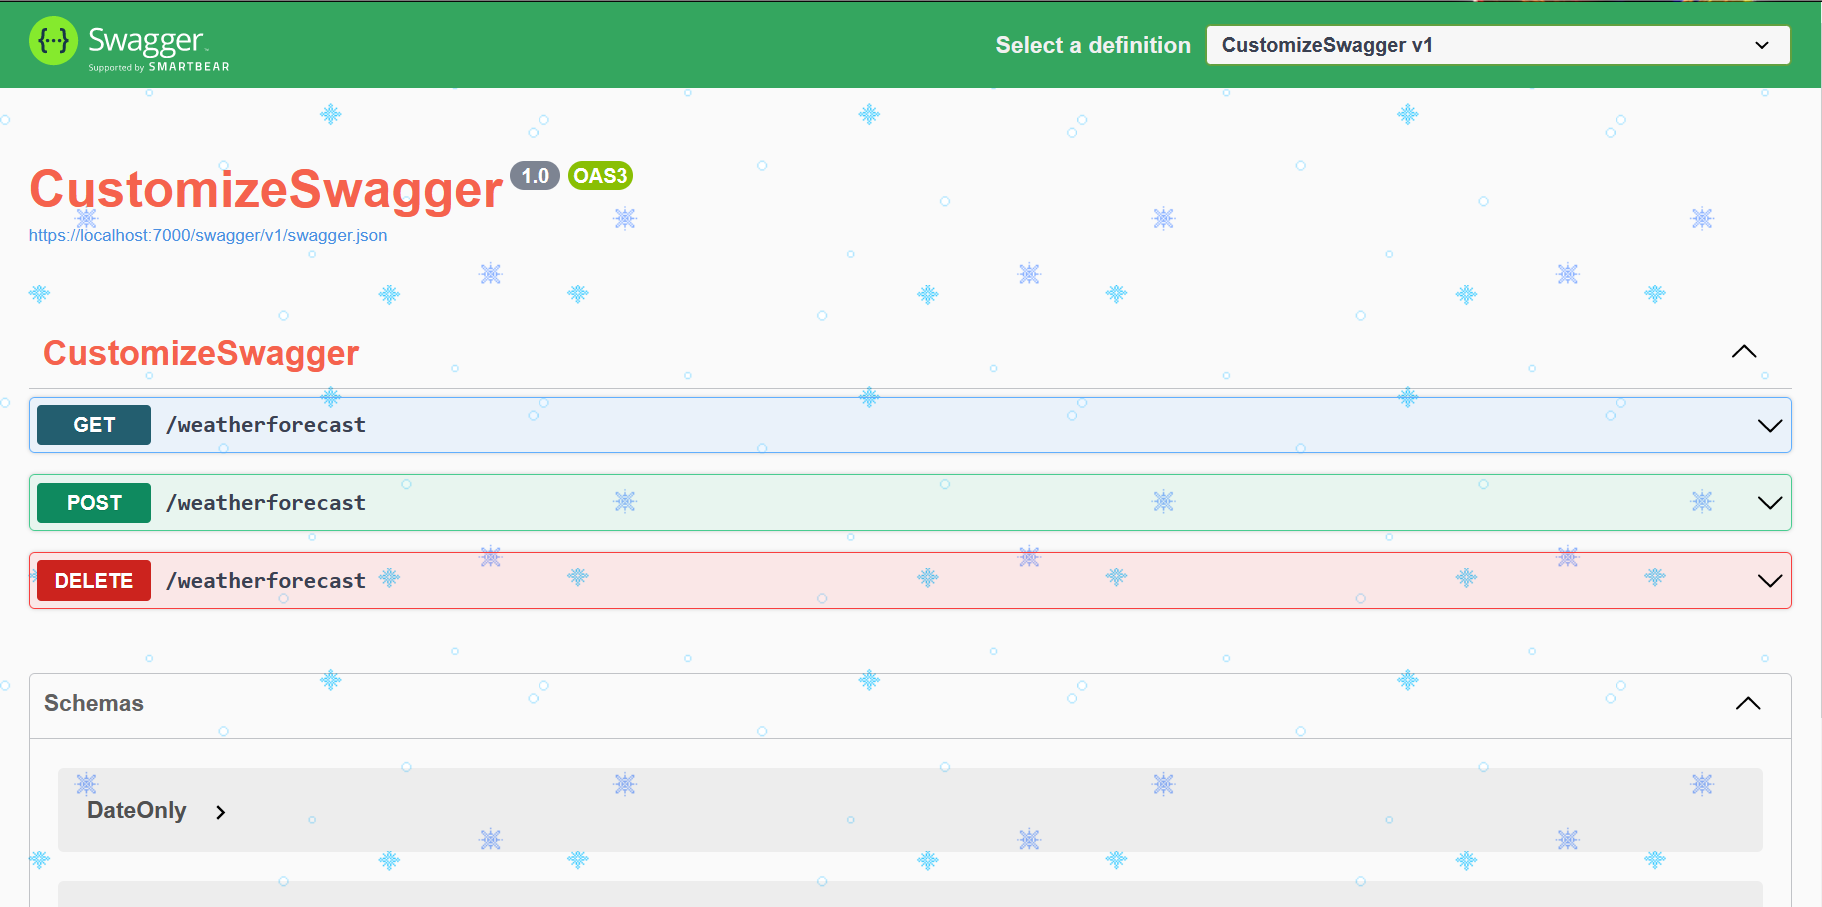
Brace yourself, Christmas is coming! 🎅
If you want to add a more festive look to your Swagger UI, it’s just a matter of creating a CSS file and injecting it.
You should create a custom CSS for your Swagger endpoints, especially if you are exposing them outside your company: if your company has a recognizable color palette, using it in your Swagger pages can make your brand stand out.
In this article, we will learn how to inject a CSS file in the Swagger UI generated using .NET Minimal APIs.
How to add Swagger in your .NET Minimal APIs
There are plenty of tutorials about how to add Swagger to your APIs. I wrote some too, where I explained how every configuration impacts what you see in the UI.
That article was targeting older dotNET versions without Minimal APIs. Now everything’s easier.
When you create your API project, Visual Studio asks you if you want to add OpenAPI support (aka Swagger). By adding it, you will have everything in place to get started with Swagger.
The key parts are builder.Services.AddEndpointsApiExplorer(), builder.Services.AddSwaggerGen(), app.UseSwagger(), app.UseSwaggerUI() and WithOpenApi(). Do you know that those methods do? If so, drop a comment below! 📩
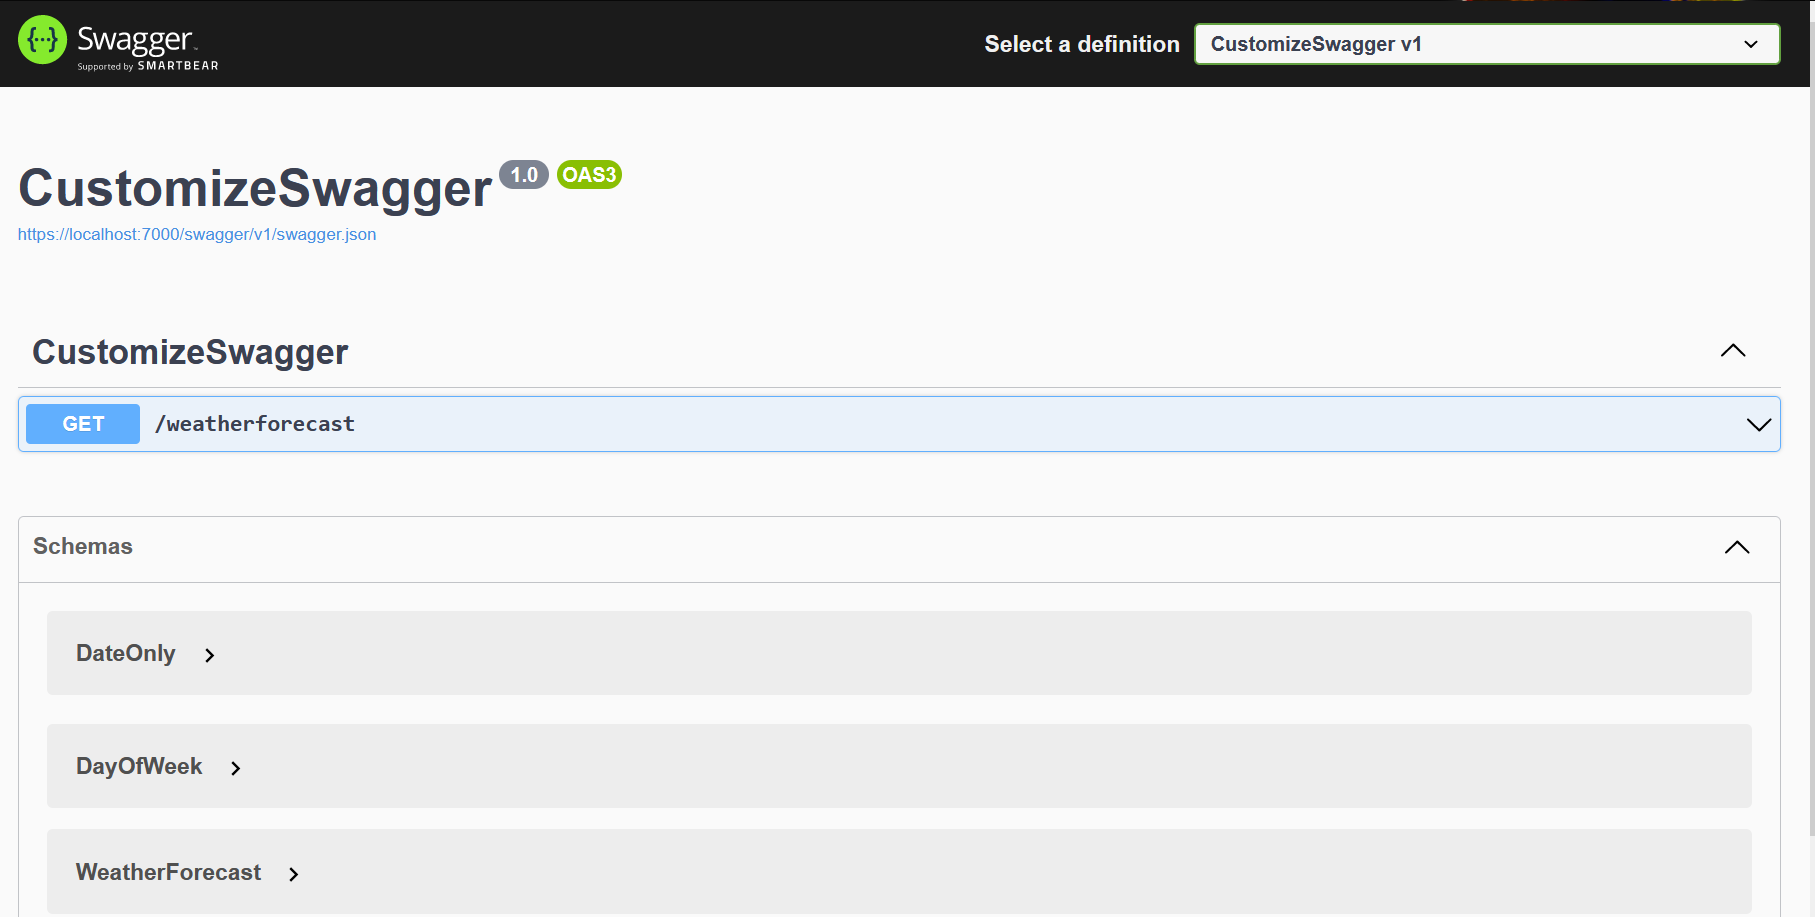
Now, if we run our application, we will see a UI similar to the one below.
That’s a basic UI. Quite boring, uh? Let’s add some style
Create the CSS file for Swagger theming
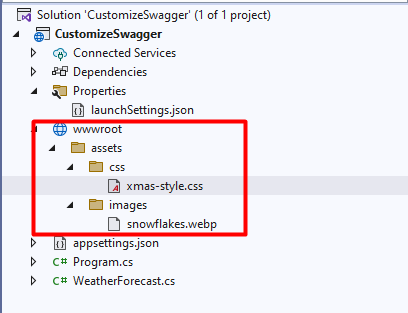
All the static assets must be stored within the wwwroot folder. It does not exist by default, so you have to create it manually. Click on the API project, add a new folder, and name it “wwwroot”. Since it’s a special folder, by default Visual Studio will show it with a special icon (it’s a sort of blue world, similar to 🌐).
Now you can add all the folders and static resources needed.
I’ve created a single CSS file under /wwwroot/assets/css/xmas-style.css. Of course, name it as you wish – as long as it is within the wwwroot folder, it’s fine.
the element selectors are taken directly from the Swagger UI – you’ll need a bit of reverse-engineering skills: just open the Browser Console and find the elements you want to update;
unless the element does not already have the rule you want to apply, you have to add the !important CSS operator. Otherwise, your code won’t affect the UI;
you can add assets from other folders: I’ve added background-image: url("../images/snowflakes.webp"); to the body style. That image is, as you can imagine, under the wwwroot folder we created before.
Just as a recap, here’s my project structure:
Of course, it’s not enough: we have to tell Swagger to take into consideration that file
How to inject a CSS file in Swagger UI
This part is quite simple: you have to update the UseSwaggerUI command within the Main method:
CSS is not the only part you can customize, there’s way more. Here’s an article I wrote about Swagger integration in .NET Core 3 APIs, but it’s still relevant (I hope! 😁)
Theming is often not considered an important part of API development. That’s generally correct: why should I bother adding some fancy colors to APIs that are not expected to have a UI?
This makes sense if you’re working on private APIs. In fact, theming is often useful to improve brand recognition for public-facing APIs.
You should also consider using theming when deploying APIs to different environments: maybe Blue for Development, Yellow for Staging, and Green for Production. That way your developers can understand which environment they’re exploring right easily.
User experience relies on small, thoughtful details that fit well into the overall design without overpowering the user. This balance can be tricky, especially with technologies like WebGL. While they can create amazing visuals, they can also become too complicated and distracting if not handled carefully.
One subtle but effective technique is the Bayer Dithering Pattern. For example, JetBrains’ recent Junie campaign page uses this approach to craft an immersive and engaging atmosphere that remains visually balanced and accessible.
In this tutorial, I’ll introduce you to the Bayer Dithering Pattern. I’ll explain what it is, how it works, and how you can apply it to your own web projects to enhance visual depth without overpowering the user experience.
Bayer Dithering
The Bayer pattern is a type of ordered dithering, which lets you simulate gradients and depth using a fixed matrix.
If we scale this matrix appropriately, we can target specific values and create basic patterns.
Here’s a simple example:
// 2×2 Bayer matrix pattern: returns a value in [0, 1)
float Bayer2(vec2 a)
{
    a = floor(a);                // Use integer cell coordinates
    return fract(a.x / 2.0 + a.y * a.y * 0.75);
    // Equivalent lookup table:
    // (0,0) → 0.0,  (1,0) → 0.5
    // (0,1) → 0.75, (1,1) → 0.25
}
Let’s walk through an example of how this can be used:
// 1. Base mask: left half is a black-to-white gradient
float mask = uv.y;

// 2. Right half: apply ordered dithering
if (uv.x > 0.5) {
    float dither = Bayer2(fragCoord);
    mask += dither - 0.5;
    mask  = step(0.5, mask); // binary threshold
}

// 3. Output the result
fragColor = vec4(vec3(mask), 1.0);
So with just a small matrix, we get four distinct dithering values—essentially for free.
See the Pen
Bayer2x2 by zavalit (@zavalit)
on CodePen.
Creating a Background Effect
This is still pretty basic—nothing too exciting UX-wise yet. Let’s take it further by creating a grid on our UV map. We’ll define the size of a “pixel” and the size of the matrix that determines whether each “pixel” is on or off using Bayer ordering.
You’ll see a rendered UV grid with blue dots for pixels and white (and subsequent blocks of the same size) for the Bayer matrix.
See the Pen
Pixel & Cell UV by zavalit (@zavalit)
on CodePen.
Recursive Bayer Matrices
Bayer’s genius was a recursively generated mask that keeps noise high-frequency and code low-complexity. So now let’s try it out, and apply also larger dithering matrix:
This gives us a nice visual transition from a basic UV grid to Bayer matrices of increasing complexity (2×2, 4×4, 8×8, 16×16).
See the Pen
Bayer Ranges Animation by zavalit (@zavalit)
on CodePen.
As you see, the 8×8 and 16×16 patterns are quite similar—beyond 8×8, the perceptual gain becomes minimal. So we’ll stick with Bayer8 for the next step.
Now, we’ll apply Bayer8 to a UV map modulated by fbm noise to make the result feel more organic—just as we promised.
See the Pen
Bayer fbm noise by zavalit (@zavalit)
on CodePen.
Adding Interactivity
Here’s where things get exciting: real-time interactivity that background videos can’t replicate. Let’s run a ripple effect around clicked points using the dithering pattern. We’ll iterate over all active clicks and compute a wave:
See the Pen
Untitled by zavalit (@zavalit)
on CodePen.
Final Thoughts
Because the entire Bayer-dither background is generated in a single GPU pass, it renders in under 0.2 ms even at 4K, ships in ~3 KB (+ Three.js in this case), and consumes zero network bandwidth after load. SVG can’t touch that once you have thousands of nodes, and autoplay video is two orders of magnitude heavier on bandwidth, CPU and battery. In short: this is the probably one of the lightest fully-interactive background effect you can build on the open web today.
A zero-day attack is defined as a cyber attack that happens when the vendor is unaware of any flaw or security vulnerability in the software, hardware, or firmware. The unknown or unaddressed vulnerability used in a zero-day attack is called a zero-day vulnerability.
What makes a Zero Day Attack lethal for organizations is
-They are often targeted attacks before the vendor can release the fix for the security vulnerability
– The malicious actor uses a zero-day exploit to plant malware, steal data, or exploit the users, organizations, or systems as part of cyber espionage or warfare.
– They take days to contain, as the fix is yet to be released by the vendors
Examples of Zero-Day Attacks in 2025
As per the India Cyber Threat Report 2025, these are the top zero day attacks identified in 2024, detailing their nature, potential impacts, and associated CVE identifiers.
A severe remote command execution vulnerability that allows attackers to execute unauthorized shell commands due to improper input validation. While authentication is typically required, an associated authentication flaw enables attackers to bypass this requirement, facilitating full system compromise.
Microsoft Windows Shortcut Handler (CVE-2024-21412)
A critical security bypass vulnerability in Windows’ shortcut file processing. It enables remote code execution through specially crafted shortcut (.lnk) files, circumventing established security controls when users interact with these malicious shortcuts.
This Server-Side request forgery vulnerability in the SAML component allows attackers to initiate unauthorized requests through the application. Successful exploitation grants access to internal network resources and enables the forwarding of malicious requests, leading to broader network compromise.
Mozilla Firefox Animation Timeline Use-After-Free (CVE-2024-9680)
A use-after-free vulnerability in Firefox’s animation timeline component permits remote code execution when users visit specially crafted websites. This vulnerability can lead to full system compromise, posing significant security risks to users.
How a Zero-day Attack Works?
Step 1: A software code creates a vulnerability without the developer realizing it.
Step 2: A malicious actor discovers this vulnerability and launches a targeted attack to exploit the code.
Step 3: The developer reliazes a security vulnerability in the software yet does not have a patch ready to fix it.
Step 4: The developers release a security patch to close the security vulnerability.
Step 5: The developers deploy the security patch.
The gap between the zero-day attack and the developers deploying a security patch is enough for a successful attack and may lead to a ransomware demand, system infiltration, and sensitive data leak. So how do we protect against