Just a second! 🫷 If you are here, it means that you are a software developer.
So, you know that storage, networking, and domain management have a cost .
If you want to support this blog, please ensure that you have disabled the adblocker for this site. I configured Google AdSense to show as few ADS as possible – I don’t want to bother you with lots of ads, but I still need to add some to pay for the resources for my site.
Thank you for your understanding. – Davide
It may happen, even just for testing some functionalities, that you want to change the Culture of the thread your application is running on.
The current Culture is defined in this global property: Thread.CurrentThread.CurrentCulture. How can we temporarily change it?
An idea is to create a class that implements the IDisposable interface to create a section, delimited by a using block, with the new Culture:
In the constructor, we store the current Culture in a private field. Then, when we call the Dispose method (which is implicitly called when closing the using block), we use that value to restore the original Culture.
How to use it
How can we try it? An example is by checking the currency symbol.
Thread.CurrentThread.CurrentCulture = new CultureInfo("ja-jp");
Console.WriteLine(Thread.CurrentThread.CurrentCulture.NumberFormat.CurrencySymbol); //¥using (new TemporaryThreadCulture(new CultureInfo("it-it")))
{
Console.WriteLine(Thread.CurrentThread.CurrentCulture.NumberFormat.CurrencySymbol);//€}
Console.WriteLine(Thread.CurrentThread.CurrentCulture.NumberFormat.CurrencySymbol); //¥
We start by setting the Culture of the current thread to Japanese so that the Currency symbol is ¥. Then, we temporarily move to the Italian culture, and we print the Euro symbol. Finally, when we move outside the using block, we get back to ¥.
Here’s a test that demonstrates the usage:
[Fact]void TestChangeOfCurrency()
{
using (new TemporaryThreadCulture(new CultureInfo("it-it")))
{
var euro = CultureInfo.CurrentCulture.NumberFormat.CurrencySymbol;
Assert.Equal(euro, "€");
using (new TemporaryThreadCulture(new CultureInfo("en-us")))
{
var dollar = CultureInfo.CurrentCulture.NumberFormat.CurrencySymbol;
Assert.NotEqual(euro, dollar);
}
Assert.Equal(euro, "€");
}
}
Using a class that implements IDisposable is a good way to create a temporary environment with different characteristics than the main environment.
I use this approach a lot when I want to experiment with different cultures to understand how the code behaves when I’m not using English (or, more generically, Western) culture.
Do you have any other approaches for reaching the same goal? If so, feel free to share them in the comments section!
Two high-severity vulnerabilities in WinRAR for Windows — CVE-2025-6218 and CVE-2025-8088 — allow attackers to write files outside the intended extraction directory. CVE-2025-6218 involves traditional path traversal, while CVE-2025-8088 extends the attack using NTFS Alternate Data Streams (ADS). Both flaws can be exploited by delivering a malicious archive to a user and relying on minimal interaction (just extraction).
Why it matters: These flaws enable reliable persistence and remote code execution (RCE) in enterprise environments. Threat actors, including RomCom and Paper Werewolf (aka GOFFEE), have exploited CVE-2025-8088 in active campaigns.
Vulnerability Overview
CVE-2025-6218
Type: Directory Traversal during extraction
Affected: WinRAR for Windows 7.11 and earlier (before 7.12 Beta 1)
Fixed in12 Beta 1
Impact: Files can be dropped outside the target extraction directory, e.g., into Windows Startup.
CVE-2025-8088
Type: Directory Traversal via NTFS ADS syntax (txt: stream)
Affected: WinRAR for Windows 7.12 and earlier
Fixed in13.
Impact: Attackers can hide payloads in ADS or place them into autorun locations for stealthy persistence.
Affected Components: WinRAR for Windows (GUI/CLI), UnRAR/UnRAR.dll, portable UnRAR (Windows builds)
Technical Details
CVE-2025-6218 – Directory Traversal in Archive Extraction
Root Cause: The RARReadHeader / RARProcessFile routines in WinRAR fail to normalize or validate relative path components (‘..\’, ‘../’). Attackers can force file writes outside the extraction directory without canonicalizing and bounding the output path.
Trigger: Any malicious RAR/ZIP archive containing file entries with traversal sequences in their header metadata.
Impact: File lands in Startup folder → auto-executes on login under user privileges.
Variant Notes: This exploit works for both absolute and relative extraction destinations. It does not require overwriting existing files — it can create new ones.
The vulnerability is exploitable whether the archive entry’s stored path is absolute (full system path) or relative (using traversal sequences).
Absolute path example: C:\Users\<username>\AppData\Roaming\Microsoft\Windows\Start Menu\Programs\Startup\evil.exe When extracted, the file is placed directly in the Startup folder, ignoring the chosen extraction directory.
Relative path example: ..\..\..\Users\<username>\AppData\Roaming\Microsoft\Windows\Start Menu\Programs\Startup\evil.exe The ‘..\’ sequences walk up the directory tree from the extraction location, then down into the Startup folder.
No Need to Overwrite Existing Files: The flaw allows new files to be created in sensitive locations even if they didn’t exist. This enables persistence without replacing trusted binaries, reducing the chance of triggering integrity alerts. Example: Dropping evil.lnk or malware.exe into Startup ensures auto-run on login.
CVE-2025-8088 – ADS-Assisted Path Traversal
Root Cause: Same traversal flaw as CVE-2025-6218, but the extraction code also fails to block NTFS ADS syntax in filenames (‘:’ character followed by stream name).
NTFS ADS Basics: An NTFS file can have multiple data streams: the main unnamed stream (default content) and any number of named alternate streams (e.g., ‘readme.txt: payload.exe’). Windows Explorer and most file listings don’t show ADS, making them useful for hiding content.
Example Payload Path: ..\..\..\Users\<username>\AppData\Roaming\Microsoft\Windows\Start Menu\Programs\Startup\readme.txt: malicious.exe
Impact: The payload of a benign-looking file in the Startup folder is stored in ADS. A loader script may execute it later or side-load it via another process.
Why It’s Worse: ADS hides the malicious binary from casual inspection and some legacy security tools, delaying detection.
Observed Exploitation: Threat actors use it for stealth persistence plus staging malware for later execution.
Attack Chain
Prepare Payload: Attacker embeds malicious executable/script in archive using traversal and/or ADS syntax.
Deliver Archive: Sent via email, instant messaging, or malicious download links.
Victim Extraction: User extracts with vulnerable WinRAR/UnRAR.
Silent Path Escape: Payload lands in Startup or other sensitive locations.
Automatic Execution: Runs on reboot/login with user privileges.
Exploitation in the Wild
RomCom: Used CVE-2025-8088 as a zero-day in spear-phishing starting mid-July 2025, delivering backdoors via autorun locations.
Paper Werewolf: Observed exploiting similar traversal flaws against Russian targets.
Forecast: Expect copycat campaigns — trivial to weaponize, high persistence rate.
Monitor HKCU\Software\Microsoft\Windows\CurrentVersion\Run for related changes.
MITRE ATT&CK Mapping
T1059 – Command and Scripting Interpreter
T1204 – User Execution
001 – Registry Run Keys / Startup Folder
004 – NTFS File Attributes (ADS)
T1027 – Obfuscated Files or Information
Patch Verification
Confirm version 13 on all endpoints.
Validate signatures & checksums of installer.
Test with crafted traversal/ADS archives to ensure blocking.
Conclusion
CVE-2025-6218 and CVE-2025-8088 show how insufficient path validation and overlooked NTFS features can lead to stealthy persistence and RCE. Exploitation requires minimal user interaction, and both flaws have been used in real-world attacks. Immediate patching, combined with proactive hunting for ADS and Startup modifications, is essential for defense.
We all need to parse strings as integers. Most of the time, we use int.TryParse(string, out int). But there’s a more advanced overload that we can use for complex parsing.
Table of Contents
Just a second! 🫷 If you are here, it means that you are a software developer.
So, you know that storage, networking, and domain management have a cost .
If you want to support this blog, please ensure that you have disabled the adblocker for this site. I configured Google AdSense to show as few ADS as possible – I don’t want to bother you with lots of ads, but I still need to add some to pay for the resources for my site.
Thank you for your understanding. – Davide
You have probably used the int.TryParse method with this signature:
That C# method accepts a string, s, which, if it can be parsed, will be converted to an int value and whose integer value will be stored in the result parameter; at the same time, the method returns true to notify that the parsing was successful.
As an example, this snippet:
if (int.TryParse("100", outint result))
{
Console.WriteLine(result + 2); // correctly parsed as an integer}
else{
Console.WriteLine("Failed");
}
prints 102.
Does it work? Yes. Is this the best we can do? No!
How to parse complex strings with int.TryParse
What if you wanted to parse 100€? There is a less-known overload that does the job:
NumberStyles.AllowThousands | NumberStyles.AllowCurrencySymbol does the trick.
Conclusion
We all use the simple int.TryParse method, but when parsing the input string requires more complex calculations, we can rely on those overloads. Of course, if it’s still not enough, you should create your custom parsers (or, as a simpler approach, you can use regular expressions).
Are there any methods that have overloads that nobody uses? Share them in the comments!
Just a second! 🫷 If you are here, it means that you are a software developer.
So, you know that storage, networking, and domain management have a cost .
If you want to support this blog, please ensure that you have disabled the adblocker for this site. I configured Google AdSense to show as few ADS as possible – I don’t want to bother you with lots of ads, but I still need to add some to pay for the resources for my site.
Thank you for your understanding. – Davide
Many developers say that
All comments are bad! 💢
False! Most of the comments are bad!
For example, look at this method, and look at the comments:
/// <summary> Checks if the password is valid </summary>/// <param name="password">The password to be validated</param>/// <returns>True if the password is valid, false otherwise</returns>publicbool IsPasswordValid(string password)
{
Regex regex = new Regex(@"[a-z]{2,7}[1-9]{3,4}");
var hasMatch = regex.IsMatch(password);
return hasMatch;
}
Here the comments are pointless – they just tell the same things you can infer by looking at the method signature: this method checks if the input string is a valid password.
So, yes, those kinds of comments are totally meaningless, and they should be avoided.
But still, there are cases when writing comments is pretty helpful.
publicbool IsPasswordValid(string password)
{
// 2 to 7 lowercase chars followed by 3 or 4 numbers// Valid: kejix173// aoe193// Invalid: a92881 Regex regex = new Regex(@"[a-z]{2,7}[1-9]{3,4}");
return regex.IsMatch(password);
}
Here the purpose of the comment is not to explain what the method does (it’s already pretty explicit), but it explains with examples the Regular Expression used to validate the password. Another way to explain it is by adding tests that validate some input strings. In this way, you make sure that the documentation (aka the tests) is always aligned with the production code.
By the way, for more complex calculations, adding comments explaining WHY (and not HOW or WHAT) a piece of code does is a good way to help developers understand the code.
Another reason to add comments is to explain why a specific piece of code exists: examples are legal regulations, related work items, or references to where you’ve found that particular solution.
Conclusion
Always pay attention when writing comments: yes, they often just clutter the code. But they can really add value to the code, in some cases.
To read more about good and bad comments, here’s a well-detailed article you might like:
With Entity Framework you can perform operations on relational databases without writing a single line of SQL. We will use EF to integrate PostgreSQL in our application
Table of Contents
Just a second! 🫷 If you are here, it means that you are a software developer.
So, you know that storage, networking, and domain management have a cost .
If you want to support this blog, please ensure that you have disabled the adblocker for this site. I configured Google AdSense to show as few ADS as possible – I don’t want to bother you with lots of ads, but I still need to add some to pay for the resources for my site.
Thank you for your understanding. – Davide
When working with relational databases, you often come across two tasks: writing SQL queries and mapping the results to some DTO objects.
.NET developers are lucky to have an incredibly powerful tool that can speed up their development: Entity Framework. Entity Framework (in short: EF) is an ORM built with in mind simplicity and readability.
In this article, we will perform CRUD operations with Entity Framework Core on a database table stored on PostgreSQL.
Introduction EF Core
With Entity Framework you don’t have to write SQL queries in plain text: you write C# code that gets automatically translated into SQL commands. Then the result is automatically mapped to your C# classes.
Entity Framework supports tons of database engines, such as SQL Server, MySQL, Azure CosmosDB, Oracle, and, of course, PostgreSQL.
There are a lot of things you should know about EF if you’re new to it. In this case, the best resource is its official documentation.
But the only way to learn it is by getting your hands dirty. Let’s go!
How to set up EF Core
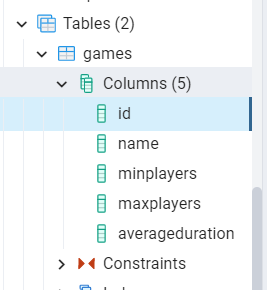
For this article, we will reuse the same .NET Core repository and the same database table we used when we performed CRUD operations with Dapper (a lightweight OR-M) and with NpgSql, which is the library that performs bare-metal operations.
The first thing to do is, as usual, install the related NuGet package. Here we will need Npgsql.EntityFrameworkCore.PostgreSQL. Since I’ve used .NET 5, I have downloaded version 5.0.10.
Then, we need to define and configure the DB Context.
Define and configure DbContext
The idea behind Entity Framework is to create DB Context objects that map database tables to C# data sets. DB Contexts are the entry point to the tables, and the EF way to work with databases.
So, the first thing to do is to define a class that inherits from DbContext:
publicclassBoardGamesContext : DbContext
{
}
Within this class we define one or more DbSets, that represent the collections of data rows on their related DB table:
public DbSet<BoardGame> Games { get; set; }
Then we can configure this specific DbContext by overriding the OnConfiguring method and specifying some options; for example, you can specify the connection string:
Now that we have the BoardGamesContext ready we have to add its reference in the Startup class.
In the ConfigureServices method, add the following instruction:
services.AddDbContext<BoardGamesContext>();
With this instruction, you make the BoardGamesContext context available across the whole application.
You can further configure that context using an additional parameter of type Action<DbContextOptionsBuilder>. In this example, you can skip it, since we’ve already configured the BoardGamesContext using the OnConfiguring method. They are equivalent.
As we know, EF allows you to map DB rows to C# objects. So, we have to create a class and configure it in a way that allows EF Core to perform the mapping.
Now that the setup is complete, we can perform our CRUD operations. Entity Framework simplifies a lot the way to perform such types of operations, so we can move fast in this part.
There are two main points to remember:
to access the context we have to create a new instance of BoardGamesContext, which should be placed into a using block.
When performing operations that change the status of the DB (insert/update/delete rows), you have to explicitly call SaveChanges or SaveChangesAsync to apply those changes. This is useful when performing batch operations on one or more tables (for example, inserting an order in the Order table and updating the user address in the Users table).
Create
To add a new BoardGame, we have to initialize the BoardGamesContext context and add a new game to the Games DbSet.
publicasync Task Add(BoardGame game)
{
using (var db = new BoardGamesContext())
{
await db.Games.AddAsync(game);
await db.SaveChangesAsync();
}
}
Read
If you need a specific entity by its id you can use Find and FindAsync.
publicasync Task<BoardGame> Get(int id)
{
using (var db = new BoardGamesContext())
{
returnawait db.Games.FindAsync(id);
}
}
Or, if you need all the items, you can retrieve them by using ToListAsync
publicasync Task<IEnumerable<BoardGame>> GetAll()
{
using (var db = new BoardGamesContext())
{
returnawait db.Games.ToListAsync();
}
}
Update
Updating an item is incredibly straightforward: you have to call the Update method, and then save your changes with SaveChangesAsync.
publicasync Task Update(int id, BoardGame game)
{
using (var db = new BoardGamesContext())
{
db.Games.Update(game);
await db.SaveChangesAsync();
}
}
For some reason, EF does not provide an asynchronous way to update and remove items. I suppose that it’s done to prevent or mitigate race conditions.
Delete
Finally, to delete an item you have to call the Remove method and pass to it the game to be removed. Of course, you can retrieve that game using FindAsync.
publicasync Task Delete(int id)
{
using (var db = new BoardGamesContext())
{
var game = await db.Games.FindAsync(id);
if (game == null)
return;
db.Games.Remove(game);
await db.SaveChangesAsync();
}
}
Further readings
Entity Framework is impressive, and you can integrate it with tons of database vendors. In the link below you can find the full list. But pay attention that not all the libraries are implemented by the EF team, some are third-party libraries (like the one we used for Postgres):
This article concludes the series that explores 3 ways to perform CRUD operations on a Postgres database with C#.
In the first article, we’ve seen how to perform bare-metal queries using NpgSql. In the second article, we’ve used Dapper, which helps mapping queries results to C# DTOs. Finally, we’ve used Entity Framework to avoid writing SQL queries and have everything in place.
Which one is your favorite way to query relational databases?
SeedTodos – quickly inserts a few sample todos into the API, so we don’t start from an empty sheet.
ListTodosToSheet – pulls all todos into Sheet1. It writes ID, Title, and Completed columns, so you can see the live state.
DumpTodosToImmediate – prints the same list into the VBA Immediate Window (Ctrl+G). Handy for quick debugging.
?CreateTodo(“Watch VitoshAcademy”,True) – creates a new todo with a title and completed flag. The ? in the Immediate Window prints the returned ID.
UpdateTodoTitle1,“Watch VitoshAcademy” – updates the title of the todo with ID=1.
SetTodoCompleted1,True – marks the same item as completed.
GetTodoById1 – fetches a single item as raw JSON, displayed in the Immediate Window.
DeleteTodo1 – removes the todo with ID=1.
DeleteAllTodos – wipes everything in the list (careful with this one!).
ListTodosToSheet – refresh the sheet after changes to confirm results.
PushSheetToApi – the powerful one: reads rows from Excel (ID, Title, Completed, Action) and syncs them back to the API. That way you can create, update, or delete tasks directly from the sheet.
With these simple commands, Excel is no longer just a spreadsheet — it’s a lightweight API client. And because the backend runs in Docker, the setup is reproducible and isolated. This small project connects three different worlds — Docker, Python, and Excel VBA. It is a demonstration that APIs are not only for web developers; even Excel can talk to them easily.
It would be great if we could break the debugging flow if a condition is (not) met. Can we? Of course!
Table of Contents
Just a second! 🫷 If you are here, it means that you are a software developer.
So, you know that storage, networking, and domain management have a cost .
If you want to support this blog, please ensure that you have disabled the adblocker for this site. I configured Google AdSense to show as few ADS as possible – I don’t want to bother you with lots of ads, but I still need to add some to pay for the resources for my site.
Thank you for your understanding. – Davide
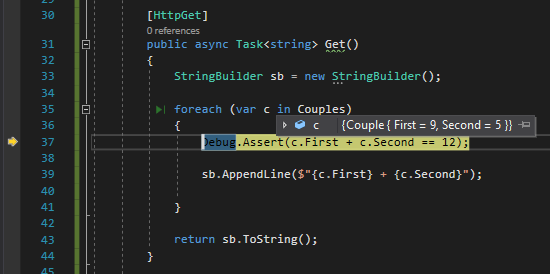
Sometimes, while debugging, you want to check if the state of your code is still valid, or, at least, it corresponds to some expectations.
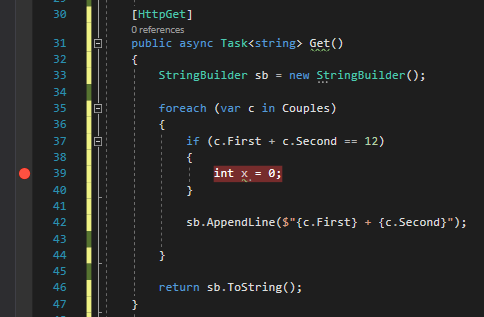
A simple approach to this problem is to add an if statement with the condition you need to check and place a dummy instruction just to be marked with a breakpoint.
[HttpGet]publicasync Task<string> Get()
{
StringBuilder sb = new StringBuilder();
foreach (var c in Couples)
{
if(c.First + c.Second == 12)
{
int x = 0;
// just to put here the debugger// or place a Console.WriteLine,// which in most of the cases// is not available }
sb.AppendLine($"{c.First} + {c.Second}");
}
return sb.ToString();
}
Which is fine, but it clutters your code.
Instead of placing breakpoints all over your code to manually check the application state (or use conditional breakpoints), you can create assertions that break your code only if launched in Debug mode.
[HttpGet]publicasync Task<string> Get()
{
StringBuilder sb = new StringBuilder();
foreach (var c in Couples)
{
Debug.Assert(c.First + c.Second == 12);
sb.AppendLine($"{c.First} + {c.Second}");
}
return sb.ToString();
}
⚠ Note: Debug, not Debugger!
With Debug.Assert can define a custom condition to be evaluated. If the check fails, the debugger automatically stops there to allow you to check the locals.
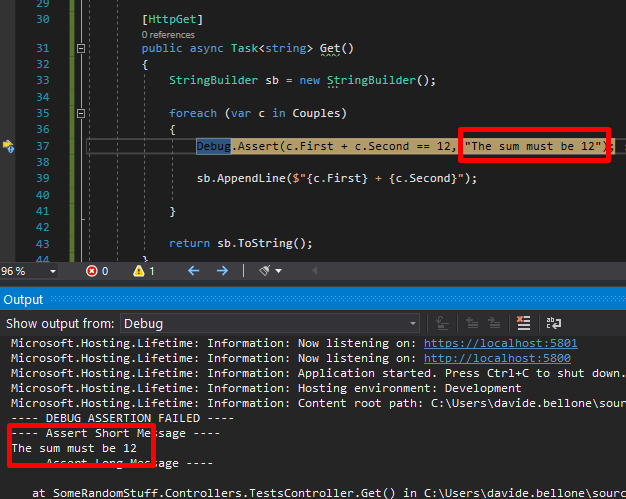
You can also add a message that can help you understand why the check fails:
foreach (var c in Couples)
{
    Debug.Assert(c.First + c.Second == 12, "The sum must be 12");

    sb.AppendLine($"{c.First} + {c.Second}");
}
To see the error message, you have to navigate to Debug > Windows > Output
where you can see the message you’ve defined before.
Note: the messages are sent to the System.Diagnostics.Trace.Listeners collection. If you have another listener, you can use it to intercept those messages.
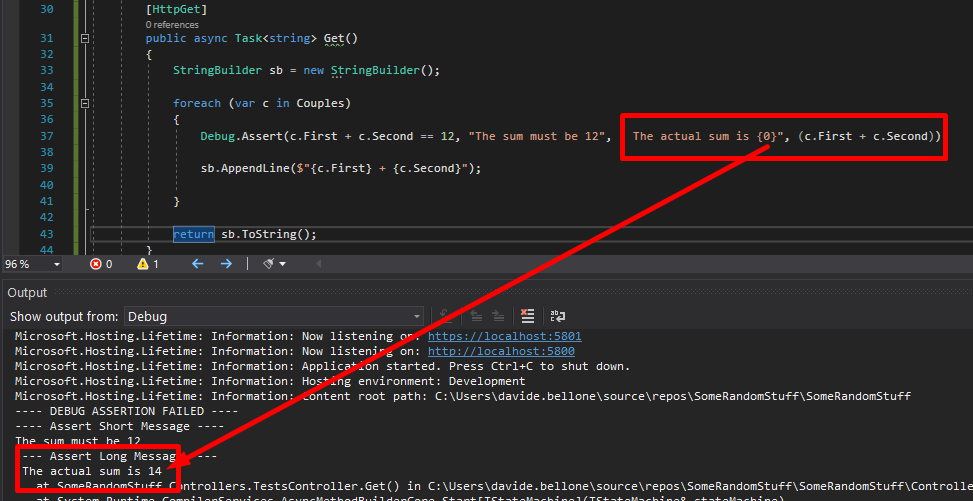
Then you can add more details to that message, and you can also more info to the detailed message by adding additional parameters to it as if you were using String.Format.
foreach (var c in Couples)
{
    Debug.Assert(c.First + c.Second == 12, "The sum must be 12", " The actual sum is {0}", (c.First + c.Second));

    sb.AppendLine($"{c.First} + {c.Second}");
}
Again, run the application and have a look at the Output folder:
Debug.Assert works only in DEBUG mode – or, at least, when the DEBUG variable is defined. Otherwise, all those checks will simply get removed from the build result, so they will not impact your application when running in RELEASE mode.
My name is Andrés Briganti, and I’m an independent graphic designer based in Buenos Aires, Argentina. I collaborate with brands, institutions, and individuals from around the world.
While my focus is on visual identity, my work spans over various fields of design visual communication, from physical to digital, from posters to wristwatches. My approach is refined and intentional, with the goal to distill abstract or complex ideas into distinctive visual forms.
Selected Projects
Personal Site
My most recent, and most visible, digital project is my portfolio website. After years of iterations and a stalled launch, the concept matured into a more cohesive direction. Earlier this year, I teamed up with Joyco Studio to bring it to life. The result has been well received and earned an FWA Site of the Day.
AB Setima
A few years ago, I began taking my interest in type design more seriously. I was even part of the team that designed the Geist typeface for Vercel while working at basement.studio.
My latest exploration in this field is AB Setima, a sans-serif display typeface that blends Art Deco geometry with a modern sensibility. It has refined proportions and tapered inner angles in contrast with sharp outer ones. The typeface includes variants and discretionary ligatures, offering some flexibility in composition.
Designed with restaurant identities, hotel graphics, and event communications in mind, AB Setima delivers a sense of distinction with some edge to it.
Einstoffen
During 2023, I led the rebrand and visual language refinement for Einstoffen, a Swiss brand founded in 2008 that creates distinctive eyewear and fashion for independent-minded individuals. The project focused on sharpening the brand’s visual identity to better reflect its bold, self-assured spirit and evolving product offering.
Various Identities
A selection of brand visual identities I’ve created over the years.
Previously, I’ve worked as Lead Brand Designer for digital studios and as Design Director for fashion and lifestyle brands. Today, I split my time between my independent practice, where I focus on visual exploration, and Rampant Studio, a collaborative creative bureau I’m building as Creative Director.
Design Philisophy
I believe in design that is both conceptually grounded and thoughtfully constructed, work that distills complex ideas into clear, enduring visual forms. My process balances strategic thinking with formal expression, creating identities and systems that are purposeful, distinctive, and built to last. I aim for clarity over noise, and visual languages that reflect the true character of the brands they serve.
Final Thoughts
I believe a designer’s greatest asset is the ability to connect the dots across the span of human experience and culture. A lack of interest in history, culture, and seemingly unrelated subjects leads to work that is shallow and short-lived. It’s curiosity – not specific skills or tools – that truly sets us apart.
Contact
I’m always happy to connect, share ideas, and explore new projects. Drop me a line anytime.
If your application is exposed on the Web, I guess that you get some values from the HTTP Requests, don’t you?
Table of Contents
Just a second! 🫷 If you are here, it means that you are a software developer.
So, you know that storage, networking, and domain management have a cost .
If you want to support this blog, please ensure that you have disabled the adblocker for this site. I configured Google AdSense to show as few ADS as possible – I don’t want to bother you with lots of ads, but I still need to add some to pay for the resources for my site.
Thank you for your understanding. – Davide
If you are building an application that is exposed on the Web, you will probably need to read some data from the current HTTP Request or set some values on the HTTP Response.
In a .NET API, all the info related to both HTTP Request and HTTP Response is stored in a global object called HttpContext. How can you access it?
In this article, we will learn how to get rid of the old HttpContext.Current and what we can do to write more testable code.
Why not HttpContext directly
Years ago, we used to access the HttpContext directly in our code.
For example, if we had to access the Cookies collection, we used to do
var cookies = HttpContext.Current.Request.Cookies;
It worked, right. But this approach has a big problem: it makes our tests hard to set up.
In fact, we were using a static instance that added a direct dependency between the client class and the HttpContext.
That’s why the .NET team has decided to abstract the retrieval of that class: we now need to use IHttpContextAccessor.
Add IHttpContextAccessor
Now, I have this .NET project that exposes an endpoint, /WeatherForecast, that returns the current weather for a particular city, whose name is stored in the HTTP Header “data-location”.
The real calculation (well, real… everything’s fake, here 😅) is done by the WeatherService. In particular, by the GetCurrentWeather method.
public WeatherForecast GetCurrentWeather()
{
string currentLocation = GetLocationFromContext();
var rng = new Random();
returnnew WeatherForecast
{
TemperatureC = rng.Next(-20, 55),
Summary = Summaries[rng.Next(Summaries.Length)],
Location = currentLocation
};
}
We have to retrieve the current location.
As we said, we cannot anymore rely on the old HttpContext.Current.Request.
Instead, we need to inject IHttpContextAccessor in the constructor, and use it to access the Request object:
public WeatherService(IHttpContextAccessor httpContextAccessor)
{
    _httpContextAccessor = httpContextAccessor;
}
Once we have the instance of IHttpContextAccessor, we can use it to retrieve the info from the current HttpContext headers:
string currentLocation = "";

if (_httpContextAccessor.HttpContext.Request.Headers.TryGetValue("data-location", out StringValues locationHeaders) && locationHeaders.Any())
{
    currentLocation = locationHeaders.First();
}

return currentLocation;
Easy, right? We’re almost done.
Configure Startup class
If you run the application in this way, you will not be able to access the current HTTP request.
That’s because we haven’t specified that we want to add IHttpContextAccessor as a service in our application.
To do that, we have to update the ConfigureServices class by adding this instruction:
services.AddHttpContextAccessor();
Which comes from the Microsoft.Extensions.DependencyInjection namespace.
Now we can run the project!
If we call the endpoint specifying a City in the data-location header, we will see its value in the returned WeatherForecast object, in the Location field:
Further improvements
Is it enough?
If we use it this way, every class that needs to access the HTTP Context will have tests quite difficult to set up, because you will need to mock several objects.
In fact, for mocking HttpContext.Request.Headers, we need to create mocks for HttpContext, for Request, and for Headers.
This makes our tests harder to write and understand.
So, my suggestion is to wrap the HttpContext access in a separate class and expose only the methods you actually need.
For instance, you could wrap the access to HTTP Request Headers in the GetValueFromRequestHeader of an IHttpContextWrapper service:
In this way, you will be able to write better tests both for the HttpContextWrapper class, by focusing on the building of the HttpRequest, and for the WeatherService class, so that you can write tests without worrying about setting up complex structures just for retrieving a value.
But pay attention to the dependency lifescope! HTTP Requests info live within – guess what? – their HTTP Request. So, when defining the dependencies in the Startup class, remember to inject the IHttpContextWrapper as Transient or, even better, as Scoped. If you don’t remember the difference, I got you covered here!
Wrapping up
In this article, we’ve learned that you can access the current HTTP request by using IHttpContextAccessor. Of course, you can use it to update the Response too, for instance by adding an HTTP Header.
Just a second! 🫷 If you are here, it means that you are a software developer.
So, you know that storage, networking, and domain management have a cost .
If you want to support this blog, please ensure that you have disabled the adblocker for this site. I configured Google AdSense to show as few ADS as possible – I don’t want to bother you with lots of ads, but I still need to add some to pay for the resources for my site.
Thank you for your understanding. – Davide
Actually, this article is not about a tip to write cleaner code, but it is an article that aims at pointing out a code smell.
Of course, once you find this code smell in your code, you can act in order to eliminate it, and, as a consequence, you will end up with cleaner code.
The code smell is easy to identify: open your classes and have a look at the imports list (in C#, the using on top of the file).
A real example of too many imports
Here’s a real-life example (I censored the names, of course):
using MyCompany.CMS.Data;
using MyCompany.CMS.Modules;
using MyCompany.CMS.Rendering;
using MyCompany.Witch.Distribution;
using MyCompany.Witch.Distribution.Elements;
using MyCompany.Witch.Distribution.Entities;
using Microsoft.Extensions.Logging;
using Newtonsoft.Json;
using Newtonsoft.Json.Serialization;
using MyProject.Controllers.VideoPlayer.v1.DataSource;
using MyProject.Controllers.VideoPlayer.v1.Vod;
using MyProject.Core;
using MyProject.Helpers.Common;
using MyProject.Helpers.DataExplorer;
using MyProject.Helpers.Entities;
using MyProject.Helpers.Extensions;
using MyProject.Helpers.Metadata;
using MyProject.Helpers.Roofline;
using MyProject.ModelsEntities;
using MyProject.Models.ViewEntities.Tags;
using MyProject.Modules.EditorialDetail.Core;
using MyProject.Modules.VideoPlayer.Models;
using System;
using System.Collections.Generic;
using System.ComponentModel;
using System.Linq;

namespace MyProject.Modules.Video
Sounds familiar?
If we exclude the imports necessary to use some C# functionalities
using System;
using System.Collections.Generic;
using System.ComponentModel;
using System.Linq;
We have lots of dependencies on external modules.
This means that if something changes in one of the classes that are part of those namespaces, we may end up with code that is difficult to update.
Also, guess what comes with all those imports? Constructor with too many parameters (and, in fact, in this class, I have 11 dependencies injected in the constructor) and code that is too long and difficult to understand (and, in fact, this class has 500+ lines).
A solution? Refactor your project in order to minimize scattering those dependencies.
Wrapping up
Having all those imports (in C# we use the keyword using) is a good indicator that your code does too many things. You should focus on minimizing those imports without cheating (like using global imports).