برچسب: How

  • HTTP Logging in ASP.NET: how to automatically log all incoming HTTP requests (and its downsides!)

    HTTP Logging in ASP.NET: how to automatically log all incoming HTTP requests (and its downsides!)


    Aren’t you tired of adding manual logs to your HTTP APIs to log HTTP requests and responses? By using a built-in middleware in ASP.NET, you will be able to centralize logs management and have a clear view of all the incoming HTTP requests.

    Table of Contents

    Just a second! 🫷
    If you are here, it means that you are a software developer.
    So, you know that storage, networking, and domain management have a cost .

    If you want to support this blog, please ensure that you have disabled the adblocker for this site.
    I configured Google AdSense to show as few ADS as possible – I don’t want to bother you with lots of ads, but I still need to add some to pay for the resources for my site.

    Thank you for your understanding.
    Davide

    Whenever we publish a service, it is important to add proper logging to the application. Logging helps us understand how the system works and behaves, and it’s a fundamental component that allows us to troubleshoot problems that occur during the actual usage of the application.

    In this blog, we have talked several times about logging. However, we mostly focused on the logs that were written manually.

    In this article, we will learn how to log incoming HTTP requests to help us understand how our APIs are being used from the outside.

    Scaffolding the empty project

    To showcase this type of logging, I created an ASP.NET API. It’s a very simple application with CRUD operations on an in-memory collection.

    [ApiController]
    [Route("[controller]")]
    public class BooksController : ControllerBase
    {
        private readonly List<Book> booksCatalogue = Enumerable.Range(1, 5).Select(index => new Book
        {
            Id = index,
            Title = $"Book with ID {index}"
        }).ToList();
    
        private readonly ILogger<BooksController> _logger;
    
        public BooksController(ILogger<BooksController> logger)
        {
            _logger = logger;
        }
    }
    

    These CRUD operations are exposed via HTTP APIs, following the usual verb-based convention.

    For example:

    [HttpGet("{id}")]
    public ActionResult<Book> GetBook([FromRoute] int id)
    {
        _logger.LogInformation("Looking if in my collection with {TotalBooksCount} books there is one with ID {SearchedId}"
                , booksCatalogue.Count, id);
    
        Book? book = booksCatalogue.SingleOrDefault(x => x.Id == id);
    
        return book switch
        {
            null => NotFound(),
            _ => Ok(book)
        };
    }
    

    As you can see, I have added some custom logs: before searching for the element with the specified ID, I also wrote a log message such as “Looking if in my collection with 5 books there is one with ID 2”.

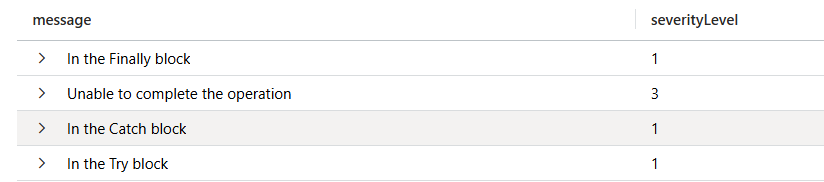
    Where can I find the message? For the sake of this article, I decided to use Seq!

    Seq is a popular log sink (well, as you may know, my favourite one!), that is easy to install and to integrate with .NET. I’ve thoroughly explained how to use Seq in conjunction with ASP.NET in this article and in other ones.

    In short, the most important change in your application is to add Seq as the log sink, like this:

    builder.Services.AddLogging(lb => {
        lb.AddSeq();
    });
    

    Now, whenever I call the GET endpoint, I can see the related log messages appear in Seq:

    Custom log messages

    But sometimes it’s not enough. I want to see more details, and I want them to be applied everywhere!

    How to add HTTP Logging to an ASP.NET application

    HTTP Logging is a way of logging most of the details of the incoming HTTP operations, tracking both the requests and the responses.

    With HTTP Logging, you don’t need to manually write custom logs to access the details of incoming requests: you just need to add its related middleware, configure it as you want, and have all the required logs available for all your endpoints.

    Adding it is pretty straightforward: you first need to add the HttpLogging middleware to the list of services:

    builder.Services.AddHttpLogging(lb => { });
    

    so that you can use it once the WebApplication instance is built:

    There’s still a problem, though: all the logs generated via HttpLogging are, by default, ignored, as logs coming from their namespace (named Microsoft.AspNetCore.HttpLogging.HttpLoggingMiddleware) are at Information log level, thus ignored because of the default configurations.

    You either have to update the appsetting.json file to tell the logging system to process logs from that namespace:

    {
      "Logging": {
        "LogLevel": {
          "Default": "Information",
          "Microsoft.AspNetCore": "Warning",
          "Microsoft.AspNetCore.HttpLogging.HttpLoggingMiddleware": "Information"
        }
      }
    }
    

    or, alternatively, you need to do the same when setting up the logging system in the Program class:

    builder.Services.AddLogging(lb => {
      lb.AddSeq();
    + lb.AddFilter("Microsoft.AspNetCore.HttpLogging.HttpLoggingMiddleware", LogLevel.Information);
    });
    

    We then have all our pieces in place: let’s execute the application!

    First, you can spin up the API; you should be able to see the Swagger page:

    Swagger page for our application&rsquo;s API

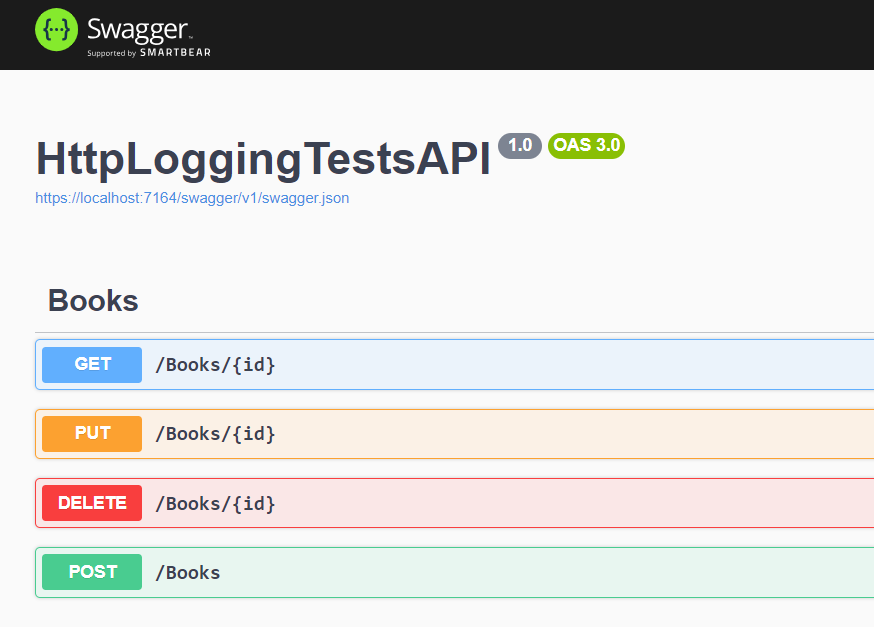
    From here, you can call the GET endpoint:

    Http response of the API call, as seen on Swagger

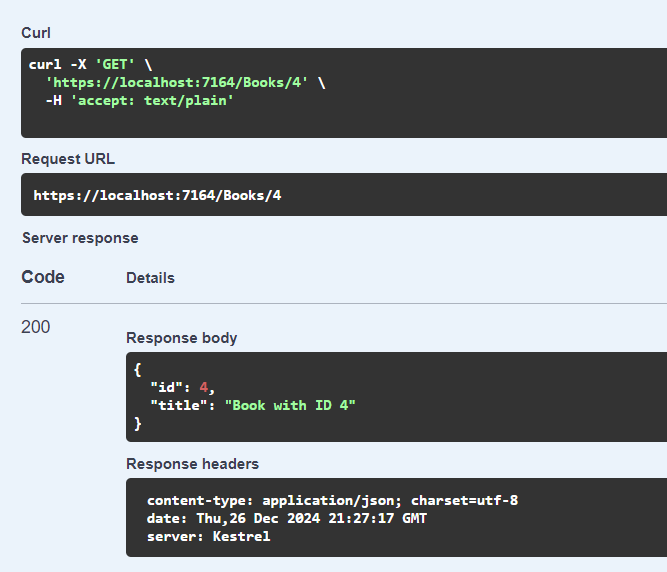
    You should now able to see all the logs in Seq:

    Logs list in Seq

    As you can see from the screenshot above, I have a log entry for the request and one for the response. Also, of course, I have the custom message I added manually in the C# method.

    Understanding HTTP Request logs

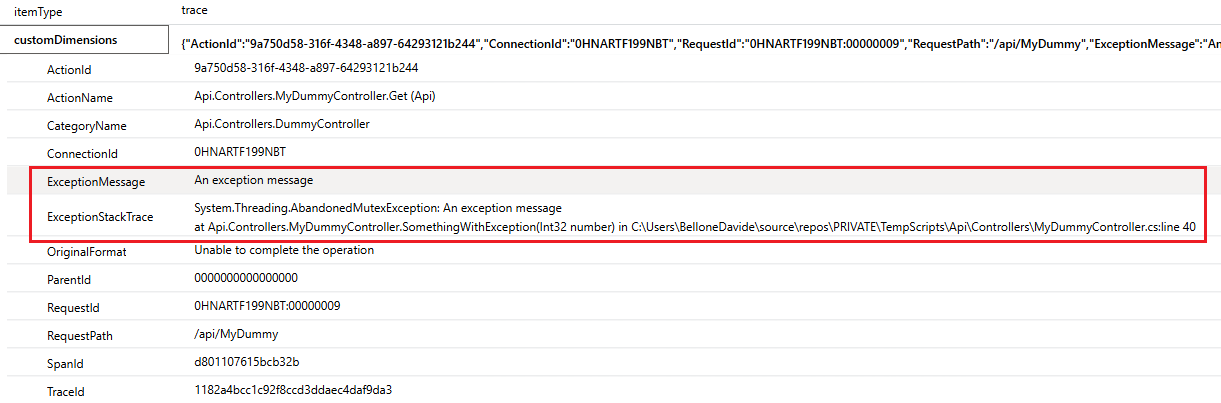
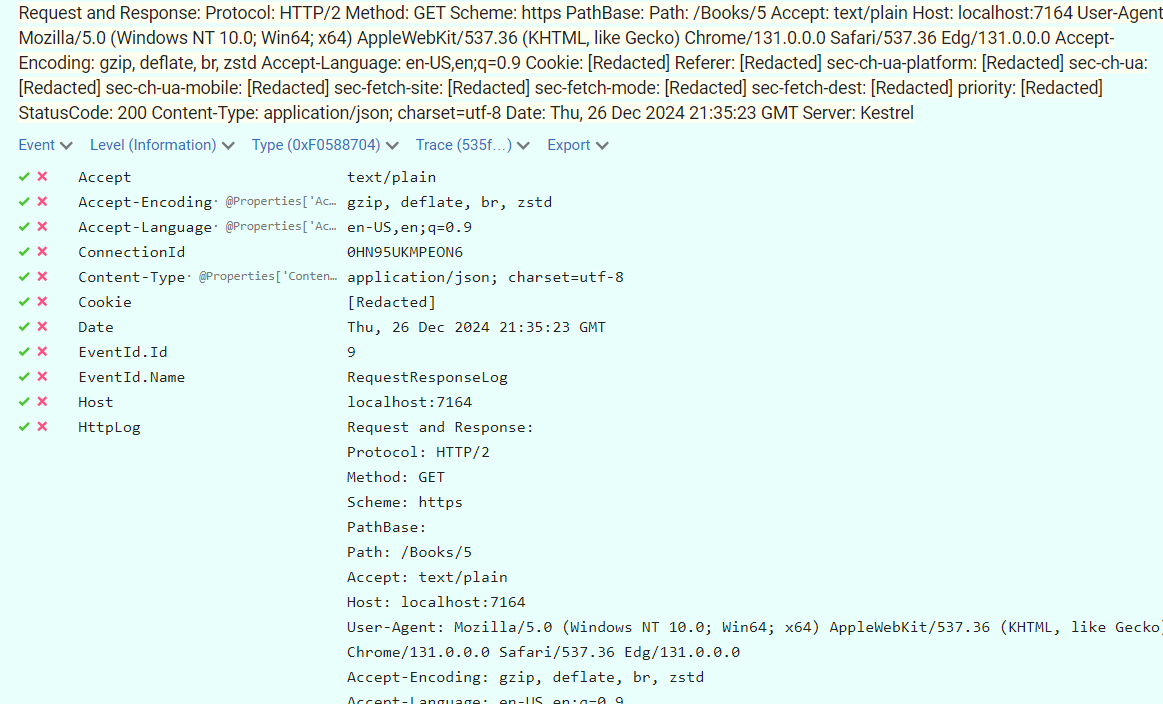
    Let’s focus on the data logged for the HTTP request.

    If we open the log related to the HTTP request, we can see all these values:

    Details of the HTTP Request

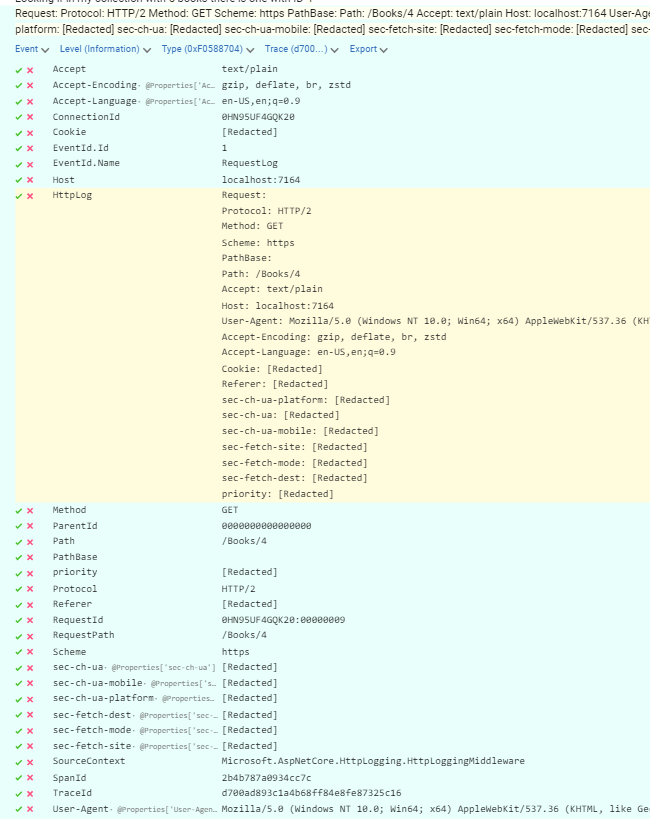
    Among these details, we can see properties such as:

    • the host name (localhost:7164)
    • the method (GET)
    • the path (/books/4)

    and much more.

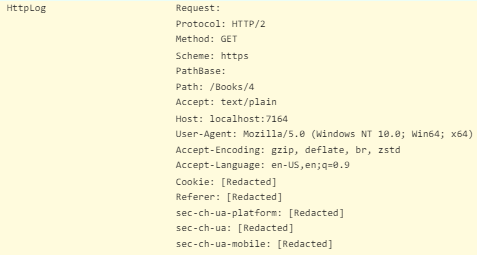
    You can see all the properties as standalone items, but you can also have a grouped view of all the properties by accessing the HttpLog element:

    Details of the HTTP Log element

    Notice that for some elements we do not have access to the actual value, as the value is set to [Redacted]. This is a default configuration that prevents logging too many things (and undisclosing some values) as well as writing too much content on the log sink (the more you write, the less performant the queries become – and you also pay more!).

    Among other redacted values, you can see that even the Cookie value is not directly available – for the same reasons explained before.

    Understanding HTTP Response logs

    Of course, we can see some interesting data in the Response log:

    Details of the HTTP Response

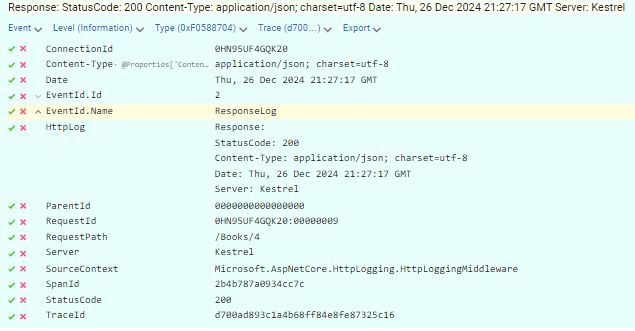
    Here, among some other properties such as the Host Name, we can see the Status Code and the Trace Id (which, as you may notice, is the same as the one in te Request).

    As you can see, the log item does not contain the body of the response.

    Also, just as it happens with the Request, we do not have access to the list of HTTP Headers.

    How to save space, storage, and money by combining log entries

    For every HTTP operation, we end up with 2 log entries: one for the Request and one for the Response.

    However, it would be more practical to have both request and response info stored in the same log item so we can understand more easily what is happening.

    Lucky for us, this functionality is already in place. We just need to set the CombineLogs property to true when we add the HttpLogging functionality:

    builder.Services.AddHttpLogging(lb =>
    {
    +  lb.CombineLogs = true;
    }
    );
    

    Then, we are able to see the data for both the request and the related response in the same log element.

    Request and Response combined logs

    The downsides of using HTTP Logging

    Even though everything looks nice and pretty, adding HTTP Logging has some serious consequences.

    First of all, remember that you are doing some more operations for every incoming HTTP request. Just processing and storing the log messages can bring to an application performance downgrade – you are using parts of the processing resources to interpret the HTTP context, create the correct log entry, and store it.

    Depending on how your APIs are structured, you may need to strip out sensitive data: HTTP Logs, by default, log almost everything (except for the parts stored as Redacted). Since you don’t want to store as plain text the content of the requests, you may need to create custom logic to redact parts of the request and response you want to hide: you may need to implement a custom IHttpLoggingInterceptor.

    Finally, consider that logging occupies storage, and storage has a cost. The more you log, the higher the cost. You should define proper strategies to avoid excessive storage costs while keeping valuable logs.

    Further readings

    There is a lot more, as always. In this article, I focused on the most essential parts, but the road to having proper HTTP Logs is still long.

    You may want to start from the official documentation, of course!

    🔗 HTTP logging in ASP.NET Core | Microsoft Docs

    This article first appeared on Code4IT 🐧

    All the logs produced for this article were stored on Seq. You can find more info about installing and integrating Seq in ASP.NET Core in this article:

    🔗 Easy logging management with Seq and ILogger in ASP.NET | Code4IT

    Wrapping up

    HTTP Logging can be a good tool for understanding the application behaviour and detecting anomalies. However, as you can see, there are some important downsides that need to be considered.

    I hope you enjoyed this article! Let’s keep in touch on LinkedIn or Twitter! 🤜🤛

    Happy coding!

    🐧


    Source link

  • How Data Analytics Can Help You Grow Your Business

    How Data Analytics Can Help You Grow Your Business


    In today’s fast-paced and competitive business landscape, companies must leverage data analytics to better understand their customers, improve products and services, and make informed decisions that can help their business grow. With the right tools and insightful analytics, businesses can identify new opportunities, spot trends, and gain a competitive advantage. In this article, we will explore four ways data analytics can help you grow your business. Keep reading to learn more.

    Boosting Customer Engagement and Loyalty

    Customer Engagement


    One of the primary benefits of using data analytics in your business is the ability to better understand your customers. By collecting and analyzing customer data, you can gain insights into their preferences, needs, and behaviors. This information can then be used to create targeted marketing campaigns and personalized experiences that are tailored to their specific interests. As a result, customers will feel more engaged with your brand and are more likely to remain loyal, resulting in higher customer retention rates and increased revenue.

    Additionally, by analyzing customer feedback, businesses can determine what aspects of their products or services require improvement. This can lead to increased customer satisfaction and an even stronger brand reputation. Having access to some of the best data analytics programs can greatly enhance your understanding of your target audience.

    Furthermore, data analytics allows businesses to identify and reach out to potential customers, leading to a more effective acquisition process. By utilizing various channels, techniques, and types of data, businesses can identify potential customers who are most likely to convert, allowing them to maximize their marketing efforts and investments.

    Improving Operational Efficiency

    Data analytics can also be invaluable in improving operational efficiency within a business. By collecting and analyzing data from internal processes, businesses can pinpoint areas of inefficiency, identify bottlenecks, and determine areas that require optimization. This can lead to significant cost savings and better resource allocation, ultimately resulting in improved profitability.

    Data analytics can also be applied to supply chain management, helping businesses optimize their inventory levels, reduce waste, and manage their relationships with suppliers more effectively. This can result in a more streamlined supply chain, leading to improved customer satisfaction and increased revenue.

    Businesses that are involved in transportation or logistics, such as those utilizing Esso Diesel for fuel, can also employ data analytics for optimizing routes and vehicle performance. By analyzing data on fuel consumption, traffic patterns, and driver behavior, businesses can implement more cost-effective and efficient transportation strategies, leading to significant savings and a better environmental footprint.

    Supporting Informed Decision-Making

    Data analytics is a key tool in helping business leaders make more informed and data-driven decisions. Rather than relying on intuition or gut feelings, businesses can use data to analyze past performance, project future trends, and identify patterns to support their decision-making process. This results in better strategic planning and more effective decision-making, enabling businesses to grow and stay ahead of their competition.

    For example, data analytics can be used to identify revenue-generating products or services, allowing businesses to focus their resources on these areas. This can help to consolidate their position within the market and drive growth through targeted investments and expansion.

    Innovating and Developing New Products

    Innovating and Developing New Products

    Lastly, data analytics can support innovation by helping businesses to identify new product development opportunities. By understanding customer needs, preferences, and pain points, businesses can develop products and services that meet the demands of their existing customers, but also attract new ones.

    Furthermore, data analytics can be used to identify emerging trends or unmet needs within the market. By leveraging this information, businesses can position themselves as leaders and innovators within their industry, setting them apart from their competitors and driving growth.

    Data analytics is a powerful tool that can drive growth and improvements across various aspects of a business, from enhancing customer engagement and loyalty to optimizing internal processes, supporting informed decision-making, and fostering innovation. By harnessing the power of data analytics, businesses can set themselves on a path to sustained growth and success.


    Source link

  • How to create Custom Attributes, and why they are useful &vert; Code4IT

    How to create Custom Attributes, and why they are useful | Code4IT


    Just a second! 🫷
    If you are here, it means that you are a software developer.
    So, you know that storage, networking, and domain management have a cost .

    If you want to support this blog, please ensure that you have disabled the adblocker for this site.
    I configured Google AdSense to show as few ADS as possible – I don’t want to bother you with lots of ads, but I still need to add some to pay for the resources for my site.

    Thank you for your understanding.
    Davide

    In C#, attributes are used to describe the meaning of some elements, such as classes, methods, and interfaces.

    I’m sure you’ve already used them before. Examples are:

    • the [Required] attribute when you define the properties of a model to be validated;
    • the [Test] attribute when creating Unit Tests using NUnit;
    • the [Get] and the [FromBody] attributes used to define API endpoints.

    As you can see, all the attributes do not specify the behaviour, but rather, they express the meaning of a specific element.

    In this article, we will learn how to create custom attributes in C# and some possible interesting usages of such custom attributes.

    Create a custom attribute by inheriting from System.Attribute

    Creating a custom attribute is pretty straightforward: you just need to create a class that inherits from System.Attribute.

    [AttributeUsage(AttributeTargets.Interface | AttributeTargets.Class | AttributeTargets.Method, AllowMultiple = true)]
    public class ApplicationModuleAttribute : Attribute
    {
     public Module BelongingModule { get; }
    
     public ApplicationModuleAttribute(Module belongingModule)
       {
     BelongingModule = belongingModule;
       }
    }
    
    public enum Module
    {
     Authentication,
     Catalogue,
     Cart,
     Payment
    }
    

    Ideally, the class name should end with the suffix -Attribute: in this way, you can use the attribute using the short form [ApplicationModule] rather than using the whole class name, like [ApplicationModuleAttribute]. In fact, C# attributes can be resolved by convention.

    Depending on the expected usage, a custom attribute can have one or more constructors and can expose one or more properties. In this example, I created a constructor that accepts an enum.
    I can then use this attribute by calling [ApplicationModule(Module.Cart)].

    Define where a Custom Attribute can be applied

    Have a look at the attribute applied to the class definition:

    [AttributeUsage(AttributeTargets.Interface | AttributeTargets.Class | AttributeTargets.Method, AllowMultiple = true)]
    

    This attribute tells us that the ApplicationModule can be applied to interfaces, classes, and methods.

    System.AttributeTargets is an enum that enlists all the points you can attach to an attribute. The AttributeTargets enum is defined as:

    [Flags]
    public enum AttributeTargets
    {
     Assembly = 1,
     Module = 2,
     Class = 4,
     Struct = 8,
     Enum = 16,
     Constructor = 32,
     Method = 64,
     Property = 128,
     Field = 256,
     Event = 512,
     Interface = 1024,
     Parameter = 2048,
     Delegate = 4096,
     ReturnValue = 8192,
     GenericParameter = 16384,
     All = 32767
    }
    

    Have you noticed it? It’s actually a Flagged enum, whose values are powers of 2: this trick allows us to join two or more values using the OR operator.

    There’s another property to notice: AllowMultiple. When set to true, this property tells us that it’s possible to use apply more than one attribute of the same type to the same element, like this:

    [ApplicationModule(Module.Cart)]
    [ApplicationModule(Module.Catalogue)]
    public class ItemDetailsService { }
    

    Or, if you want, you can inline them:

    [ApplicationModule(Module.Cart), ApplicationModule(Module.Catalogue)]
    public class ItemDetailsService { }
    

    Practical usage of Custom Attributes

    You can use custom attributes to declare which components or business areas an element belongs to.

    In the previous example, I defined an enum that enlists all the business modules supported by my application:

    public enum Module
    {
        Authentication,
        Catalogue,
        Cart,
        Payment
    }
    

    This way, whenever I define an interface, I can explicitly tell which components it belongs to:

    [ApplicationModule(Module.Catalogue)]
    public interface IItemDetails
    {
        [ApplicationModule(Module.Catalogue)]
        string ShowItemDetails(string itemId);
    }
    
    [ApplicationModule(Module.Cart)]
    public interface IItemDiscounts
    {
        [ApplicationModule(Module.Cart)]
        bool CanHaveDiscounts(string itemId);
    }
    

    Not only that: I can have one single class implement both interfaces and mark it as related to both the Catalogue and the Cart areas.

    [ApplicationModule(Module.Cart)]
    [ApplicationModule(Module.Catalogue)]
    public class ItemDetailsService : IItemDetails, IItemDiscounts
    {
        [ApplicationModule(Module.Catalogue)]
        public string ShowItemDetails(string itemId) => throw new NotImplementedException();
    
        [ApplicationModule(Module.Cart)]
        public bool CanHaveDiscounts(string itemId) => throw new NotImplementedException();
    }
    

    Notice that I also explicitly enriched the two inner methods with the related attribute – even if it’s not necessary.

    Further readings

    As you noticed, the AttributeTargets is a Flagged Enum. Don’t you know what they are and how to define them? I’ve got you covered! I wrote two articles about Enums, and you can find info about Flagged Enums in both articles:

    🔗 5 things you should know about enums in C# | Code4IT

    and
    🔗 5 more things you should know about enums in C# | Code4IT

    This article first appeared on Code4IT 🐧

    There are some famous but not-so-obvious examples of attributes that you should know: DebuggerDisplay and InternalsVisibleTo.

    DebuggerDisplay can be useful for improving your debugging sessions.

    🔗 Simplify debugging with DebuggerDisplay attribute dotNET | Code4IT

    IntenalsVisibleTo can be used to give access to internal classes to external projects:;for example, you can use that attribute when writing unit tests.

    🔗 Testing internal members with InternalsVisibleTo | Code4IT

    Wrapping up

    In this article, I showed you how to create custom attributes in C# to specify which modules a class or a method belongs to. This trick can be useful if you want to speed up the analysis of your repository: if you need to retrieve all the classes that are used for the Cart module (for example, because you want to move them to an external library), you can just search for Module.Cart across the repository and have a full list of elements.

    In particular, this approach can be useful for the exposed components, such as API controllers. Knowing that two or more modules use the same Controller can help you understand if a change in the API structure is necessary.

    Another good usage of this attribute is automatic documentation: you could create a tool that automatically enlists all the interfaces, API endpoints, and classes grouped by the belonging module. The possibilities are infinite!

    I hope you enjoyed this article! Let’s keep in touch on LinkedIn, Twitter or BlueSky! 🤜🤛

    Happy coding!

    🐧


    Source link

  • How to log to Azure Application Insights using ILogger in ASP.NET Core &vert; Code4IT

    How to log to Azure Application Insights using ILogger in ASP.NET Core | Code4IT


    Application Insights is a great tool for handling high volumes of logs. How can you configure an ASP.NET application to send logs to Azure Application Insights? What can I do to have Application Insights log my exceptions?

    Table of Contents

    Just a second! 🫷
    If you are here, it means that you are a software developer.
    So, you know that storage, networking, and domain management have a cost .

    If you want to support this blog, please ensure that you have disabled the adblocker for this site.
    I configured Google AdSense to show as few ADS as possible – I don’t want to bother you with lots of ads, but I still need to add some to pay for the resources for my site.

    Thank you for your understanding.
    Davide

    Logging is crucial for any application. However, generating logs is not enough: you must store them somewhere to access them.

    Application Insights is one of the tools that allows you to store your logs in a cloud environment. It provides a UI and a query editor that allows you to drill down into the details of your logs.

    In this article, we will learn how to integrate Azure Application Insights with an ASP.NET Core application and how Application Insights treats log properties such as Log Levels and exceptions.

    For the sake of this article, I’m working on an API project with HTTP Controllers with only one endpoint. The same approach can be used for other types of applications.

    How to retrieve the Azure Application Insights connection string

    Azure Application Insights can be accessed via any browser by using the Azure Portal.

    Once you have an instance ready, you can simply get the value of the connection string for that resource.

    You can retrieve it in two ways.

    You can get the connection string by looking at the Connection String property in the resource overview panel:

    Azure Application Insights overview panel

    The alternative is to navigate to the Configure > Properties page and locate the Connection String field.

    Azure Application Insights connection string panel

    How to add Azure Application Insights to an ASP.NET Core application

    Now that you have the connection string, you can place it in the configuration file or, in general, store it in a place that is accessible from your application.

    To configure ASP.NET Core to use Application Insights, you must first install the Microsoft.Extensions.Logging.ApplicationInsights NuGet package.

    Now you can add a new configuration to the Program class (or wherever you configure your services and the ASP.NET core pipeline):

    builder.Logging.AddApplicationInsights(
    configureTelemetryConfiguration: (config) =>
     config.ConnectionString = "InstrumentationKey=your-connection-string",
     configureApplicationInsightsLoggerOptions: (options) => { }
    );
    

    The configureApplicationInsightsLoggerOptions allows you to configure some additional properties: TrackExceptionsAsExceptionTelemetry, IncludeScopes, and FlushOnDispose. These properties are by default set to true, so you probably don’t want to change the default behaviour (except one, which we’ll modify later).

    And that’s it! You have Application Insights ready to be used.

    How log levels are stored and visualized on Application Insights

    I have this API endpoint that does nothing fancy: it just returns a random number.

    [Route("api/[controller]")]
    [ApiController]
    public class MyDummyController(ILogger<DummyController> logger) : ControllerBase
    {
     private readonly ILogger<DummyController> _logger = logger;
    
        [HttpGet]
        public async Task<IActionResult> Get()
        {
            int number = Random.Shared.Next();
            return Ok(number);
        }
    }
    

    We can use it to run experiments on how logs are treated using Application Insights.

    First, let’s add some simple log messages in the Get endpoint:

    [HttpGet]
    public async Task<IActionResult> Get()
    {
        int number = Random.Shared.Next();
    
        _logger.LogDebug("A debug log");
        _logger.LogTrace("A trace log");
        _logger.LogInformation("An information log");
        _logger.LogWarning("A warning log");
        _logger.LogError("An error log");
        _logger.LogCritical("A critical log");
    
        return Ok(number);
    }
    

    These are just plain messages. Let’s search for them in Application Insights!

    You first have to run the application – duh! – and wait for a couple of minutes for the logs to be ready on Azure. So, remember not to close the application immediately: you have to give it a few seconds to send the log messages to Application Insights.

    Then, you can open the logs panel and access the logs stored in the traces table.

    Log levels displayed on Azure Application Insights

    As you can see, the messages appear in the query result.

    There are three important things to notice:

    • in .NET, the log level is called “Log Level”, while on Application Insights it’s called “severity level”;
    • the log levels lower than Information are ignored by default (in fact, you cannot see them in the query result);
    • the Log Levels are exposed as numbers in the severityLevel column: the higher the value, the higher the log level.

    So, if you want to update the query to show only the log messages that are at least Warnings, you can do something like this:

    traces
    | where severityLevel >= 2
    | order  by timestamp desc
    | project timestamp, message, severityLevel
    

    How to log exceptions on Application Insights

    In the previous example, we logged errors like this:

    _logger.LogError("An error log");
    

    Fortunately, ILogger exposes an overload that accepts an exception in input and logs all the details.

    Let’s try it by throwing an exception (I chose AbandonedMutexException because it’s totally nonsense in this simple context, so it’s easy to spot).

    private void SomethingWithException(int number)
    {
        try
        {
            _logger.LogInformation("In the Try block");
    
            throw new AbandonedMutexException("An exception message");
        }
        catch (Exception ex)
        {
            _logger.LogInformation("In the Catch block");
            _logger.LogError(ex, "Unable to complete the operation");
        }
        finally
        {
            _logger.LogInformation("In the Finally block");
        }
    }
    

    So, when calling it, we expect to see 4 log entries, one of which contains the details of the AbandonedMutexException exception.

    The Exception message in Application Insights

    Hey, where is the exception message??

    It turns out that ILogger, when creating log entries like _logger.LogError("An error log");, generates objects of type TraceTelemetry. However, the overload that accepts as a first parameter an exception (_logger.LogError(ex, "Unable to complete the operation");) is internally handled as an ExceptionTelemetry object. Since internally, it’s a different type of Telemetry object, and it gets ignored by default.

    To enable logging exceptions, you have to update the way you add Application Insights to your application by setting the TrackExceptionsAsExceptionTelemetry property to false:

    builder.Logging.AddApplicationInsights(
    configureTelemetryConfiguration: (config) =>
     config.ConnectionString = connectionString,
     configureApplicationInsightsLoggerOptions: (options) => options.TrackExceptionsAsExceptionTelemetry = false);
    

    This way, ExceptionsTelemetry objects are treated as TraceTelemetry logs, making them available in Application Insights logs:

    The Exception log appears in Application Insights

    Then, to access the details of the exception like the message and the stack trace, you can look into the customDimensions element of the log entry:

    Details of the Exception log

    Even though this change is necessary to have exception logging work, it is barely described in the official documentation.

    Further readings

    It’s not the first time we have written about logging in this blog.

    For example, suppose you don’t want to use Application Insights but prefer an open-source, vendor-independent log sink. In that case, my suggestion is to try Seq:

    🔗 Easy logging management with Seq and ILogger in ASP.NET | Code4IT

    Logging manually is nice, but you may be interested in automatically logging all the data related to incoming HTTP requests and their responses.

    🔗 HTTP Logging in ASP.NET: how to automatically log all incoming HTTP requests (and its downsides!) | Code4IT

    This article first appeared on Code4IT 🐧

    You can read the official documentation here (even though I find it not much complete and does not show the results):

    🔗 Application Insights logging with .NET | Microsoft docs

    Wrapping up

    This article taught us how to set up Azure Application Insights in an ASP.NET application.
    We touched on the basics, discussing log levels and error handling. In future articles, we’ll delve into some other aspects of logging, such as correlating logs, understanding scopes, and more.

    I hope you enjoyed this article! Let’s keep in touch on LinkedIn, Twitter or BlueSky! 🤜🤛

    Happy coding!

    🐧


    Source link

  • How To Convert A List To A String In Python (With Examples)


    How To Convert A List To A String In Python (With Examples)


    Source link

  • How to Market Your Business Internationally


    It’s every business owner’s dream that their business will scale up, even reaching an international status if possible. That said, it may seem like an impossible task to take your business to the international level. The truth is that it’s doable, with a few tips that may take resources to put in place. Here are a few of the ways in which you can market your business internationally and scale up beyond your wildest imagination.

    Understand the Different Laws and Cultures

    The first thing that you need to do is to understand the laws and social norms of the various regions that you hope to expand to. By doing this, you can avoid doing things that are likely to backfire on you and make it even harder to scale up down the road. In addition to learning the social norms, you should also be aware of the legalities in the market that you want to appeal to. Remember to also make considerations for the issues that people generally face in the market in question.

    For the best outcome, you may want to work with a lawyer. This should be easy to do because you can find legal assistance for practically any issue that you may face, including family affairs. On this note, keep in mind that anyone of the 43% of people in Tennessee working through a difficult custody battle, going through a difficult divorce, or even making modifications to a parenting plan, it’s crucial to enlist the assistance of an experienced family law attorney who can advocate for your legal rights and needs.

    Do Thorough Research

    Next, you need to do thorough research on the best ways to make your products or services beneficial and appealing to the markets in question. To this end, look at what other businesses in your niche are doing. Borrow from what works and make fixes to whatever doesn’t so that you can end up with an efficient plan. This research may need to be extensive to the point of helping you learn that Belize has a coral reef system that’s as long as 185 miles, according to NASA, especially if your business has anything to do with coastal areas and such.

    Choose the Right Channels

    Keep in mind that there are many different channels that you can use to market your business. The ones that you focus on can make or break your business, so make sure to find the right ones. These should be those that are the most likely to have a large segment of your target market, which will be influenced by factors such as age. That said, some channels are a safe bet because they have a massive selection of a mixed demographic. One of these is Facebook, on which an estimated 86% of marketers advertise, according to Oberlo.

    Make Your Payment Methods Seamless

    Last but not least, do your best to ensure that clients don’t have a hard time when trying to give you their money. Find the best way to make sure that your payment methods are both safe and seamless. This will have the effect of building trust in your business among the people who interact with it. As a result, they’re quite likely to market your business to others by word of mouth, which is one of the most effective methods of marketing that any business owner could ever hope for. If there aren’t issues like information leaks and hacks in your business systems, it will be easy for you to scale up.

    These are some of the best ways in which you can market your business internationally. If you put in the time and work that’s required, you can improve your chances of getting a great outcome. Keep an open mind and learn from any mistakes that you make so that you move from one level to the next as seamlessly as possible.


    Source link

  • How to Start a Thriving Business in Philly


    Starting a thriving business in Philly is a way to bring your dreams into reality, whether you’ve always wanted to own a fashion line or provide products that are in demand in your own community. If you’re thinking of building a business in Philly, there are a few tips and tricks to keep close to you every step of the way. The more familiar you are with Philadelphia, its growth, and its evolution, the easier it’ll be for you to set up a shop with the best chances of success.

    Choosing the Right Location

    According to Enviro USA, Denmark is currently ranked as the cleanest country in the entire world. Any time your dreams consist of opening a thriving company in Philadelphia, you’ll want to take some time to research cleanliness factors, crime rates, and even the number of successful businesses that already exist in areas you consider to be prime real estate. Selecting the right location can mean the difference between having the ability to promote your goods and remaining off the radar of the locals in your community.

    Minimize the Risk of Crime

    In 2019, residents of Pennsylvania reported more than 39,228 cases of violent crimes, according to the direct FBI Uniform Crime Reporting Program unit. Unfortunately, there are many different cities and boroughs that are not considered safe in Philly today, especially when it comes to setting up shops or launching businesses.

    But, with the advent of online search engines and live reports of crimes and incidents, it’s now easier than ever to keep an eye on the busiest, cleanest, and safest areas in Philly right from home or even with the use of your smartphone. You can use live updates, published crime statistics, and even input from nearby business owners to determine locations that are ideal for the type of business you’re interested in opening in Philly.

    Set Your Business and Brand Apart

    You will need to consider how you will be setting your brand apart when you’re operating in Philly, even if you do so online. Creating a designated brand that is unlike any other will help others remember you. Use unique logos and slogans to help others remember your brand name. Consider hosting contests and/or giveaways that will attract attention to your business while also helping you spread the word as you boost sales and the notoriety your business has around Philly at the time.

    Create an Online Presence

    Connecting to the internet without lag time while gaining access to networks and websites much faster is possible with the use of 5G. Having the internet is one of the best ways to set your business apart, whether you’re offering to fix electronics, repair them, or if you have clothing to sell. The more connected you are to the internet, the easier it will be for you to maximize your reach while spreading the image of your brand. An online presence can include a traditional website, social media page, newsletters, and even a live stream page to promote your products, services, and even items you intend to give away.

    The more immersed and engaged you become in Philly, the easier it’ll be for you to build a thriving business of your own, regardless of your preferred and/or designated industry. From selling comic books and retail shirts to offering unique one-of-a-kind street foods, there are many different avenues to consider when you’re looking to build a thriving business in Philly today. The right vision and an understanding of Philly’s culture will go a long way once you make the leap into the world of entrepreneurship. Best of luck in your journey!


    Source link

  • How Can Advanced Gadgets Help Your Business Succeed?


    In today’s competitive business environment, leveraging advanced technology is not just advantageous but often essential for staying ahead. From improving operational efficiency to enhancing customer experiences, advanced gadgets play a crucial role in driving business success. Despite the challenges businesses face, such as the statistic that up to 70% of all business partnerships fail, integrating advanced gadgets can mitigate risks and propel growth.

    Enhancing Operational Efficiency

    One of the primary benefits of advanced gadgets in business is their ability to streamline operations and boost productivity. Whether it’s through automation tools, smart devices, or advanced software solutions, technology empowers businesses to automate repetitive tasks, optimize workflows, and allocate resources more effectively. By reducing manual errors and accelerating processes, businesses can achieve greater efficiency and operational excellence.

    Ensuring Workplace Safety

    The safety and security of employees and assets are paramount concerns for any business. According to the National Fire Protection Association, an average of 3,340 fires occur in offices every year, highlighting the importance of robust safety measures. Advanced gadgets such as smart fire detection systems, CCTV cameras with AI-powered analytics, and automated emergency response systems can significantly enhance workplace safety. These technologies not only detect potential hazards early but also enable swift responses, mitigating risks and minimizing damage.

    Navigating Regulatory Compliance

    Navigating regulatory requirements and tax obligations is another critical aspect of business operations. For example, in New Jersey, the State Treasury imposes a 6.625% Sales Tax on sales of most tangible personal property, specified digital products, and certain services unless exempt under state law. Advanced gadgets equipped with financial management software can automate tax calculations, ensure compliance with regulatory standards, and facilitate accurate reporting. By reducing the burden of manual compliance tasks, businesses can avoid penalties and optimize financial processes.

    Empowering Customer Engagement

    Customer engagement and satisfaction are fundamental drivers of business growth. Advanced gadgets such as customer relationship management (CRM) systems, personalized marketing automation tools, and AI-powered chatbots enable businesses to deliver tailored experiences and responsive customer service. These technologies analyze customer data in real-time, anticipate needs, and personalize interactions, fostering long-term customer loyalty and driving revenue growth.

    Harnessing Data for Strategic Insights

    In today’s data-driven economy, insights derived from data analytics can provide businesses with a competitive edge. Advanced gadgets equipped with analytics tools collect, analyze, and visualize data from various sources, offering valuable insights into market trends, customer behavior, and operational performance. By making informed decisions based on data-driven insights, businesses can identify opportunities, mitigate risks, and optimize strategies for sustainable growth.

    Improving Decision-Making with Real-Time Analytics

    Advanced gadgets are invaluable in empowering businesses with real-time data analytics capabilities. These tools enable organizations to gather and analyze data swiftly, providing deep insights into market dynamics, consumer preferences, and operational efficiencies. By harnessing these insights, businesses can make informed decisions promptly, adapt strategies proactively, and capitalize on emerging opportunities. Real-time analytics not only enhances strategic planning but also optimizes resource allocation, driving sustained growth and competitiveness in today’s fast-paced business landscape.

    Conclusion

    In conclusion, integrating advanced gadgets into business operations can significantly enhance efficiency, safety, compliance, customer engagement, and strategic decision-making. Despite the challenges highlighted by statistics showing high business partnership failure rates and the prevalence of office fires, advanced technology offers solutions to mitigate risks and drive success. By leveraging automation, enhancing safety measures, ensuring regulatory compliance, empowering customer engagement, and harnessing data-driven insights, businesses can navigate challenges more effectively and capitalize on opportunities in a rapidly evolving marketplace.

    As technology continues to evolve, businesses that embrace advanced gadgets not only position themselves for current success but also future-proof their operations against emerging challenges. By investing in the right technology solutions and adapting them to meet specific business needs, organizations can innovate, grow, and thrive in an increasingly competitive landscape. Embracing the transformative potential of advanced gadgets is not merely advantageous but imperative for businesses striving to achieve sustainable success and leadership in their respective industries.


    Source link

  • How Has Medical Technology Impacted the Surrogacy Process?


    Advancements in medical technology have significantly transformed the surrogacy process, offering new opportunities and improving outcomes for all parties involved. From the initial application to post-birth care, technology plays a crucial role in making surrogacy a viable and successful option for many families. Let’s explore how these advancements have impacted the various stages of the surrogacy journey.

    Streamlining the Application Process

    Every year, thousands of women express their interest in becoming surrogate mothers. The process begins with a thorough application and screening to ensure candidates are suitable for the role. Medical technology has streamlined this initial stage, enabling agencies to efficiently process and review applications. Online platforms and databases allow for quick and secure submission of documents, while advanced screening tools help identify potential surrogates who meet the necessary health and psychological criteria.

    Ensuring Health and Compatibility

    The first three months of the surrogacy process involve a rigorous schedule of paperwork, legal formalities, and medical exams, as stated by Elevate Baby. Medical technology has enhanced these early stages by providing sophisticated diagnostic tools and tests. Surrogate mothers undergo comprehensive health evaluations to ensure they are physically capable of carrying a pregnancy to term. This includes blood tests, ultrasounds, and other imaging techniques that offer detailed insights into their health status. These exams help identify any potential issues early on, ensuring a smooth and safe journey ahead.

    Facilitating Legal and Ethical Compliance

    Legal aspects are a critical component of the surrogacy process. The initial months also involve meticulous legal work to protect the rights and responsibilities of all parties. Medical technology aids in this by ensuring accurate and secure documentation. Digital contracts and electronic signatures have replaced traditional paperwork, making the process more efficient and less prone to errors. Secure online portals allow for the easy sharing and storage of legal documents, ensuring compliance with local regulations and ethical standards.

    Enhancing Fertility Treatments

    One of the most significant impacts of medical technology on surrogacy is in the realm of fertility treatments. In vitro fertilization (IVF) is a cornerstone of the surrogacy process, and advancements in this field have greatly improved success rates. Technologies such as preimplantation genetic testing (PGT) allow for the screening of embryos for genetic abnormalities before implantation. This increases the likelihood of a healthy pregnancy and reduces the risk of complications. Additionally, innovations in cryopreservation enable the freezing and storage of eggs, sperm, and embryos, providing greater flexibility and options for intended parents and surrogates.

    Monitoring Pregnancy and Health

    Throughout the surrogacy journey, continuous monitoring of the surrogate’s health is paramount. Modern medical technology offers a range of tools to track the progress of the pregnancy and ensure the well-being of both the surrogate and the developing baby. Regular ultrasounds, non-invasive prenatal testing (NIPT), and wearable health devices provide real-time data on the surrogate’s condition. This information allows healthcare providers to promptly address any concerns and make informed decisions to support a healthy pregnancy.

    Supporting Emotional Well-being

    The surrogacy process can be emotionally taxing for all involved. Medical technology also plays a role in supporting the mental health of surrogate mothers. Telemedicine and virtual counseling services offer accessible support, allowing surrogates to connect with mental health professionals from the comfort of their homes. These resources help surrogates manage stress, anxiety, and other emotional challenges, ensuring a positive and fulfilling experience.

    Post-Birth Care and Follow-Up

    After the birth of the child, medical technology continues to be essential. Surrogates receive comprehensive post-birth care to ensure their physical and emotional recovery. Regular follow-up visits and check-ups are facilitated by advanced medical scheduling systems and electronic health records, ensuring continuity of care. It is recommended that individuals visit a doctor at least once a year to maintain their overall health, and this applies to surrogate mothers as well. Annual check-ups help monitor long-term health outcomes and provide ongoing support.


    Source link