You have a collection of items. You want to retrieve N elements randomly. Which alternatives do we have?
Table of Contents
Just a second! 🫷 If you are here, it means that you are a software developer.
So, you know that storage, networking, and domain management have a cost .
If you want to support this blog, please ensure that you have disabled the adblocker for this site. I configured Google AdSense to show as few ADS as possible – I don’t want to bother you with lots of ads, but I still need to add some to pay for the resources for my site.
Thank you for your understanding. – Davide
One of the most common operations when dealing with collections of items is to retrieve a subset of these elements taken randomly.
Before .NET 8, the most common way to retrieve random items was to order the collection using a random value and then take the first N items of the now sorted collection.
From .NET 8 on, we have a new method in the Random class: GetItems.
So, should we use this method or stick to the previous version? Are there other alternatives?
For the sake of this article, I created a simple record type, CustomRecord, which just contains two properties.
publicrecordCustomRecord(int Id, string Name);
I then stored a collection of such elements in an array. This article’s final goal is to find the best way to retrieve a random subset of such items. Spoiler alert: it all depends on your definition of best!
Method #1: get random items with Random.GetItems
Starting from .NET 8, released in 2023, we now have a new method belonging to the Random class: GetItems.
There are three overloads:
public T[] GetItems<T>(T[] choices, int length);
public T[] GetItems<T>(ReadOnlySpan<T> choices, int length);
publicvoid GetItems<T>(ReadOnlySpan<T> choices, Span<T> destination);
We will focus on the first overload, which accepts an array of items (choices) in input and returns an array of size length.
If you need to preserve the initial order of the items, you should create a copy of the initial array and shuffle only the copy. You can do this by using this syntax:
CustomRecord[] copy = [.. Items];
If you just need some random items and don’t care about the initial array, you can shuffle it without making a copy.
Once we’ve shuffled the array, we can pick the first N items to get a subset of random elements.
Method #3: order by Guid, then take N elements
Before .NET 8, one of the most used approaches was to order the whole collection by a random value, usually a newly generated Guid, and then take the first N items.
This approach works fine but has the disadvantage that it instantiates a new Guid value for every item in the collection, which is an expensive memory-wise operation.
Method #4: order by Number, then take N elements
Another approach was to generate a random number used as a discriminator to order the collection; then, again, we used to get the first N items.
We are going to run the benchmarks on arrays with different sizes. We will start with a smaller array with 100 items and move to a bigger one with one million items.
We generate the initial array of CustomRecord instances for every iteration and store it in the Items property. Then, we randomly choose the number of items to get from the Items array and store it in the TotalItemsToBeRetrieved property.
We also generate a copy of the initial array at every iteration; this way, we can run Random.Shuffle without modifying the original array.
Finally, we define the body of the benchmarks using the implementations we saw before.
Notice: I marked the benchmark for the GetItems method as a baseline, using [Benchmark(Baseline = true)]. This way, we can easily see the results ratio for the other methods compared to this specific method.
When we run the benchmark, we can see this final result (for simplicity, I removed the Error, StdDev, and Median columns):
Method
Size
Mean
Ratio
Allocated
Alloc Ratio
WithRandomGetItems
100
6.442 us
1.00
424 B
1.00
WithRandomGuid
100
39.481 us
6.64
3576 B
8.43
WithRandomNumber
100
22.219 us
3.67
2256 B
5.32
WithShuffle
100
7.038 us
1.16
1464 B
3.45
WithShuffleNoCopy
100
4.254 us
0.73
624 B
1.47
WithRandomGetItems
10000
58.401 us
1.00
5152 B
1.00
WithRandomGuid
10000
2,369.693 us
65.73
305072 B
59.21
WithRandomNumber
10000
1,828.325 us
56.47
217680 B
42.25
WithShuffle
10000
180.978 us
4.74
84312 B
16.36
WithShuffleNoCopy
10000
156.607 us
4.41
3472 B
0.67
WithRandomGetItems
1000000
15,069.781 us
1.00
4391616 B
1.00
WithRandomGuid
1000000
319,088.446 us
42.79
29434720 B
6.70
WithRandomNumber
1000000
166,111.193 us
22.90
21512408 B
4.90
WithShuffle
1000000
48,533.527 us
6.44
11575304 B
2.64
WithShuffleNoCopy
1000000
37,166.068 us
4.57
6881080 B
1.57
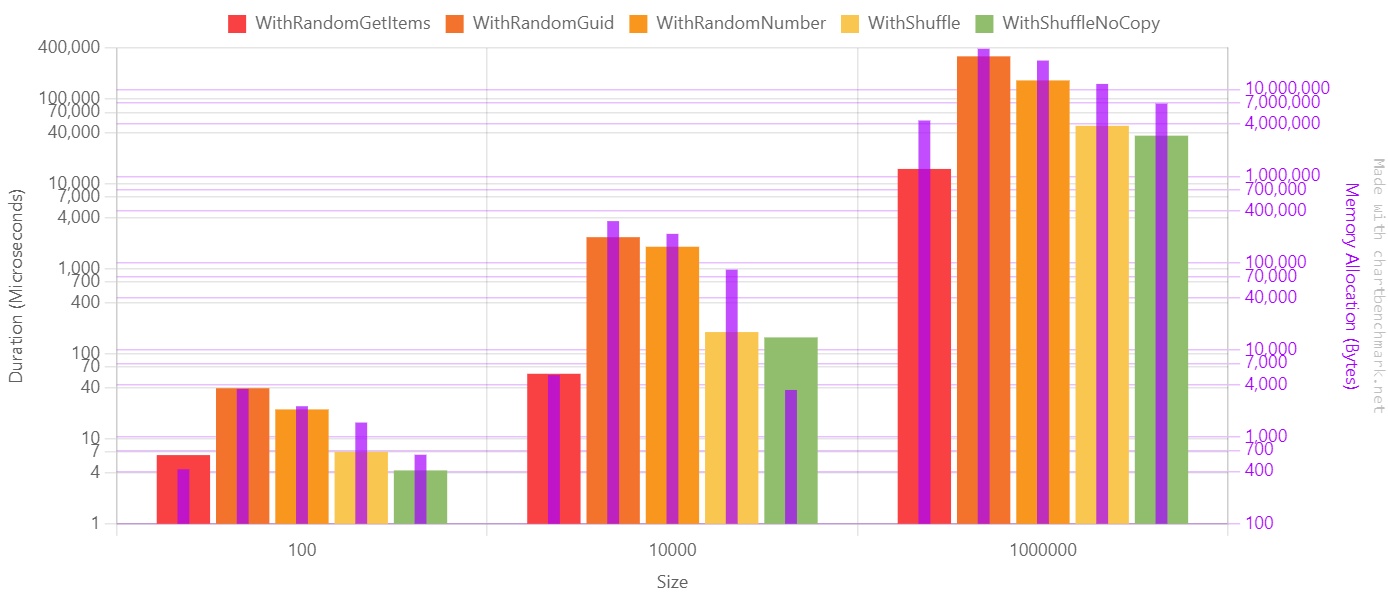
By looking at the numbers, we can notice that:
GetItems is the most performant method, both for time and memory allocation;
using Guid.NewGuid is the worst approach: it’s 10 to 60 times slower than GetItems, and it allocates, on average, 4x the memory;
sorting by random number is a bit better: it’s 30 times slower than GetItems, and it allocates around three times more memory;
shuffling the array in place and taking the first N elements is 4x slower than GetItems; if you also have to preserve the original array, notice that you’ll lose some memory allocation performance because you must allocate more memory to create the cloned array.
Here’s the chart with the performance values. Notice that, for better readability, I used a Log10 scale.
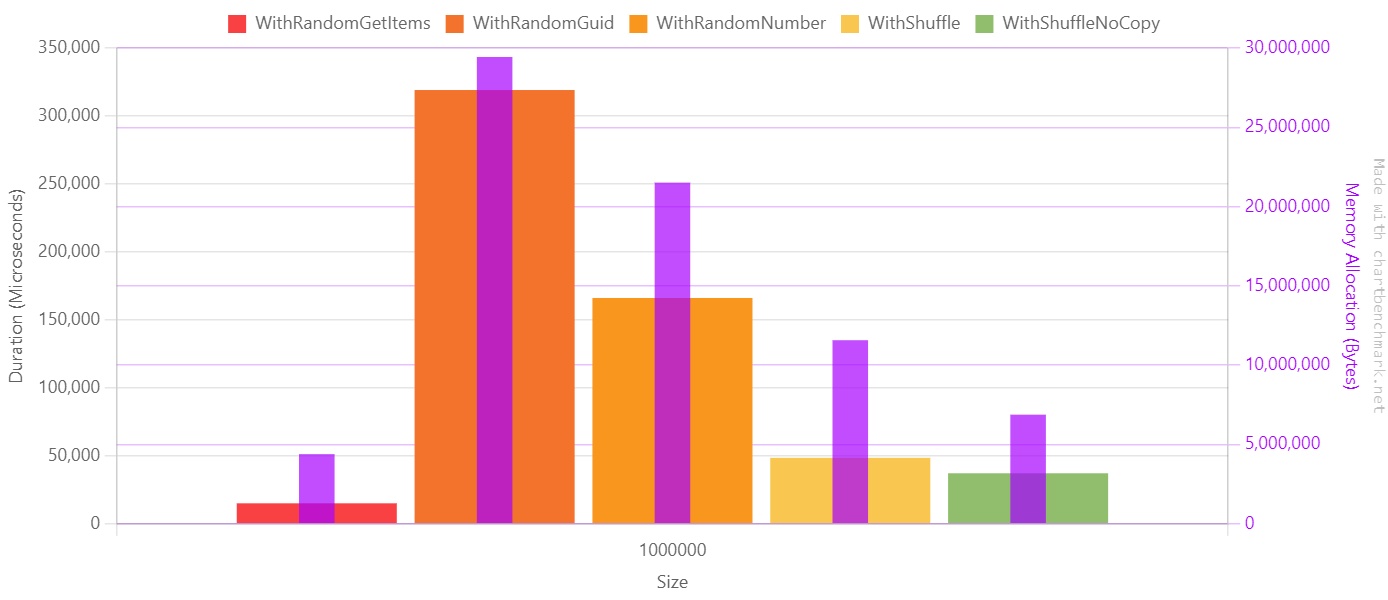
If we move our focus to the array with one million items, we can better understand the impact of choosing one approach instead of the other. Notice that here I used a linear scale since values are on the same magnitude order.
The purple line represents the memory allocation in bytes.
So, should we use GetItems all over the place? Well, no! Let me tell you why.
The problem with Random.GetItems: repeated elements
There’s a huge problem with the GetItems method: it returns duplicate items. So, if you need to get N items without duplicates, GetItems is not the right choice.
Here’s how you can demonstrate it.
First, create an array of 100 distinct items. Then, using Random.Shared.GetItems, retrieve 100 items.
The final array will have 100 items; the array may or may not contain duplicates.
int[] source = Enumerable.Range(0, 100).ToArray();

StringBuilder sb = new StringBuilder();

for (int i = 1; i <= 200; i++)
{
    HashSet<int> ints = Random.Shared.GetItems(source, 100).ToHashSet();
    sb.AppendLine($"run-{i}, {ints.Count}");
}

var finalCsv = sb.ToString();
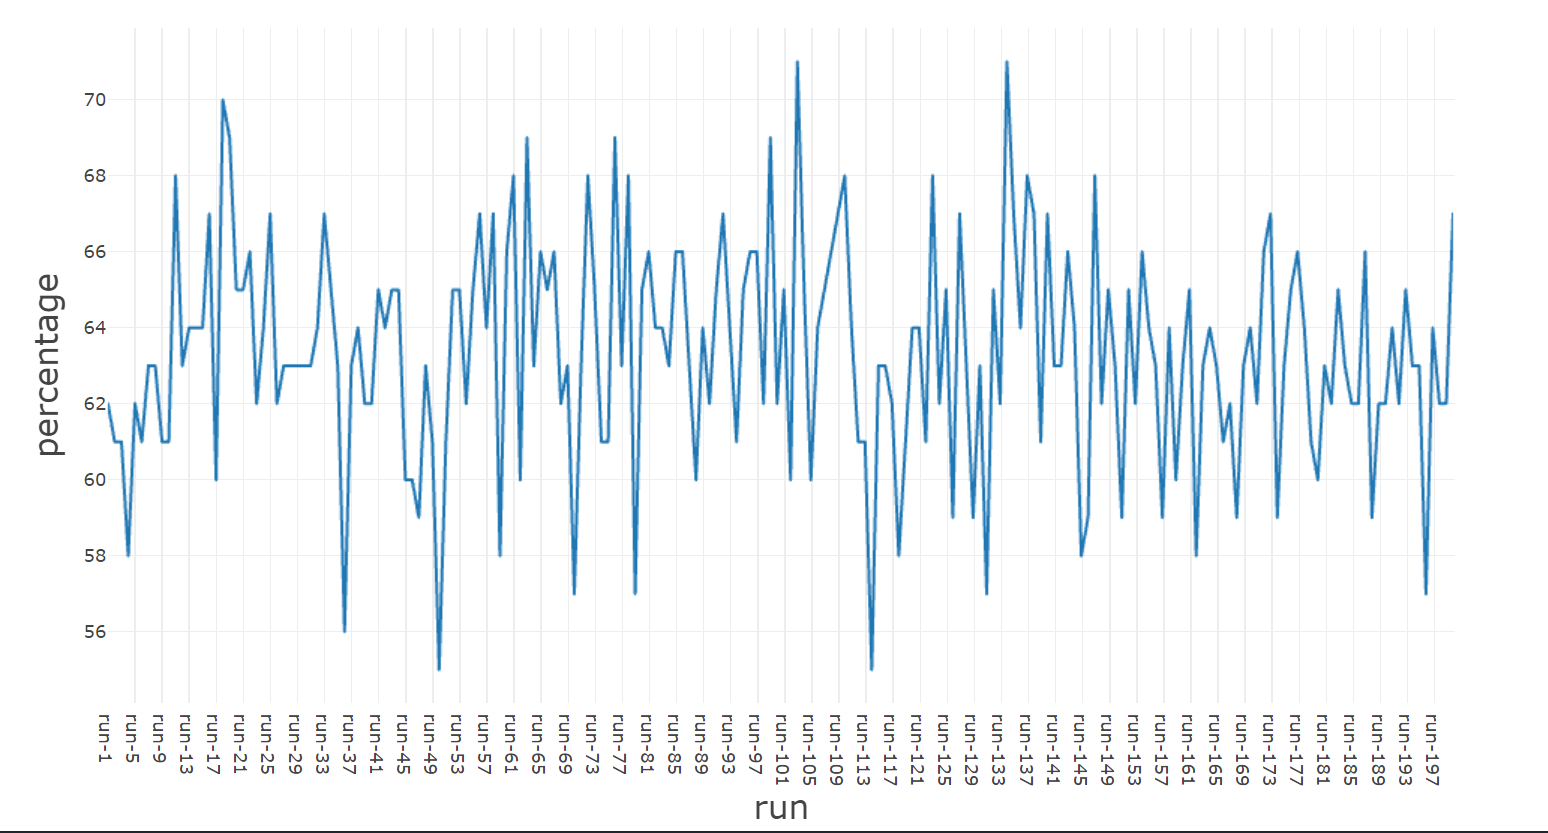
To check the number of distinct elements, I put the resulting array in a HashSet<int>. The final size of the HashSet will give us the exact percentage of unique values.
If the HashSet size is exactly 100, it means that GetItems retrieved each element from the original array exactly once.
For simplicity, I formatted the result in CSV format so that I could generate plots with it.
As you can see, on average, we have 65% of unique items and 35% of duplicate items.
Further readings
I used the Enumerable.Range method to generate the initial items.
I wrote an article to explain how to use it, which are some parts to consider when using it, and more.
Creating a third-person character controller involves more than just moving an object around a 3D scene. Realistic movement, grounded physics, responsive jumping, and animation blending are essential for a polished feel. This article explores how these elements can be assembled — not through traditional manual coding, but via AI-assisted development using Bolt.new, a browser-based AI-assisted development tool that generates web code from natural language prompts, backed by Claude 3.7 Sonnet and Claude 3.5 Sonnet LLMs. It provides a lightweight environment where developers can focus on describing functionality rather than writing boilerplate.
For this character controller, Bolt handled tasks like setting up physics, integrating animations, and managing input systems, making it easier to test ideas and iterate quickly without switching between tools or writing everything from scratch.
If you’re curious to learn more, check out this article on Codrops, which also explores the platform’s capabilities and showcases another real-world project built entirely with AI.
The final project is powered by React Three Fiber, Three.js, and Rapier, and showcases how a designer or developer can create complex, interactive 3D experiences by guiding AI — focusing on behavior and structure rather than syntax.
Step 1: Setting Up Physics with a Capsule and Ground
The character controller begins with a simple setup: a capsule collider for the player and a ground plane to interact with. Rapier, a fast and lightweight physics engine built in WebAssembly, handles gravity, rigid body dynamics, and collisions. This forms the foundation for player movement and world interaction.
The capsule shape was chosen for its stability when sliding across surfaces and climbing over small obstacles — a common pattern in real-time games.
Step 2: Real-Time Tuning with a GUI
To enable rapid iteration and balance gameplay feel, a visual GUI was introduced (using Leva.js). This panel exposes parameters such as:
Player movement speed
Jump force
Gravity scale
Follow camera offset
Debug toggles
By integrating this directly into the experience, developers can tune the controller live without needing to edit or recompile code, speeding up testing and design decisions.
Step 3: Ground Detection with Raycasting
A raycast is used to detect whether the player is grounded. This simple yet effective check prevents the character from jumping mid-air or triggering multiple jumps in sequence.
The logic is executed on every frame, casting a ray downward from the base of the capsule collider. When contact is confirmed, the jump input is enabled. This technique also allows smooth transitions between grounded and falling states in the animation system.
Step 4: Integrating a Rigged Character with Animation States
The visual character uses a rigged GLB model via Mixamo, with three key animations: Idle, Run, and Fall. These are integrated as follows:
The GLB character is attached as a child of the capsule collider
The animation state switches dynamically based on velocity and grounded status
Transitions are handled via animation blending for a natural feel
This setup keeps the visuals in sync with physics, while preserving modular control over the physical capsule.
Step 5: World Building and Asset Integration
The environment was arranged in Blender, then exported as a single .glb file and imported into the bolt.new project scene. This approach allows for efficient scene composition while keeping asset management simple.
For web, using .glb keeps geometry and textures bundled together. To maintain performance, it’s recommended to keep textures at 1024×1024 resolution or other square power-of-two sizes (e.g. 256, 512, 2048). This ensures optimal GPU memory usage and faster load times across devices.
Special thanks to KayLousberg for the low-poly 3D kit used for prototyping.
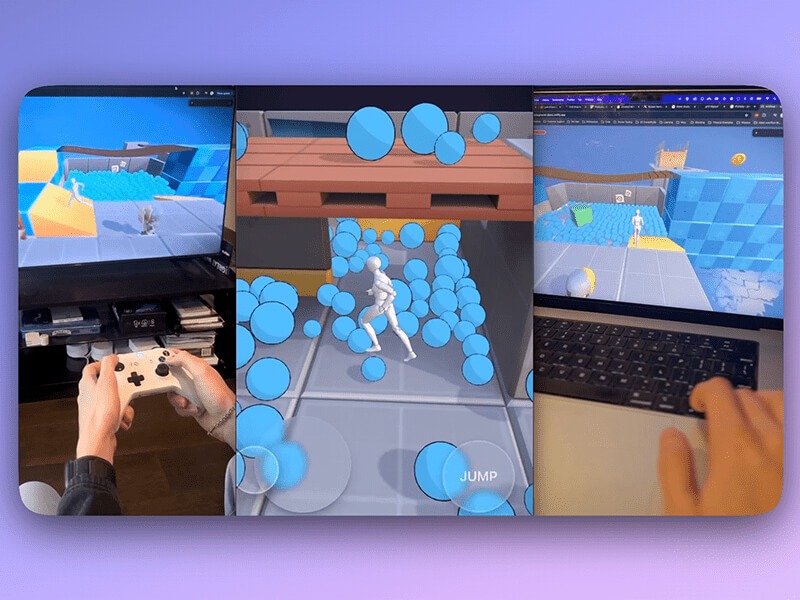
Step 6: Cross-Platform Input Support
The controller was designed to work seamlessly across desktop, mobile, and gamepad platforms — all built using AI-generated logic through Bolt.
Gamepad support was added using the Gamepad API, allowing players to plug in a controller and play with analog input.
On desktop, the controller uses standard keyboard input (WASD or arrow keys) and mouse movement for camera control.
On mobile, AI-generated code enabled an on-screen joystick and jump button, making the game fully touch-compatible.
All input types control the same physics-driven character, ensuring consistent behavior across devices — whether you’re playing on a laptop, touchscreen, or game controller.
This cross-platform support was implemented entirely through natural language prompts, showcasing how AI can translate high-level intent into working input systems.
The Role of AI in the Workflow
What makes this controller unique isn’t the mechanics — it’s the process. Every system was generated by AI through descriptive prompts, allowing the developer to work more like a creative director than a traditional engineer.
AI handled the boilerplate, the physics setup, the animation switching logic — all based on clear creative goals. This opens new doors for prototyping and interactive design, where iteration speed matters more than syntax.
This character controller demo includes:
Capsule collider with physics
Grounded detection via raycast
State-driven animation blending
GUI controls for tuning
Environment interaction with static/dynamic objects
Cross-Platform Input Support
It’s a strong starting point for creating browser-based games, interactive experiences, or prototyping new ideas — all with the help of AI.
Check out the full game built using this setup as a base: 🎮 Demo Game
Just a second! 🫷 If you are here, it means that you are a software developer.
So, you know that storage, networking, and domain management have a cost .
If you want to support this blog, please ensure that you have disabled the adblocker for this site. I configured Google AdSense to show as few ADS as possible – I don’t want to bother you with lots of ads, but I still need to add some to pay for the resources for my site.
Thank you for your understanding. – Davide
Even when the internal data is the same, sometimes you can represent it in different ways. Think of the DateTime structure: by using different modifiers, you can represent the same date in different formats.
We can make this class implement the IFormattable interface so that we can define and use the advancedToString:
publicclassPerson : IFormattable
{
publicstring FirstName { get; set; }
publicstring LastName { get; set; }
public DateTime BirthDate { get; set; }
publicstring ToString(string? format, IFormatProvider? formatProvider)
{
// Here, you define how to work with different formats }
}
Now, we can define the different formats. Since I like to keep the available formats close to the main class, I added a nested class that only exposes the names of the formats.
publicclassPerson : IFormattable
{
publicstring FirstName { get; set; }
publicstring LastName { get; set; }
public DateTime BirthDate { get; set; }
publicstring ToString(string? format, IFormatProvider? formatProvider)
{
// Here, you define how to work with different formats }
publicstaticclassStringFormats {
publicconststring FirstAndLastName = "FL";
publicconststring Mini = "Mini";
publicconststring Full = "Full";
}
}
Finally, we can implement the ToString(string? format, IFormatProvider? formatProvider) method, taking care of all the different formats we support (remember to handle the case when the format is not recognised!)
publicstring ToString(string? format, IFormatProvider? formatProvider)
{
switch (format)
{
case StringFormats.FirstAndLastName:
returnstring.Format("{0} {1}", FirstName, LastName);
case StringFormats.Full:
{
FormattableString fs = $"{FirstName} {LastName} ({BirthDate:D})";
return fs.ToString(formatProvider);
}
case StringFormats.Mini:
return$"{FirstName.Substring(0, 1)}.{LastName.Substring(0, 1)}";
default:
returnthis.ToString();
}
}
A few things to notice:
I use a switch statement based on the values defined in the StringFormats subclass. If the format is empty or unrecognised, this method returns the default implementation of ToString.
You can use whichever way to generate a string, like string interpolation, or more complex ways;
In the StringFormats.Full branch, I stored the string format in a FormattableString instance to apply the input formatProvider to the final result.
Getting a custom string representation of an object
We can try the different formatting options now that we have implemented them all.
Look at how the behaviour changes based on the formatting and input culture (Hint: venerdí is the Italian for Friday.).
Person person = new Person
{
FirstName = "Albert",
LastName = "Einstein",
BirthDate = new DateTime(1879, 3, 14)
};
System.Globalization.CultureInfo italianCulture = new System.Globalization.CultureInfo("it-IT");
Console.WriteLine(person.ToString(Person.StringFormats.FirstAndLastName, italianCulture)); //Albert EinsteinConsole.WriteLine(person.ToString(Person.StringFormats.Mini, italianCulture)); //A.EConsole.WriteLine(person.ToString(Person.StringFormats.Full, italianCulture)); //Albert Einstein (venerdì 14 marzo 1879)Console.WriteLine(person.ToString(Person.StringFormats.Full, null)); //Albert Einstein (Friday, March 14, 1879)Console.WriteLine(person.ToString(Person.StringFormats.Full, CultureInfo.InvariantCulture)); //Albert Einstein (Friday, 14 March 1879)Console.WriteLine(person.ToString("INVALID FORMAT", CultureInfo.InvariantCulture)); //Scripts.General.IFormattableTest+PersonConsole.WriteLine(string.Format("I am {0:Mini}", person)); //I am A.EConsole.WriteLine($"I am not {person:Full}"); //I am not Albert Einstein (Friday, March 14, 1879)
Not only that, but now the result can also depend on the Culture related to the current thread:
using (new TemporaryThreadCulture(italianCulture))
{
Console.WriteLine(person.ToString(Person.StringFormats.Full, CultureInfo.CurrentCulture)); // Albert Einstein (venerdì 14 marzo 1879)}
using (new TemporaryThreadCulture(germanCulture))
{
Console.WriteLine(person.ToString(Person.StringFormats.Full, CultureInfo.CurrentCulture)); //Albert Einstein (Freitag, 14. März 1879)}
(note: TemporaryThreadCulture is a custom class that I explained in a previous article – see below)
Further readings
You might be thinking «wow, somebody still uses String.Format? Weird!»
Well, even though it seems an old-style method to generate strings, it’s still valid, as I explain here:
Bolt.new is a browser-based AI web development agent focused on speed and simplicity. It lets anyone prototype, test, and publish web apps instantly—without any dev experience required.
Designed for anyone with an idea, Bolt empowers users to create fully functional websites and apps using just plain language. No coding experience? No problem. By combining real-time feedback with prompt-based development, Bolt turns your words into working code right in the browser. Whether you’re a designer, marketer, educator, or curious first-timer, Bolt.new offers an intuitive, AI-assisted playground where you can build, iterate, and launch at the speed of thought.
Core Features:
Instantly live: Bolt creates your code as you type—no server setup needed.
Web-native: Write in HTML, CSS, and JavaScript; no frameworks required.
Live preview: Real-time output without reloads or delays.
One-click sharing: Publish your project with a single URL.
A Lean Coding Playground
Bolt is a lightweight workspace that allows anyone to become an engineer without knowing how to code. Bolt presents users with a simple, chat-based environment in which you can prompt your agent to create anything you can imagine. Features include:
Split view: Code editor and preview side by side.
Multiple files: Organize HTML, CSS, and JS independently.
ES module support: Structure your scripts cleanly and modularly.
Live interaction testing: Great for animations and frontend logic.
Beyond the Frontend
With integrated AI and full-stack support via WebContainers (from StackBlitz), Bolt.new can handle backend tasks right in the browser.
Full-stack ready: Run Node.js servers, install npm packages, and test APIs—all in-browser.
AI-assisted dev: Use natural-language prompts for setup and changes.
Quick deployment: Push to production with a single click, directly from the editor.
Design-to-Code with Figma
For designers, Bolt.new is more than a dev tool, it’s a creative enabler. By eliminating the need to write code, it opens the door to hands-on prototyping, faster iteration, and tighter collaboration. With just a prompt, designers can bring interfaces to life, experiment with interactivity, and see their ideas in action – without leaving the browser. Whether you’re translating a Figma file into responsive HTML or testing a new UX flow, Bolt gives you the freedom to move from concept to clickable with zero friction.
Key Features:
Bolt.new connects directly with Figma, translating design components into working web code ideal for fast iteration and developer-designer collaboration.
Enable real-time collaboration between teams.
Use it for prototyping, handoff, or production-ready builds.
Trying it Out
To put Bolt.new to the test, we set out to build a Daily Coding Challenge Planner. Here’s the prompt we used:
Web App Request: Daily Frontend Coding Challenge Planner
I’d like a web app that helps me plan and keep track of one coding challenge each day. The main part of the app should be a calendar that shows the whole month. I want to be able to click on a day and add a challenge to it — only one challenge per day.
Each challenge should have:
A title (what the challenge is)
A category (like “CSS”, “JavaScript”, “React”, etc.)
A way to mark it as “completed” once I finish it
Optionally, a link to a tutorial or resource I’m using
I want to be able to:
Move challenges from one day to another by dragging and dropping them
Add new categories or rename existing ones
Easily delete or edit a challenge if I need to
There should also be a side panel or settings area to manage my list of categories.
The app should:
Look clean and modern
Work well on both computer and mobile
Offer light/dark mode switch
Automatically save data—no login required
This is a tool to help me stay consistent with daily practice and see my progress over time.
Building with Bolt.new
We handed the prompt to Bolt.new and watched it go to work.
Visual feedback while the app was being generated.
The initial result included key features: adding, editing, deleting challenges, and drag-and-drop.
Prompts like “fix dark mode switch” and “add category colors” helped refine the UI.
Integrated shadcn/ui components gave the interface a polished finish.
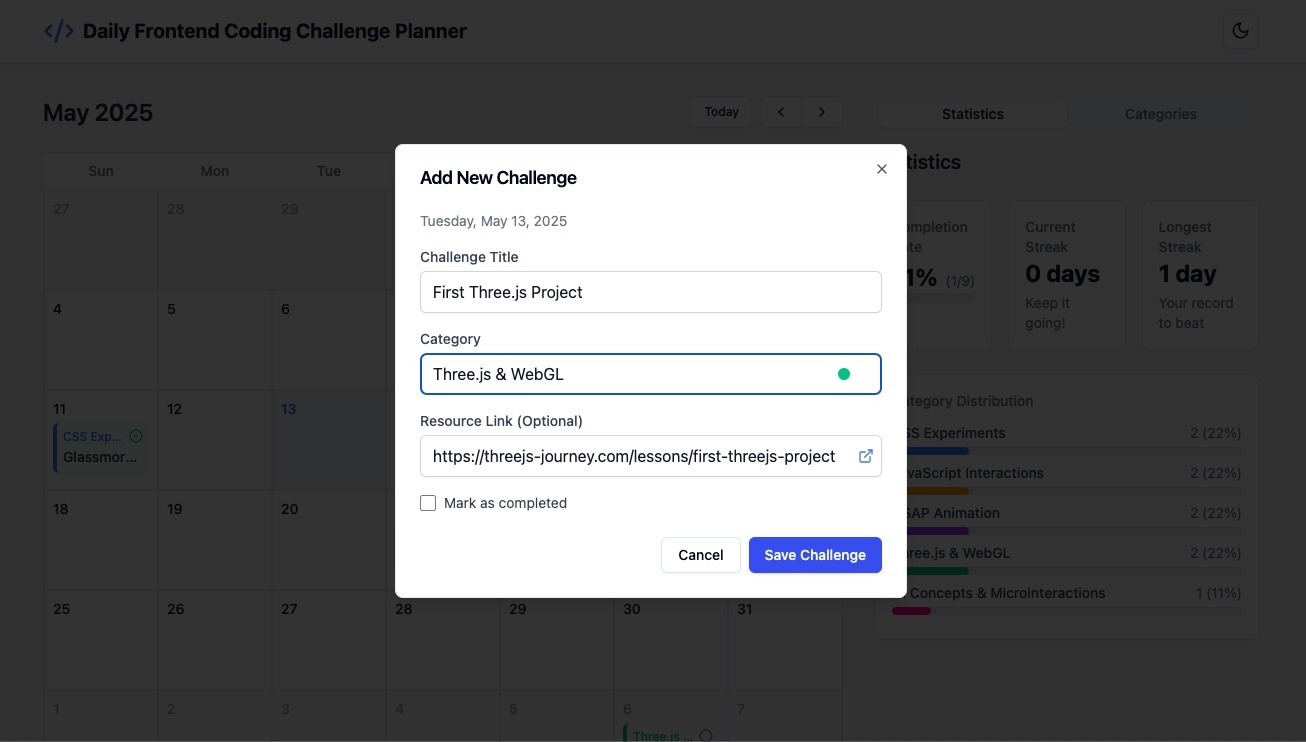
Screenshots
The Daily Frontend Coding Challenge Planner app, built using just a few promptsAdding a new challenge to the planner
With everything in place, we deployed the app in one click.
We were genuinely impressed by how quickly Bolt.new generated a working app from just a prompt. Minor tweaks were easy, and even a small bug resolved itself with minimal guidance.
Try it yourself—you might be surprised by how much you can build with so little effort.
The future of the web feels more accessible, creative, and immediate—and tools like Bolt.new are helping shape it. In a landscape full of complex tooling and steep learning curves, Bolt.new offers a refreshing alternative: an intelligent, intuitive space where ideas take form instantly.
Bolt lowers the barrier to building for the web. Its prompt-based interface, real-time feedback, and seamless deployment turn what used to be hours of setup into minutes of creativity. With support for full-stack workflows, Figma integration, and AI-assisted editing, Bolt.new isn’t just another code editor, it’s a glimpse into a more accessible, collaborative, and accelerated future for web creation.
“Aurel’s Grand Theater” is an experimental, unconventional solo portfolio project that invites users to read case
studies, solve mysteries to unlock secret pages, or freely explore the theater – jumping around and even smashing
things!
I had an absolute blast working on it, even though it took much longer than I anticipated. Once I finally settled on a
creative direction, the project took about a year to complete – but reaching that direction took nearly two years on
its own. Throughout the journey, I balanced a full-time job as a lead web developer, freelance gigs, and an unexpected
relocation to the other side of the world. The cherry on top? I went through way
too many artistic iterations. It ‘s my longest solo project to date, but also one of the most fun and creatively
rewarding. It gave me the chance to dive deep into creative coding and design.
This article takes you behind the scenes of the project – covering everything from design to code, including tools,
inspiration, project architecture, design patterns, and even feature breakdowns with code snippets you can adapt for
your own work.
The Creative Process: Behind the Curtain
Genesis
After eight years, my portfolio no longer reflected my skills or creativity. I wanted to create something unconventional – an experience where visitors become active participants rather than passive observers. Most importantly, I wanted it to be something I ‘d genuinely enjoy building. I was wrapping up “ Leap for Mankind” at the time and had a blast working on it, blending storytelling with game and interactive elements. I wanted to create another experimental website that combines game mechanics with a narrative experience.
From the beginning, I envisioned a small character that could freely explore its environment – smashing objects, interacting with surrounding elements, and navigating not just the floor but also vertical spaces by jumping onto tables and chairs. The goal was to transform the portfolio from a passive viewing experience into a fun, interactive one. At the same time, I recognized that some content demands clarity over creativity. For example, case studies require a more traditional format that emphasizes readability.
One of the key challenges, then, was designing a portfolio that could seamlessly transition between an immersive 3D game world and more conventional documentation pages – without disrupting the overall experience.
Building the Foundation
I had a general concept of the website in mind, so I started coding a proof of concept (POC) for the game back in
2022. In this early version, the player could move around, bump into objects, and jump – laying the foundation for the
interactive world I envisioned. Interestingly, much of the core code structure from that POC made it into the final
product. While the technical side was coming together, I still hadn ‘t figured out the artistic direction at that
point.
Early Proof Of Concept
Trials and Errors
As a full-time web developer, I rarely find myself wrestling with artistic direction. Until now, every freelance and
side project I took on began with a clear creative vision that simply needed technical execution.
This time was different. At first, I leaned toward a cartoonish aesthetic with bold outlines, thinking it would
emphasize my creativity. I tried to convince myself it worked, but something felt off – especially when pairing the
visual style with the user interface. The disconnect between my vision and its execution was unfamiliar territory, and
it led me down a long and winding path of creative exploration.
Early artistic direction
I experimented with other styles too, like painterly visuals, which held promise but proved too time-consuming. Each
artistic direction felt either not suitable for me or beyond my practical capabilities as a developer moonlighting as
a designer.
The theater concept – which ultimately became central to the portfolio ‘s identity – arrived surprisingly late. It
wasn ‘t part of the original vision but surfaced only after countless iterations and discarded ideas. In total,
finding an artistic direction that truly resonated took nearly two years – a journey further complicated by a major
relocation across continents, ongoing work and freelance commitments, and personal responsibilities.
The extended timeline wasn ‘t due to technical complexity, but to an unexpected battle with creative identity. What
began as a straightforward portfolio refresh evolved into a deeper exploration of how to merge professional
presentation with personal expression – pushing me far beyond code and into the world of creative direction.
Tools & Inspiration: The Heart of Creation
After numerous iterations and abandoned concepts, I finally arrived at a creative direction that resonated with my
vision. Rather than detailing every artistic detour, I ‘ll focus on the tools and direction that ultimately led to the
final product.
Design Stack
Below is the stack I use to design my 3D projects:
UI/UX & Visual Design
Figma
: When I first started, everything was laid out in a Photoshop file. Over the years, I tried various design tools,
but I ‘ve been using Figma consistently since 2018 – and I ‘ve been really satisfied with it ever since.
Miro
: reat for moodboarding and early ideation. It helps me visually organize thoughts and explore concepts during the
initial phase.
3D Modeling & Texturing
Blender
: My favorite tool for 3D modeling. It ‘s incredibly powerful and flexible, though it does have a steep learning
curve at first. Still, it ‘s well worth the effort for the level of creative control it offers.
Adobe Substance 3D Painter
: The gold standard in my workflow for texture painting. It’s expensive, but the quality and precision it delivers
make it indispensable.
Image Editing
Krita
: I only need light photo editing, and Krita handles that perfectly without locking me into Adobe ‘s ecosystem – a
practical and efficient alternative.
Drawing Inspiration from Storytellers
While I drew inspiration from many sources, the most influential were Studio Ghibli and the mystical world of Harry
Potter. Ghibli ‘s meticulous attention to environmental detail shaped my understanding of atmosphere, while the
enchanting realism of the Harry Potter universe helped define the mood I wanted to evoke. I also browsed platforms
like ArtStation and Pinterest for broader visual inspiration, while sites like Behance, FWA, and Awwwards influenced
the more granular aspects of UX/UI design.
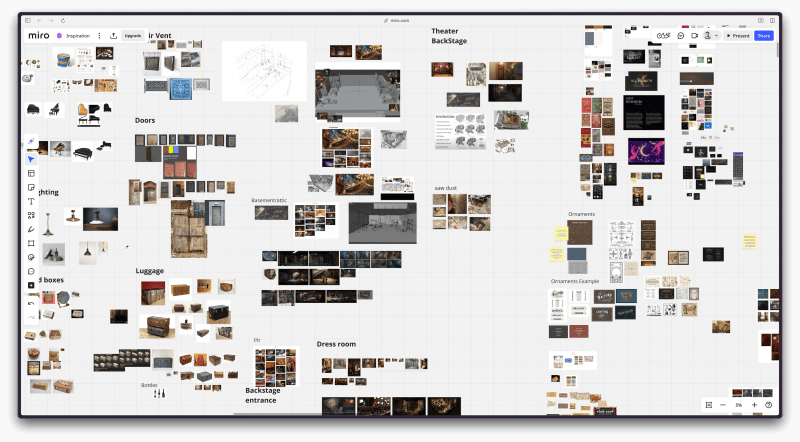
Initially, I organized these references on an InVision board. However, when the platform shut down mid-project, I had
to migrate everything to Miro – an unexpected transition and symbolic disruption that echoed the broader delays in the
project.
Mood board of Aurel’s Grand Theater
Designing the Theater
The theater concept emerged as the perfect metaphor for a portfolio: a space where different works could be presented
as “performances,” while maintaining a cohesive environment. It also aligned beautifully with the nostalgic,
pre-digital vibe inspired by many of my visual references.
Environment design is a specialized discipline I wasn ‘t very familiar with initially. To create a theater that felt
visually engaging and believable, I studied techniques from the FZD School
. These approaches were invaluable in conceptualizing spaces that truly feel alive: places where you can sense people
living their lives, working, and interacting with the environment.
To make the environment feel genuinely inhabited, I incorporated details that suggest human presence: scattered props,
tools, theater posters, food items, pamphlets, and even bits of miscellaneous junk throughout the space. These
seemingly minor elements were crucial in transforming the static 3D model into a setting rich with history, mood, and
character.
The 3D Modeling Process
Optimizing for Web Performance
Creating 3D environments for the web comes with unique challenges that differ significantly from video modelling. When
scenes need to be rendered in real-time by a browser, every polygon matters.
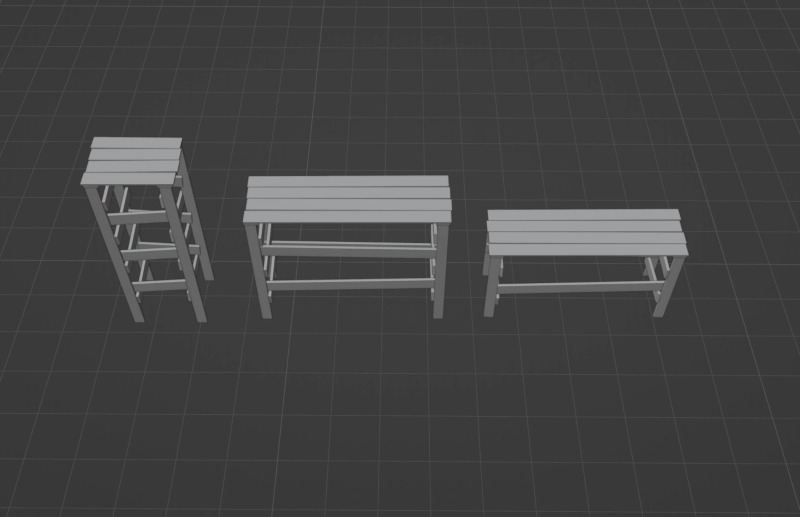
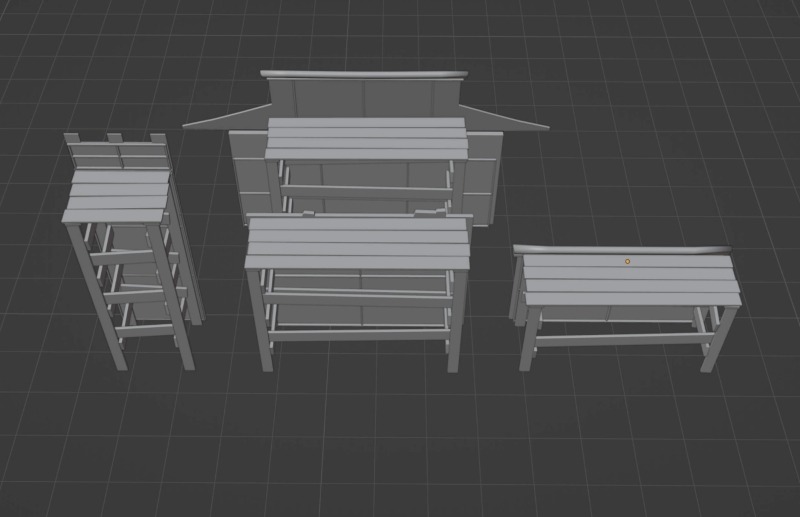
To address this, I adopted a strict low-poly approach and focused heavily on building reusable modular components.
These elements could be instantiated throughout the environment without duplicating unnecessary geometry or textures.
While the final result is still relatively heavy, this modular system allowed me to construct more complex and
detailed scenes while maintaining reasonable download sizes and rendering performance, which wouldn ‘t have been
possible without this approach.
Scaffolds models
Scaffolds models merged with the tower, hanok house and walls props
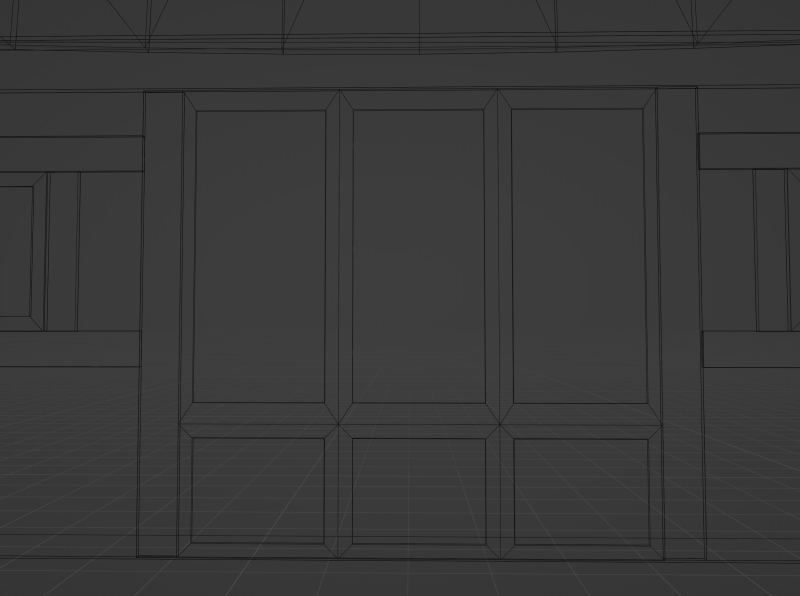
Texture Over Geometry
Rather than modeling intricate details that would increase polygon counts, I leveraged textures to suggest complexity.
Adobe Substance 3D became my primary tool for creating rich material surfaces that could convey detail without
overloading the renderer. This approach was particularly effective for elements like the traditional Hanok windows
with their intricate wooden lattice patterns. Instead of modeling each panel, which would have been
performance-prohibitive, I painted the details into textures and applied them to simple geometric forms.
Hanok model’s verticesHanok model painted using 3d Substance Painter
Frameworks & Patterns: Behind the Scenes of Development
Tech Stack
This is a comprehensive overview of the technology stack I used for Aurel’s Grand Theater website, leveraging my
existing expertise while incorporating specialized tools for animation and 3D effects.
Core Framework
Vue.js
: While I previously worked with React, Vue has been my primary framework since 2018. Beyond simply enjoying and
loving this framework, it makes sense for me to maintain consistency between the tools I use at work and on my side
projects. I also use Vite and Pinia.
Animation & Interaction
GSAP
: A cornerstone of my development toolkit for nearly a decade, primarily utilized on this project for:
ScrollTrigger functionality
MotionPath animations
Timeline and tweens
As a personal challenge, I created my own text-splitting functionality for this project (since it wasn ‘t client
work), but I highly recommend GSAP ‘s SplitText for most use cases.
Lenis
: My go-to library for smooth scrolling. It integrates beautifully with scroll animations, especially when working
with Three.js.
3D Graphics & Physics
Three.js
: My favorite 3D framework and a key part of my toolkit since 2015. I enjoy using it to bring interactive 3D
elements to the web.
Cannon.js
: Powers the site ‘s physics simulations. While I considered alternatives like Rapier, I stuck with Cannon.js since
it was already integrated into my 2022 proof-of-concept. Replacing it would have introduced unnecessary delays.
Styling
Queso
: A headless CSS framework developed at MamboMambo (my workplace). I chose it for its comprehensive starter
components and seamless integration with my workflow. Despite being in beta, it ‘s already reliable and flexible.
This tech stack strikes a balance between familiar tools and specialized libraries that enable the visual and
interactive elements that define the site’s experience.
Architecture
I follow Clean Code principles and other industry best practices, including aiming to keep my files small,
independent, reusable, concise, and testable.
I’ve also adopted the component folder architecture developed at my workplace. Instead of placing Vue
files directly inside the ./components
directory, each component resides in its own folder. This folder contains the Vue
file along with related types, unit tests, supporting files, and any child components.
Although initially designed for Vue
components, I ‘ve found this structure works equally well for organizing logic with Typescript
files, utilities
, directives
, and more. It ‘s a clean, consistent system that improves code readability, maintainability, and scalability.
This structured approach helps me manage the code base efficiently and maintain clear separation of concerns
throughout the codebase, making both development and future maintenance significantly more straightforward.
Design Patterns
Singleton
Singletons play a key role in this type of project architecture, enabling efficient code reuse without incurring
performance penalties.
import Experience from "@/three/Experience/Experience";
import type { Scene } from "@/types/three.types";

let instance: SingletonExample | null = null;

export default class SingletonExample {
  private scene: Scene;
  private experience: Experience;

  constructor() {
    if (instance) {
      return instance;
    }
    instance = this;

    this.experience = new Experience();
    this.scene = this.experience.scene;
  }

  init() {
    // initialize the singleton
  }

  someMethod() {
    // some method
  }

  update() {
    // update the singleton
  }

  update10fps() {
    // Optional: update methods capped at 10FPS
  }

  destroySingleton() {
    // clean up three.js + destroy the singleton
  }
}
Split Responsibility Architecture
As shown earlier in the project architecture section, I deliberately separated physics management from model handling
to produce smaller, more maintainable files.
World Management Files:
These files are responsible for initializing factories and managing meshes within the main loop. They may also include
functions specific to individual world items.
Here’s an example of one such file:
// src/three/Experience/Theater/mockFileModel/mockFileModel.ts
import Experience from "@/three/Experience/Theater/Experience/Experience";

import type {
  List,
  LoadModel
} from "@/types/experience/experience.types";
import type { Scene } from "@/types/three.types";
import type Physics from "@/three/Experience/Theater/Physics/Physics";
import type { Resources } from "@/three/Experience/Utils/Ressources/Resources";
import type { MaterialGenerator } from "@/types/experience/materialGeneratorType";


let instance: mockWorldFile | null = null;
export default class mockWorldFile {
  private experience: Experience;
  private list: List;
  private physics: Physics;
  private resources: Resources;
  private scene: Scene;
  private materialGenerator: MaterialGenerator;
  public loadModel: LoadModel;
  constructor() {
    //    Singleton
    if (instance) {
      return instance;
    }

    instance = this;

    this.experience = new Experience();
    this.scene = this.experience.scene;
    this.resources = this.experience.resources;
    this.physics = this.experience.physics;

    // factories
    this.materialGenerator = this.experience.materialGenerator;
    this.loadModel = this.experience.loadModel;

     // Most of the material are init in a file called sharedMaterials
    const bakedMaterial = this.experience.world.sharedMaterials.bakedMaterial;
    // physics infos such as position, rotation, scale, weight etc.
    const paintBucketPhysics = this.physics.items.paintBucket;

    // Array of objects of models. This will be used to update it's position, rotation, scale, etc.
    this.list = {
      paintBucket: [],
      ...
    };

    // get the resource file
    const resourcePaintBucket = this.resources.items.paintBucketWhite;

     //Reusable code to add models with physics to the scene. I will talk about that later.
    this.loadModel.setModels(
      resourcePaintBucket.scene,
      paintBucketPhysics,
      "paintBucketWhite",
      bakedMaterial,
      true,
      true,
      false,
      false,
      false,
      this.list.paintBucket,
      this.physics.mock,
      "metalBowlFalling",
    );
  }

  otherMethod() {
    ...
  }

  destroySingleton() {
    ...
  }
}
Physics Management Files
These files trigger the factories to apply physics to meshes, store the resulting physics bodies, and update mesh
positions on each frame.
// src/three/Experience/Theater/pathTo/mockFilePhysics
import Experience from "@/three/Experience/Theater/Experience/Experience";

import additionalShape from "./additionalShape.json";

import type {
  PhysicsResources,
  TrackName,
  List,
  modelsList
} from "@/types/experience/experience.types";
import type { cannonObject } from "@/types/three.types";
import type PhysicsGenerator from "../Factories/PhysicsGenerator/PhysicsGenerator";
import type UpdateLocation from "../Utils/UpdateLocation/UpdateLocation";
import type UpdatePositionMesh from "../Utils/UpdatePositionMesh/UpdatePositionMesh";
import type AudioGenerator from "../Utils/AudioGenerator/AudioGenerator";

let instance: MockFilePhysics | null = null;

export default class MockFilePhysics {
  private experience: Experience;
  private list: List;
  private physicsGenerator: PhysicsGenerator;
  private updateLocation: UpdateLocation;
  private modelsList: modelsList;
  private updatePositionMesh: UpdatePositionMesh;
  private audioGenerator: AudioGenerator;

  constructor() {
    //    Singleton
    if (instance) {
      return instance;
    }
    instance = this;

    this.experience = new Experience();
    this.debug = this.experience.debug;
    this.physicsGenerator = this.experience.physicsGenerator;
    this.updateLocation = this.experience.updateLocation;
    this.updatePositionMesh = this.experience.updatePositionMesh;
    this.audioGenerator = this.experience.audioGenerator;

    // Array of objects of physics. This will be used to update the model's position, rotation, scale etc.
    this.list = {
      paintBucket: [],
    };
  }

  setModelsList() {
    //When the load progress reaches a certain percentage, we can set the models list, avoiding some potential bugs or unnecessary conditional logic. Please note that the method update is never run until the scene is fully ready.
    this.modelsList = this.experience.world.constructionToolsModel.list;
  }

  addNewItem(
    element: PhysicsResources,
    listName: string,
    trackName: TrackName,
    sleepSpeedLimit: number | null = null,
  ) {

    // factory to add physics, I will talk about that later
    const itemWithPhysics = this.physicsGenerator.createItemPhysics(
      element,
      null,
      true,
      true,
      trackName,
      sleepSpeedLimit,
    );

    // Additional optional shapes to the item if needed
    switch (listName) {
      case "broom":
        this.physicsGenerator.addMultipleAdditionalShapesToItem(
          itemWithPhysics,
          additionalShape.broomHandle,
        );
        break;

    }

    this.list[listName].push(itemWithPhysics);
  }

  // this methods is called everyfame.
  update() {
    // reusable code to update the position of the mesh
    this.updatePositionMesh.updatePositionMesh(
      this.modelsList["paintBucket"],
      this.list["paintBucket"],
    );
  }


  destroySingleton() {
    ...
  }
}
Since the logic for updating mesh positions is consistent across the project, I created reusable code that can be
applied in nearly all physics-related files.
// src/three/Experience/Utils/UpdatePositionMesh/UpdatePositionMesh.ts

export default class UpdatePositionMesh {
  updatePositionMesh(meshList: MeshList, physicList: PhysicList) {
    for (let index = 0; index < physicList.length; index++) {
      const physic = physicList[index];
      const model = meshList[index].model;

      model.position.set(
        physic.position.x,
        physic.position.y,
        physic.position.z
      );
      model.quaternion.set(
        physic.quaternion.x,
        physic.quaternion.y,
        physic.quaternion.z,
        physic.quaternion.w
      );
    }
  }
}
Factory Patterns
To avoid redundant code, I built a system around reusable code. While the project includes multiple factories, these
two are the most essential:
Model Factory
: LoadModel
With few exceptions, all models—whether instanced or regular, with or without physics—are added through this factory.
// src/three/Experience/factories/LoadModel/LoadModel.ts
import * as THREE from "three";
import Experience from "@/three/Experience/Theater/Experience/Experience";

import type {
  PhysicsResources,
  TrackName,
  List,
  modelListPath,
  PhysicsListPath
} from "@/types/experience/experience.type";
import type { loadModelMaterial } from "./types";
import type { Material, Scene, Mesh } from "@/types/Three.types";
import type Progress from "@/three/Experience/Utils/Progress/Progress";
import type AddPhysicsToModel from "@/three/Experience/factories/AddPhysicsToModel/AddPhysicsToModel";

let instance: LoadModel | null = null;


export default class LoadModel {
  public experience: Experience;
  public progress: Progress;
  public mesh: Mesh;
  public addPhysicsToModel: AddPhysicsToModel;
  public scene: Scene;


  constructor() {
    if (instance) {
      return instance;
    }
    instance = this;

    this.experience = new Experience();
    this.scene = this.experience.scene;
    this.progress = this.experience.progress;
    this.addPhysicsToModel = this.experience.addPhysicsToModel;
  }


  async setModels(
    model: Model,
    list: PhysicsResources[],
    physicsList: string,
    bakedMaterial: LoadModelMaterial,
    isCastShadow: boolean = false,
    isReceiveShadow: boolean = false,
    isIntancedModel: boolean = false,
    isDoubleSided: boolean = false,
    modelListPath: ModelListPath,
    physicsListPath: PhysicsListPath,
    trackName: TrackName = null,
    sleepSpeedLimit: number | null = null,
  ) {
    const loadedModel = isIntancedModel
      ? await this.addInstancedModel(
          model,
          bakedMaterial,
          true,
          true,
          isDoubleSided,
          isCastShadow,
          isReceiveShadow,
          list.length,
        )
        : await this.addModel(
            model,
            bakedMaterial,
            true,
            true,
            isDoubleSided,
            isCastShadow,
            isReceiveShadow,
          );


    this.addPhysicsToModel.loopListThenAddModelToSceneThenToPhysics(
      list,
      modelListPath,
      physicsListPath,
      physicsList,
      loadedModel,
      isIntancedModel,
      trackName,
      sleepSpeedLimit,
    );
  }


  addModel = (
    model: Model,
    material: Material,
    isTransparent: boolean = false,
    isFrustumCulled: boolean = true,
    isDoubleSided: boolean = false,
    isCastShadow: boolean = false,
    isReceiveShadow: boolean = false,
    isClone: boolean = true,
  ) => {
    model.traverse((child: THREE.Object3D) => {
      !isFrustumCulled ? (child.frustumCulled = false) : null;
      if (child instanceof THREE.Mesh) {
        child.castShadow = isCastShadow;
        child.receiveShadow = isReceiveShadow;

        material
          && (child.material = this.setMaterialOrCloneMaterial(
              isClone,
              material,
            ))


        child.material.transparent = isTransparent;
        isDoubleSided ? (child.material.side = THREE.DoubleSide) : null;
        isReceiveShadow ? child.geometry.computeVertexNormals() : null; // https://discourse.threejs.org/t/gltf-model-shadows-not-receiving-with-gltfmeshstandardsgmaterial/24112/9
      }
    });

    this.progress.addLoadedModel(); // Update the number of items loaded
    return { model: model };
  };


  setMaterialOrCloneMaterial(isClone: boolean, material: Material) {
    return isClone ? material.clone() : material;
  }


  addInstancedModel = () => {
   ...
  };

  // other methods


  destroySingleton() {
    ...
  }
}
Physics Factory: PhysicsGenerator
This factory has a single responsibility: creative physics properties for meshes.
// src/three/Experience/Utils/PhysicsGenerator/PhysicsGenerator.ts
import Experience from "@/three/Experience/Theater/Experience/Experience";
import * as CANNON from "cannon-es";

import CannonUtils from "@/utils/cannonUtils.js";

import type {
  Quaternion,
  PhysicsItemPosition,
  PhysicsItemType,
  PhysicsResources,
  TrackName,
  CannonObject,
} from "@/types/experience/experience.types";

import type { Scene, ConvexGeometry } from "@/types/three.types";
import type Progress from "@/three/Experience/Utils/Progress/Progress";
import type AudioGenerator from "@/three/Experience/Utils/AudioGenerator/AudioGenerator";
import type Physics from "@/three/Experience/Theater/Physics/Physics";
import type { physicsShape } from "./PhysicsGenerator.types"

let instance: PhysicsGenerator | null = null;

export default class PhysicsGenerator {
  public experience: Experience;
  public physics: Physics;
  public currentScene: string | null = null;
  public progress: Progress;
  public audioGenerator: AudioGenerator;

  constructor() {
    //    Singleton
    if (instance) {
      return instance;
    }
    instance = this;

    this.experience = new Experience();
    this.resources = this.experience.resources;
    this.audioGenerator = this.experience.audioGenerator;
    this.physics = this.experience.physics;
    this.progress = this.experience.progress;

    this.currentScene = this.experience.currentScene;
  }


  //#region add physics to an object

  createItemPhysics(
    source: PhysicsResources, // object containing physics info such as mass, shape, position....
    convex?: ConvexGeometry | null = null,
    allowSleep?: boolean = true,
    isBodyToAdd?: boolean = true,
    trackName?: TrackName = null,
    sleepSpeedLimit?: number | null = null
  ) {
    const setSpeedLimit = sleepSpeedLimit ?? 0.15;

    // For this project I needed to detect if the user was in the Mont-Saint-Michel, Leap For Mankind, About or Archives scene.
    const localCurrentScene = source.locations[this.currentScene]
      ? this.currentScene
      : "about";

    switch (source.type as physicsShape) {
      case "box": {
        const boxShape = new CANNON.Box(new CANNON.Vec3(...source.shape));
        const boxBody = new CANNON.Body({
          mass: source.mass,
          position: new CANNON.Vec3(
            source.locations[localCurrentScene].position.x,
            source.locations[localCurrentScene].position.y,
            source.locations[localCurrentScene].position.z
          ),
          allowSleep: allowSleep,
          shape: boxShape,
          material: source.material
            ? source.material
            : this.physics.physics.defaultMaterial,
          sleepSpeedLimit: setSpeedLimit,
        });

        source.locations[localCurrentScene].quaternion
          && (boxBody.quaternion.y =
              source.locations[localCurrentScene].quaternion.y);

        this.physics.physics.addBody(boxBody);
        this.updatedLoadedItem();

        // Add optional SFX that will be played if the item collides with another physics item
        trackName
          && this.audioGenerator.addEventListenersToObject(boxBody, TrackName);

        return boxBody;
      }

      // Then it's basicly the same logic for all other cases
      case "sphere": {
        ...
      }

      case "cylinder": {
       ...
      }

      case "plane": {
       ...
      }

      case "trigger": {
      ...
      }

      case "torus": {
        ...
      }

      case "trimesh": {
       ...
      }

      case "polyhedron": {
        ...
      }

      default:
        ...
        break;
    }
  }

  updatedLoadedItem() {
    this.progress.addLoadedPhysicsItem(); // Update the number of item loaded (physics only)
  }

  //#endregion add physics to an object

  // other

  destroySingleton() {
    ...
  }
}
FPS Capping
With over 100 models and approximately 150 physics items loaded in the main scene, Aurel’s Grand Theater required
performance-driven coding from the outset.
I were to rebuild the project today, I would leverage GPU computing much more intensively. However, when I started the
proof of concept in 2022, GPU computing for the web was still relatively new and not fully mature—at least, that was
my perception at the time. Rather than recoding everything, I worked with what I had, which also presented a great
personal challenge. In addition to using low-poly models and employing classic optimization techniques, I extensively
used instanced meshes for all small, reusable items—even those with physics. I also relied on many other
under-the-hood techniques to keep the performance as smooth as possible on this CPU-intensive website.
One particularly helpful approach I implemented was adaptive frame rates. By capping the FPS to different levels (60,
30, or 10), depending on whether the logic required rendering at those rates, I optimized performance. After all, some
logic doesn ‘t require rendering every frame. This is a simple yet effective technique that can easily be incorporated
into your own project.
Now, let ‘s take a look at the file responsible for managing time in the project.
// src/three/Experience/Utils/Time/Time.ts
import * as THREE from "three";
import EventEmitter from "@/three/Experience/Utils/EventEmitter/EventEmitter";

let instance: Time | null = null;
let animationFrameId: number | null = null;
const clock = new THREE.Clock();

export default class Time extends EventEmitter {
  private lastTick60FPS: number = 0;
  private lastTick30FPS: number = 0;
  private lastTick10FPS: number = 0;

  private accumulator60FPS: number = 0;
  private accumulator30FPS: number = 0;
  private accumulator10FPS: number = 0;

  public start: number = 0;
  public current: number = 0;
  public elapsed: number = 0;
  public delta: number = 0;
  public delta60FPS: number = 0;
  public delta30FPS: number = 0;
  public delta10FPS: number = 0;

  constructor() {
    if (instance) {
      return instance;
    }
    super();
    instance = this;
  }

  tick() {
    const currentTime: number = clock.getElapsedTime() * 1000;

    this.delta = currentTime - this.current;
    this.current = currentTime;

    // Accumulate the time that has passed
    this.accumulator60FPS += this.delta;
    this.accumulator30FPS += this.delta;
    this.accumulator10FPS += this.delta;

    // Trigger uncapped tick event using the project's EventEmitter class
    this.trigger("tick");

    // Trigger 60FPS tick event
    if (this.accumulator60FPS >= 1000 / 60) {
      this.delta60FPS = currentTime - this.lastTick60FPS;
      this.lastTick60FPS = currentTime;

      // Same logic as "this.trigger("tick")" but for 60FPS
      this.trigger("tick60FPS");
      this.accumulator60FPS -= 1000 / 60;
    }

    // Trigger 30FPS tick event
    if (this.accumulator30FPS >= 1000 / 30) {
      this.delta30FPS = currentTime - this.lastTick30FPS;
      this.lastTick30FPS = currentTime;

      this.trigger("tick30FPS");
      this.accumulator30FPS -= 1000 / 30;
    }

    // Trigger 10FPS tick event
    if (this.accumulator10FPS >= 1000 / 10) {
      this.delta10FPS = currentTime - this.lastTick10FPS;
      this.lastTick10FPS = currentTime;

      this.trigger("tick10FPS");
      this.accumulator10FPS -= 1000 / 10;
    }

    animationFrameId = window.requestAnimationFrame(() => {
      this.tick();
    });
  }
}
Then, in the Experience.ts
file, we simply place the methods according to the required FPS.
constructor() {
   if (instance) {
      return instance;
    }

    ...

    this.time = new Time();

    ...


    //  The game loops (here called tick) are updated when the EventEmitter class is triggered.
    this.time.on("tick", () => {
      this.update();
    });
    this.time.on("tick60FPS", () => {
      this.update60();
    });
    this.time.on("tick30FPS", () => {
      this.update30();
    });
    this.time.on("tick10FPS", () => {
      this.update10();
    });
    }


  update() {
    this.renderer.update();
  }

  update60() {
    this.camera.update60FPS();
    this.world.update60FPS();
    this.physics.update60FPS();
  }

  update30() {
    this.physics.update30FPS();
    this.world.update30FPS();
  }

  update10() {
    this.physics.update10FPS();
    this.world.update10FPS();
  }
Inspired by techniques from the film industry, the transitions between the 3D game and the more traditionally
structured pages, such as the Case Studies, About, and Credits pages, were carefully designed to feel seamless and
cinematic.
The first-time visit animation provides context and immerses users into the website experience. Meanwhile, the other
page transitions play a crucial role in ensuring a smooth shift between the game and the more conventional layout of
the Case Studies and About page, preserving immersion while naturally guiding users from one experience to the next.
Without these transitions, it would feel like abruptly jumping between two entirely different worlds.
I’ll do a deep dive into the code for the animation when the user returns from the basement level. It’s a bit simpler
than the other cinematic transitions but the underlying logic is the same, which makes it easier for you to adapt it
to another project.
The init
method, called from another file, initiates the creation of the animation. At first, we set the path for the
animation, then the timeline.
init() {
    this.camera = this.experience.camera.instance;
    this.initPath();
 }

initPath() {
  // create the path for the camera
  const pathPoints = new CatmullRomCurve3([
    new Vector3(CAMERA_POSITION_SEAT[0], CAMERA_POSITION_SEAT[1], 15),
    new Vector3(5.12, 4, 8.18),
    new Vector3(...RETURNING_PLAYER_CAMERA_FINAL_POSITION),
  ]);

  // init the timeline
  this.initTimeline(pathPoints);
}

initTimeline(path: CatmullRomCurve3) {
 ...
}
The timeline animation is split into two: a) The camera moves vertically from the basement to the theater, above the
seats.
...

initTimeline(path: CatmullRomCurve3) {
    // get the points
    const pathPoints = path.getPoints(30);

    // create the gsap timeline
    this.timelineAnimation
      // set the initial position
      .set(this.camera.position, {
        x: CAMERA_POSITION_SEAT[0],
        y: CAMERA_POSITION_SEAT[1] - 3,
        z: 15,
      })
      .add(() => {
        this.camera.lookAt(3.5, 1, 0);
      })
      //   Start the animation! In this case the camera is moving from the basement to above the seat
      .to(this.camera.position, {
        x: CAMERA_POSITION_SEAT[0],
        y: CAMERA_POSITION_SEAT[1],
        z: 15,
        duration: 3,
        ease: "elastic.out(0.1,0.1)",
      })
      .to(
        this.camera.position,
        {
		      ...
        },
      )
      ...
  }
b) The camera follows a path while smoothly transitioning its view to the final location.
 .to(
    this.camera.position,
    {
      // then we use motion path to move the camera to the player behind the raccoon
      motionPath: {
        path: pathPoints,
        curviness: 0,
        autoRotate: false,
      },
      ease: "power1.inOut",
      duration: DURATION_RETURNING_FORWARD,
      onUpdate: function () {
        const progress = this.progress();

        // wait until progress reaches a certain point to rotate to the camera at the player LookAt
        if (
          progress >=
            1 -
              DURATION_LOOKAT_RETURNING_FORWARD /
                DURATION_RETURNING_FORWARD &&
          !this.lookAtTransitionStarted
        ) {
	         this.lookAtTransitionStarted = true;

           // Create a new Vector3 to store the current look direction
           const currentLookAt = new Vector3();

            // Get the current camera's forward direction (where it's looking)
            instance!.camera.getWorldDirection(currentLookAt);

            // Extend the look direction by 100 units and add the camera's position
            // This creates a point in space that the camera is currently looking at
            currentLookAt.multiplyScalar(100).add(instance!.camera.position);

            // smooth lookAt animation
	          createSmoothLookAtTransition(
	            currentLookAt,
	            new Vector3(...RETURNING_PLAYER_CAMERA_FINAL_LOOKAT),
	            DURATION_LOOKAT_RETURNING_FORWARD,
	            this.camera
	          );
        }
      },
    },
  )
  .add(() => {
    // animation is completed, you can add some code here
  });
As you noticed, I used a utility function called smoothLookAtTransition
since I needed this functionality in multiple places.
With everything ready, the animation sequence is run when playAnimation()
is triggered.
playAnimation() {
    // first set the position of the player
    this.setPositionPlayer();
    // then play the animation
    this.timelineAnimation.play();
  }

  setPositionPlayer() {
   // an simple utils to update the position of the player when the user land in the scene, return or switch scene.
    setPlayerPosition(this.experience, {
      position: PLAYER_POSITION_RETURNING,
      quaternion: RETURNING_PLAYER_QUATERNION,
      rotation: RETURNING_PLAYER_ROTATION,
    });
  }
Scroll-Triggered Animations: Showcasing Books on About Pages
While the game is fun and filled with details, the case studies and about pages are crucial to the overall experience,
even though they follow a more standardized format. These pages still have their own unique appeal. They are filled
with subtle details and animations, particularly scroll-triggered effects such as split text animations when
paragraphs enter the viewport, along with fade-out effects on SVGs and other assets. These animations create a vibe
that mirrors the mysterious yet intriguing atmosphere of the game, inviting visitors to keep scrolling and exploring.
While I can’t cover every animation in detail, I ‘d like to share the technical approach behind the book animations
featured on the about page. This effect blends DOM scroll event tracking with a Three.js scene, creating a seamless
interaction between the user ‘s scrolling behavior and the 3D-rendered books. As visitors scroll down the page, the
books transition elegantly and respond dynamically to their movement.
Before we dive into the Three.js
file, let ‘s look into the Vue
component.
//src/components/BookGallery/BookGallery.vue
<template>
  <!-- the ID is used in the three.js file -->
  <div class="book-gallery" id="bookGallery" ref="bookGallery"></div>
</template>

<script setup lang="ts">
import { onBeforeUnmount, onMounted, onUnmounted, ref } from "vue";

import gsap from "gsap";
import { ScrollTrigger } from "gsap/ScrollTrigger";

import type { BookGalleryProps } from "./types";

gsap.registerPlugin(ScrollTrigger);

const props = withDefaults(defineProps<BookGalleryProps>(), {});

const bookGallery = ref<HTMLBaseElement | null>(null);

const setupScrollTriggers = () => {
 ...
};

const triggerAnimation = (index: number) => {
  ...
};

onMounted(() => {
  setupScrollTriggers();
});

onUnmounted(() => {
  ...
});
</script>

<style lang="scss" scoped>
.book-gallery {
  position: relative;
  height: 400svh; // 1000svh * 4 books
}
</style>
Thresholds are defined for each book to determine which one will be active – that is, the book that will face the
camera.
// src/three/Experience/Basement/World/Books/Books.ts

import * as THREE from "three";
import Experience from "@/three/Experience/Basement/Experience/Experience";

import { SCROLL_RATIO } from "@/constant/scroll";

import { gsap } from "gsap";

import type { Book } from "./books.types";
import type { Material, Scene, Texture, ThreeGroup } from "@/types/three.types";
import type { Sizes } from "@/three/Experience/Utils/Sizes/types";
import type LoadModel from "@/three/Experience/factories/LoadModel/LoadModel";
import type MaterialGenerator from "@/three/Experience/factories/MaterialGenerator/BasicMaterialGenerator";
import type Resources from "@/three/Experience/Utils/Ressources/Resources";

const GSAP_EASE = "power2.out";
const GSAP_DURATION = 1;
const NB_OF_VIEWPORTS_BOOK_SECTION = 5;

let instance: Books | null = null;

export default class Books {
  public scene: Scene;
  public experience: Experience;
  public resources: Resources;
  public loadModel: LoadModel;
  public sizes: Sizes;

  public materialGenerator: MaterialGenerator;
  public resourceDiffuse: Texture;
  public resourceNormal: Texture;
  public bakedMaterial: Material;

  public startingPostionY: number;
  public originalPosition: Book[];
  public activeIndex: number = 0;
  public isAnimationRunning: boolean = false;

  public bookGalleryElement: HTMLElement | null = null;
  public bookSectionHeight: number;
  public booksGroup: ThreeGroup;


  constructor() {
    if (instance) {
      return instance;
    }
    instance = this;

    this.experience = new Experience();
    this.scene = this.experience.sceneSecondary; // I am using a second scene for the books, so it's not affected by the primary scene (basement in the background)
    this.sizes = this.experience.sizes;

    this.resources = this.experience.resources;
    this.materialGenerator = this.experience.materialGenerator;

    this.init();
  }

  init() {
    ...
  }

  initModels() {
   ...
  }

  findPosition() {
   ...
  }

  setBookSectionHeight() {
   ...
  }

  initBooks() {
   ...
  }

  initBook() {
   ...
  }

  createAnimation() {
    ...
  }

  toggleIsAnimationRunning() {
    ...
  }

  ...

  destroySingleton() {
    ...
  }
}
When the file is initialized, we set up the textures and positions of the books.
init() {
  this.initModels();
  this.findPosition();
  this.setBookSectionHeight();
  this.initBooks();
}

initModels() {
  this.originalPosition = [
      {
      name: "book1",
      meshName: null, // the name of the mesh from Blender will dynamically be written here
      position: { x: 0, y: -0, z: 20 },
      rotation: { x: 0, y: Math.PI / 2.2, z: 0 }, // some rotation on y axis so it looks more natural when the books are pilled
    },
    {
      name: "book2",
      meshName: null,
      position: { x: 0, y: -0.25, z: 20 },
      rotation: { x: 0, y: Math.PI / 1.8, z: 0 },
    },
    {
      name: "book3",
      meshName: null,
      position: { x: 0, y: -0.52, z: 20 },
      rotation: { x: 0, y: Math.PI / 2, z: 0 },
    },
    {
      name: "book4",
      meshName: null,
      position: { x: 0, y: -0.73, z: 20 },
      rotation: { x: 0, y: Math.PI / 2.3, z: 0 },
    },
  ];

  this.resourceDiffuse = this.resources.items.bookDiffuse;
  this.resourceNormal = this.resources.items.bookNormal;

    // a reusable class to set the material and normal map
  this.bakedMaterial = this.materialGenerator.setStandardMaterialAndNormal(
    this.resourceDiffuse,
    this.resourceNormal
  );
}

//#region position of the books

// Finds the initial position of the book gallery in the DOM
findPosition() {
  this.bookGalleryElement = document.getElementById("bookGallery");

  if (this.bookGalleryElement) {
    const rect = this.bookGalleryElement.getBoundingClientRect();
    this.startingPostionY = (rect.top + window.scrollY) / 200;
  }
}

//  Sets the height of the book section based on viewport and scroll ratio
setBookSectionHeight() {
  this.bookSectionHeight =
    this.sizes.height * NB_OF_VIEWPORTS_BOOK_SECTION * SCROLL_RATIO;
}

//#endregion position of the books
Each book mesh is created and added to the scene as a THREE.Group
.
Each time a book enters
or reenters
its thresholds, the triggers from the Vue
file run the animation createAnimation
in this file, which rotates the active book in front of the camera and stacks the other books into a pile.
The game is the main attraction of the website. The entire concept began back in 2022, when I set out to build a small
mini-game where you could jump on tables and smash things and it was my favorite part to work on.
Beyond being fun to develop, the interactive physics elements make the experience more engaging, adding a whole new
layer of excitement and exploration that simply isn’t possible in a flat, static environment.
While I can ‘t possibly cover all the physics-related elements, one of my favorites is the rope system near the menu.
It’s a subtle detail, but it was one of the first things I coded when I started leaning into a more theatrical,
artistic direction.
The ropes were also built with performance in mind—optimized to look and behave convincingly without dragging down the
framerate.
This is the base file for the meshes:
// src/three/Experience/Theater/World/Theater/Rope/RopeModel.ts

import * as THREE from "three";
import Experience from "@/three/Experience/Theater/Experience/Experience";
import RopeMaterialGenerator from "@/three/Experience/Factories/MaterialGenerator/RopeMaterialGenerator";

import ropesLocation from "./ropesLocation.json";

import type { Location, List } from "@/types/experience/experience.types";
import type { Scene, Resources, Physics, RopeMesh, CurveQuad } from "@/types/three.types";

let instance: RopeModel | null = null;

export default class RopeModel {
  public scene: Scene;
  public experience: Experience;
  public resources: Resources;
  public physics: Physics;
  public material: Material;
  public list: List;
  public ropeMaterialGenerator: RopeMaterialGenerator;

  public ropeLength: number = 20;
  public ropeRadius: number = 0.02;
  public ropeRadiusSegments: number = 8;

  constructor() {
    //    Singleton
    if (instance) {
      return instance;
    }
    instance = this;

    this.experience = new Experience();
    this.scene = this.experience.scene;
    this.resources = this.experience.resources;
    this.physics = this.experience.physics;
    this.ropeMaterialGenerator = new RopeMaterialGenerator();

    this.ropeLength = this.experience.physics.rope.numberOfSpheres || 20;
    this.ropeRadius = 0.02;
    this.ropeRadiusSegments = 8;

    this.list = {
      rope: [],
    };

    this.initRope();
  }

  initRope() {
   ...
  }

  createRope() {
    ...
  }

  setArrayOfVertor3() {
    ...
  }

  setYValues() {
    ...
  }

  setMaterial() {
    ...
  }

  addRopeToScene() {
    ...
  }

  //#region update at 60FPS
  update() {
   ...
  }

  updateLineGeometry() {
   ...
  }
  //#endregion update at 60FPS

  destroySingleton() {
    ...
  }
}
Mesh creation is initiated inside the constructor.
// src/three/Experience/Theater/World/Theater/Rope/RopeModel.ts
constructor() {
...
this.initRope();
}
initRope() {
// Generate the material that will be used for all ropes
this.setMaterial();
// Create a rope at each location specified in the ropesLocation configuration
ropesLocation.forEach((location) => {
this.createRope(location);
});
}
createRope(location: Location) {
// Generate the curve that defines the rope's path
const curveQuad = this.setArrayOfVertor3();
this.setYValues(curveQuad);
const tube = new THREE.TubeGeometry(
curveQuad,
this.ropeLength,
this.ropeRadius,
this.ropeRadiusSegments,
false
);
const rope = new THREE.Mesh(tube, this.material);
rope.geometry.attributes.position.needsUpdate = true;
// Add the rope to the scene and set up its physics. I'll explain it later.
this.addRopeToScene(rope, location);
}
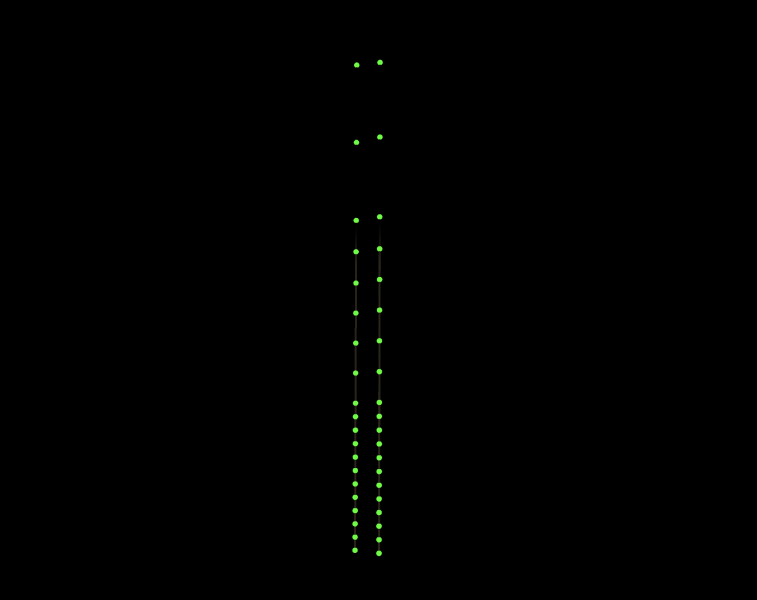
setArrayOfVertor3() {
const arrayLimit = this.ropeLength;
const setArrayOfVertor3 = [];
// Create points in a vertical line, spaced 1 unit apart
for (let index = 0; index < arrayLimit; index++) {
setArrayOfVertor3.push(new THREE.Vector3(10, 9 - index, 0));
if (index + 1 === arrayLimit) {
return new THREE.CatmullRomCurve3(
setArrayOfVertor3,
false,
"catmullrom",
0.1
);
}
}
}
setYValues(curve: CurveQuad) {
// Set each point's Y value to its index, creating a vertical line
for (let i = 0; i < curve.points.length; i++) {
curve.points[i].y = i;
}
}
setMaterial(){
...
}
Since the rope texture is used in multiple places, I use a factory pattern for efficiency.
...

setMaterial() {
    this.material = this.ropeMaterialGenerator.generateRopeMaterial(
      "rope",
      0x3a301d, // Brown color
      1.68, // Normal Repeat
      0.902, // Normal Intensity
      21.718, // Noise Strength
      1.57, // UV Rotation
      9.14, // UV Height
      this.resources.items.ropeDiffuse, // Diffuse texture map
      this.resources.items.ropeNormal // Normal map for surface detail
    );
  }
// src/three/Experience/Shaders/Rope/vertex.glsl

uniform float uNoiseStrength;      // Controls the intensity of noise effect
uniform float uNormalIntensity;    // Controls the strength of normal mapping
uniform float uNormalRepeat;       // Controls the tiling of normal map
uniform vec3 uLightColor;          // Color of the light source
uniform float uShadowStrength;     // Intensity of shadow effect
uniform vec3 uLightPosition;       // Position of the light source
uniform float uvRotate;            // Rotation angle for UV coordinates
uniform float uvHeight;            // Height scaling for UV coordinates
uniform bool isShadowBothSides;    // Flag for double-sided shadow rendering


varying float vNoiseStrength;      // Passes noise strength to fragment shader
varying float vNormalIntensity;    // Passes normal intensity to fragment shader
varying float vNormalRepeat;       // Passes normal repeat to fragment shader
varying vec2 vUv;                  // UV coordinates for texture mapping
varying vec3 vColorPrimary;        // Primary color for the material
varying vec3 viewPos;              // Position in view space
varying vec3 vLightColor;          // Light color passed to fragment shader
varying vec3 worldPos;             // Position in world space
varying float vShadowStrength;     // Shadow strength passed to fragment shader
varying vec3 vLightPosition;       // Light position passed to fragment shader

// Helper function to create a 2D rotation matrix
mat2 rotate(float angle) {
    return mat2(cos(angle), -sin(angle), sin(angle), cos(angle));
}

void main() {
    // Calculate rotation angle and its sine/cosine components
    float angle = 1.0 * uvRotate;
    float s = sin(angle);
    float c = cos(angle);

    // Create rotation matrix for UV coordinates
    mat2 rotationMatrix = mat2(c, s, -s, c);

    // Define pivot point for UV rotation
    vec2 pivot = vec2(0.5, 0.5);

    // Transform vertex position to clip space
    gl_Position = projectionMatrix * viewMatrix * modelMatrix * vec4(position, 1.0);

    // Apply rotation and height scaling to UV coordinates
    vUv = rotationMatrix * (uv - pivot) + pivot;
    vUv.y *= uvHeight;

    // Pass various parameters to fragment shader
    vNormalRepeat = uNormalRepeat;
    vNormalIntensity = uNormalIntensity;
    viewPos = vec3(0.0, 0.0, 0.0);  // Initialize view position
    vNoiseStrength = uNoiseStrength;
    vLightColor = uLightColor;
    vShadowStrength = uShadowStrength;
    vLightPosition = uLightPosition;
}
Once the material is created and added to the mesh, the addRopeToScene
function adds the rope to the scene, then calls the addPhysicsToRope
function from the physics file.
// src/three/Experience/Theater/World/Theater/Rope/RopeModel.ts
  addRopeToScene(mesh: Mesh, location: Location) {
    this.list.rope.push(mesh); //Add the rope to an array, which will be used by the physics file to update the mesh
    this.scene.add(mesh);
    this.physics.rope.addPhysicsToRope(location); // same as src/three/Experience/Theater/Physics/Theater/Rope/Rope.addPhysicsToRope(location)
  }
Let ‘s now focus on the physics file.
// src/three/Experience/Theater/Physics/Theater/Rope/Rope.ts

import * as CANNON from "cannon-es";

import Experience from "@/three/Experience/Theater/Experience/Experience";

import type { Location } from "@/types/experience.types";
import type Physics from "@/three/Experience/Theater/Physics/Physics";
import type { Scene, SphereBody } from "@/types/three.types";

let instance: Rope | null = null;

const SIZE_SPHERE = 0.05;
const ANGULAR_DAMPING = 1;
const DISTANCE_BETWEEN_SPHERES = SIZE_SPHERE * 5;
const DISTANCE_BETWEEN_SPHERES_BOTTOM = 2.3;
const DISTANCE_BETWEEN_SPHERES_TOP = 6;
const LINEAR_DAMPING = 0.5;
const NUMBER_OF_SPHERES = 20;

export default class Rope {
  public experience: Experience;
  public physics: Physics;
  public scene: Scene;
  public list: list[];

  constructor() {
    //    Singleton
    if (instance) {
      return instance;
    }
    instance = this;

    this.experience = new Experience();
    this.scene = this.experience.scene;
    this.physics = this.experience.physics;

    this.list = {
      rope: [],
    };
  }

  //#region add physics
  addPhysicsToRope() {
   ...
  }

  setRopePhysics() {
    ...
  }

  setMassRope() {
   ...
  }

  setDistanceBetweenSpheres() {
    ...
  }

  setDistanceBetweenConstraints() {
   ...
  }

  addConstraints() {
    ...
  }
  //#endregion add physics

  //#region update at 60FPS
  update() {
    ...
  }

  loopRopeWithPhysics() {
    ...
  }

  updatePoints() {
    ...
  }
  //#endregion update at 60FPS

  destroySingleton() {
    ...
  }
}
The rope’s physics is created from the mesh file using the methods addPhysicsToRope
, called using this.physics.rope.addPhysicsToRope(location);.
addPhysicsToRope(location: Location) {
  this.setRopePhysics(location);
}

setRopePhysics(location: Location) {
  const sphereShape = new CANNON.Sphere(SIZE_SPHERE);
  const rope = [];

  let lastBody = null;
  for (let index = 0; index < NUMBER_OF_SPHERES; index++) {
    // Create physics body for each sphere in the rope. The spheres will be what collide with the player
    const spherebody = new CANNON.Body({ mass: this.setMassRope(index) });

    spherebody.addShape(sphereShape);
    spherebody.position.set(
      location.x,
      location.y - index * DISTANCE_BETWEEN_SPHERES,
      location.z
    );
    this.physics.physics.addBody(spherebody);
    rope.push(spherebody);
    spherebody.linearDamping = LINEAR_DAMPING;
    spherebody.angularDamping = ANGULAR_DAMPING;

    // Create constraints between consecutive spheres
    lastBody !== null
      ? this.addConstraints(spherebody, lastBody, index)
      : null;

    lastBody = spherebody;

    if (index + 1 === NUMBER_OF_SPHERES) {
      this.list.rope.push(rope);
    }
  }
}

setMassRope(index: number) {
  return index === 0 ? 0 : 2; // first sphere is fixed (mass 0)
}

setDistanceBetweenSpheres(index: number, locationY: number) {
  return locationY - DISTANCE_BETWEEN_SPHERES * index;
}

setDistanceBetweenConstraints(index: number) {
// since the user only interact the spheres are the bottom, so the distance between the spheres is gradualy increasing from the bottom to the top//Since the user only interacts with the spheres that are at the bottom, the distance between the spheres is gradually increasing from the bottom to the top
  if (index <= 2) {
    return DISTANCE_BETWEEN_SPHERES * DISTANCE_BETWEEN_SPHERES_TOP;
  }
  if (index > 2 && index <= 8) {
    return DISTANCE_BETWEEN_SPHERES * DISTANCE_BETWEEN_SPHERES_BOTTOM;
  }
  return DISTANCE_BETWEEN_SPHERES;
}

addConstraints(
  sphereBody: CANNON.Body,
  lastBody: CANNON.Body,
  index: number
) {
  this.physics.physics.addConstraint(
    new CANNON.DistanceConstraint(
      sphereBody,
      lastBody,
      this.setDistanceBetweenConstraints(index)
    )
  );
}
When configuring physics parameters, strategy is key. Although users won ‘t consciously notice during gameplay, they
can only interact with the lower portion of the rope. Therefore, I concentrated more physics detail where it matters –
by adding more spheres to the bottom of the rope.
Since the user only interacts with the bottom of the rope, the density of the physics sphere is higher at the bottom
of the rope than at the top of the rope.
Rope meshes are then updated every frame from the physics file.
 //#region update at 60FPS
 update() {
  this.loopRopeWithPhysics();
}

loopRopeWithPhysics() {
  for (let index = 0; index < this.list.rope.length; index++) {
    this.updatePoints(this.list.rope[index], index);
  }
}

updatePoints(element: CANNON.Body[], indexParent: number) {
  element.forEach((item: CANNON.Body, index: number) => {
    // Update the mesh with the location of each of the physics spheres
    this.experience.world.rope.list.rope[
      indexParent
    ].geometry.parameters.path.points[index].copy(item.position);
  });
}
//#endregion update at 60FPS
Animations in the DOM – ticket tearing particles
While the website heavily relies on Three.js to create an immersive experience, many elements remain DOM-based. One of
my goals for this portfolio was to combine both worlds: the rich, interactive 3D environments and the efficiency of
traditional DOM elements. Furthermore, I genuinely enjoy coding DOM-based micro-interactions, so skipping out on them
wasn ‘t an option!
One of my favorite DOM animations is the ticket-tearing effect, especially the particles flying away. It ‘s subtle,
but adds a bit of charm. The effect is not only fun to watch but also relatively easy to adapt to other projects.
First, let ‘s look at the structure of the components.
TicketBase.vue
is a fairly simple file with minimal styling. It handles the tearing animation and a few basic functions. Everything
else related to the ticket such as the style is handled by other components passed through slots.
To make things clearer, I ‘ve cleaned up my TicketBase.vue
file a bit to highlight how the particle effect works.
The createParticles
function creates a few new <div>
elements, which act as the little particles. These divs are then appended to either the main part of the ticket or the
torn part.
const createParticles = (containerSelector: HTMLElement, direction: string) => {
  const numParticles = 5;
  for (let i = 0; i < numParticles; i++) {
    const particle = document.createElement("div");
    particle.className = "particle";

    // Calculate left position based on index and add small random offset
    const baseLeft = (i / numParticles) * 100;
    const randomOffset = (Math.random() - 0.5) * 10;
    particle.style.left = `calc(${baseLeft}% + ${randomOffset}%)`;

    // Assign unique animation properties
    const duration = Math.random() * 0.3 + 0.1;
    const translateY = (i / numParticles) * -20 - 2;
    const scale = Math.random() * 0.5 + 0.5;
    const delay = ((numParticles - i - 1) / numParticles) * 0;

    particle.style.animation = `flyAway ${duration}s ${delay}s ease-in forwards`;
    particle.style.setProperty("--translateY", `${translateY}px`);
    particle.style.setProperty("--scale", scale.toString());

    if (direction === "bottom") {
      particle.style.animation = `flyAwayBottom ${duration}s ${delay}s ease-in forwards`;
    }

    containerSelector.appendChild(particle);

    // Remove particle after animation ends
    particle.addEventListener("animationend", () => {
      particle.remove();
    });
  }
};
The particles are animated using a CSS keyframes animation called flyAway
or flyAwayBottom
.
There are so many features, details easter eggs and animation I wanted to cover in this article, but it’s simply not
possible to go through everything as it would be too much and many deserve their own tutorial.
That said, here are some of my favorites to code. They definitely deserve a spot in this article.
Some features I had a blast working on: radial blur, cursor trail, particles, 404 page, paws/bird animation,
navigation animation, collision animation.
Reflections on Aurel’s Grand Theater
Even though it took longer than I originally anticipated, Aurel ‘s Grand Theater was an incredibly fun and rewarding
project to work on. Because it wasn ‘t a client project, it offered a rare opportunity to freely experiment, explore
new ideas, and push myself outside my comfort zone, without the usual constraints of budgets or deadlines.
Looking back, there are definitely things I ‘d approach differently if I were to start again. I ‘d spend more time
defining the art direction upfront, lean more heavily into GPU, and perhaps implement Rapier. But despite these
reflections, I had an amazing time building this project and I ‘m satisfied with the final result.
While recognition was never the goal, I ‘m deeply honored that the site was acknowledged. It received FWA of the Day,
Awwwards Site of the Day and Developer Award, as well as GSAP’s Site of the Week and Site of the Month.
I ‘m truly grateful for the recognition, and I hope this behind-the-scenes look and shared code snippets inspire you
in your own creative coding journey.
The digital realm has morphed into a volatile battleground. Organizations are no longer just facing isolated cyber incidents but are squarely in the crosshairs of sophisticated cyberwarfare. Nation-states, organized cybercrime syndicates, and resourceful individual attackers constantly pursue vulnerabilities, launching relentless attacks. Traditional security measures are increasingly insufficient, leaving businesses dangerously exposed. So, how can organizations effectively defend their critical digital assets against this escalating tide of sophisticated and persistent threats? The answer, with increasing certainty, lies in the power of Extended Detection and Response (XDR).
The Limitations of Traditional Security in the Cyberwarfare Era
For years, security teams have been navigating a fragmented landscape of disparate security tools. Endpoint Detection and Response (EDR), Network Detection and Response (NDR), email security gateways, and cloud security solutions have operated independently, each generating a stream of alerts that often lacked crucial context and demanded time-consuming manual correlation. This lack of integration created significant blind spots, allowing malicious actors to stealthily move laterally within networks and establish long-term footholds, leading to substantial damage and data breaches. The complexity inherent in managing these siloed systems has become a major impediment to effective threat defense in this new era of cyber warfare.
XDR: A Unified Defense Against Advanced Cyber Threats
XDR fundamentally breaks down these security silos. It’s more than just an upgrade to EDR; it represents a transformative shift towards a unified security incident detection and response platform that spans multiple critical security layers. Imagine having a centralized view that provides a comprehensive understanding of your entire security posture, seamlessly correlating data from your endpoints, network infrastructure, email communications, cloud workloads, and more. This holistic visibility forms the bedrock of a resilient defense strategy in the face of modern cyberwarfare tactics.
Key Advantages of XDR in the Age of Cyber Warfare
Unprecedented Visibility and Context for Effective Cyber Defense:
XDR ingests and intelligently analyzes data from a wide array of security telemetry sources, providing a rich and contextual understanding of emerging threats. Instead of dealing with isolated and often confusing alerts, security teams gain a complete narrative of an attack lifecycle, from the initial point of entry to lateral movement attempts and data exfiltration activities. This comprehensive context empowers security analysts to accurately assess the scope and severity of a security incident, leading to more informed and effective response actions against sophisticated cyber threats.
Enhanced Threat Detection Capabilities Against Advanced Attacks
By correlating seemingly disparate data points across multiple security domains, XDR can effectively identify sophisticated and evasive attacks that might easily bypass traditional, siloed security tools. Subtle anomalies and seemingly innocuous behavioral patterns, which could appear benign in isolation, can paint a clear and alarming picture of malicious activity when analyzed holistically by XDR. This significantly enhances the ability to detect and neutralize advanced persistent threats (APTs), zero-day exploits, and other complex cyberattacks that characterize modern cyber warfare.
Faster and More Efficient Incident Response in a Cyber Warfare Scenario
In the high-pressure environment of cyber warfare, rapid response is paramount. XDR automates many of the time-consuming and manual tasks associated with traditional incident response processes, such as comprehensive data collection, in-depth threat analysis, and thorough investigation workflows. This automation enables security teams to respond with greater speed and decisiveness, effectively containing security breaches before they can escalate and minimizing the potential impact of a successful cyberattack. Automated response actions, such as isolating compromised endpoints or blocking malicious network traffic, can be triggered swiftly and consistently based on the correlated intelligence provided by XDR.
Improved Productivity for Security Analysts Facing Cyber Warfare Challenges
The sheer volume of security alerts generated by a collection of disconnected security tools can quickly overwhelm even the most skilled security teams, leading to alert fatigue and a higher risk of genuinely critical threats being missed. XDR addresses this challenge by consolidating alerts from across the security landscape, intelligently prioritizing them based on rich contextual information, and providing security analysts with the comprehensive information they need to quickly understand, triage, and effectively respond to security incidents. This significantly reduces the workload on security teams, freeing up valuable time and resources to focus on proactive threat hunting activities and the implementation of more robust preventative security measures against the evolving threats of cyber warfare.
Proactive Threat Hunting Capabilities in the Cyber Warfare Landscape
With a unified and comprehensive view of the entire security landscape provided by XDR, security analysts can proactively hunt for hidden and sophisticated threats and subtle indicators of compromise (IOCs) that might not trigger traditional, signature-based security alerts. By leveraging the power of correlated data analysis and applying advanced behavioral analytics, security teams can uncover dormant threats and potential attack vectors before they can be exploited and cause significant harm in the context of ongoing cyber warfare.
Future-Proofing Your Security Posture Against Evolving Cyber Threats
The cyber threat landscape is in a constant state of evolution, with new attack vectors, sophisticated techniques, and increasingly complex methodologies emerging on a regular basis. XDR’s inherently unified architecture and its ability to seamlessly integrate with new and emerging security layers ensure that your organization’s defenses remain adaptable and highly resilient in the face of future, as-yet-unknown threats that characterize the dynamic nature of cyber warfare.
Introducing Seqrite XDR: Your AI-Powered Shield in the Cyberwarfare Era
In this challenging and ever-evolving cyberwarfare landscape,Seqrite XDR emerges as your powerful and intelligent ally. Now featuring SIA – Seqrite Intelligent Assistant, a groundbreaking virtual security analyst powered by the latest advancements in GenAI technology, Seqrite XDR revolutionizes your organization’s security operations. SIA acts as a crucial force multiplier for your security team, significantly simplifying complex security tasks, dramatically accelerating in-depth threat investigations through intelligent contextual summarization and actionable insights, and delivering clear, concise, and natural language-based recommendations directly to your analysts.
Unlock Unprecedented Security Capabilities with Seqrite XDR and SIA
SIA – Your LLM Powered Virtual Security Analyst: Leverage the power of cutting-edge Gen AI to achieve faster response times and enhanced security analysis. SIA provides instant access to critical incident details, Indicators of Compromise (IOCs), and comprehensive incident timelines. Seamlessly deep-link to relevant incidents, security rules, and automated playbooks across the entire Seqrite XDR platform, empowering your analysts with immediate context and accelerating their workflows.
Speed Up Your Response with Intelligent Automation: Gain instant access to all critical incident-related information, including IOCs and detailed incident timelines. Benefit from seamless deep-linking capabilities to incidents, relevant security rules, and automated playbooks across the Seqrite XDR platform, significantly accelerating your team’s response capabilities in the face of cyber threats.
Strengthen Your Investigations with AI-Powered Insights: Leverage SIA to gain comprehensive contextual summarization of complex security events, providing your analysts with a clear understanding of the attack narrative. Receive valuable insights into similar past threats, suggested mitigation strategies tailored to your environment, and emerging threat trends, empowering your team to make more informed decisions during critical investigations.
Make Smarter Security Decisions with AI-Driven Recommendations: Utilize pre-built and intuitive conversational prompts specifically designed for security analysts, enabling them to quickly query and understand complex security data. Benefit from clear visualizations, concise summaries of key findings, and structured, actionable recommendations generated by SIA, empowering your team to make more effective and timely security decisions.
With Seqrite XDR, now enhanced with the power of SIA – your GenAI-powered virtual security analyst, you can transform your organization’s security posture by proactively uncovering hidden threats and sophisticated adversaries that traditional, siloed security tools often miss. Don’t wait until it’s too late.
Contact our cybersecurity experts today to learn how Seqrite XDR and SIA can provide the ultimate answer to withstanding the modern cyberwarfare era. Request a personalized demo now to experience the future of intelligent security.
As organizations continue to embrace hybrid work models and migrate applications to the cloud, traditional network security approaches like VPNs are proving inadequate. Zero-trust network Access (ZTNA) has emerged as the modern framework for secure access, operating on the principle of “never trust, always verify.” However, with numerous vendors offering different ZTNA solutions, selecting the right one requires careful consideration of organizational needs, solution types, key features, and implementation factors.
Assessing Organizational Requirements
The first step in selecting a ZTNA solution is thoroughly evaluating your organization’s specific needs. Consider the nature of your workforce: do employees work remotely, in-office, or in a hybrid arrangement? The solution must accommodate secure access from various locations while ensuring productivity. Additionally, assess whether third-party vendors or contractors require controlled access to specific resources, as this will influence whether an agent-based or agentless approach is more suitable.
Another critical factor is the sensitivity of the data and applications being accessed. Organizations handling financial, healthcare, or other regulated data must ensure the ZTNA solution complies with industry standards such as GDPR, HIPAA, or SOC 2. Furthermore, examine how the solution integrates with your existing security infrastructure, including identity and access management (IAM) systems, endpoint detection and response (EDR) tools, and security information and event management (SIEM) platforms. A seamless integration ensures cohesive security policies and reduces operational complexity.
Understanding ZTNA Deployment Models
ZTNA solutions generally fall into two primary categories: service-initiated (agent-based) and network-initiated (agentless). Service-initiated ZTNA requires installing a lightweight agent on user devices, which then connects to a cloud-based broker that enforces access policies. This model is ideal for organizations with managed corporate devices, as it provides granular control over endpoint security.
On the other hand, network-initiated ZTNA does not require software installation. Instead, users access resources through a web portal or browser, enforcing policies via DNS or routing controls. This approach is better suited for third-party users or unmanaged devices, offering flexibility without compromising security. Some vendors provide hybrid models that combine both approaches, allowing organizations to tailor access based on user roles and device types.
Essential Features of a Robust ZTNA Solution
When evaluating ZTNA providers, prioritize solutions that offer strong identity-centric security. Multi-factor authentication (MFA) and continuous authentication mechanisms, such as behavioral analytics, ensure that only verified users gain access. Role-based access control (RBAC) further enhances security by enforcing the principle of least privilege, granting users access only to the resources they need.
Granular access controls are another critical feature. Look for solutions that provide application-level segmentation rather than just network-level controls. Context-aware policies, which consider device posture, geographic location, and time of access, add a layer of security.
Moreover, A robust ZTNA solution should include several other essential features to ensure security and flexibility. It must support user device binding to associate users with their specific devices securely. Additionally, it should support local users in accommodating on-premises authentication needs. Compatibility with legacy identity providers (IdPs) is crucial for seamless integration with existing systems. Furthermore, the solution should enable session recording over various protocols to enhance monitoring and compliance.
Integration capabilities should not be overlooked. The ideal ZTNA solution should seamlessly connect with existing security tools, such as SIEM and SOAR platforms, for centralized monitoring and incident response. Additionally, API-based automation can streamline policy management, reducing administrative overhead. Finally, user experience plays a pivotal role in adoption. Features like single sign-on (SSO) and fast, reliable connectivity help maintain productivity while ensuring security.
Evaluating Deployment and Cost Considerations
Implementation complexity and cost are decisive factors in choosing a ZTNA solution. Cloud-based ZTNA, delivered as a SaaS offering, typically involves minimal deployment effort and is ideal for organizations with predominantly cloud-based applications. While offering greater control, on-premises deployments require more extensive setup and maintenance, making them better suited for highly regulated industries with strict data residency requirements. Hybrid models strike a balance, catering to organizations with mixed infrastructure.
Cost structures vary among providers, with some offering per-user licensing and others charging based on application access. Be mindful of potential hidden costs, such as bandwidth usage or fees for additional security integrations. Conducting a proof-of-concept (POC) trial can provide valuable insights into the solution’s real-world performance and help justify investment by demonstrating potential cost savings, such as reduced VPN expenses or improved security efficiency.
Conclusion: Making an Informed Decision
Choosing the right ZTNA solution demands a structured approach. Begin by assessing your organization’s unique requirements, including workforce dynamics, data sensitivity, and existing security infrastructure. Next, understand the different deployment models to determine whether an agent-based, agentless, or hybrid solution aligns with your needs. Prioritize features that enhance security without compromising usability and carefully evaluate deployment efforts and costs to ensure smooth implementation.
By following this comprehensive guide, organizations can adopt a ZTNA solution that strengthens security and supports operational efficiency and scalability. As the threat landscape evolves, a well-chosen ZTNA framework will provide flexibility and resilience to safeguard critical assets in an increasingly perimeter-less world.
Discover how Seqrite ZTNA can transform your organization’s security with a robust, cloud-native zero-trust solution tailored for modern enterprises. Contact us today or request a demo to start your journey toward a more secure and efficient network!
Bringing new tools into a workflow is always exciting—curiosity bumps up against the comfort of familiar methods. But when our longtime client, Chumbi Valley, came to us with their Valley Adventures project, we saw the perfect opportunity to experiment with Rive and craft cartoon-style animations that matched the playful spirit of the brand.
Rive is a powerful real-time interactive design tool with built-in support for interactivity through State Machines. In this guide, we’ll walk you through how we integrated a .riv file into a React environment and added mouse-responsive animations.
We’ll also walk through a modernized integration method using Rive’s newer Data Binding feature—our current preferred approach for achieving the same animation with less complexity and greater flexibility.
Animation Concept & File Preparation
Valley Adventures is a gamified Chumbi NFT staking program, where magical creatures called Chumbi inhabit an enchanted world. The visual direction leans heavily into fairytale book illustrations—vibrant colors, playful characters, and a whimsical, cartoon-like aesthetic.
To immediately immerse users in this world, we went with a full-section hero animation on the landing page. We split the animation into two parts:
an idle animation that brings the scene to life;
a cursor-triggered parallax effect, adding depth and interactivity.
Several elements animate simultaneously—background layers like rustling leaves and flickering fireflies, along with foreground characters that react to movement. The result is a dynamic, storybook-like experience that invites users to explore.
The most interesting—and trickiest—part of the integration was tying animations to mouse tracking. Rive provides a built-in way to handle this: by applying constraints with varying strengths to elements within a group that’s linked to Mouse Tracking, which itself responds to the cursor’s position.
However, we encountered a limitation with this approach: the HTML buttons layered above the Rive asset were blocking the hover state, preventing it from triggering the animation beneath.
To work around this, we used a more robust method that gave us finer control and avoided those problems altogether.
Here’s how we approached it:
Create four separate timelines, each with a single keyframe representing an extreme position of the animation group:
Far left
Far right
Top
Bottom
Add two animation layers, each responsible for blending between opposite keyframes:
Layer 1 blends the far-left and far-right timelines
Layer 2 blends the top and bottom timelines
Tie each layer’s blend amount to a numeric input—one for the X axis, one for the Y axis.
By adjusting the values of these inputs based on the cursor’s position, you can control how tightly the animation responds on each axis. This approach gives you a smoother, more customizable parallax effect—and prevents unexpected behavior caused by overlapping UI.
Once the animation is ready, simply export it as a .riv file—and leave the rest of the magic to the devs.
How We Did It: Integrating a Rive File into a React Project
Before we dive further, let’s clarify what a .riv file actually is.
A .riv file is the export format from the Rive editor. It can include:
vector graphics,
timeline animations,
a State Machine with input parameters.
In our case, we’re using a State Machine with two numeric inputs: Axis_X and Axis_Y. These inputs are tied to how we control animation in Rive, using values from the X and Y axes of the cursor’s position.
These inputs drive the movement of different elements—like the swaying leaves, fluttering fireflies, and even subtle character reactions—creating a smooth, interactive experience that responds to the user’s mouse.
Step-by-Step Integration
Step 1: Install the Rive React runtime
Install the official package:
npm install @rive-app/react-canvas
Step 2: Create an Animation Component
Create a component called RiveBackground.tsx to handle loading and rendering the animation.
This setup connects directly to the input values defined inside the State Machine, allowing us to update them dynamically in response to user interaction.
State Machine 1 — the name of your State Machine, exactly as defined in the Rive editor
Axis_X and Axis_Y — numeric inputs that control movement based on cursor position
0 — the initial (default) value for each input
☝️ Important: Make sure your .riv file includes the exact names: Axis_X, Axis_Y, and State Machine 1. These must match what’s defined in the Rive editor — otherwise, the animation won’t respond as expected.
Now you can use the RiveBackground like any other component:
<RiveBackground className="hero-background" />
Step 8: Preload the WASM File
To avoid loading the .wasm file at runtime—which can delay the initial render—you can preload it in App.tsx:
import riveWASMResource from '@rive-app/canvas/rive.wasm';

<link
  rel="preload"
  href={riveWASMResource}
  as="fetch"
  crossOrigin="anonymous"
/>
This is especially useful if you’re optimizing for first paint or overall performance.
Simple Parallax: A New Approach with Data Binding
In the first part of this article, we used a classic approach with a State Machine to create the parallax animation in Rive. We built four separate animations (top, bottom, left, right), controlled them using input variables, and blended their states to create smooth motion. This method made sense at the time, especially before Data Binding support was introduced.
But now that Data Binding is available in Rive, achieving the same effect is much simpler—just a few steps. Data binding in Rive is a system that connects editor elements to dynamic data and code via view models, enabling reactive, runtime-driven updates and interactions between design and development.
In this section, we’ll show how to refactor the original Rive file and code using the new approach.
Updating the Rive File
Remove the old setup:
Go to the State Machine.
Delete the input variables: top, bottom, left, right.
Remove the blending states and their associated animations.
Group the parallax layers:
Wrap all the parallax layers into a new group—e.g., ParallaxGroup.
Create binding parameters:
Select ParallaxGroup and add:
pointerX (Number)
pointerY (Number)
Bind coordinates:
In the properties panel, set:
X → pointerX
Y → pointerY
Now the group will move dynamically based on values passed from JavaScript.
The Updated JS Code
Before we dive into the updated JavaScript, let’s quickly define an important concept:
When using Data Binding in Rive, viewModelInstance refers to the runtime object that links your Rive file’s bindable properties (like pointerX or pointerY) to your app’s logic. In the Rive editor, you assign these properties to elements like positions, scales, or rotations. At runtime, your code accesses and updates them through the viewModelInstance—allowing for real-time, declarative control without needing a State Machine.
With that in mind, here’s how the new setup replaces the old input-driven logic:
Data Binding is a major step forward for interactive Rive animations. Effects like parallax can now be set up faster, more reliably, and with cleaner logic. We strongly recommend this approach for new projects.
Final Thoughts
So why did we choose Rive over Lottie for this project?
Interactivity: With Lottie, achieving the same level of interactivity would’ve required building a custom logic layer from scratch. With Rive, we got that behavior baked into the file—plug and play.
Optimization: Rive gives you more control over each asset inside the .riv file, and the output tends to be lighter overall.
Our biggest takeaway? Don’t be afraid to experiment with new tools—especially when they feel like the right fit for your project’s concept. Rive matched the playful, interactive vibe of Valley Adventures perfectly, and we’re excited to keep exploring what it can do.
Welcome to the world of sine and cosine! These two functions are the backbone of trigonometry, and they’re much simpler than they seem. In this article, we will explore the unit circle, the home of sine and cosine, and learn…