Just a second! 🫷 If you are here, it means that you are a software developer.
So, you know that storage, networking, and domain management have a cost .
If you want to support this blog, please ensure that you have disabled the adblocker for this site. I configured Google AdSense to show as few ADS as possible – I don’t want to bother you with lots of ads, but I still need to add some to pay for the resources for my site.
Thank you for your understanding. – Davide
If you have a set of related functions, use always a coherent order of parameters.
Is your application slow? How to find bottlenecks? If so, you can use MiniProfiler to profile a .NET API application and analyze the timings of the different operations.
Table of Contents
Just a second! 🫷 If you are here, it means that you are a software developer.
So, you know that storage, networking, and domain management have a cost .
If you want to support this blog, please ensure that you have disabled the adblocker for this site. I configured Google AdSense to show as few ADS as possible – I don’t want to bother you with lots of ads, but I still need to add some to pay for the resources for my site.
Thank you for your understanding. – Davide
Sometimes your project does not perform well as you would expect. Bottlenecks occur, and it can be hard to understand where and why.
So, the best thing you should do is to profile your code and analyze the execution time to understand which are the parts that impact the most your application performance.
In this article, we will learn how to use Miniprofiler to profile code in a .NET 5 API project.
Setting up the project
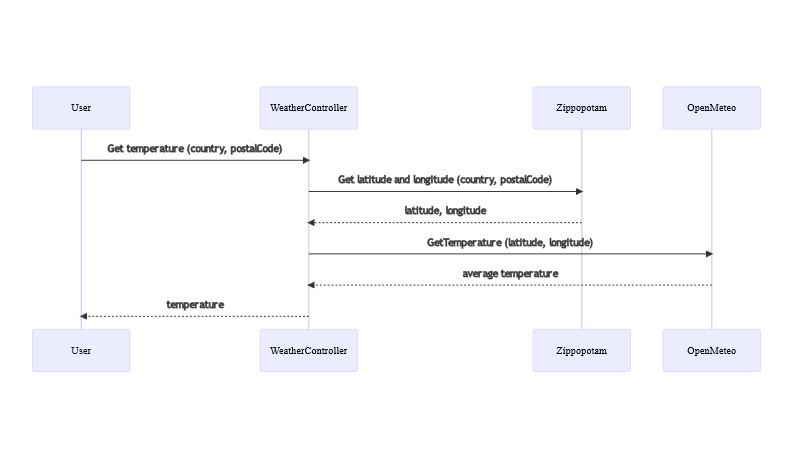
For this article, I’ve created a simple project. This project tells you the average temperature of a place by specifying the country code (eg: IT), and the postal code (eg: 10121, for Turin).
There is only one endpoint, /Weather, that accepts in input the CountryCode and the PostalCode, and returns the temperature in Celsius.
To retrieve the data, the application calls two external free services: Zippopotam to get the current coordinates, and OpenMeteo to get the daily temperature using those coordinates.
Let’s see how to profile the code to see the timings of every operation.
Installing MiniProfiler
As usual, we need to install a Nuget package: since we are working on a .NET 5 API project, you can install the MiniProfiler.AspNetCore.Mvc package, and you’re good to go.
MiniProfiler provides tons of packages you can use to profile your code: for example, you can profile Entity Framework, Redis, PostgreSql, and more.
Once you’ve installed it, we can add it to our project by updating the Startup class.
In the Configure method, you can simply add MiniProfiler to the ASP.NET pipeline:
Then, you’ll need to configure it in the ConfigureServices method:
As you might expect, the king of this method is AddMiniProfiler. It allows you to set MiniProfiler up by configuring an object of type MiniProfilerOptions. There are lots of things you can configure, that you can see on GitHub.
For this example, I’ve updated the color scheme to use Dark Mode, and I’ve defined the base path of the page that shows the results. The default is mini-profiler-resources, so the results would be available at /mini-profiler-resources/results. With this setting, the result is available at /profiler/results.
Defining traces
Time to define our traces!
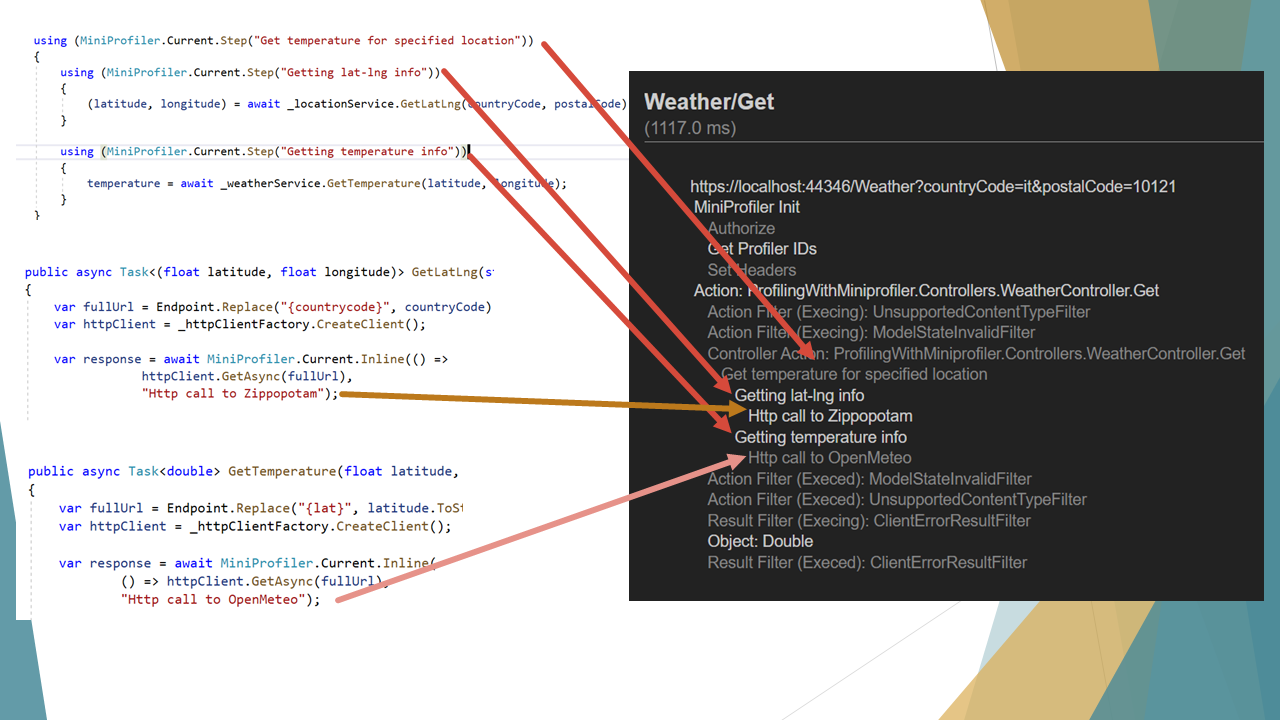
When you fire up the application, a MiniProfiler object is created and shared across the project. This object exposes several methods. The most used is Step: it allows you to define a portion of code to profile, by wrapping it into a using block.
The snippet above defines a step, giving it a name (“Getting lat-lng info”), and profiles everything that happens within those lines of code.
You can also use nested steps by simply adding a parent step:
using (MiniProfiler.Current.Step("Get temperature for specified location"))
{
using (MiniProfiler.Current.Step("Getting lat-lng info"))
{
    (latitude, longitude) = await _locationService.GetLatLng(countryCode, postalCode);
}
using (MiniProfiler.Current.Step("Getting temperature info"))
{
temperature = await _weatherService.GetTemperature(latitude, longitude);
}
}
In this way, you can create a better structure of traces and perform better analyses. Of course, this method doesn’t know what happens inside the GetLatLng method. If there’s another Step, it will be taken into consideration too.
You can also use inline steps to trace an operation and return its value on the same line:
var response = await MiniProfiler.Current.Inline(() => httpClient.GetAsync(fullUrl), "Http call to OpenMeteo");
Inline traces the operation and returns the return value from that method. Notice that it works even for async methods! 🤩
Viewing the result
Now that we’ve everything in place, we can run our application.
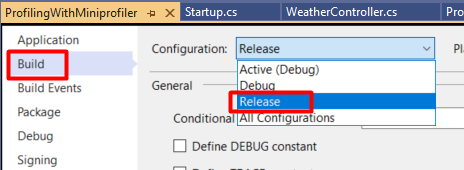
To get better data, you should run the application in a specific way.
First of all, use the RELEASE configuration. You can change it in the project properties, heading to the Build tab:
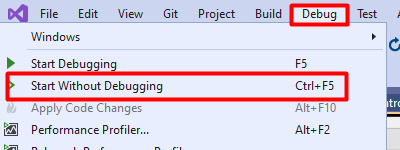
Then, you should run the application without the debugger attached. You can simply hit Ctrl+F5, or head to the Debug menu and click Start Without Debugging.
Now, run the application and call the endpoint. Once you’ve got the result, you can navigate to the report page.
Remember the options.RouteBasePath = "/profiler" option? It’s the one that specifies the path to this page.
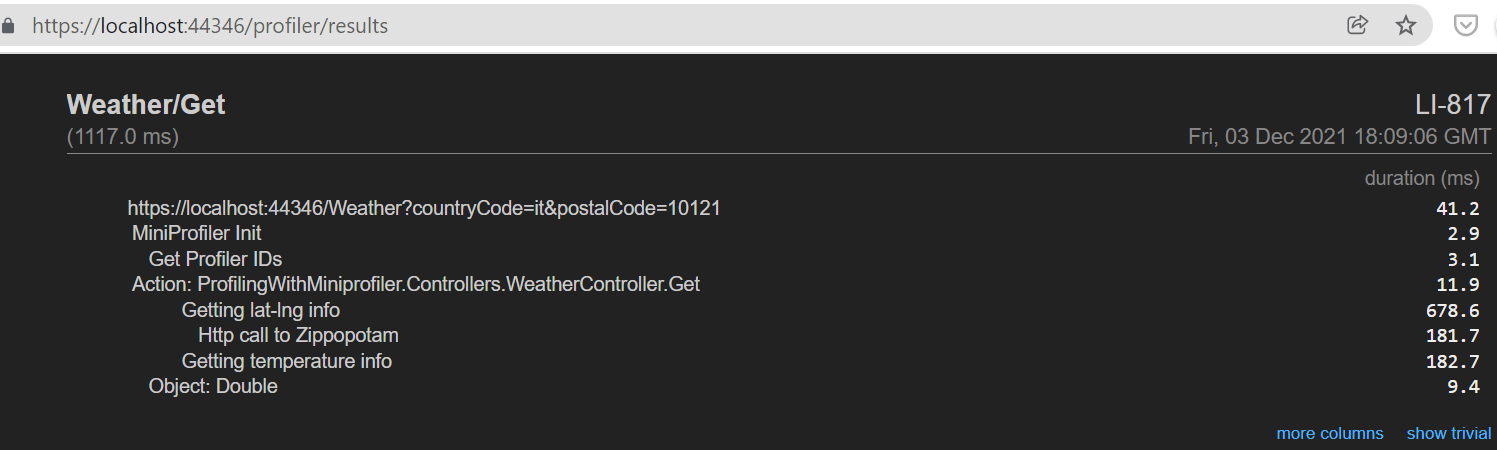
If you head to /profiler/results, you will see a page similar to this one:
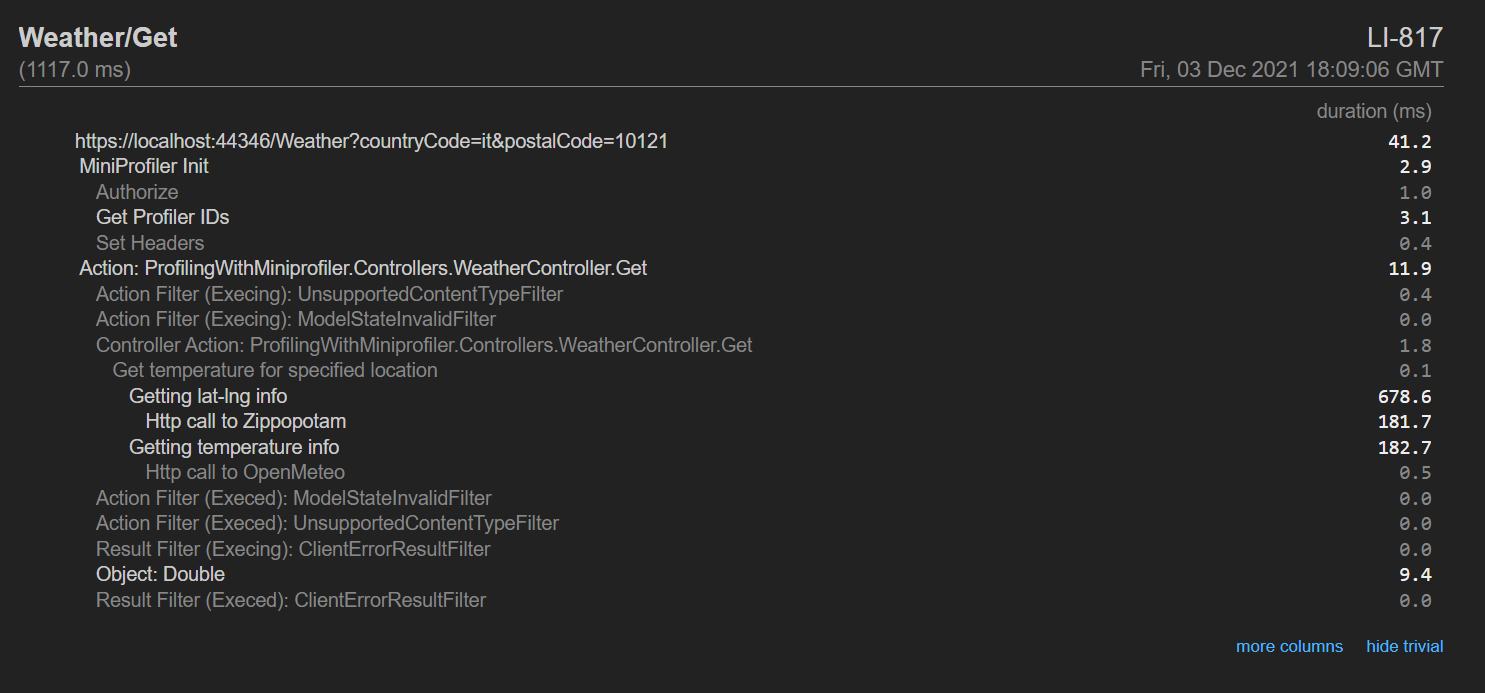
On the left column, you can see the hierarchy of the messages we’ve defined in the code. On the right column, you can see the timings for each operation.
Noticed that Show trivial button on the bottom-right corner of the report? It displays the operations that took such a small amount of time that can be easily ignored. By clicking on that button, you’ll see many things, such as all the operations that the .NET engine performs to handle your HTTP requests, like the Action Filters.
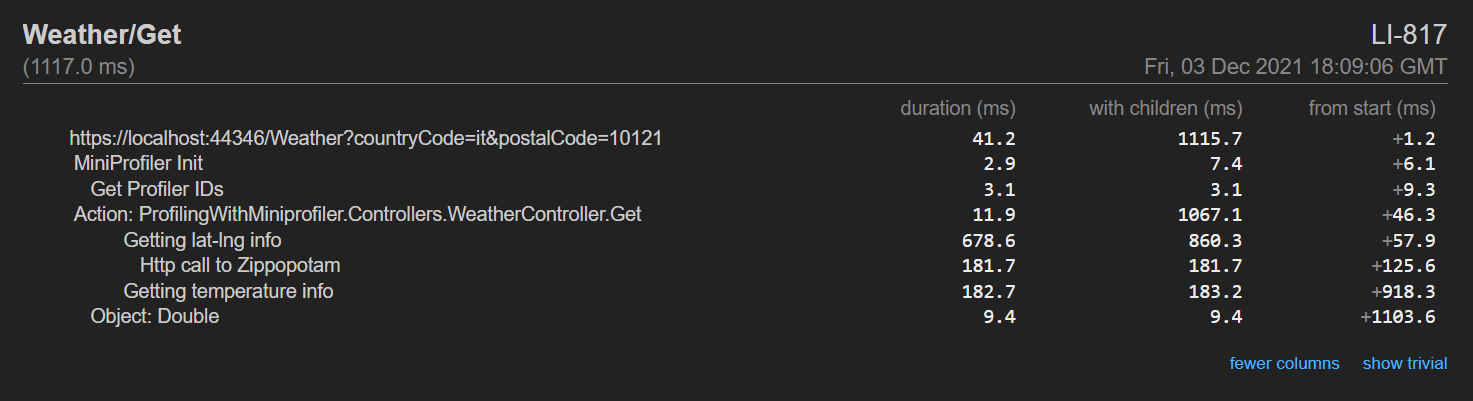
Lastly, the More columns button shows, well… more columns! You will see the aggregate timing (the operation + all its children), and the timing from the beginning of the request.
The mystery of x-miniprofiler-ids
Now, there’s one particular thing that I haven’t understood of MiniProfiler: the meaning of x-miniprofiler-ids.
This value is an array of IDs that represent every time we’ve profiled something using by MiniProfiler during this session.
You can find this array in the HTTP response headers:
I noticed that every time you perform a call to that endpoint, it adds some values to this array.
My question is: so what? What can we do with those IDs? Can we use them to filter data, or to see the results in some particular ways?
If you know how to use those IDs, please drop a message in the comments section 👇
Additional links
If you want to run this project and play with MiniProfiler, I’ve shared this project on GitHub.
I’ve already used MiniProfiler for analyzing the performances of an application, and thanks to this library I was able to improve the response time from 14 seconds (yes, seconds!) to less than 3. I’ve explained all the steps in 2 articles.
In this article, we’ve seen how we can profile .NET applications using MiniProfiler.
This NuGet Package works for almost every version of .NET, from the dear old .NET Framework to the most recent one, .NET 6.
A suggestion: configure it in a way that you can turn it off easily. Maybe using some environment variables. This will give you the possibility to turn it off when this tracing is no more required and to speed up the application.
Ever used it? Any alternative tools?
And, most of all, what the f**k is that x-miniprofiler-ids array??😶
When you plot two variables, you see data dots scattered across the plane. Their overall tilt and shape tell you how the variables move together. Correlation turns that visual impression into a single number you can report and compare.
What correlation measures
Correlation summarises the direction and strength of association between two numeric variables on a scale from −1 to +1.
Sign shows direction
positive – larger x tends to come with larger y
negative – larger x tends to come with smaller y
Magnitude shows strength
near 0 – weak association
near 1 in size – strong association
Correlation does not prove causation.
Two methods to measure correlation
Pearson correlation – distance based
Pearson asks: how straight is the tilt of the data dots? It uses actual distances from a straight line, so it is excellent for line-like patterns and sensitive to outliers. Use when:
you expect a roughly straight relationship
units and distances matter
residuals look symmetric around a line
Spearman correlation – rank based
Spearman converts each variable to ranks (1st, 2nd, 3rd, …) and then computes Pearson on those ranks. It measures monotonic association: do higher x values tend to come with higher y values overall, even if the shape is curved.
Ranks ignore distances and care only about order, which gives two benefits:
robust to outliers and weird units
invariant to any monotonic transform (log, sqrt, min-max), since order does not change
Use when:
you expect a consistent up or down trend that may be curved
the data are ordinal or have many ties
outliers are a concern
r and p in plain language
r is the correlation coefficient. It is your effect size on the −1 to +1 scale.
p answers: if there were truly no association, how often would we see an r at least this large in magnitude just by random chance.
Small p flags statistical signal. It is not a measure of importance. Usually findings, where p is bigger than .05 should be ignored.
When Pearson and Spearman disagree?
Curved but monotonic (for example price vs horsepower with diminishing returns) Spearman stays high because order increases consistently. Pearson is smaller because a straight line underfits the curve.
Outliers (for example a 10-year-old exotic priced very high) Pearson can jump because distances change a lot. Spearman changes less because rank order barely changes.
When the conversation turns to artificial intelligence, many assume that design is one of the professions most at risk of automation. But Shopify’s latest move sends a very different message. The e-commerce giant has revived the role of Chief Design Officer earlier this year and acquired Brooklyn-based creative studio Molly — signaling that, far from being diminished, design will sit at the center of its AI strategy.
At the helm is Carl Rivera, Shopify’s Chief Design Officer, who believes this moment is an inflection point not just for the company, but for the design industry as a whole.
Big news! Shopify has acquired https://t.co/ZeDYX1vHqm, to launch Shopify Product Design Studio. Their mission is simple: work together with our teams to deliver 10/10 product experiences. Thread (1/6)
“At a time when the market is saying maybe you don’t need designers anymore,” Rivera told me, “we’re saying the opposite. They’ve never been more important than they are right now.”
A Statement of Intent
Shopify has a long history of treating design as a strategic advantage. In its early days, co-founder Daniel Weinand held the title of Chief Design Officer and helped shape Shopify’s user-first approach. But when Weinand left the company, the role disappeared — until now.
Bringing it back, Rivera argues, is both symbolic and practical. “It’s really interesting to consider that the moment Shopify decides to reinstate the Chief Design Officer role is at the dawn of AI,” he said. “That’s not a coincidence.”
For Rivera, design is the best tool for navigating uncertainty. “When you face ambiguity and don’t know where the world is going, there’s no better way to imagine that future than through design,” he explained. “Design turns abstract ideas into something you can hold and touch, so everyone can align on the same vision.”
Why Molly?
Central to Shopify’s announcement is the acquisition of Molly, the Brooklyn-based design studio co-founded by Jaytel and Marvin Schwaibold. Known for their experimental but disciplined approach, Molly has collaborated with Shopify in the past.
Rivera recalled how the deal came together almost organically. “I was having dinner with Marvin, and we were talking about the future I wanted to build at Shopify. The alignment was immediate. It was like — of course we should do this together. We could go faster, go further, and it would be more fun.”
The studio will operate as an internal agency, but Rivera is careful to stress that Molly won’t exist in isolation. “What attracted me to Molly is not just their output, but their culture,” he said. “That culture is exactly the one we want to spread across Shopify. They’ll be a cultural pillar that helps manifest the ways of working we want everyone to embrace.”
Importantly, the internal agency won’t replace Shopify’s existing design teams. Instead, it will augment them in moments that call for speed, experimentation, or tackling problems shaped by AI. “If something changes in the market and we need to respond quickly, Molly can embed with a team for a few months, supercharging their generative process,” Rivera explained.
Redefining AI + Design
Rivera is energized by the possibilities of AI and how it can transform the way people interact with technology. While today’s implementations often serve as early steps in that journey, he believes the real opportunity lies in what comes next.
He acknowledges that many current products still treat AI as an add-on. “You have the product, which looks the same as it has for ten years, and then a little panel next to it that says AI. That can’t be the future,” Rivera said.
For him, these early patterns are just the beginning — a foundation to build on. He envisions AI woven deeply into user experiences, reshaping interaction patterns themselves. “If AI had existed ten years ago, I don’t believe products would look the way they do today. We need to move beyond chat as the default interface and create experiences where AI feels native, invisible, and context-aware.”
That, he argues, is where design proves indispensable. “It’s designers who will define the interaction patterns of AI in commerce. This is our role: to make the abstract real, to imagine the future, and to bring it into the present.”
Measuring Success: Subjective by Design
In a world obsessed with metrics, Rivera offers a refreshingly contrarian view of how design success should be measured.
“Designers have often felt insecure, so they chase numbers to prove their value,” he said. “But to me, the most important measure isn’t a KPI. It’s whether the work feels right. Are we proud of it? Did it accelerate our vision? Does it make the product more delightful? I’m comfortable leaning on instinct.”
That doesn’t mean ignoring business outcomes. But Rivera wants his teams to be guided first by craft, ambition, and impact on user experience — not by dashboards.
Advice for Designers in an AI Era
For independent designers and studio owners — many of whom worry that AI might disrupt their livelihoods — Rivera offers encouragement.
He believes the most valuable skill today is adaptability: “The best trait a designer can have right now is the ability to quickly learn a new problem and generate many different options. That’s what the agency world trains you to do, and it’s exactly what big companies like Shopify need.”
In fact, Rivera sees agency and freelance experience as increasingly attractive in large-scale design hiring. “People who have jumped between many problems quickly bring a unique skill set. That adaptability is crucial when technology and user expectations are changing so fast.”
The Ambition at Shopify
Rivera is clear about his mandate. He sums it up in three goals:
Build the place where the world’s best designers choose to work.
Enable them to do the best work of their careers.
Define the future interaction patterns of AI in commerce.
It’s an ambitious vision, but one he believes is within reach. “Ambition begets ambition,” he told his team in a recent message. “By raising expectations for ourselves and each other, we’ll attract people who want that environment, and they’ll keep raising the bar.”
For Shopify, investing in design now goes beyond aesthetics. It is about shaping the future of commerce itself. As Rivera put it:
“We don’t need to dream up sci-fi scenarios. The future is already here — just unevenly distributed. Our job is to bring it into the hands of entrepreneurs and make it usable for everyone.”
Borrowing from William Gibson’s famous line, Rivera frames Shopify’s bet on Molly and design as a way of redistributing that future, through creativity, craft, and culture.
Yield is a keyword that allows you to return an item at the time instead of creating a full list and returning it as a whole.
Table of Contents
Just a second! 🫷 If you are here, it means that you are a software developer.
So, you know that storage, networking, and domain management have a cost .
If you want to support this blog, please ensure that you have disabled the adblocker for this site. I configured Google AdSense to show as few ADS as possible – I don’t want to bother you with lots of ads, but I still need to add some to pay for the resources for my site.
Thank you for your understanding. – Davide
To me, yield return has always been one of the most difficult things to understand.
Now that I’ve understood it (not thoroughly, but enough to explain it), it’s my turn to share my learnings.
So, what does yield return mean? How is it related to collections of items?
Using Lists
Say that you’re returning a collection of items and that you need to iterate over them.
A first approach could be creating a list with all the items, returning it to the caller, and iterating over the collection:
IEnumerable<int> WithList()
{
    List<int> items = new List<int>();

    for (int i = 0; i < 10; i++)
    {
        Console.WriteLine($"Added item {i}");
        items.Add(i);
    }

    return items;
}

void Main()
{
    var items = WithList();

    foreach (var i in items)
    {
        Console.WriteLine($"This is Mambo number {i}");
    }
}
This snippet creates the whole collection and then prints the values inside that list. On the console, you’ll see this text:
Added item 0
Added item 1
Added item 2
Added item 3
Added item 4
Added item 5
Added item 6
Added item 7
Added item 8
Added item 9
This is Mambo number 0
This is Mambo number 1
This is Mambo number 2
This is Mambo number 3
This is Mambo number 4
This is Mambo number 5
This is Mambo number 6
This is Mambo number 7
This is Mambo number 8
This is Mambo number 9
This means that, if you need to operate over a collection with 1 million items, at first you’ll create ALL the items, and then you’ll perform operations on each of them. This approach has two main disadvantages: it’s slow (especially if you only need to work with a subset of those items), and occupies a lot of memory.
With Yield
We can use another approach: use the yield return keywords:
IEnumerable<int> WithYield()
{
for (int i = 0; i < 10; i++)
{
Console.WriteLine($"Returning item {i}");
yieldreturn i;
}
}
void Main()
{
var items = WithYield();
foreach (var i in items)
{
Console.WriteLine($"This is Mambo number {i}");
}
}
With this method, the order of messages is different:
Returning item 0
This is Mambo number 0
Returning item 1
This is Mambo number 1
Returning item 2
This is Mambo number 2
Returning item 3
This is Mambo number 3
Returning item 4
This is Mambo number 4
Returning item 5
This is Mambo number 5
Returning item 6
This is Mambo number 6
Returning item 7
This is Mambo number 7
Returning item 8
This is Mambo number 8
Returning item 9
This is Mambo number 9
So, instead of creating the whole list, we create one item at a time, and only when needed.
Benefits of Yield
As I said before, there are several benefits with yield: the application is more performant when talking about both the execution time and the memory usage.
It’s like an automatic iterator: every time you get a result, the iterator advances to the next item.
Just a note: yield works only for methods that return IAsyncEnumerable<T>, IEnumerable<T>, IEnumerable, IEnumerator<T>, or IEnumerator.
You cannot use it with a method that returns, for instance, List<T>, because, as the error message says,
The body of X cannot be an iterator block because List<int> is not an iterator interface type
A real use case
If you use NUnit as a test suite, you’ve probably already used this keyword.
In particular, when using the TestCaseSource attribute, you specify the name of the class that outputs the test cases.
publicclassMyTestClass{
[TestCaseSource(typeof(DivideCases))]publicvoid DivideTest(int n, int d, int q)
{
Assert.AreEqual(q, n / d);
}
}
classDivideCases : IEnumerable
{
public IEnumerator GetEnumerator()
{
yieldreturnnewobject[] { 12, 3, 4 };
yieldreturnnewobject[] { 12, 2, 6 };
yieldreturnnewobject[] { 12, 4, 3 };
}
}
When executing the tests, an iterator returns a test case at a time, without creating a full list of test cases.
The previous snippet is taken directly from NUnit’s documentation for the TestCaseSource attribute, that you can find here.
Wrapping up
Yes, yield is a quite difficult keyword to understand.
With Log4J’s vulnerability, we’ve all been reminded that systems are vulnerable, and OSS are not immune too. What should we do now?
Table of Contents
Just a second! 🫷 If you are here, it means that you are a software developer.
So, you know that storage, networking, and domain management have a cost .
If you want to support this blog, please ensure that you have disabled the adblocker for this site. I configured Google AdSense to show as few ADS as possible – I don’t want to bother you with lots of ads, but I still need to add some to pay for the resources for my site.
Thank you for your understanding. – Davide
After the Log4J vulnerability, we should reflect on how open source impacts our projects, and what are the benefits and disadvantages of using such libraries.
The following article is more an opinion, just some random thoughts about what happened and what we can learn from this event.
A recap of the Log4J vulnerability
To give some context to those who have never heard (or forgot) about the Log4J vulnerability, here’s a short recap.
Log4J is a popular Java library for logging. So popular that it has been inglobed in the Apache ecosystem.
For some reason I haven’t understood, the logger evaluates the log messages instead of just treating them as strings. So, a kind of SQL injection (but for logs) could be executed: by sending a specific string format to services that use Log4J, that string is evaluated and executed on the server; as a result, external scripts could be run on the server, allowing attackers to access your server. Of course, it’s not a detailed and 100% accurate description: there are plenty of resources on the Internet if you want to deep dive into this topic.
Some pieces of evidence show that the earliest exploitation of this vulnerability happened on Dec 1, 2021, as stated by Matthew Prince, CEO of Cloudflare, in this Tweet. But the vulnerability became public 9 days later.
Benefits of OSS projects
The source code of Log4J is publicly available on GitHub
This means that:
it’s free to use (yes, OSS != free, but it’s rare to find paid OSS projects)
you can download and run the source code
you can inspect the code and propose changes
it saves you time: you don’t have to reinvent the wheel – everything is already done by others.
Issues with OSS projects
Given that the source code is publicly accessible, attackers can study it to find security flaws, and – of course – take advantage of those vulnerabilities before the community notices them.
Most of the time, OSS projects are created by single devs to solve their specific problems. Then, they share those repositories to help their peers and allow other devs to work on the library. All the coding is done for free and in their spare time. As you can expect, the quality is deeply impacted by this.
What to do with OSS projects?
So, what should we do with all those OSS projects? Should we stop using them?
I don’t think so. just because those kinds of issues can arise, it doesn’t mean that they will arise so often.
Also, it’s pretty stupid to build everything from scratch “just in case”. Just because attackers don’t know the source code, it doesn’t mean that they can’t find a way to access your systems.
On the other hand, we should not blindly use every library we see on GitHub. It’s not true that just because it’s open source, it’s safe to use – as the Log4J story taught us.
So, what should we do?
I don’t have an answer. But for sure we can perform some operations when working on our projects.
We should review which external packages we’re using, and keep track of their version. Every N months, we should write a recap (even an Excel file is enough) to update the list of packages we’re using. In this way, if a vulnerability is discovered for a package, and a patch is released, we can immediately apply that patch to our applications.
Finding installed dependencies for .NET projects is quite simple: you can open the csproj file and see the list of NuGet packages you’re using.
The problem with this approach is that you don’t see the internal dependencies: if one of the packages you’re using depends on another package with a known vulnerability, your application may be vulnerable too.
How can you list all your dependencies? Are there any tools that work with your programming language? Drop a comment below, it can help other devs!
Then, before choosing a project instead of another, we should answer (at least) three questions. Does this package solve our problem? Does the code look safe to use? Is the repository active, or is it stale?
Spend some time skimming the source code, looking for weird pieces of code. Pay attention when they evaluate the code (possible issues like with Log4J), when they perform unexpected calls to external services (are they tracking you?), and so on.
Look at the repository history: is the repository still being updated? Is it maintained by a single person, or is there a community around it?
You can find this info on GitHub under the Insight tab.
In the following picture, you can see the contributions to the Log4J library (available here):
Does this repo have tests? Without tests (or, maybe worse, with not meaningful tests), the package should not be considered safe. Have a look at the code and at the CI pipelines, if publicly available.
Finally, a hope for a future: to define a standard and some procedures to rate the security of a package/repository. I don’t know if it can be feasible, but it would be a good addition to the OSS world.
Further readings
If you’re interested in the general aspects of the Log4J vulnerability, you can have a look at this article by the Wall Street Journal:
This was not the usual article/tutorial, it was more an opinion on the current status of OSS and on what we should do to avoid issues like those caused by Log4J.
It’s not the first vulnerability, and for sure it won’t be the only one.
PostgreSQL is a famous relational database. In this article, we will learn how to run it locally using Docker.
Table of Contents
Just a second! 🫷 If you are here, it means that you are a software developer.
So, you know that storage, networking, and domain management have a cost .
If you want to support this blog, please ensure that you have disabled the adblocker for this site. I configured Google AdSense to show as few ADS as possible – I don’t want to bother you with lots of ads, but I still need to add some to pay for the resources for my site.
Thank you for your understanding. – Davide
PostgreSQL is a relational database characterized for being open source and with a growing community supporting the project.
There are several ways to store a Postgres database online so that you can use it to store data for your live applications. But, for local development, you might want to spin up a Postgres database on your local machine.
In this article, we will learn how to run PostgreSQL on a Docker container for local development.
Pull Postgres Docker Image
As you may know, Docker allows you to download images of almost everything you want in order to run them locally (or wherever you want) without installing too much stuff.
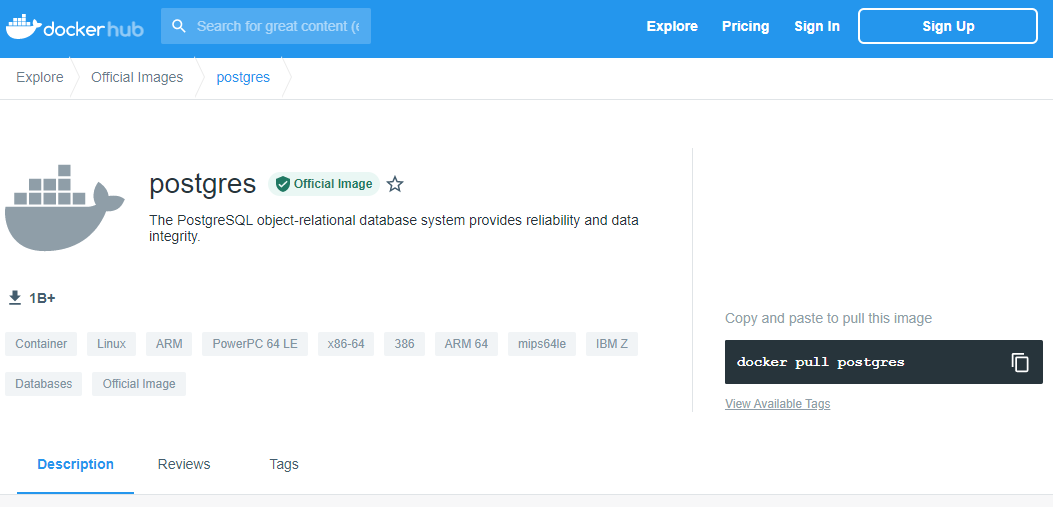
The best way to check the available versions is to head to DockerHub and search for postgres.
Here you’ll find a description of the image, all the documentation related to the installation parameters, and more.
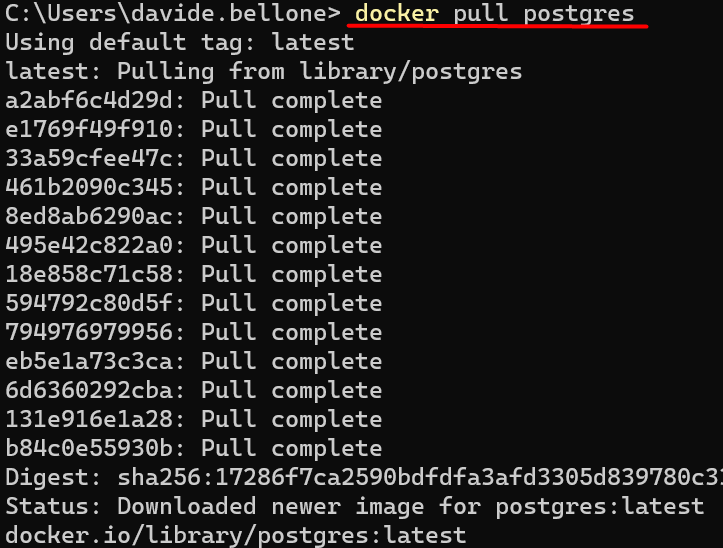
If you have Docker already installed, just open a terminal and run
to download the latest image of PostgreSQL.
Run the Docker Container
Now that we have the image in our local environment, we can spin up a container and specify some parameters.
docker run is the command used to create and run a new container based on an already downloaded image.
--name myPostgresDb is the name we assign to the container that we are creating.
-p 5455:5432 is the port mapping. Postgres natively exposes the port 5432, and we have to map that port (that lives within Docker) to a local port. In this case, the local 5455 port maps to Docker’s 5432 port.
-e POSTGRES_USER=postgresUser, -e POSTGRES_PASSWORD=postgresPW, and -e POSTGRES_DB=postgresDB set some environment variables. Of course, we’re defining the username and password of the admin user, as well as the name of the database.
-d indicates that the container run in a detached mode. This means that the container runs in a background process.
postgres is the name of the image we are using to create the container.
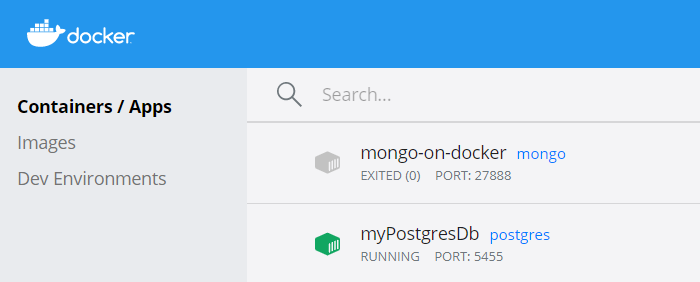
As a result, you will see the newly created container on the CLI (running docker ps) or view it using some UI tool like Docker Desktop:
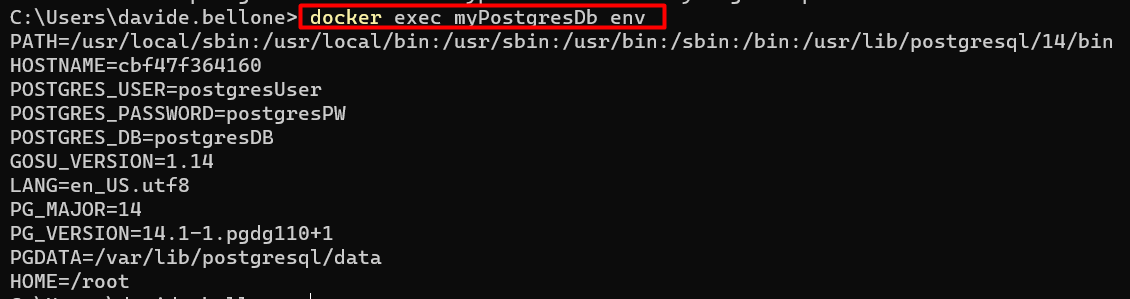
If you forgot which environment variables you’ve defined for that container, you can retrieve them using Docker Desktop or by running docker exec myPostgresDb env, as shown below:
Note: environment variables may change with newer image versions. Always refer to the official docs, specifically to the documentation related to the image version you are consuming.
Navigate the DB with PgAdmin
Now that we have Postgres up and running, we can work with it.
You can work with the DB using the console, or, if you prefer, using a UI.
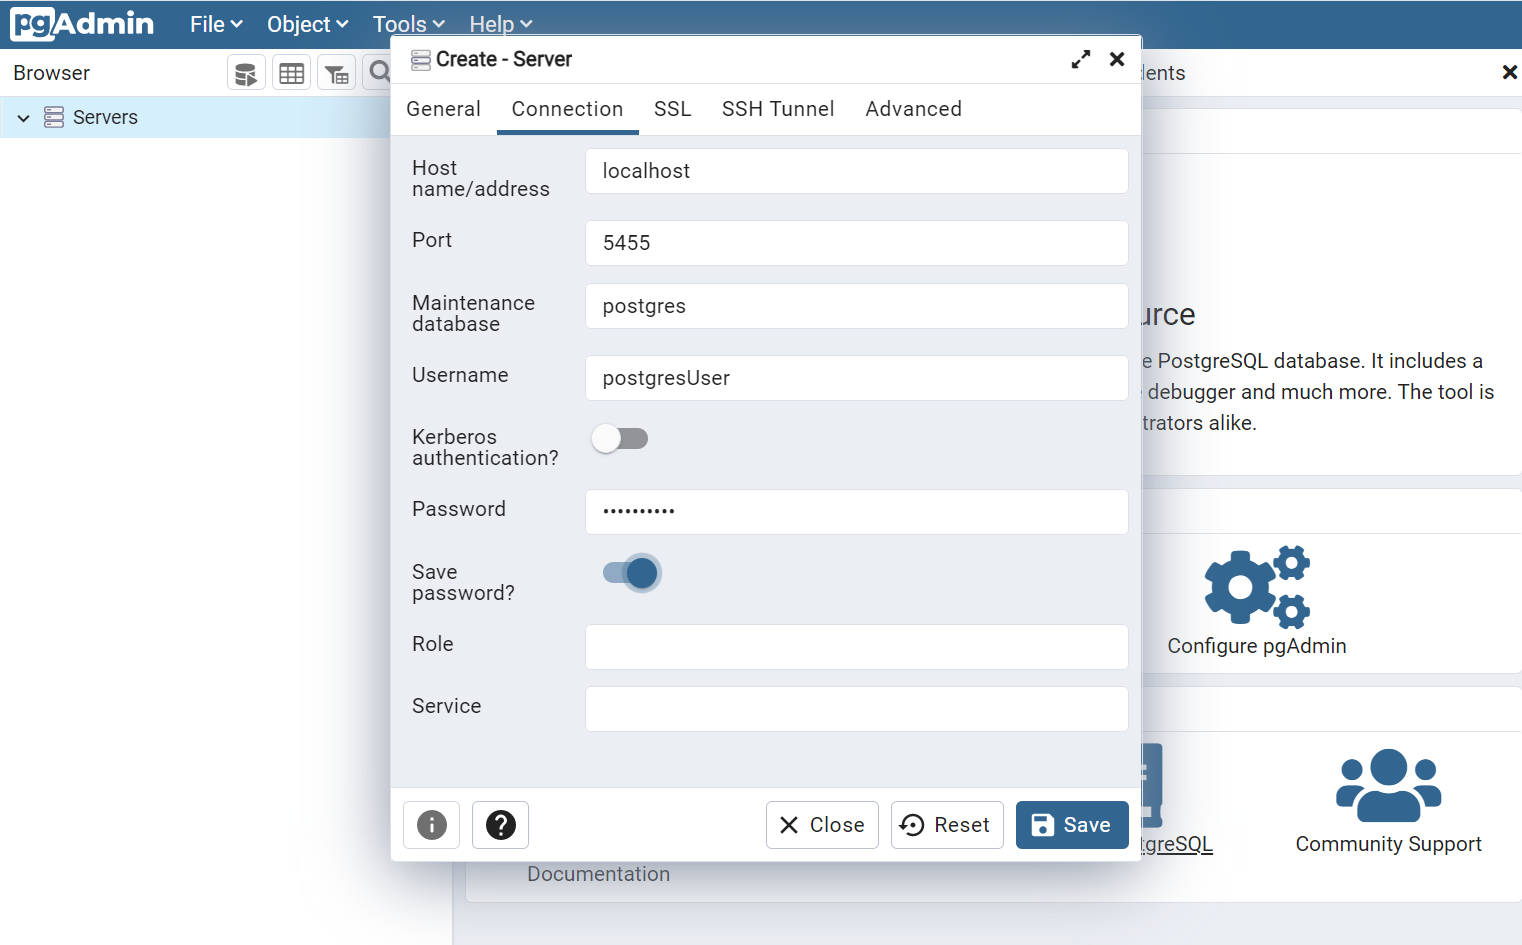
I prefer the second approach (yes, I know, it’s not cool as using the terminal, but it works), so I downloaded pgAdmin.
There, you can connect to the server by using the environment variable you’ve defined when running docker run. Remember that the hostname is simply localhost.
And we’ve finished! 🥳 Now you can work with a local instance of Postgres and shut it remove it when you don’t need it anymore.
Additional resources
I’ve already introduced Docker in another article, where I explained how to run MongoDB locally:
Finally, a special mention to Francesco Ciulla, who thought me how to run Postgres with Docker while I thought him how to query it with C#. Yes, mutual help! 👏
Hello I’m Thierry Chopain, a freelance interactive art director, co-founder of type8 studio and a UX/UI design instructor at SUP de PUB (Lyon).
Based near Saint-Étienne, I cultivate a balance between creative ambition and local grounding, between high-level design and a more human pace of life. I work remotely with a close-knit team spread between Lyon, Montpellier, and Paris, where we design custom projects that blend strategy, brand identity, and digital experience.
My approach is deeply collaborative. I believe in lasting relationships built on trust, mutual listening, and the value of each perspective. Beyond aesthetics, my role is to bring clarity, meaning, and visual consistency to every project. Alongside my design practice, I teach at SUP de PUB, where I support students not only in mastering UX/UI concepts, but also in shaping their path as independent designers. Sharing what I’ve learned on the ground the wins, the struggles, and the lessons is a mission that matters deeply to me.
My day-to-day life is a mix of slow living and agility. This hybrid rhythm allows me to stay true to my values while continuing to grow in a demanding and inspiring industry. I collaborate with a trusted network of creatives including Jeremy Fagis, Marine Ferrari ,Thomas Aufresne, Jordan Thiervoz, Alexandre Avram, Benoit Drigny and Olivier Marmillon to enrich every project with a shared, high-level creative vision.
It’s an investment fund built around a strong promise: to invest disruptively in the most valuable assets of our time. Type8 studio partnered collaboration with DEPARTMENT Maison de Création and Paul Barbinto design a fully reimagined website that lives up to its bold vision and distinctive positioning. Site structure, visual direction, tone of voice, and user experience were all redefined to reflect the strategic precision, elegance, and forward-thinking nature of the fund.
The goal of this project: Position OVA as a benchmark combining financial performance, innovation, and rarity, through refined design, a seamless interface, and custom development, in order to strengthen its credibility with a discerning audience and strategic partners.
Hocus Pocus is a Lyon based animation studio specialized in creation of CGI and visual effects for television, cinema and video game industry. The studio offer the best quality services with an always higher technical and artistic level of requirement. I worked on this project in collaboration with the Lyon-based studio AKARU which specializes in tailored and meticulously crafted projects.
The goal of this project: Develop a coherent and professional digital brand image that highlights visual effects, while boosting visibility and online presence to attract and inspire trust in customers.
21 TSI isn’t your typical sports holding company. Overseeing a portfolio of brands in the sports equipment space the team set out to break from the mold of the standard corporate website. Instead, they envisioned a digital experience that would reflect their DNA where innovation, design, and technology converge into a rich, immersive journey. We collaborated with DEPARTMENT Maison de Création and Paul Barbin to create something truly unique.
The goal of this project: A website that embodies the DNA of 21TSI: innovation, technology, minimalism. An immersive and aesthetic experience, a clean design, and an approach that explores new ways of engaging with sport through AI.
TERIA is a system that provides real-time centimeter-level positioning. It is an innovative tool that allows the localization and georeferencing. We set out to create an intuitive and innovative experience that perfectly reflects Teria’s precision and forward-thinking vision. A major part of the work focused on a clean, minimalist design that allows for smooth navigation making space to highlight the incredible work of Alexandre Avram, showcasing the products through Spline and 3D motion design.
The goal of this project: Develop a clear and professional digital brand that reflects the brand’s identity and values, showcases product innovation, and boosts visibility to build trust and attract customers.
In a dense and ever-evolving music scene, standing out requires more than just great sound it also takes a strong and cohesive visual presence. Whether it’s the cinematic intensity of Lecomte de Brégeot, the raw emotion of Élimane my approach remains the same: to craft a visual universe that extends and enhances the essence of each artist, regardless of the medium.
Lecomte de Brégeot – French electronic music producerVisual recap – Cover design for “Sequences” (Lecomte de Brégeot)Case study – Création de la cover “fragment” (Lecomte de Brégeot)Élimane – Weaver of Sounds, Sculptor of Emotions.
I’m design visual identities, websites, and digital assets that combine bold aesthetics with clarity. The goal is to give each artist a unique space where their music, vision, and personality can fully come to life both visually and emotionally.
A Defining Moment in My Career
A turning point in my journey was the transition from working as an independent designer to founding a structured creative studio, type8 Studio. For more than ten years, I worked solo or within informal networks, juggling projects, constantly adapting, and learning how to shape my own freedom. That period gave me a lot—not only in terms of experience, but also in understanding what I truly wanted… and what I no longer wanted.
Creating a studio was never a predefined goal. It came together progressively, through encounters, shared values, and the growing need to give form to something more collective and sustainable. Type8 was born from this shared intention: bringing together skills and creative ambitions while preserving individual freedom.
This change was not a rupture but a natural evolution. I didn’t abandon my three identities—independent designer, studio art director, and educator. On the contrary, I integrated them into a more fluid and conscious ecosystem. Today, I can choose the most relevant role depending on the project: sometimes the studio takes the lead, sometimes it’s the freelance spirit that fits best, and at other times, it’s the educator in me who comes forward.
This hybrid model, which some might see as unstable, is for me a tailor-made balance, deeply aligned with how I envision work: adaptive, intentional, and guided by respect for the project’s purpose and values.
My Design Philosophy
I see design as a tool serving meaning, people, and impact beyond mere aesthetics. It’s about creating connection, clarity, and relevance between intention and users. This approach was shaped through my collaboration with my wife, an expert in digital accessibility, who raised my awareness of inclusion and real user needs often overlooked.
Today, I bring ethics, care, and respect into every project, focusing on accessible design and core human values: kindness, clarity, usefulness, and respecting user constraints. I prioritize human collaboration, tailoring each solution to the client’s context and values, even if it means going against trends. My design blends strategic thinking, creativity, and personal commitment to create enriching and socially valuable experiences.
Tools and Techniques
Figma: To design, create, and gather ideas collaboratively.
Jitter: For crafting smooth and engaging motion designs.
Loom: To exchange feedback efficiently with clients.
Tools evolve but they’re just means to an end. What really matters is your ability to think and create. If you’re a good designer, you’ll know how to adapt, no matter the tool.
My Inspirations
My imagination was shaped somewhere between a game screen, a sketchbook. Among all my influences, narrative video games hold a special place. Titles like “The Last of Us” have had a deep impact on me not just for their striking art direction, but for their ability to tell a story in an immersive, emotional, and sensory way. What inspires me in these universes isn’t just the gameplay, but how they create atmosphere, build meaningful moments, and evoke emotion without words. Motion design, sound, typography, lighting all of it is composed like a language. And that’s exactly how I approach interactive design: orchestrating visual and experiential elements to convey a message, an intention, or a feeling.
But my inspirations go beyond the digital world. They lie at the intersection of street art, furniture design, and sneakers. My personal environment also plays a crucial role in fueling my creativity. Living in a small village close to nature, surrounded by calm and serenity, gives me the mental space I need to create. It’s often in these quiet moments, a walk through the woods, a shared silence, the way light plays on a path that my strongest ideas emerge.
I’m a creative who exists at the crossroads: between storytelling and interaction, between city and nature, between aesthetics and purpose. That’s where my work finds its balance.
Final Thoughts
For me, design has always been more than a craft it’s a way to connect ideas, people, and emotions. Every project is an opportunity to tell a story, to create something that feels both meaningful and timeless. Stay curious, stay human, and don’t be afraid to push boundaries. Because the most memorable work is born when passion meets purpose.
“Turning ideas into timeless experiences.”
Contact
Thanks for taking the time to read this article.
If you’re a brand, studio, or institution looking for a strong and distinctive digital identity. I’d be happy to talk whether it’s about a project, a potential collaboration, or just sharing a few ideas.
Just a second! 🫷 If you are here, it means that you are a software developer.
So, you know that storage, networking, and domain management have a cost .
If you want to support this blog, please ensure that you have disabled the adblocker for this site. I configured Google AdSense to show as few ADS as possible – I don’t want to bother you with lots of ads, but I still need to add some to pay for the resources for my site.
Thank you for your understanding. – Davide
Every name must be meaningful and clear. If names are not obvious, other developers (or your future self) may misinterpret what you were meaning.
Avoid using mental mapping to abbreviate names, unless the abbreviation is obvious or common.
Names should not be based on mental mapping, even worse without context.
Bad mental mappings
Take this bad example:
publicvoid RenderWOSpace()
What is a WOSpace? Without context, readers won’t understand its meaning. Ok, some people use WO as an abbreviation of without.
So, a better name is, of course:
publicvoid RenderWithoutSpace()
Acceptable mappings
Some abbreviations are quite obvious and are totally fine to be used.
For instance, standard abbreviations, like km for kilometer.
The AI ecosystem is evolving rapidly, and Anthropic releasing the Model Context Protocol on November 25th, 2024 has certainly shaped how LLM’s connect with data. No more building custom integrations for every data source: MCP provides one protocol to connect them all. But here’s the challenge: building MCP servers from scratch can be complex.
TL;DR: What is MCP?
Think of MCP like a USB-C port for AI applications. Just as USB-C provides a standardized way to connect devices to various peripherals, MCP provides a standardized way to connect AI models to different data sources, tools, and services. It’s an open protocol that enables AI applications to safely and efficiently access external context – whether that’s your company’s database, file systems, APIs, or custom business logic.
In practice, this means you can hook LLMs into the things you already work with every day. To name a few examples, you could query databases to visualize trends, pull and resolve issues from GitHub, fetch or update content to a CMS, and so on. Beyond development, the same applies to broader workflows: customer support agents can look up and resolve tickets, enterprise search can fetch and read content scattered across wikis and docs, operations can monitor infrastructure or control devices.
But there’s more to it, and that’s when you really unlock the power of MCP. It’s not just about single tasks, but rethinking entire workflows. Suddenly, we’re shaping our way to interact with products and even our own computers: instead of adapting ourselves to the limitations of software, we can shape the experience around our own needs.
That’s where xmcp comes in: a TypeScript framework designed with DX in mind, for developers who want to build and ship MCP servers without the usual friction. It removes the complexity and gets you up and running in a matter of minutes.
A little backstory
xmcp was born out of necessity at Basement Studio, where we needed to build internal tools for our development processes. As we dove deeper into the protocol, we quickly discovered how fragmented the tooling landscape was and how much time we were spending on setup, configuration, and deployment rather than actually building the tools our team needed.
That’s when we decided to consolidate everything we’d learned into a framework. The philosophy was simple: developers shouldn’t have to become experts just to build AI tools. The focus should be on creating valuable functionality, not wrestling with boilerplate code and all sorts of complexities.
Key features & capabilities
xmcp shines in its simplicity. With just one command, you can scaffold a complete MCP server:
npx create-xmcp-app@latest
The framework automatically discovers and registers tools. No extra setup needed.
All you need is tools/
xmcp abstracts the original tool syntax from the TypeScript SDK and follows a SOC principle, following a simple three-exports structure:
Implementation: The actual tool logic.
Schema: Define input parameters using Zod schemas with automatic validation
Metadata: Specify tool identity and behavior hints for AI models
// src/tools/greet.ts
import { z } from "zod";
import { type InferSchema } from "xmcp";

// Define the schema for tool parameters
export const schema = {
  name: z.string().describe("The name of the user to greet"),
};

// Define tool metadata
export const metadata = {
  name: "greet",
  description: "Greet the user",
  annotations: {
    title: "Greet the user",
    readOnlyHint: true,
    destructiveHint: false,
    idempotentHint: true,
  },
};

// Tool implementation
export default async function greet({ name }: InferSchema<typeof schema>) {
  return `Hello, ${name}!`;
}
Transport Options
HTTP: Perfect for server deployments, enabling tools that fetch data from databases or external APIs
STDIO: Ideal for local operations, allowing LLMs to perform tasks directly on your machine
You can tweak the configuration to your needs by modifying the xmcp.config.ts file in the root directory. Among the options you can find the transport type, CORS setup, experimental features, tools directory, and even the webpack config. Learn more about this file here.
const config: XmcpConfig = {
  http: {
    port: 3000,
    // The endpoint where the MCP server will be available
    endpoint: "/my-custom-endpoint",
    bodySizeLimit: 10 * 1024 * 1024,
    cors: {
      origin: "*",
      methods: ["GET", "POST"],
      allowedHeaders: ["Content-Type"],
      credentials: true,
      exposedHeaders: ["Content-Type"],
      maxAge: 600,
    },
  },

  webpack: (config) => {
    // Add raw loader for images to get them as base64
    config.module?.rules?.push({
      test: /\.(png|jpe?g|gif|svg|webp)$/i,
      type: "asset/inline",
    });

    return config;
  },
};
Built-in Middleware & Authentication
For HTTP servers, xmcp provides native solutions to add Authentication (JWT, API Key, OAuth). You can always leverage your application by adding custom middlewares, which can even be an array.
While you can bootstrap an application from scratch, xmcp can also work on top of your existing Next.js or Express project. To get started, run the following command:
npx init-xmcp@latest
on your initialized application, and you are good to go! You’ll find a tools directory with the same discovery capabilities. If you’re using Next.js the handler is set up automatically. If you’re using Express, you’ll have to configure it manually.
From zero to prod
Let’s see this in action by building and deploying an MCP server. We’ll create a Linear integration that fetches issues from your backlog and calculates completion rates, perfect for generating project analytics and visualizations.
For this walkthrough, we’ll use Cursor as our MCP client to interact with the server.
Setting up the project
The fastest way to get started is by deploying the xmcp template directly from Vercel. This automatically initializes the project and creates an HTTP server deployment in one click.
Alternative setup: If you prefer a different platform or transport method, scaffold locally with npx create-xmcp-app@latest
Once deployed, you’ll see this project structure:
Building our main tool
Our tool will accept three parameters: team name, start date, and end date. It’ll then calculate the completion rate for issues within that timeframe.
Head to the tools directory, create a file called get-completion-rate.ts and export the three main elements that construct the syntax:
import { z } from "zod";
import { type InferSchema, type ToolMetadata } from "xmcp";

export const schema = {
  team: z
    .string()
    .min(1, "Team name is required")
    .describe("The team to get completion rate for"),
  startDate: z
    .string()
    .min(1, "Start date is required")
    .describe("Start date for the analysis period (YYYY-MM-DD)"),
  endDate: z
    .string()
    .min(1, "End date is required")
    .describe("End date for the analysis period (YYYY-MM-DD)"),
};

export const metadata: ToolMetadata = {
  name: "get-completion-rate",
  description: "Get completion rate analytics for a specific team over a date range",
};

export default async function getCompletionRate({
  team,
  startDate,
  endDate,
}: InferSchema<typeof schema>) {
// tool implementation we'll cover in the next step
};
Our basic structure is set. We now have to add the client functionality to actually communicate with Linear and get the data we need.
We’ll be using Linear’s personal API Key, so we’ll need to instantiate the client using @linear/sdk . We’ll focus on the tool implementation now:
export default async function getCompletionRate({
  team,
  startDate,
  endDate,
}: InferSchema<typeof schema>) {

    const linear = new LinearClient({
        apiKey: // our api key
    });

};
Instead of hardcoding API keys, we’ll use the native headers utilities to accept the Linear API key securely from each request:
export default async function getCompletionRate({
  team,
  startDate,
  endDate,
}: InferSchema<typeof schema>) {

    // API Key from headers
    const apiKey = headers()["linear-api-key"] as string;

    if (!apiKey) {
        return "No linear-api-key header provided";
    }

    const linear = new LinearClient({
        apiKey: apiKey,
    });

    // rest of the implementation
}
This approach allows multiple users to connect with their own credentials. Your MCP configuration will look like:
Moving forward with the implementation, this is what our complete tool file will look like:
import { z } from "zod";
import { type InferSchema, type ToolMetadata } from "xmcp";
import { headers } from "xmcp/dist/runtime/headers";
import { LinearClient } from "@linear/sdk";

export const schema = {
  team: z
    .string()
    .min(1, "Team name is required")
    .describe("The team to get completion rate for"),
  startDate: z
    .string()
    .min(1, "Start date is required")
    .describe("Start date for the analysis period (YYYY-MM-DD)"),
  endDate: z
    .string()
    .min(1, "End date is required")
    .describe("End date for the analysis period (YYYY-MM-DD)"),
};

export const metadata: ToolMetadata = {
  name: "get-completion-rate",
  description: "Get completion rate analytics for a specific team over a date range",
};

export default async function getCompletionRate({
  team,
  startDate,
  endDate,
}: InferSchema<typeof schema>) {

    // API Key from headers
    const apiKey = headers()["linear-api-key"] as string;

    if (!apiKey) {
        return "No linear-api-key header provided";
    }

    const linear = new LinearClient({
        apiKey: apiKey,
    });

    // Get the team by name
    const teams = await linear.teams();
    const targetTeam = teams.nodes.find(t => t.name.toLowerCase().includes(team.toLowerCase()));

    if (!targetTeam) {
        return `Team "${team}" not found`
    }

    // Get issues created in the date range for the team
    const createdIssues = await linear.issues({
        filter: {
            team: { id: { eq: targetTeam.id } },
            createdAt: {
                gte: startDate,
                lte: endDate,
            },
        },
    });

    // Get issues completed in the date range for the team (for reporting purposes)
    const completedIssues = await linear.issues({
        filter: {
            team: { id: { eq: targetTeam.id } },
            completedAt: {
                gte: startDate,
                lte: endDate,
            },
        },
    });

    // Calculate completion rate: percentage of created issues that were completed
    const totalCreated = createdIssues.nodes.length;
    const createdAndCompleted = createdIssues.nodes.filter(issue =>
        issue.completedAt !== undefined &&
        issue.completedAt >= new Date(startDate) &&
        issue.completedAt <= new Date(endDate)
    ).length;
    const completionRate = totalCreated > 0 ? (createdAndCompleted / totalCreated * 100).toFixed(1) : "0.0";

    // Structure data for the response
    const analytics = {
        team: targetTeam.name,
        period: `${startDate} to ${endDate}`,
        totalCreated,
        totalCompletedFromCreated: createdAndCompleted,
        completionRate: `${completionRate}%`,
        createdIssues: createdIssues.nodes.map(issue => ({
            title: issue.title,
            createdAt: issue.createdAt,
            priority: issue.priority,
            completed: issue.completedAt !== null,
            completedAt: issue.completedAt,
        })),
        allCompletedInPeriod: completedIssues.nodes.map(issue => ({
            title: issue.title,
            completedAt: issue.completedAt,
            priority: issue.priority,
        })),
    };

    return JSON.stringify(analytics, null, 2);
}
Let’s test it out!
Start your development server by running pnpm dev (or the package manager you’ve set up)
The server will automatically restart whenever you make changes to your tools, giving you instant feedback during development. Then, head to Cursor Settings → Tools & Integrations and toggle the server on. You should see it’s discovering one tool file, which is our only file in the directory.
Let’s now use the tool by querying to “Get the completion rate of the xmcp project between August 1st 2025 and August 20th 2025”.
Let’s try using this tool in a more comprehensive way: we want to understand the project’s completion rate in three separate months, June, July and August, and visualize the tendency. So we will ask Cursor to retrieve the information for these months, and generate a tendency chart and a monthly issue overview:
Once we’re happy with the implementation, we’ll push our changes and deploy a new version of our server.
Pro tip: use Vercel’s branch deployments to test new tools safely before merging to production.
Next steps
Nice! We’ve built the foundation, but there’s so much more you can do with it.
Expand your MCP toolkit with a complete workflow automation. Take this MCP server as a starting point and add tools that generate weekly sprint reports and automatically save them to Notion, or build integrations that connect multiple project management platforms.
Leverage the application by adding authentication. You can use the OAuth native provider to add Linear’s authentication instead of using API Keys, or use the Better Auth integration to handle custom authentication paths that fit your organization’s security requirements.
For production workloads, you may need to add custom middlewares, like rate limiting, request logging, and error tracking. This can be easily set up by creating a middleware.ts file in the source directory. You can learn more about middlewares here.
Final thoughts
The best part of what you’ve built here is that xmcp handled all the protocol complexity for you. You didn’t have to learn the intricacies of the Model Context Protocol specification or figure out transport layers: you just focused on solving your actual business problem. That’s exactly how it should be.
Looking ahead, xmcp’s roadmap includes full MCP specification compliance, bringing support for resources, prompts and elicitation. More importantly, the framework is evolving to bridge the gap between prototype and production, with enterprise-grade features for authentication, monitoring, and scalability.